Atlanta MP — Race Line
Estimated from data not in trackdays.ai. The line, speeds and braking points come from cars lapping at a typical quick HPDE pace, cross-checked against published brake markers. If you have data you would like to contribute, please send it to upload@trackdays.ai to help improve our estimates.
Heads up: This is an estimate of a typical quick HPDE line, not any one car's lap. Braking points are a starting point, not a target: start a little earlier and work later in small steps. The line goes straight from throttle to brake; amber only marks where you really lift or hold part throttle. AMP has 26 m of elevation change, so read the corner notes: grade and crests matter here as much as the line.
- Throttle
- Coast / partial
- Braking
- Apex
- T4Off-camber corner
Arrows show the direction of the lap. The grey basemap is USGS LiDAR: dark = asphalt, light = grass. Tap any map for the full-size image.
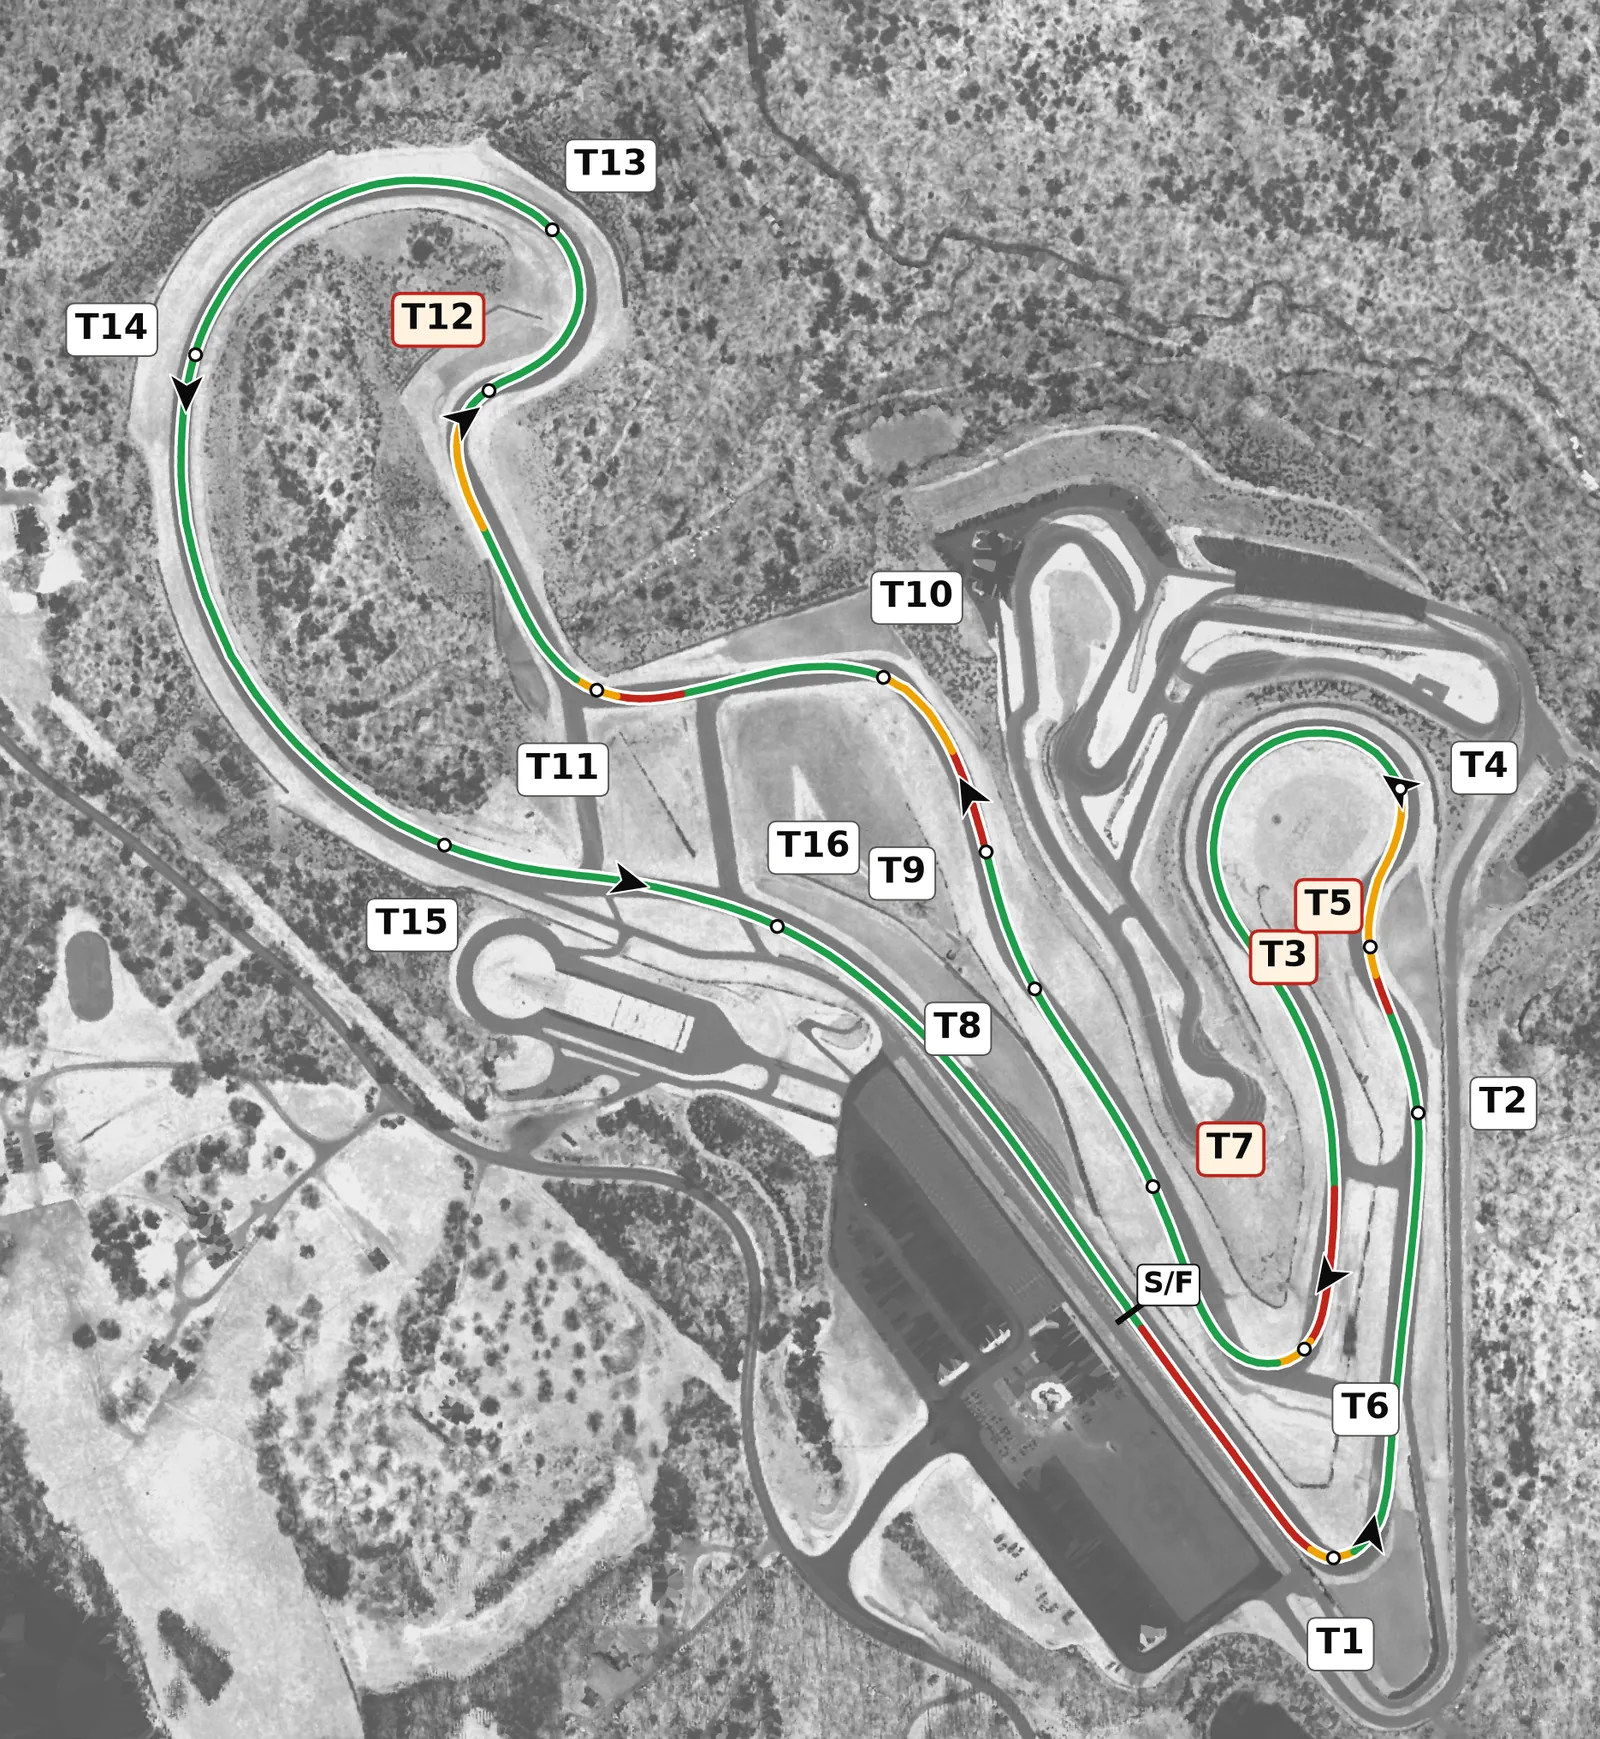
AMP is a tight, hilly circuit with about 26 m of elevation and several blind crests, so the best lap is one you can see coming: learn the crests at T5, T12 and T13 slowly before you add speed. There are only a handful of real brake zones (T1, T3, T6, T10 and T11; at T12 the climb does most of the slowing) and the rest of the lap flows, so focus on exits and on keeping the car settled whenever it goes light. The biggest gains are in the T11–T13 section, which drives as one climb and turn, and in the long T13–T15 left that leads onto the front straight.
Sectors
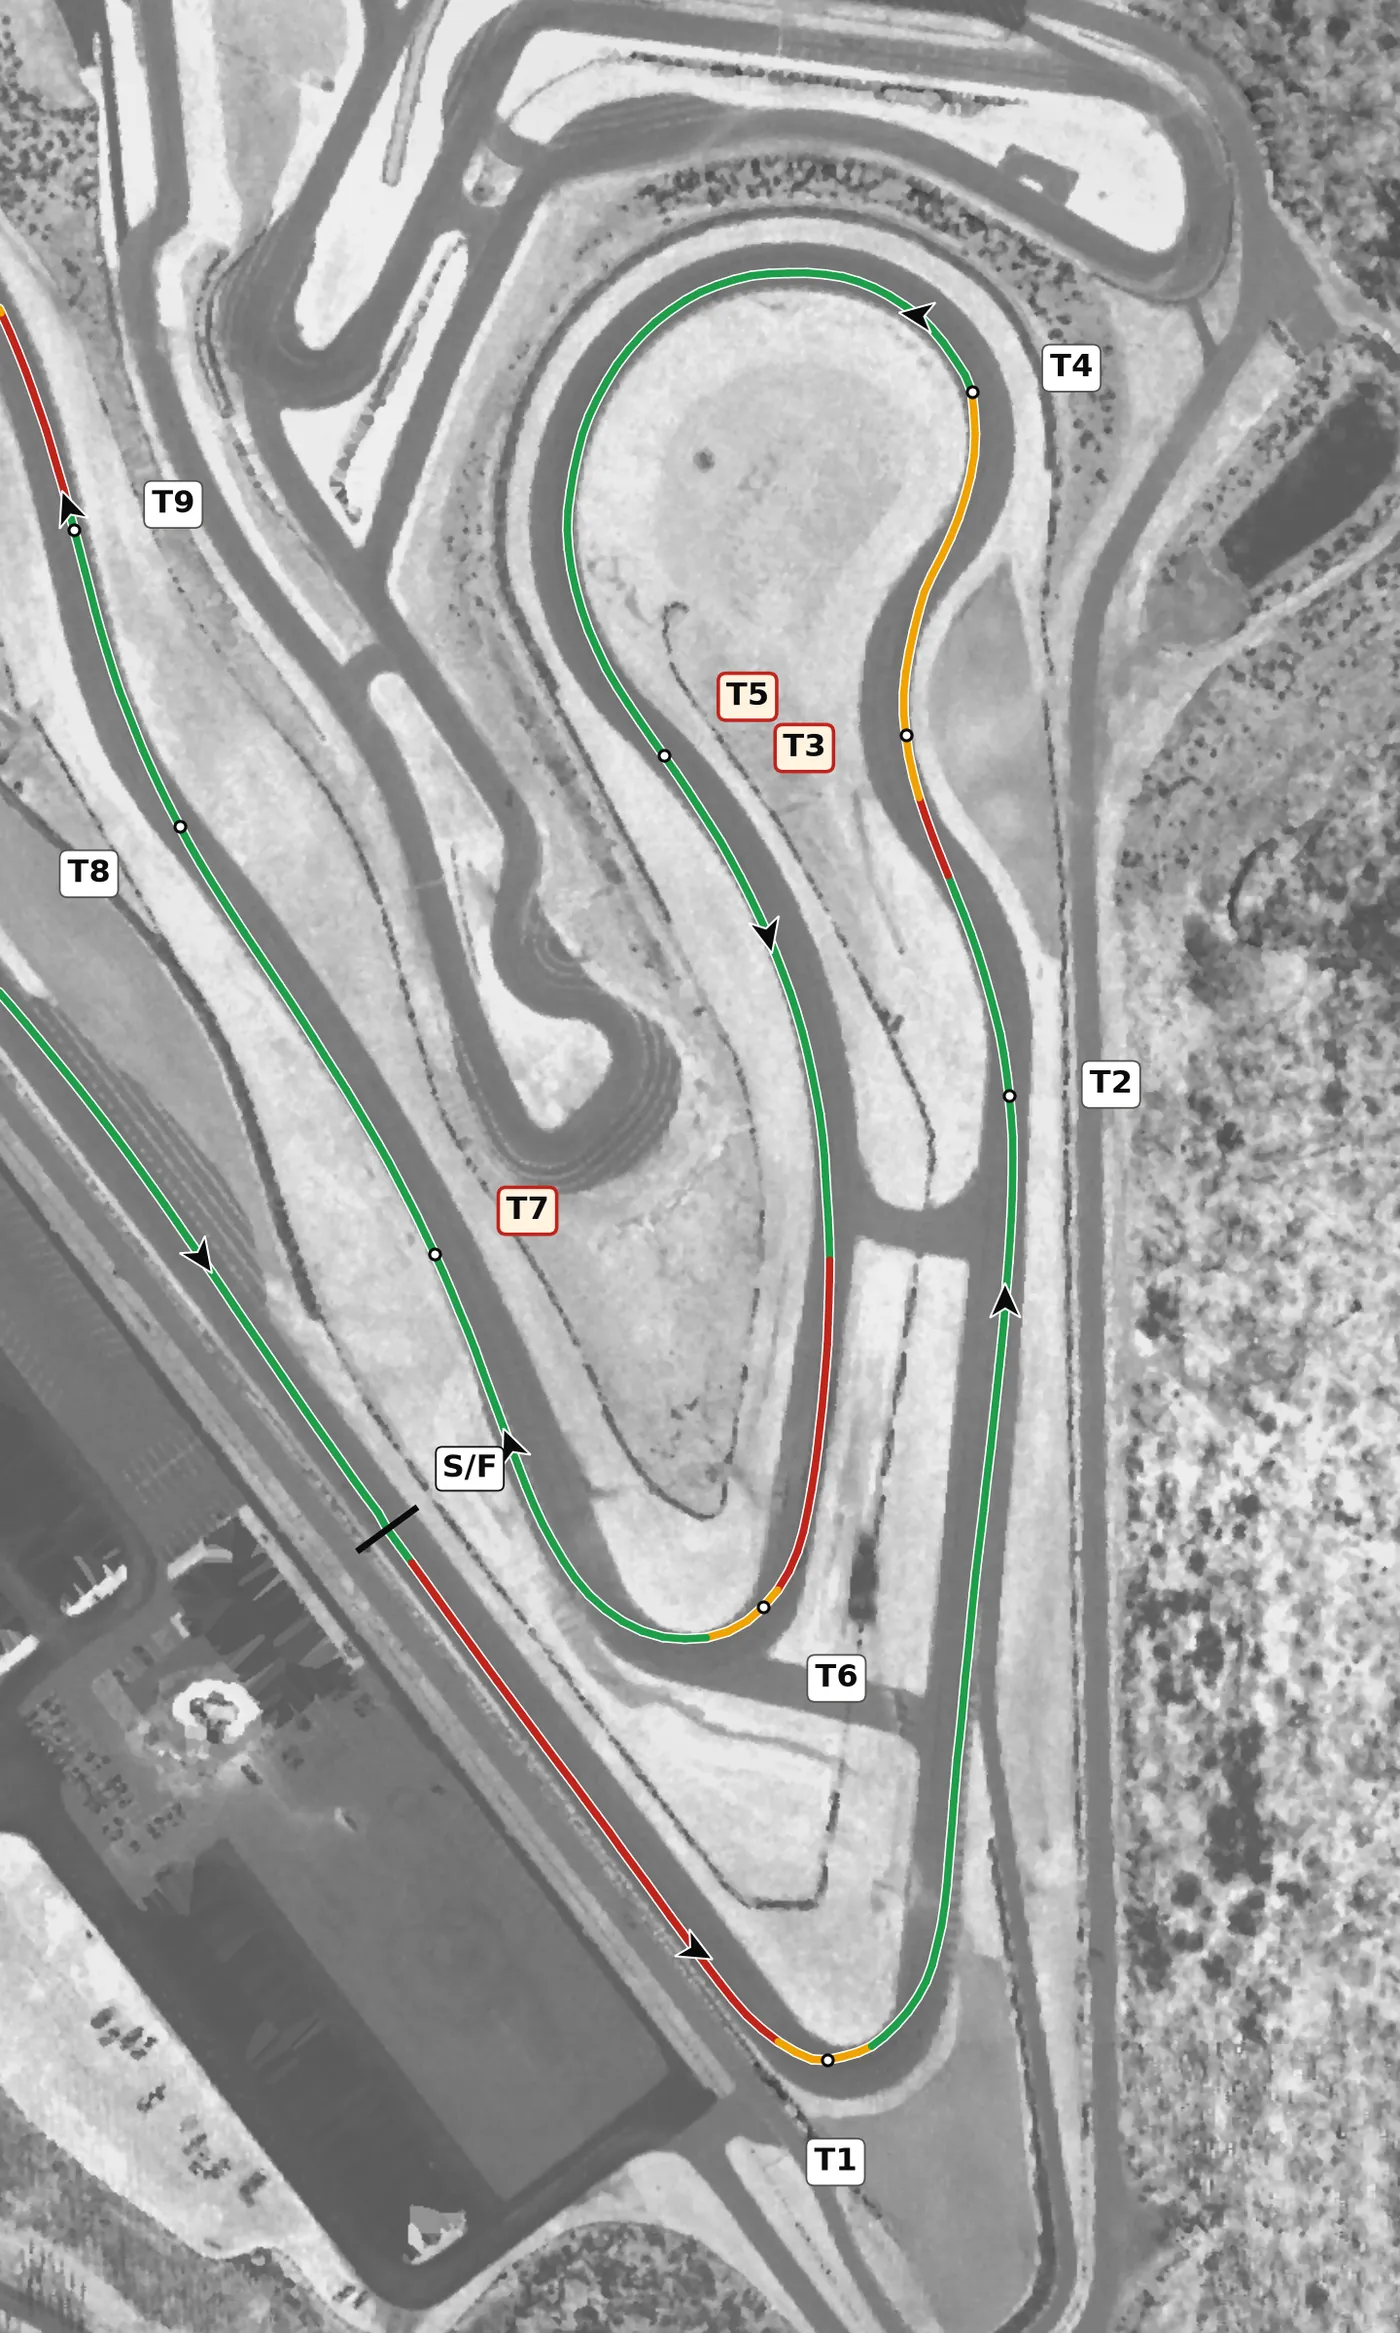
The lap opens with a downhill brake into the T1 left, then a fast, climbing left kink at T2 and a short brake for the off-camber T3 right. T4, the Carousel, is a long constant-radius left that climbs to the highest point on the track, and T5 is a fast right bend over a blind crest, after which the road drops steeply toward T6.
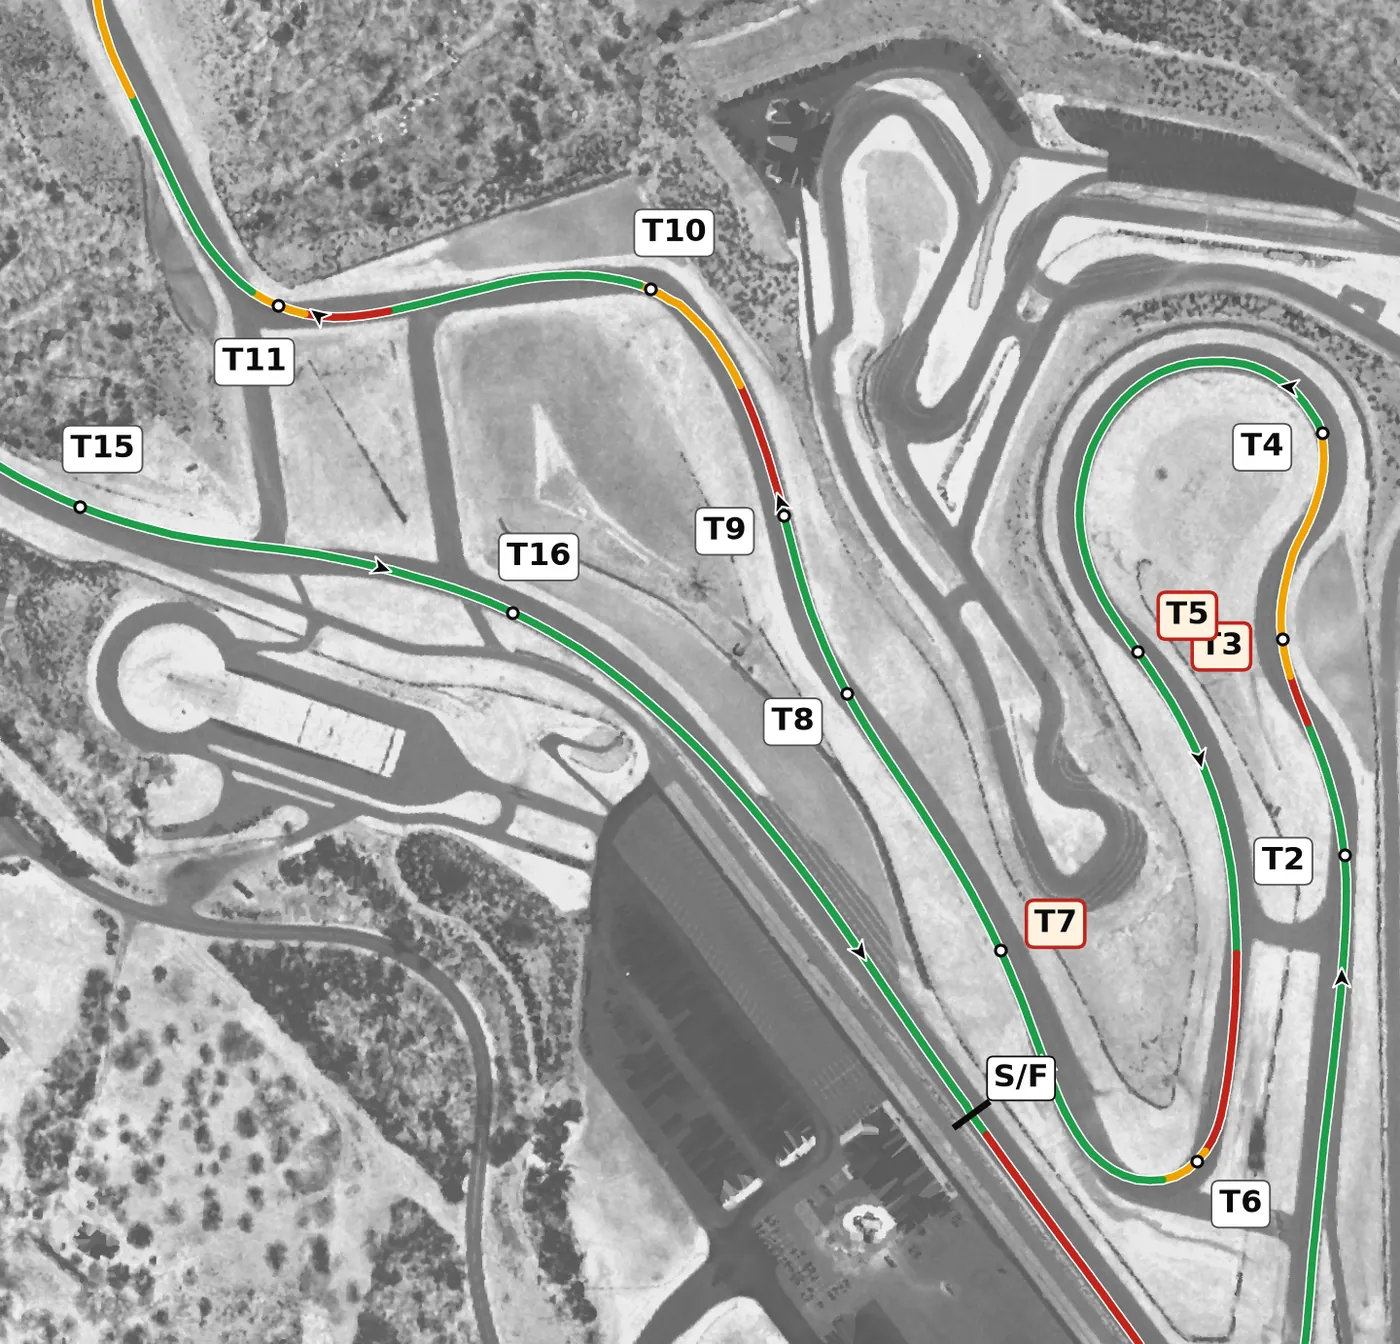
T6 is a tight uphill right where a straight-line brake and patience pay off. From its exit, T7, T8 and T9 are bends on one long full-throttle run downhill, then a little brake in the T9 bend sets up the tighter T10 left. T11 drops into the Dip, the lowest point and biggest compression on the lap, and the brake you use there sets your speed for the climb that follows.
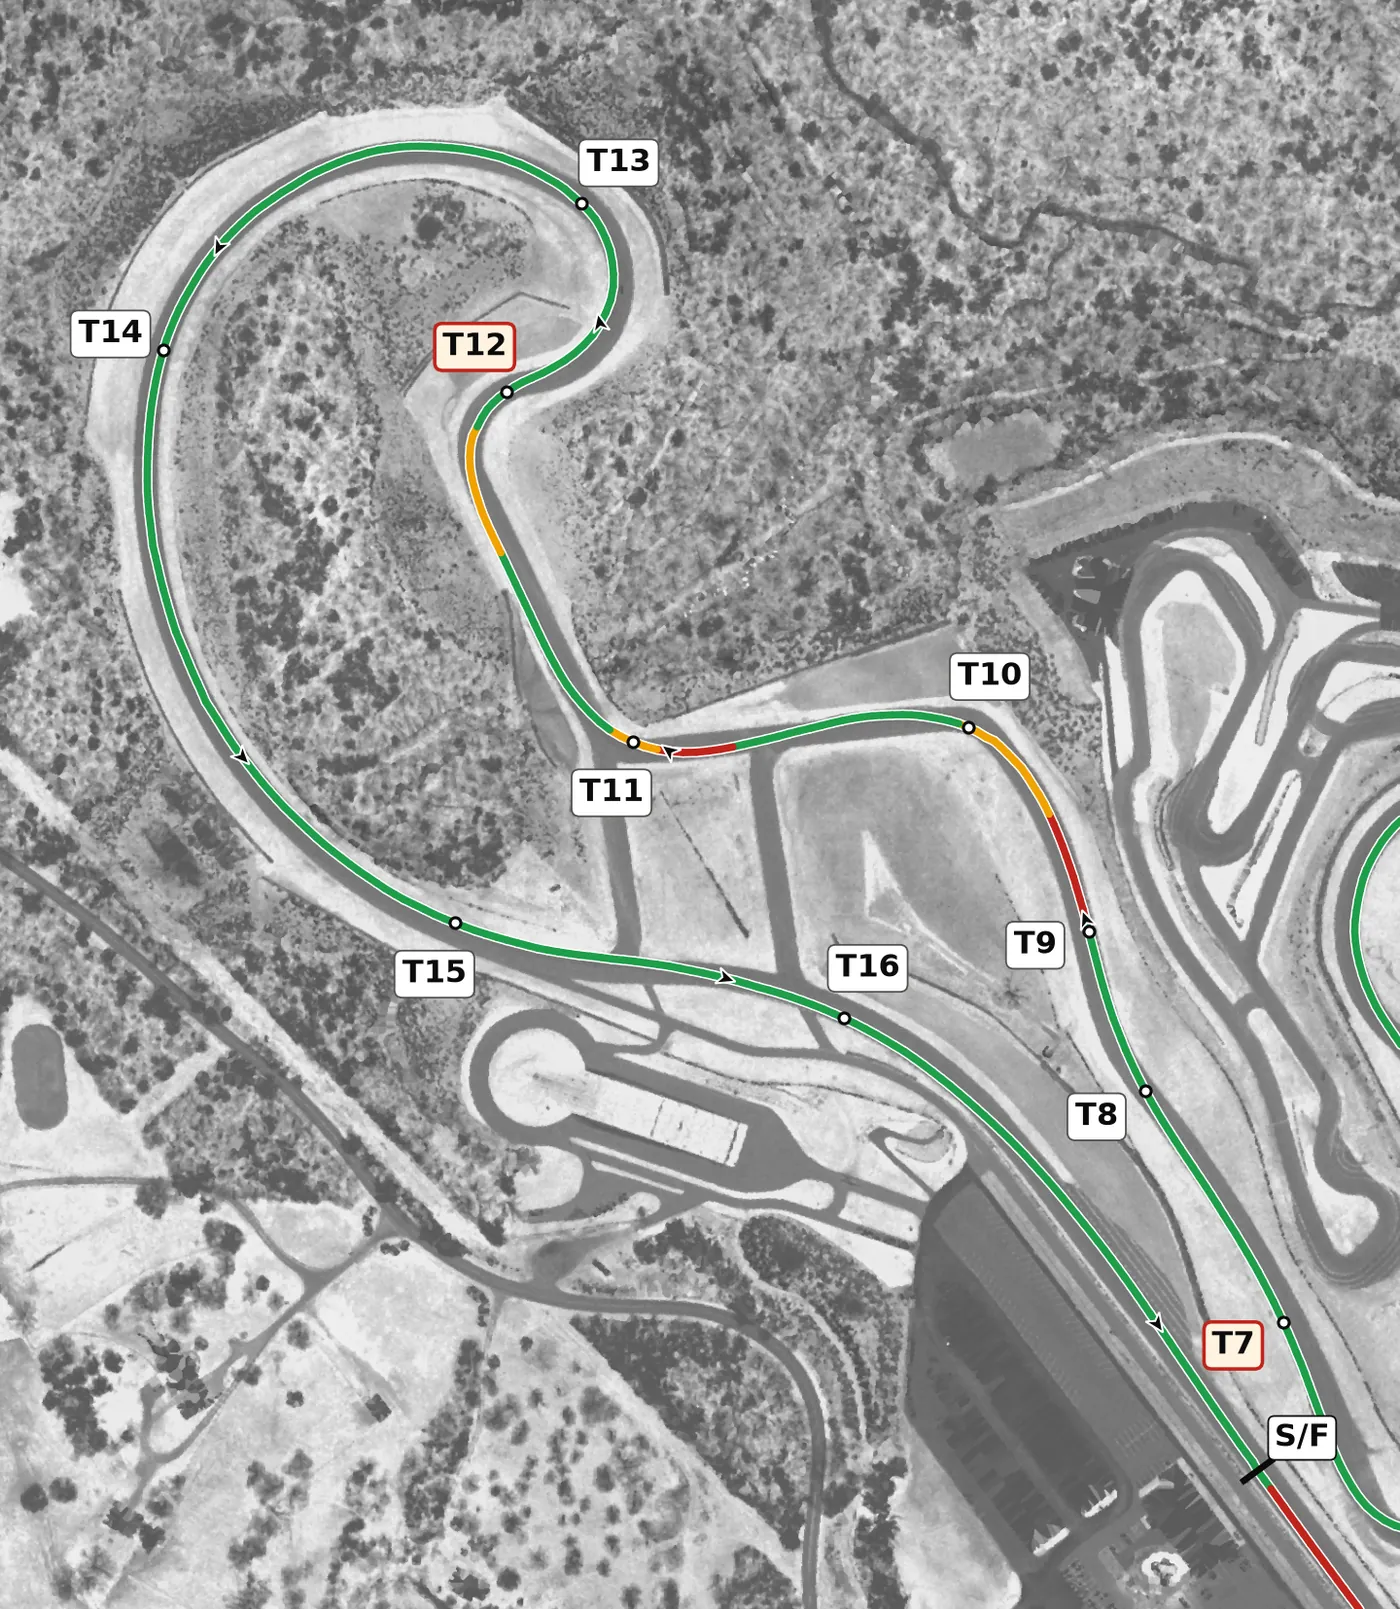
T12 climbs steeply to a blind crest, so arrive with your speed already set and use the apex kerb to stay on the road over the top. T13 falls away to the left, and T13 to T15 form one long left sweep in which you hold a steady steering angle and balance the car on the throttle. Finish on the left for the gentle T16 right, which you take on the throttle onto the front straight.
Corners
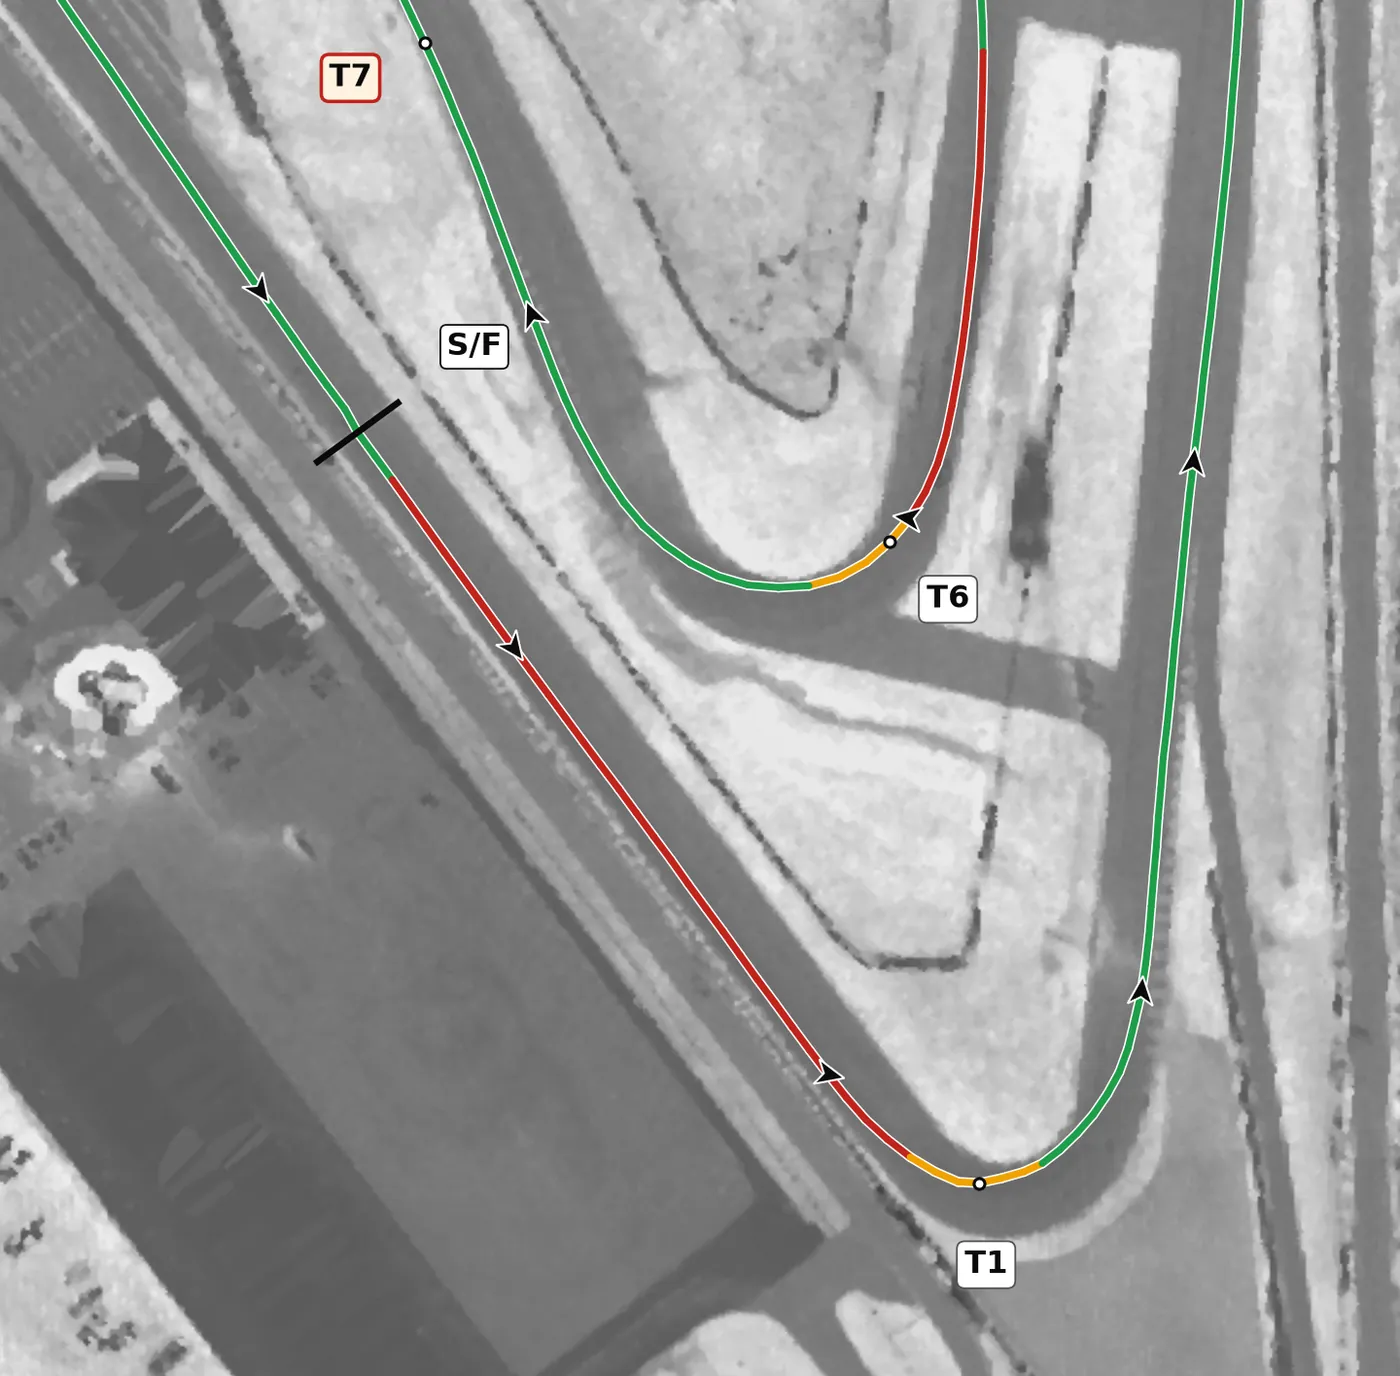
Start on the right and brake early and in a straight line, because the downhill approach makes the car harder to stop. Trail off the brake toward a late apex and put a clean exit first, as the road keeps falling away. The mistake to avoid is trying to carry too much speed in: the slope pushes you wide, and this corner catches drivers who think they can brake later.
From the survey: Downhill: −7.4% at the apex.
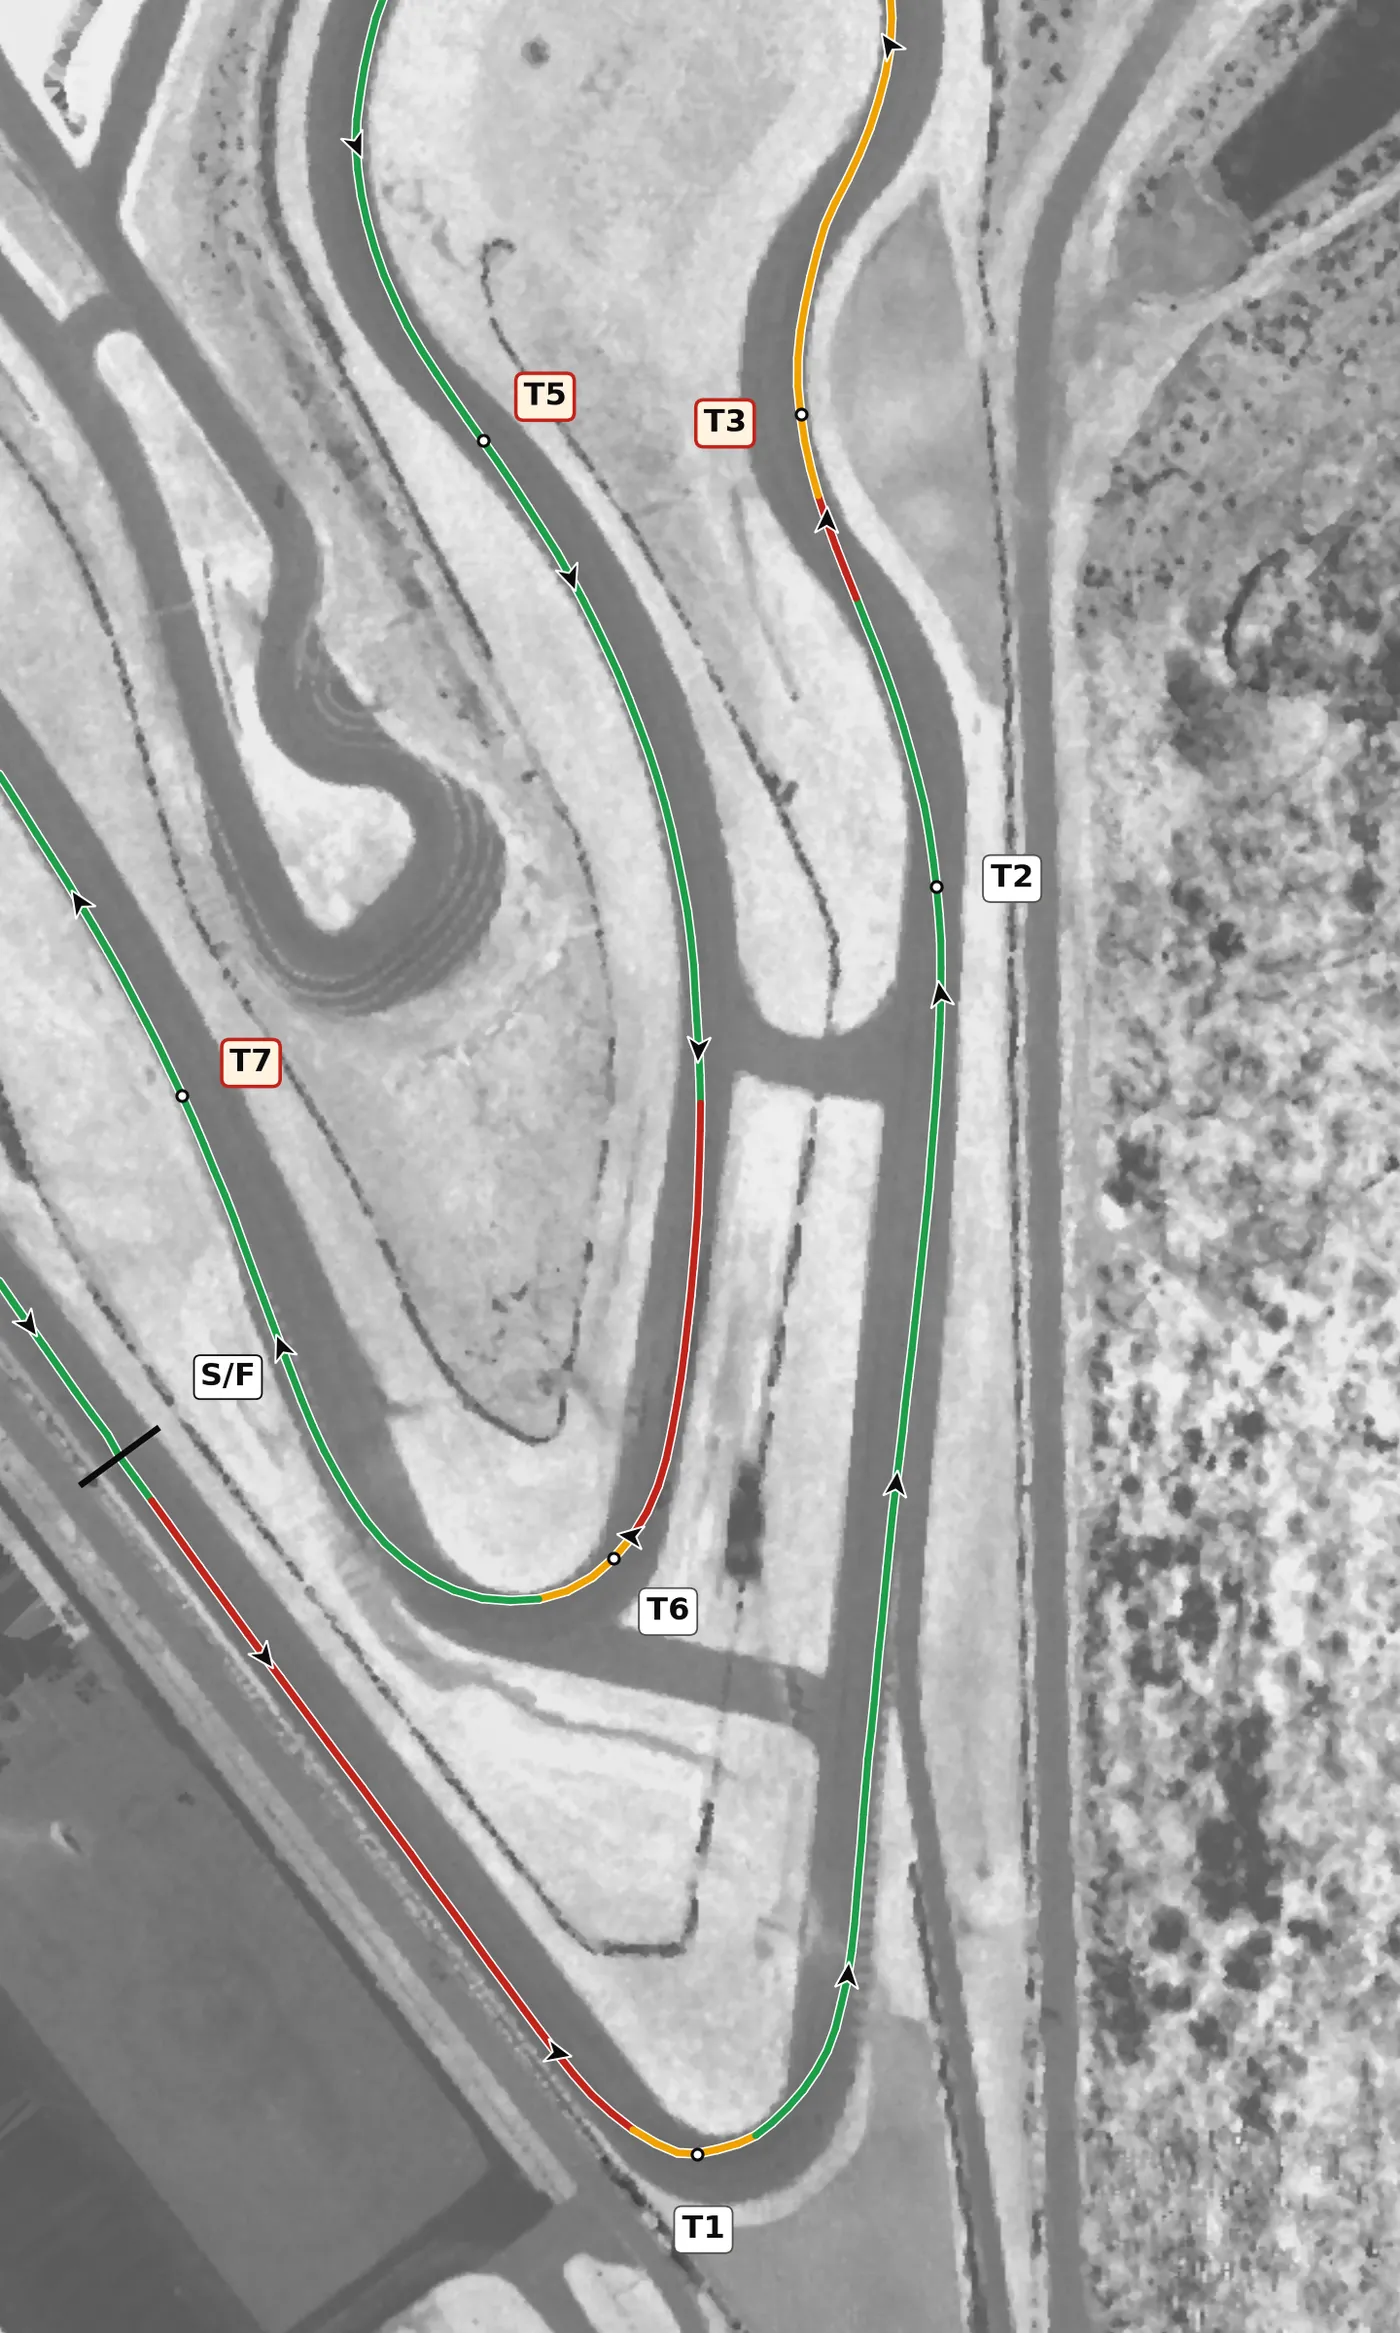
T2 is a fast left kink that climbs toward T3, taken smoothly on the throttle with very little steering. Use it to get the car straight and settled for the short brake into T3. The mistake to avoid is arriving at the T3 brake zone still turning, which unsettles the car just as you need it stable.
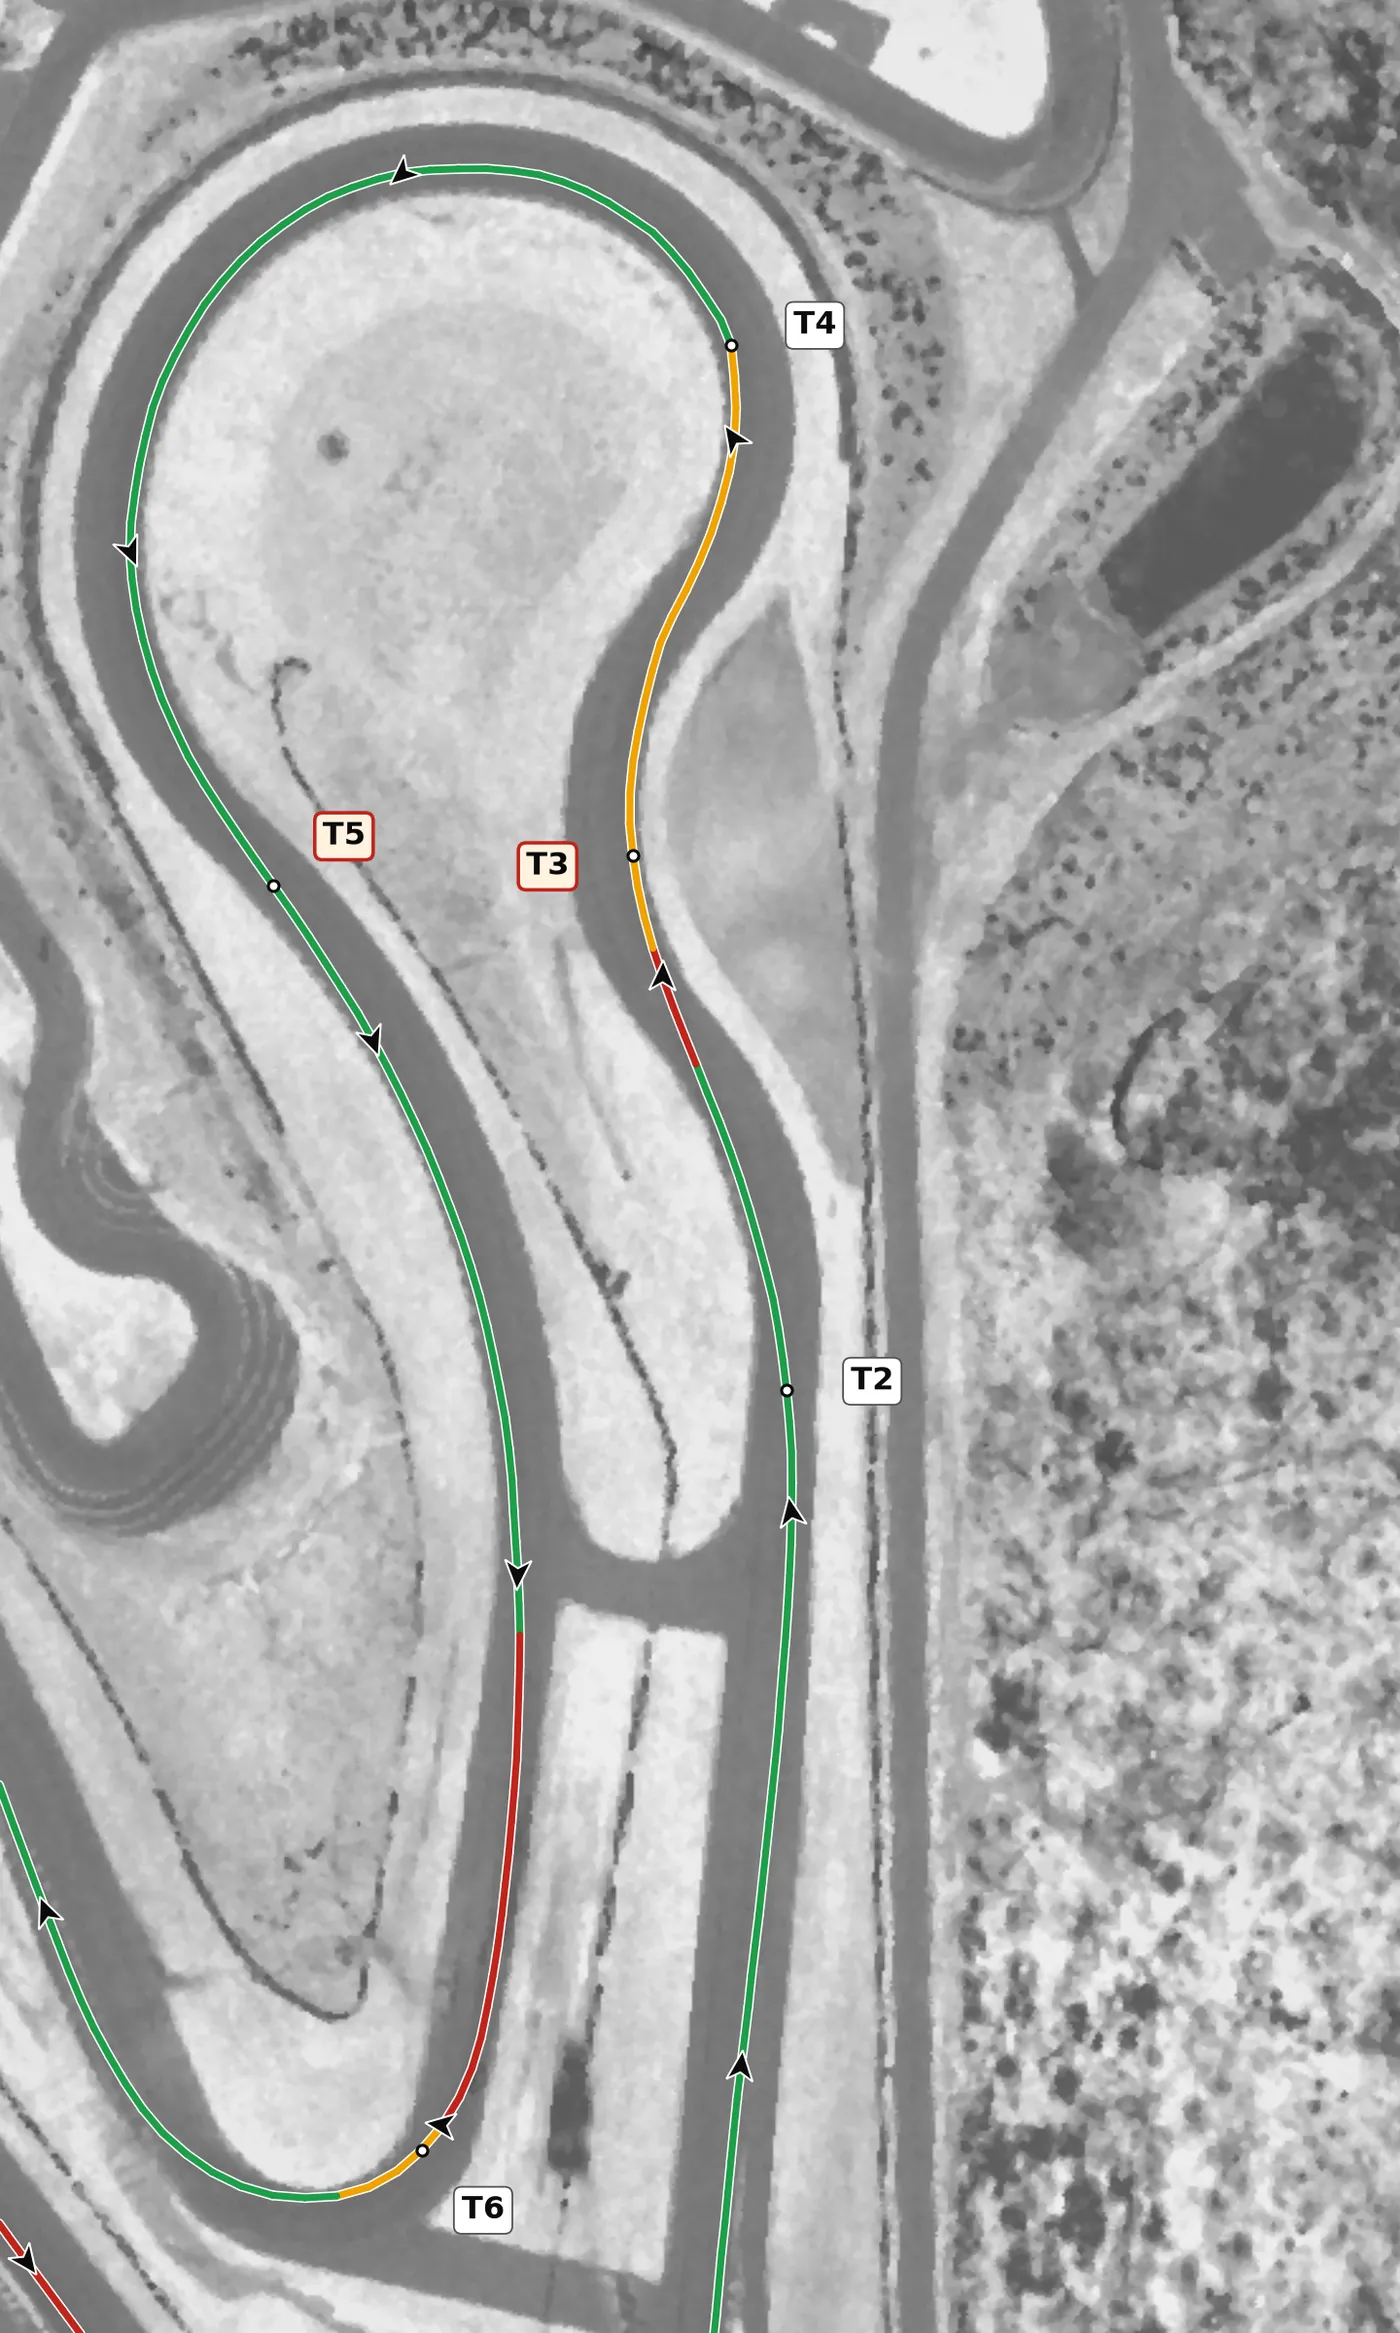
Brake briefly in a straight line, then turn into this right, which is off camber and compresses at the apex. Be gentle with the steering and throttle until the car settles, and set it up for the long entry to the Carousel. The mistake to avoid is over-driving the entry, because the off-camber surface will push the car wide.
From the survey: The most off-camber apex on the lap (−3.3%), in a compression.
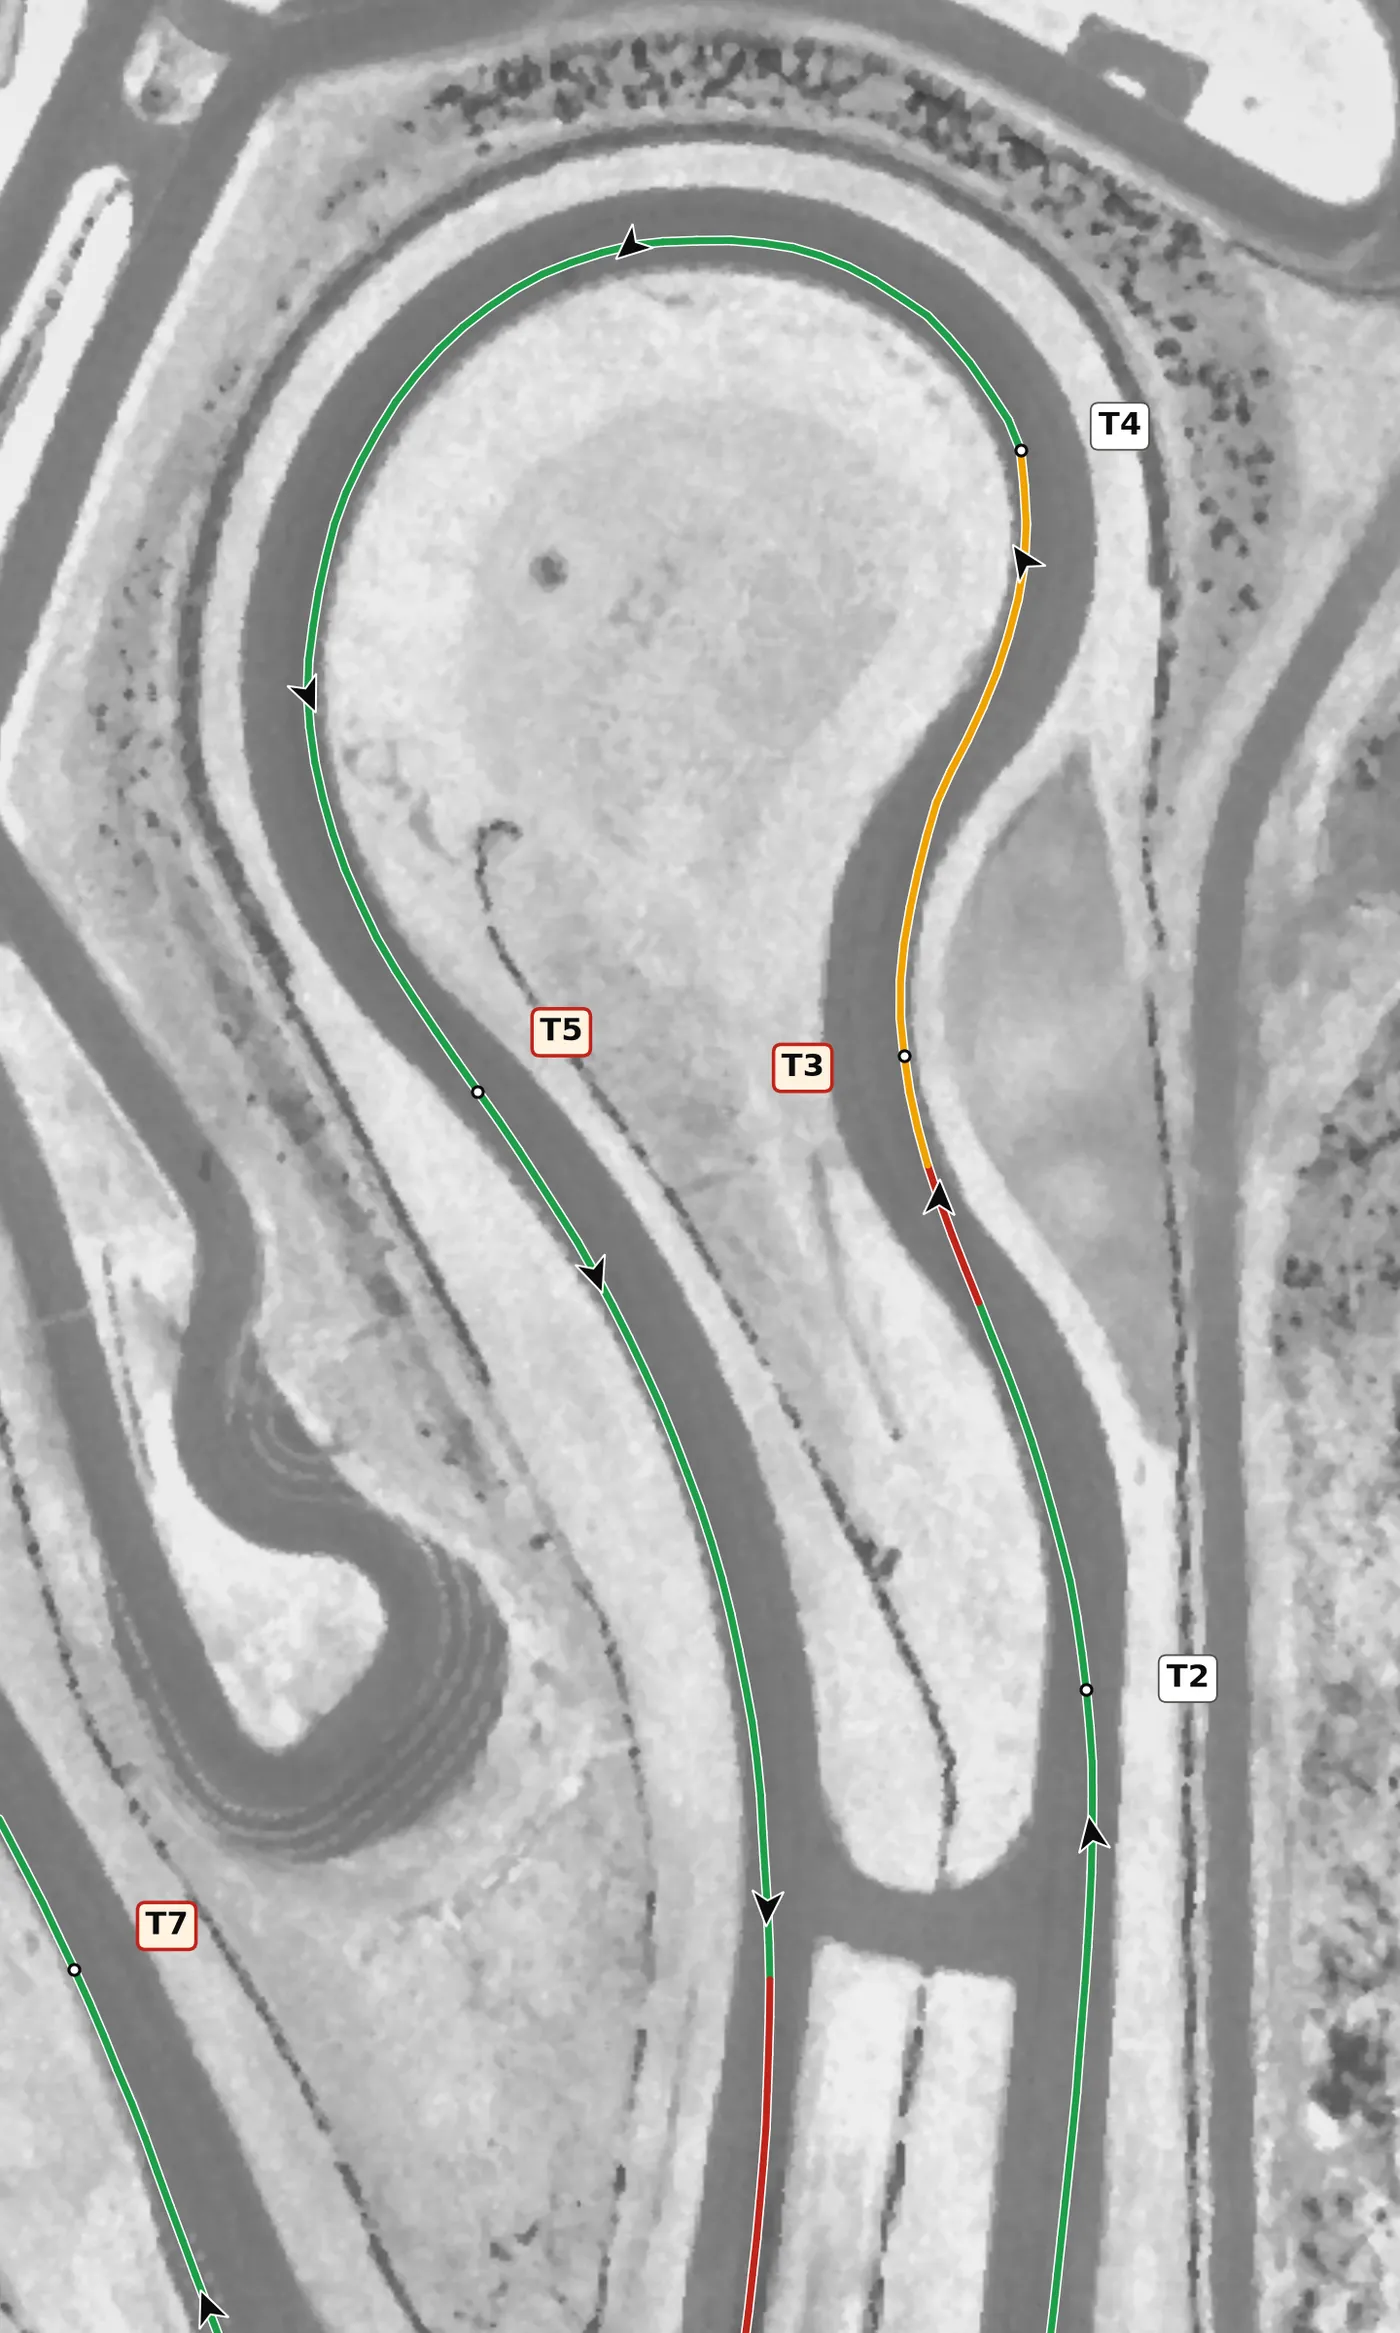
The Carousel is a long, constant-radius left that climbs steeply to the highest point on the track. Hold one steering angle and use the throttle to steer: more throttle pushes the car wide, less tightens the line. The mistake to avoid is over-accelerating early in the corner and running out of road at the top of the hill.
From the survey: The Carousel. Climbs at 11% at the apex, and the lap's highest point (431 m) is inside it.
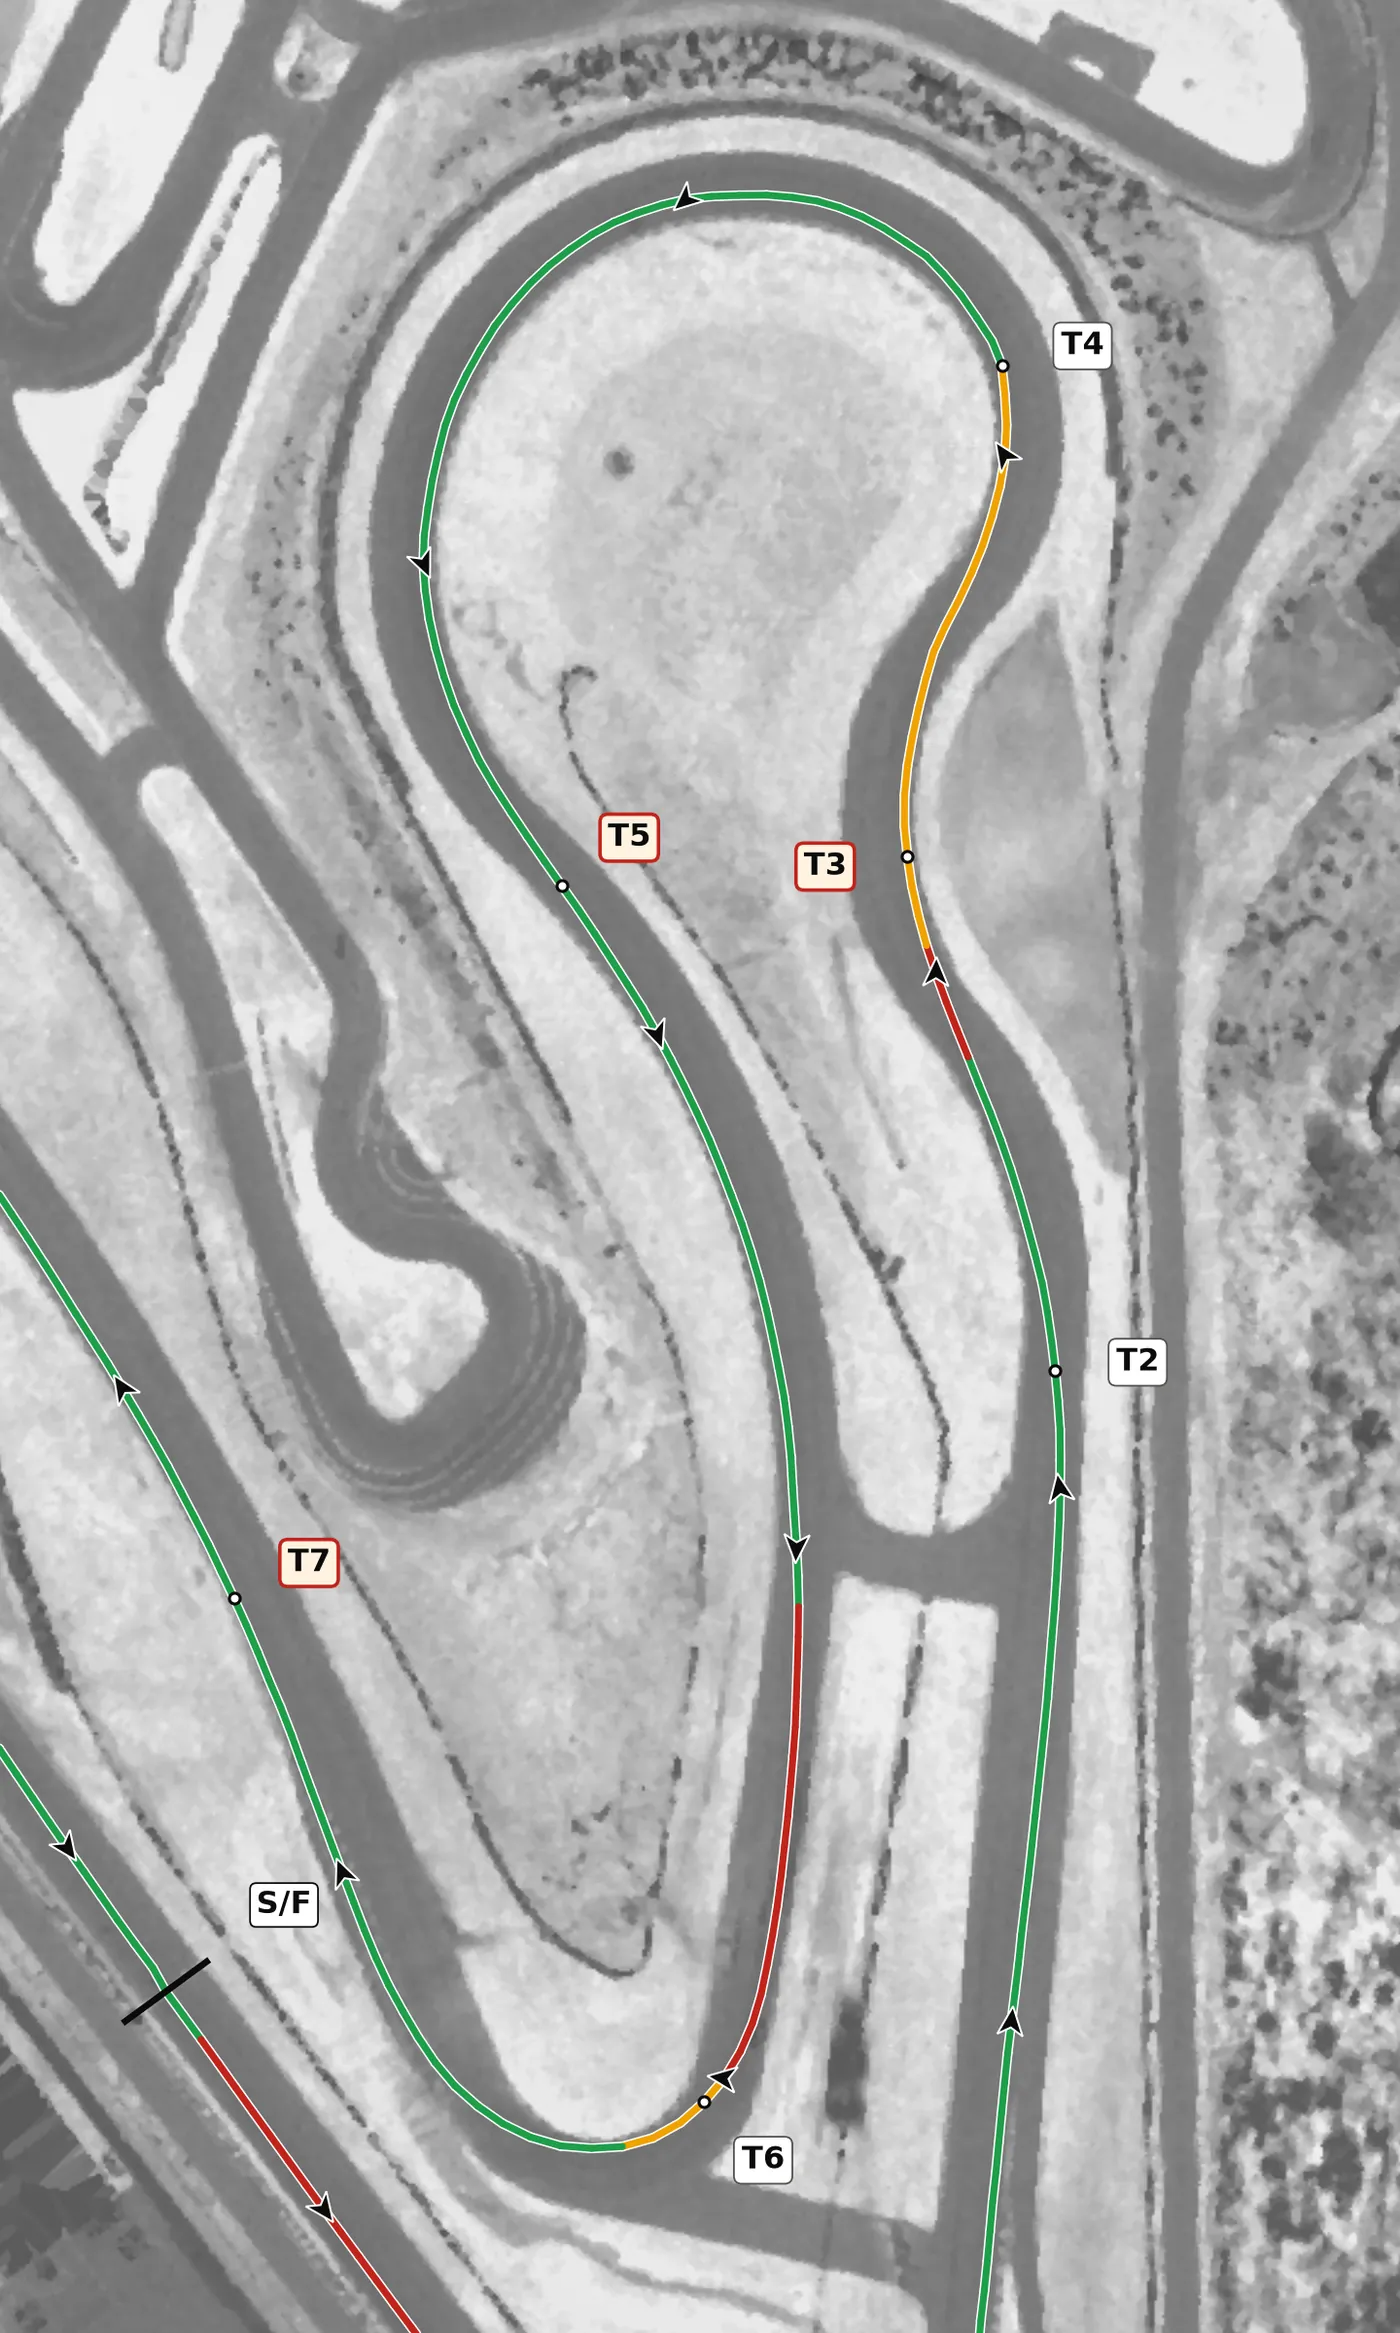
T5 is a fast right bend over a blind crest, and the road falls away steeply after the apex toward T6. Keep the wheel steady and the car settled as it goes light, and do your braking for T6 once the car is back on the ground on the downhill, not on the crest. It is also slightly off camber at the apex, so build speed here over several laps rather than committing on your first lap.
From the survey: Off camber at the apex (−1.5%), and the road falls 10 m from the apex to the exit.
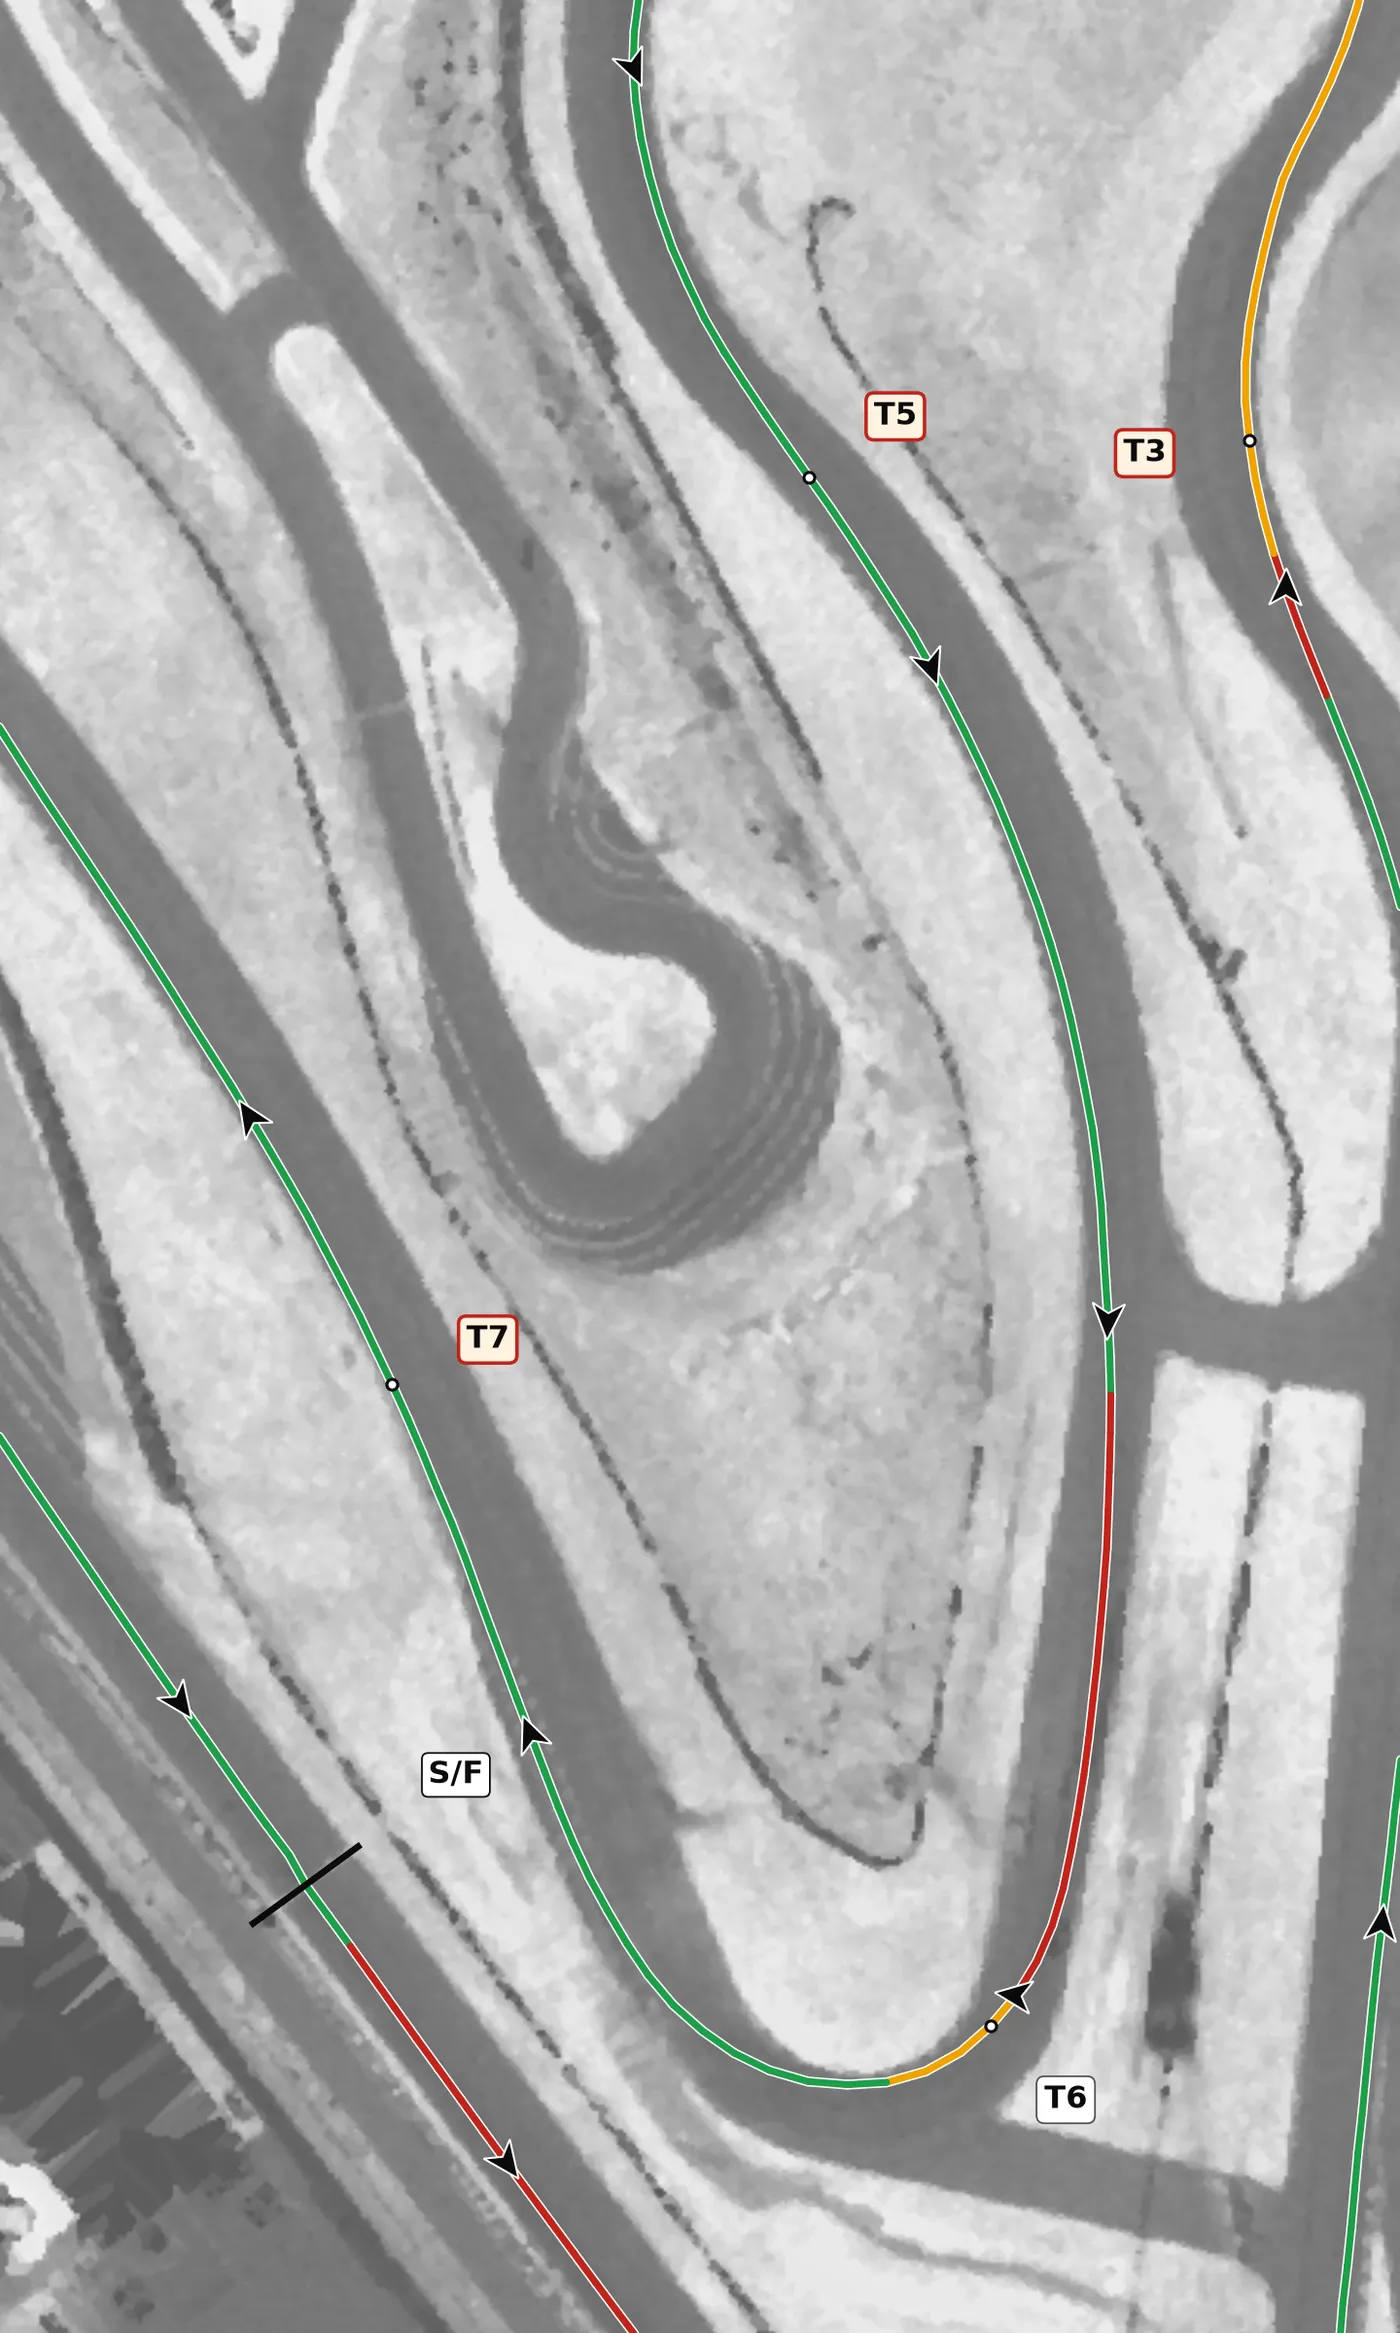
Brake in a straight line from the left side for this tight uphill right, one of the slowest corners on the lap. Apex just before the top of the hill, where the corner is still banked, and focus on a strong exit, because a long full-throttle run follows. The mistake to avoid is over-driving the entry, which brings understeer and a slow exit; carrying a little more minimum speed, not braking later, is what makes this corner faster.
From the survey: The most banked apex on the lap (+4.1%), over a crest.
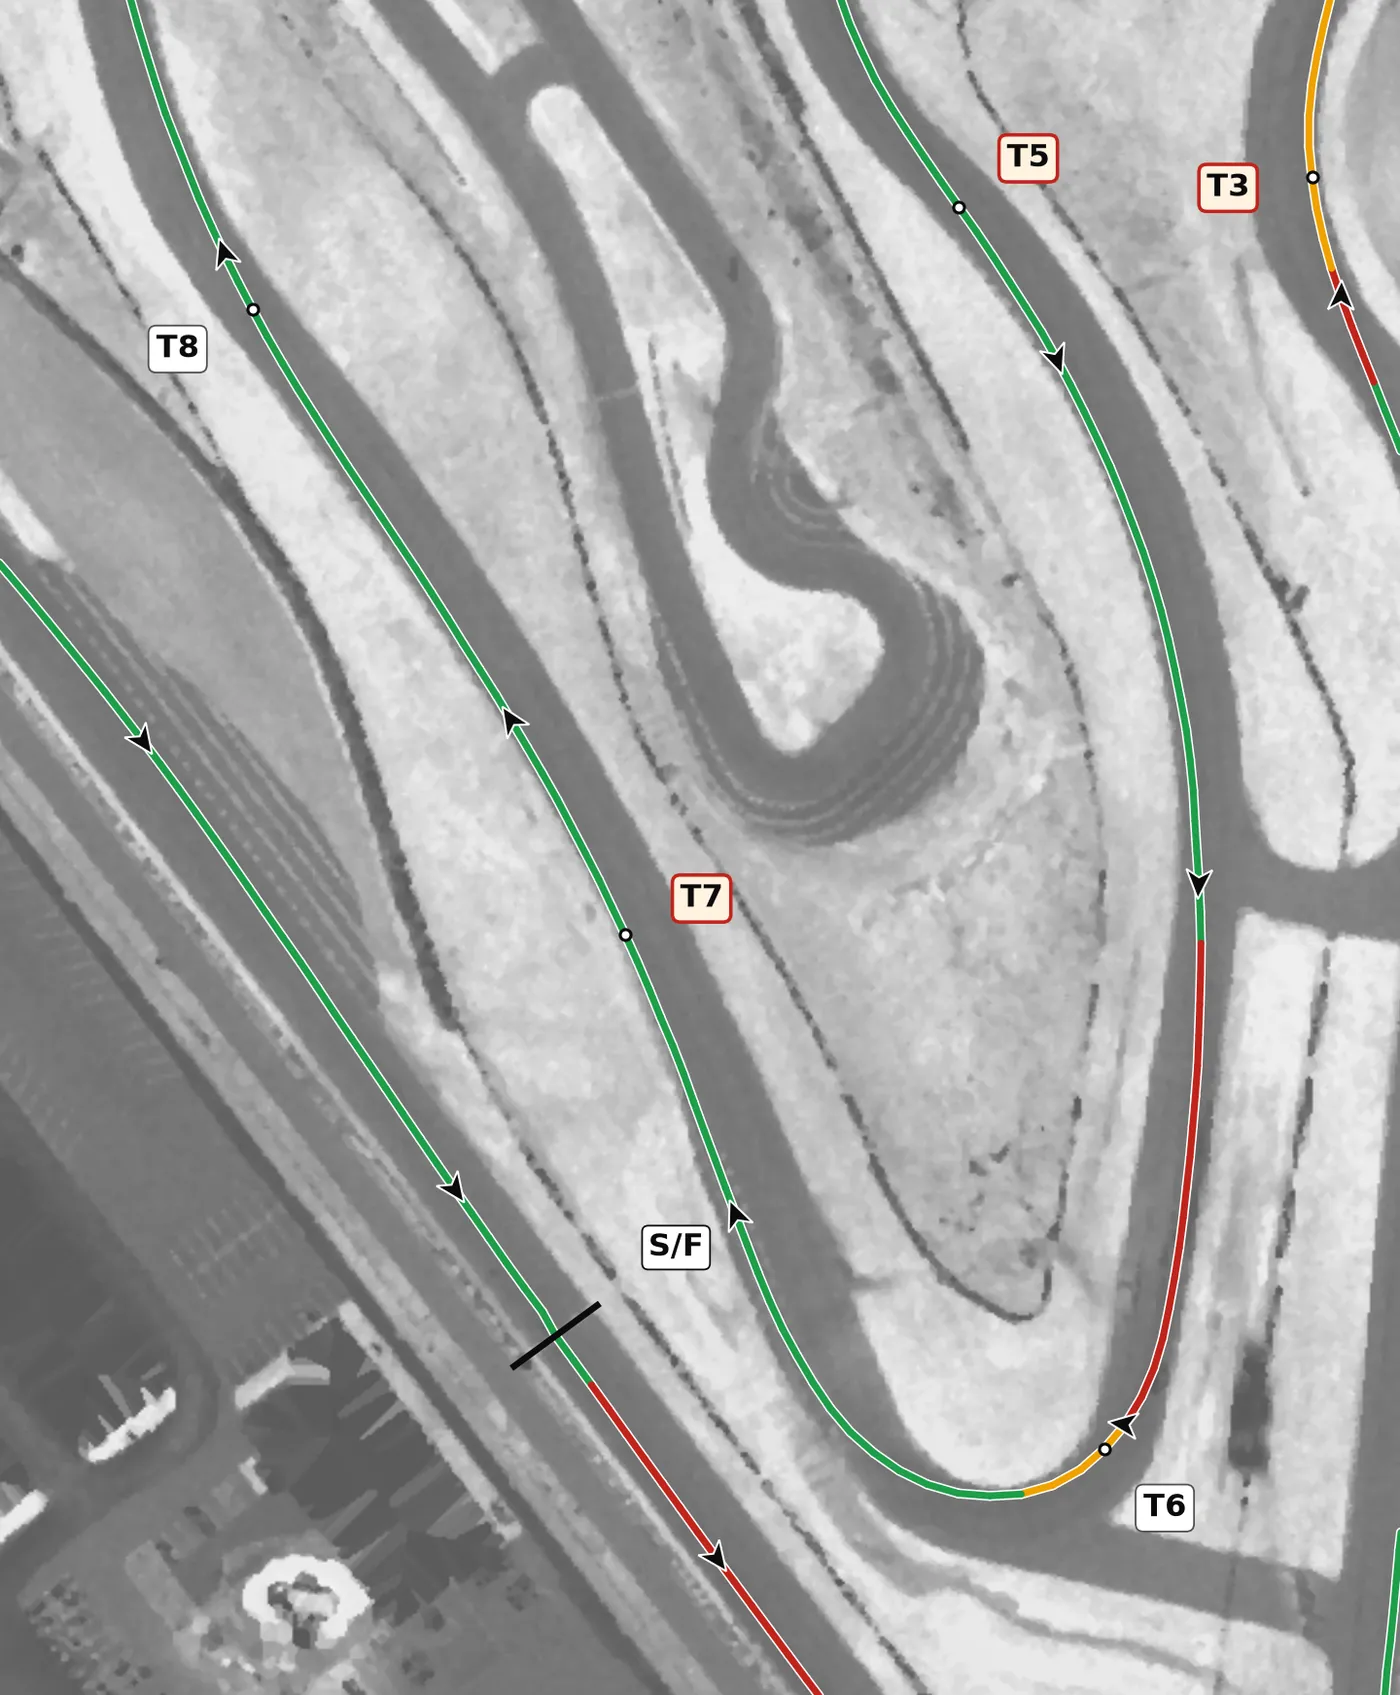
T7 is a slight left bend on the long run from T6 to T10; hug the left and stay on the throttle. It is off camber at speed, so keep your steering small and smooth. The mistake to avoid is a jerky correction here, which unsettles the car before the run downhill.
From the survey: Off camber at the apex (−1.9%).
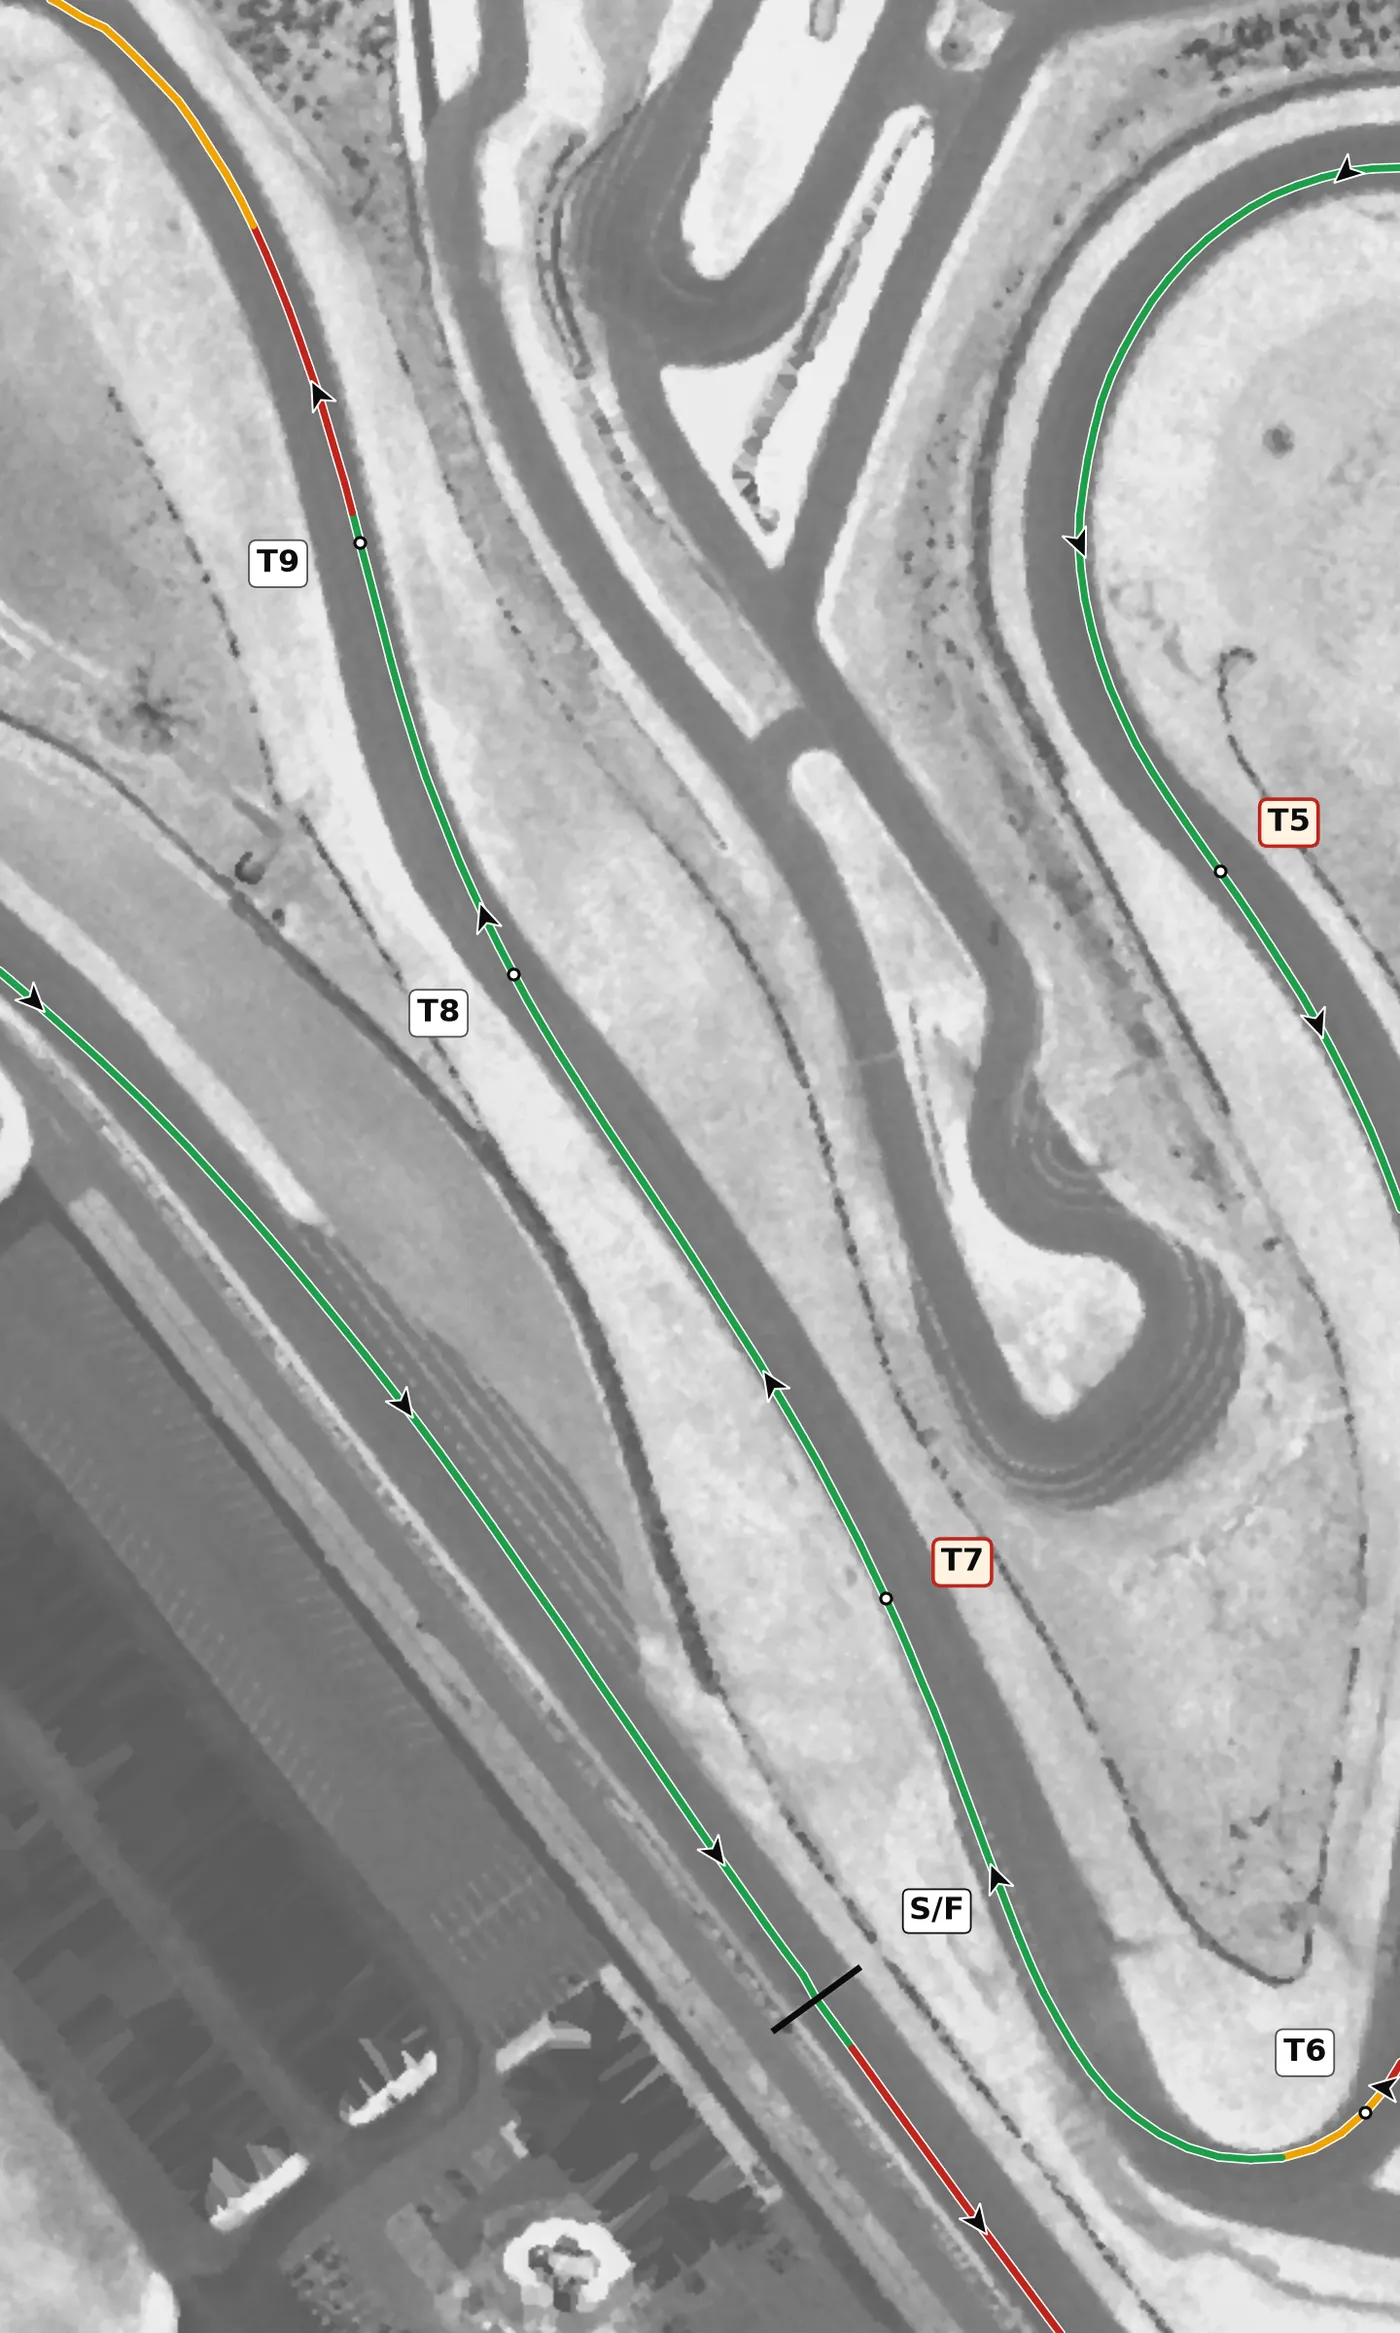
T8 is a slight right bend on the same full-throttle run; hug the right side and keep the car straight and accelerating. It is barely a corner, so the main job is staying smooth. The mistake to avoid is lifting because the T6 exit was messy; fix the exit, not the bend.
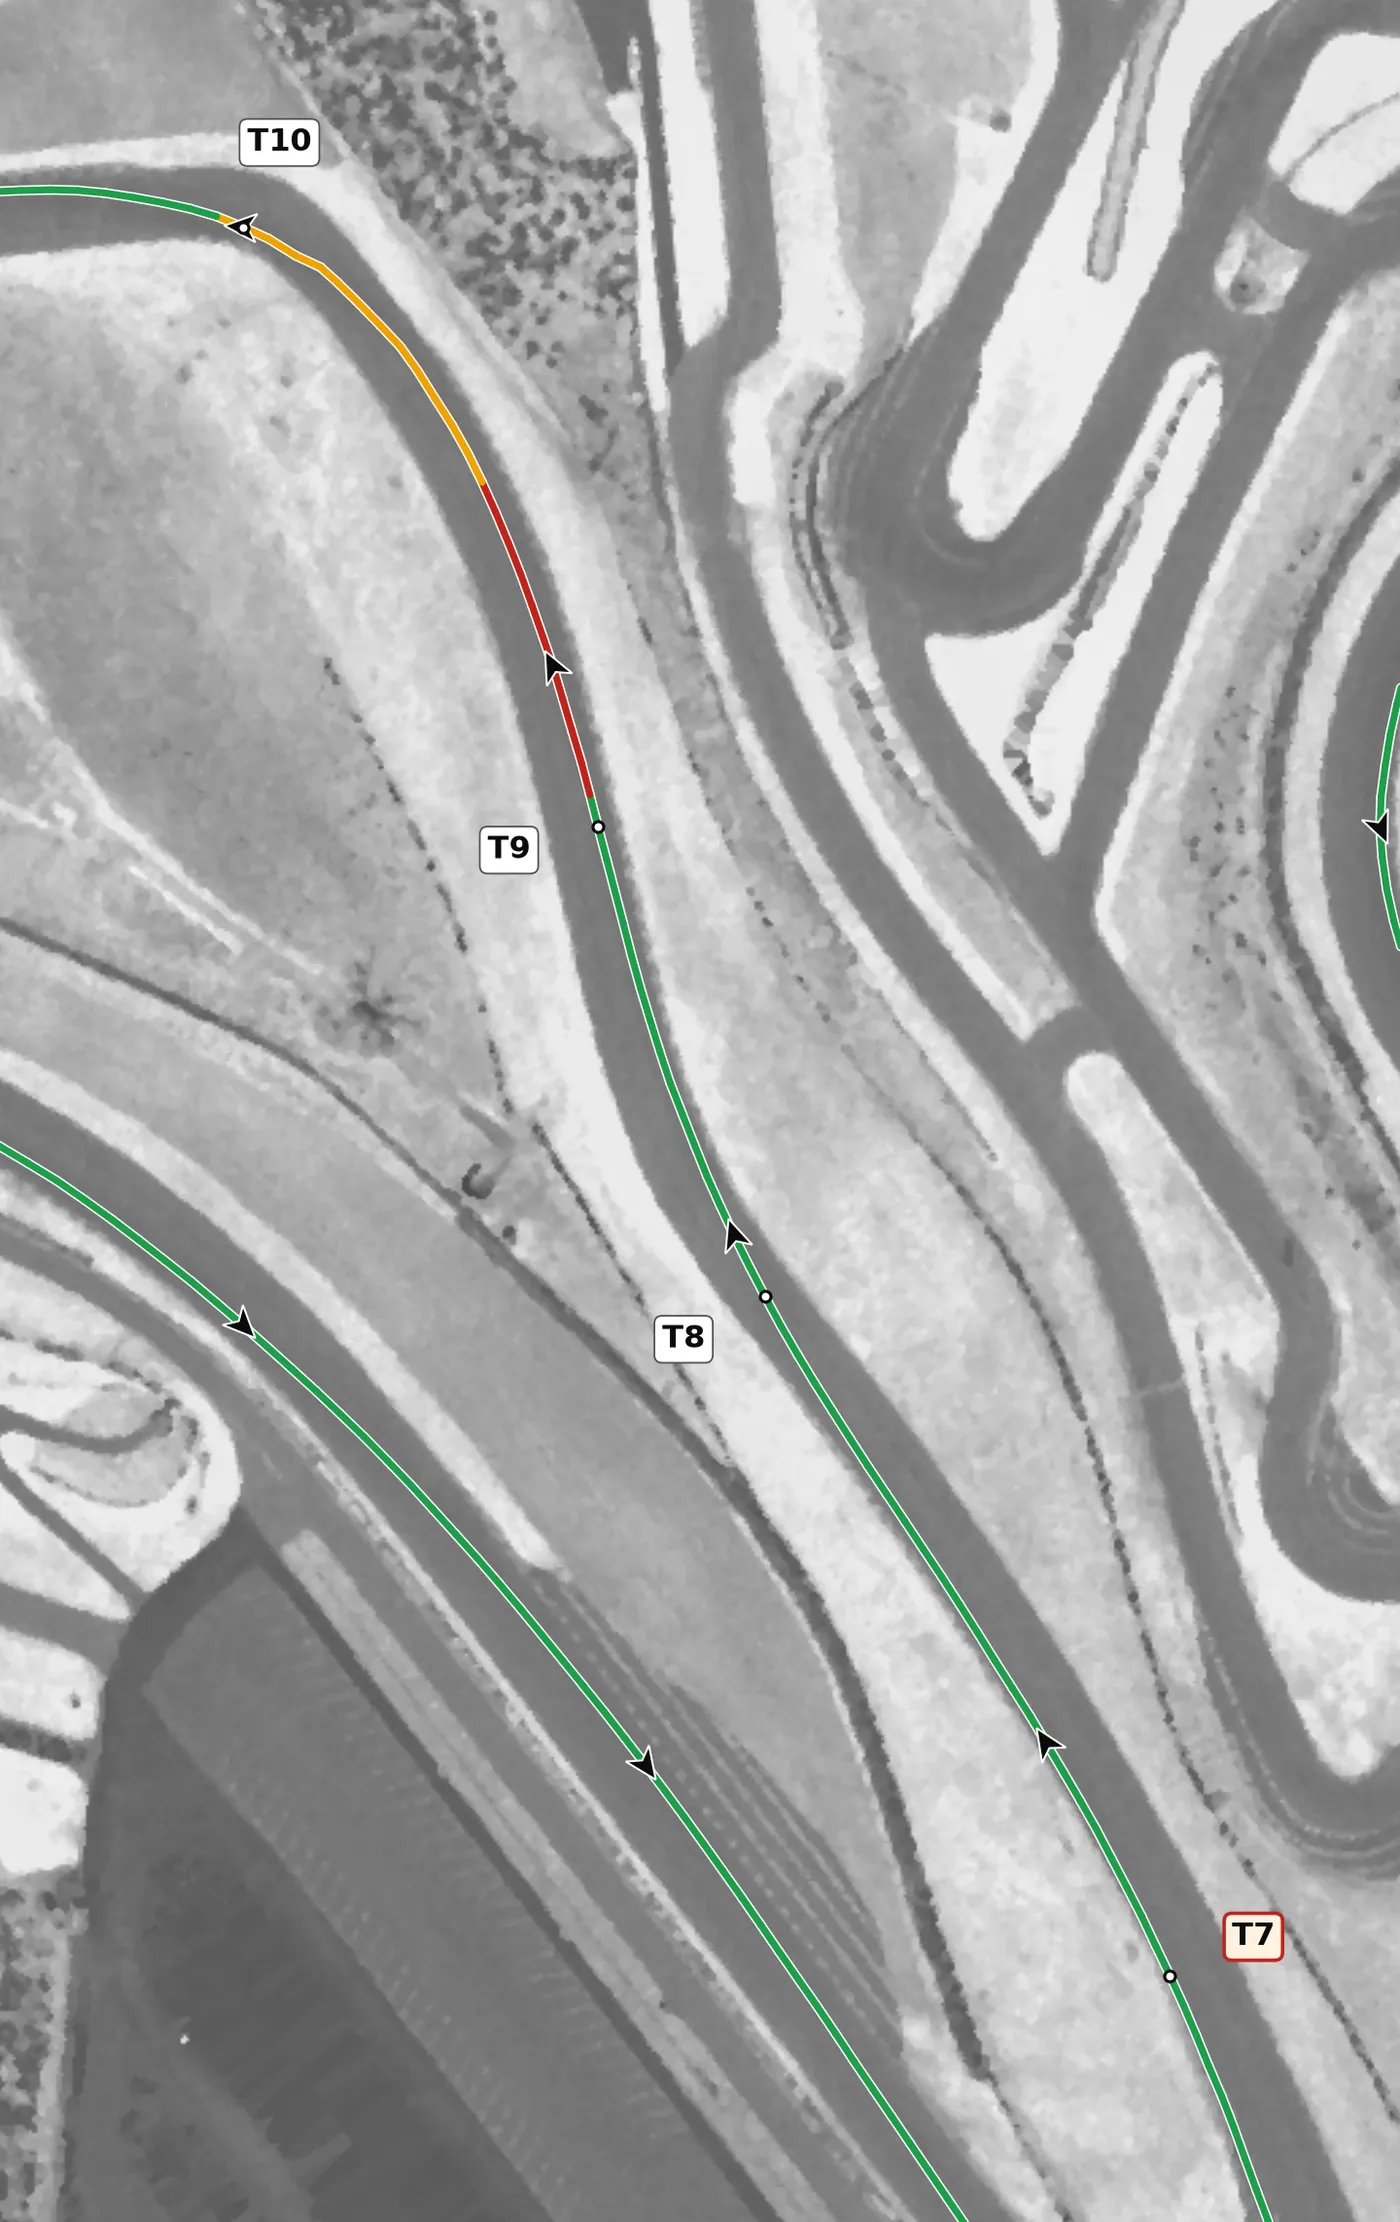
T9 is not really a corner but the downhill bend before T10, where a little brake goes on. Use it to slow the car while it is still nearly straight and to settle it before turning into T10, keeping to the right. The mistake to avoid is leaving all your braking for T10, which means braking while turning on a downhill.
From the survey: Barely a direction change (2.6° net): a bend, not a corner.
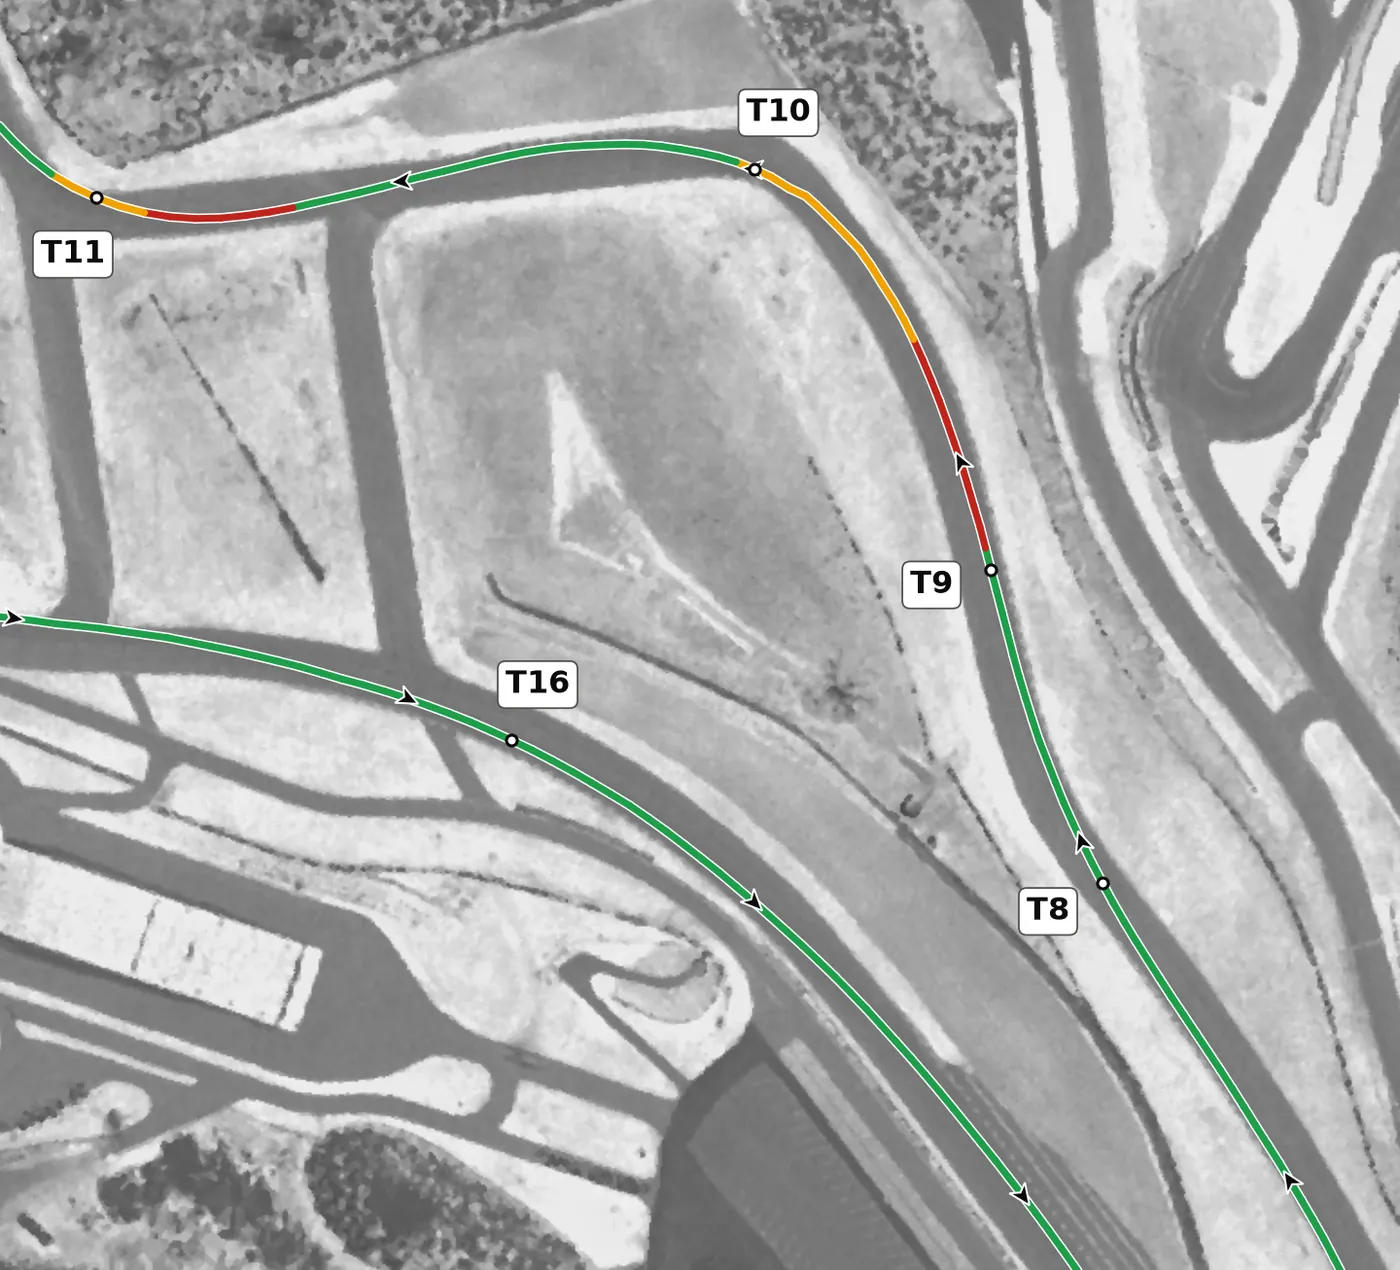
T10 is a tighter left at the bottom of the downhill run; arrive on the right, finish most of your braking before you turn in, and aim for a late apex. The exit tilts away from you, so feed in the throttle gradually as you unwind the wheel toward T11. The mistake to avoid is turning in too early and running wide on the exit.
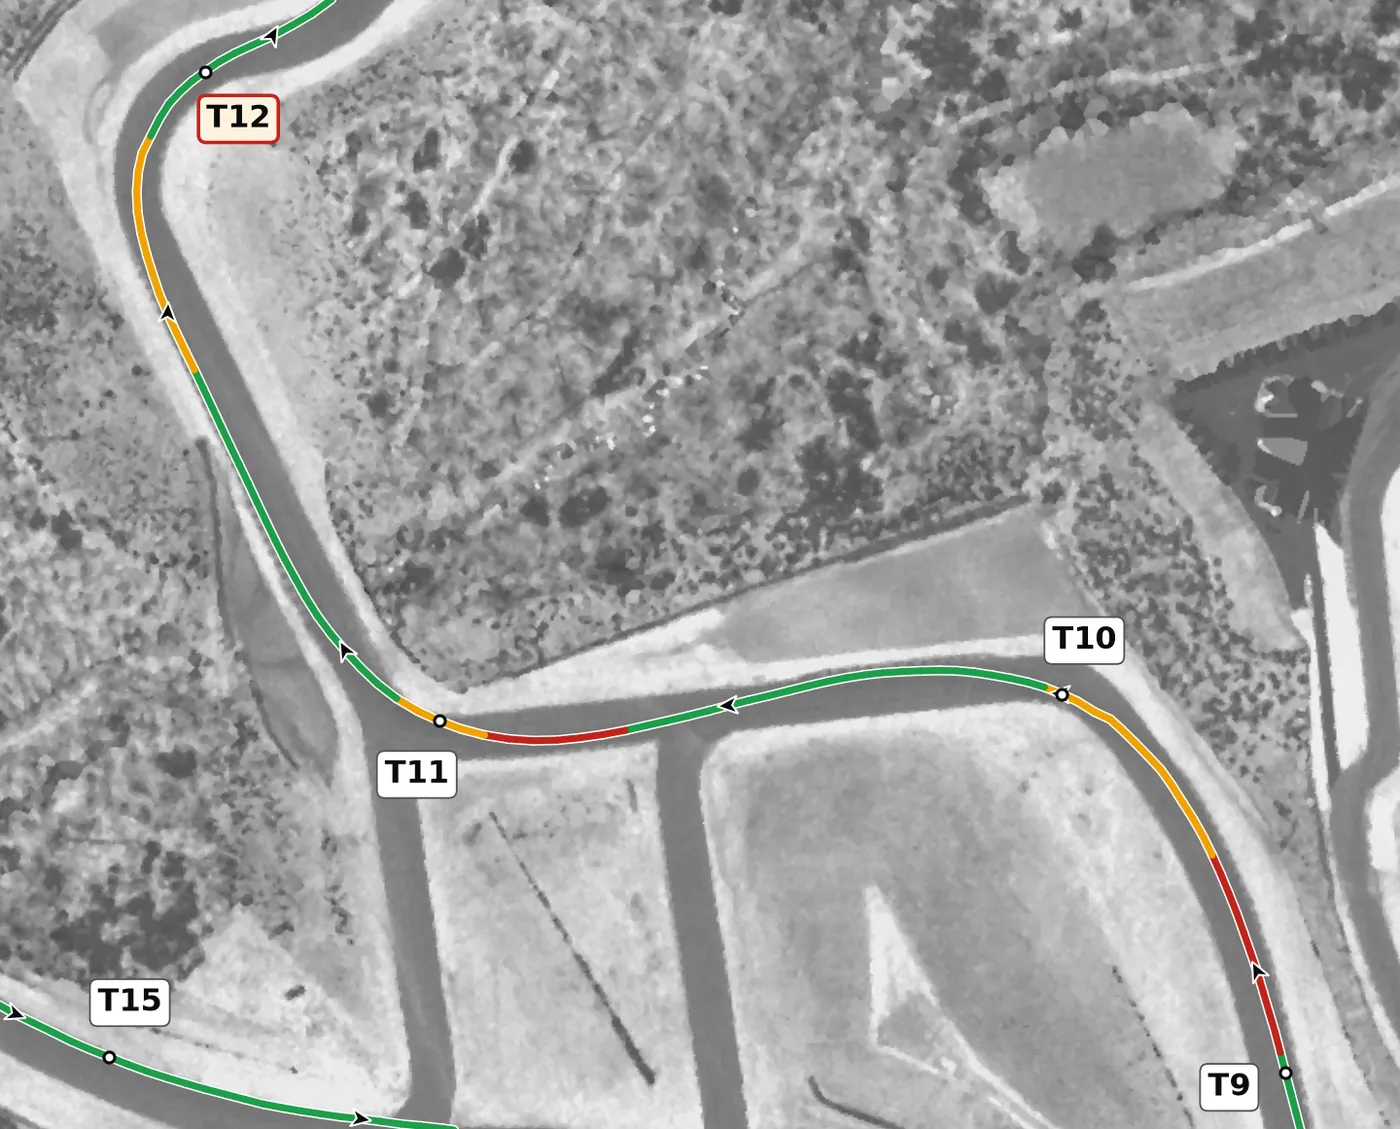
The road drops steeply into the Dip, the lowest point on the track, so do your braking in a straight line on the way down. Trust the compression at the bottom, which gives more grip than you expect, and feel it before you add power for the climb. This is the brake that matters for the T11–T13 section, so set your speed here rather than arriving at T12 too fast.
From the survey: The Dip: the lowest point on the lap and its biggest compression. The 20% climb follows.
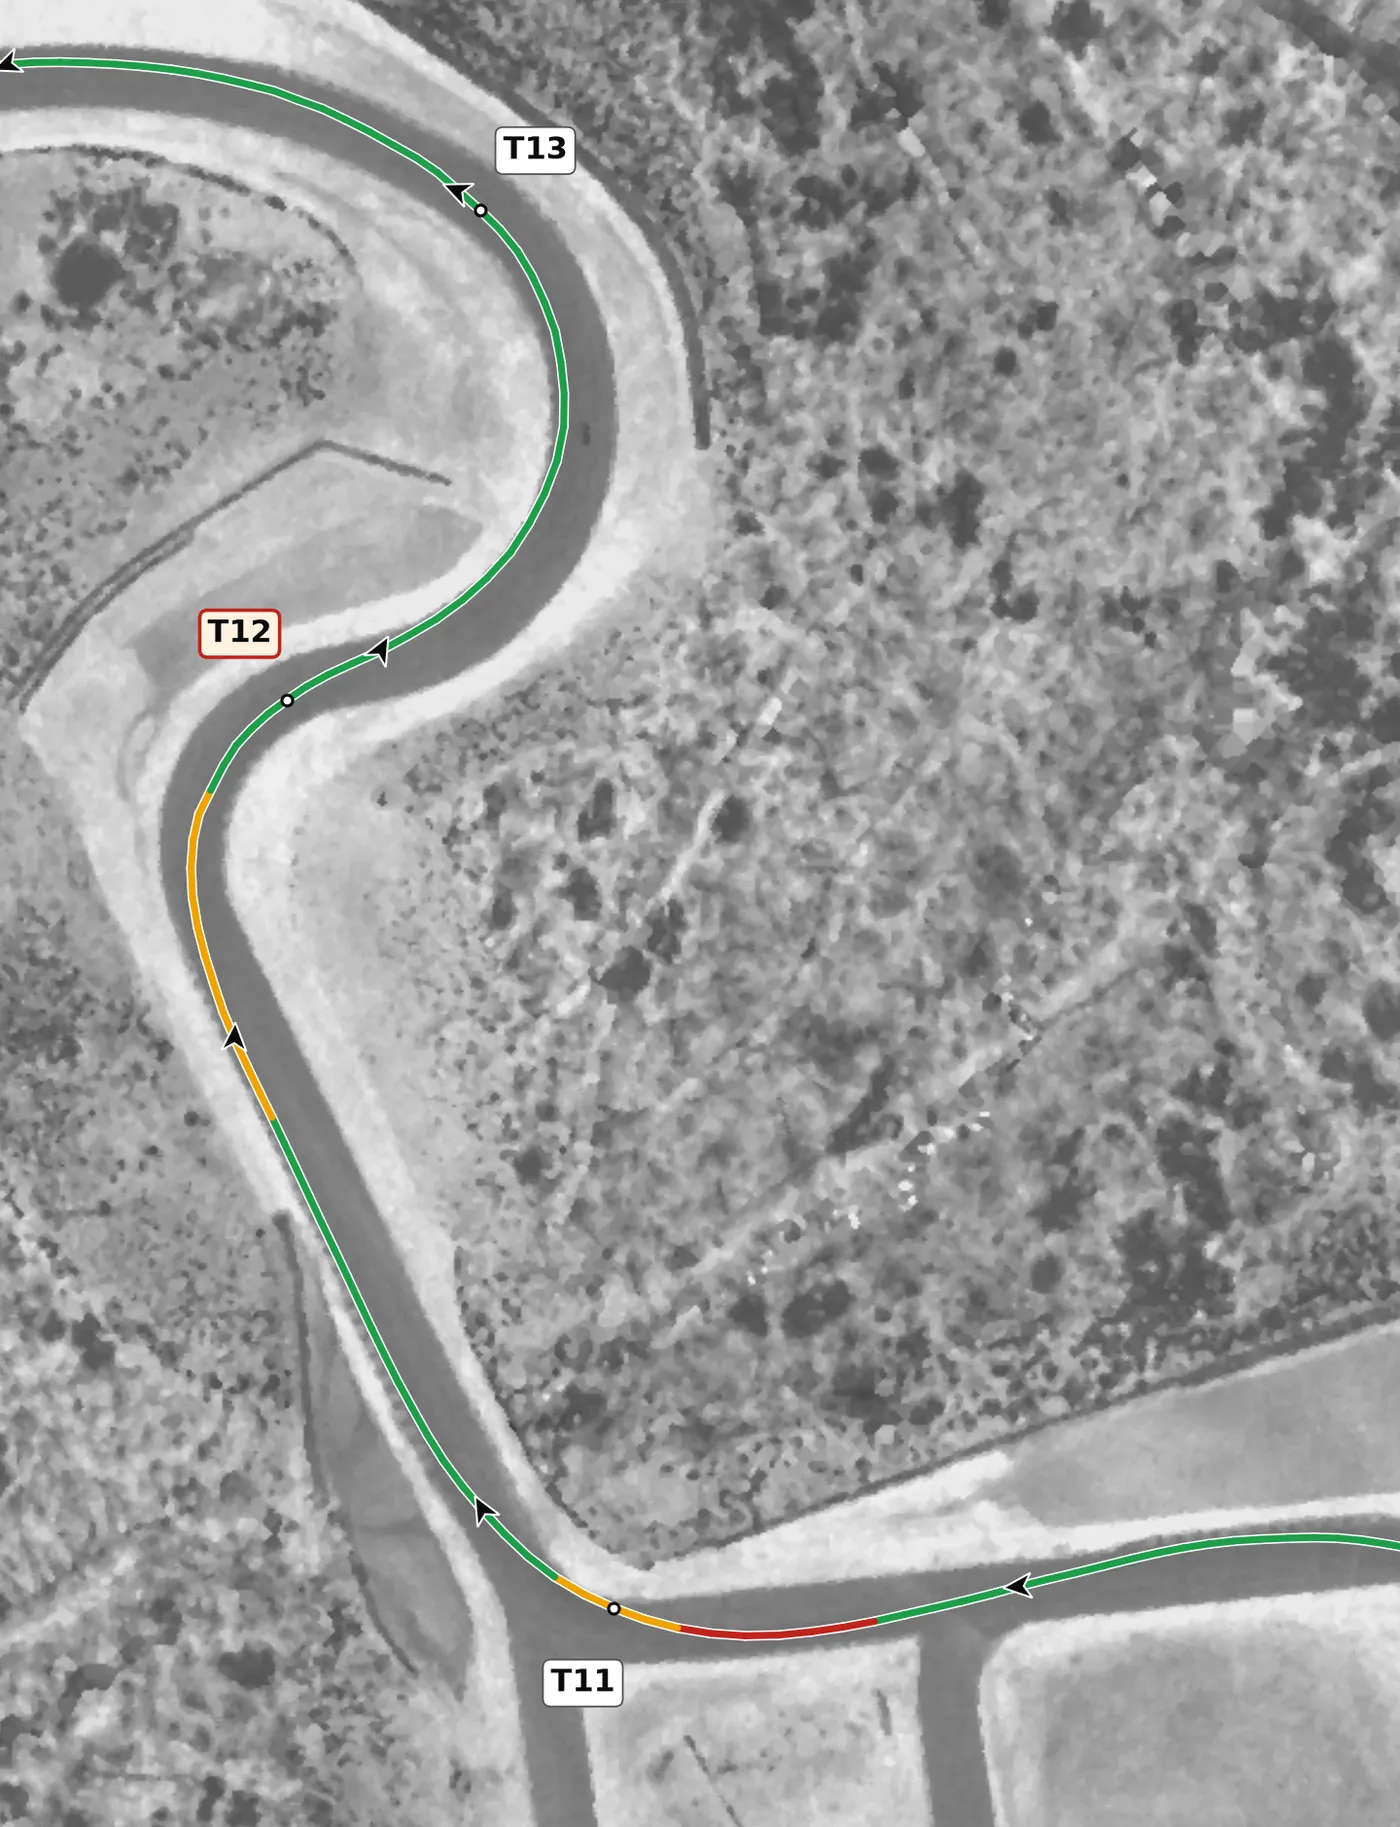
T12 is a right that climbs steeply to a blind crest, so arrive with your speed set from T11 and let the climb slow the car: a lift is usually enough, with only a light brake if you need it. Get to the apex and use the apex kerb so the car does not run wide over the top on the exit. Drive it slowly the first few times to learn where the road goes before adding speed.
From the survey: Climbs 17 m from entry to apex, and it is mildly off camber (−0.8%) at the top.
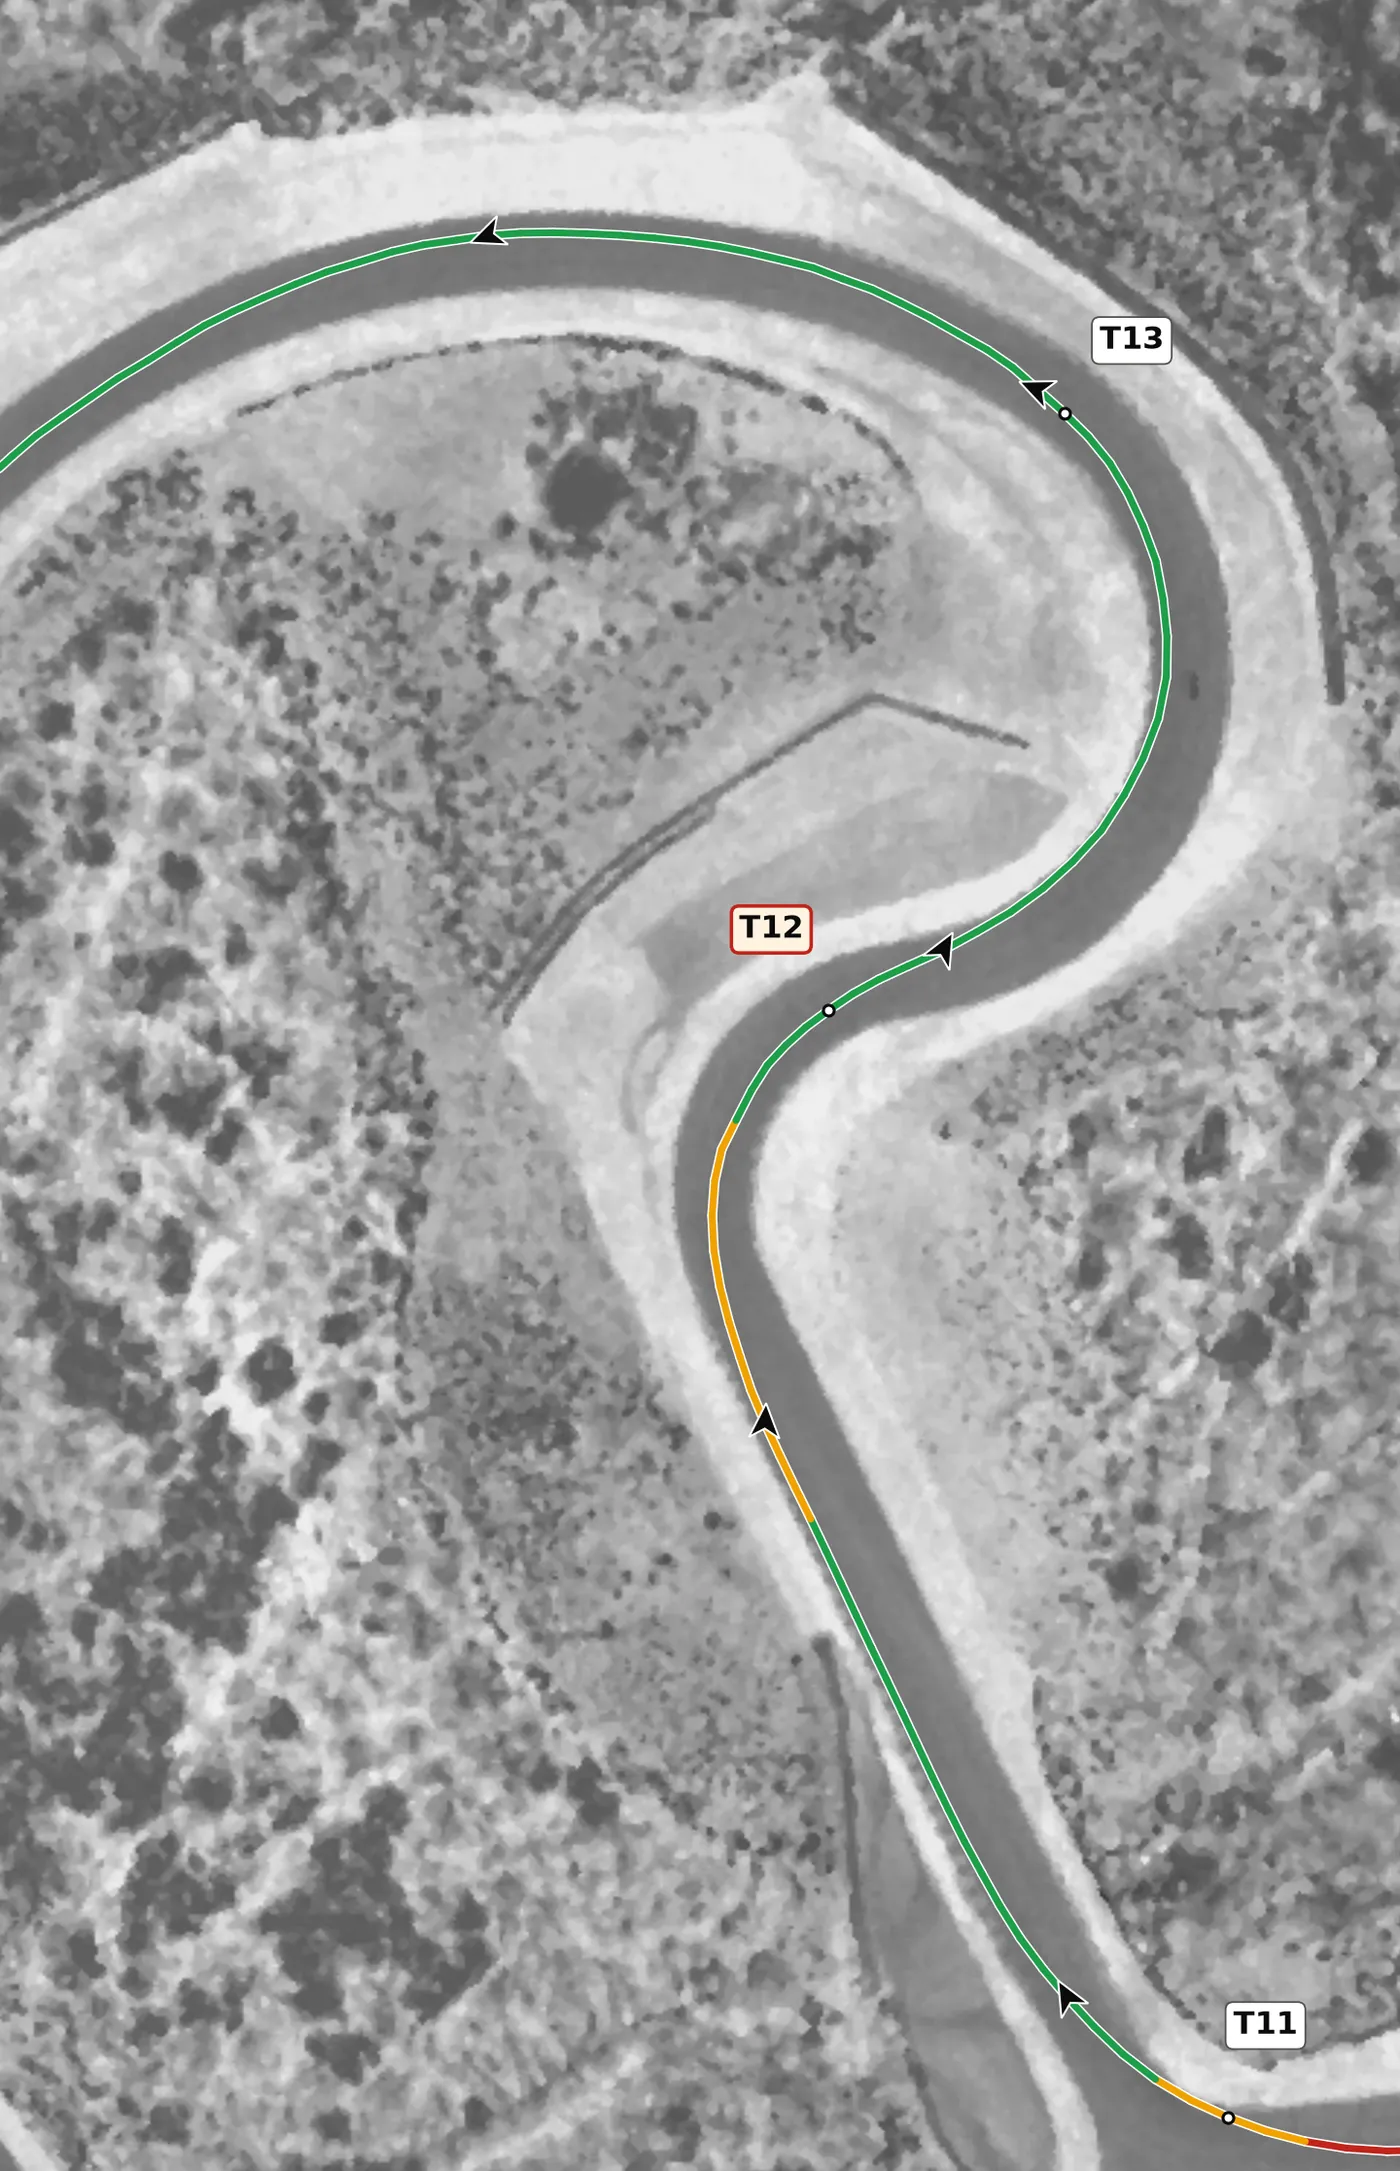
The biggest crest on the lap comes on the way into T13, and the track falls away as you turn left, so the car will tend to understeer. Keep the throttle light and steady over the crest so the front can bite, get to the apex, then unwind the wheel and track all the way out on full throttle. The mistake to avoid is turning in while the car is still light over the crest.
From the survey: The biggest crest on the lap is on the way in.
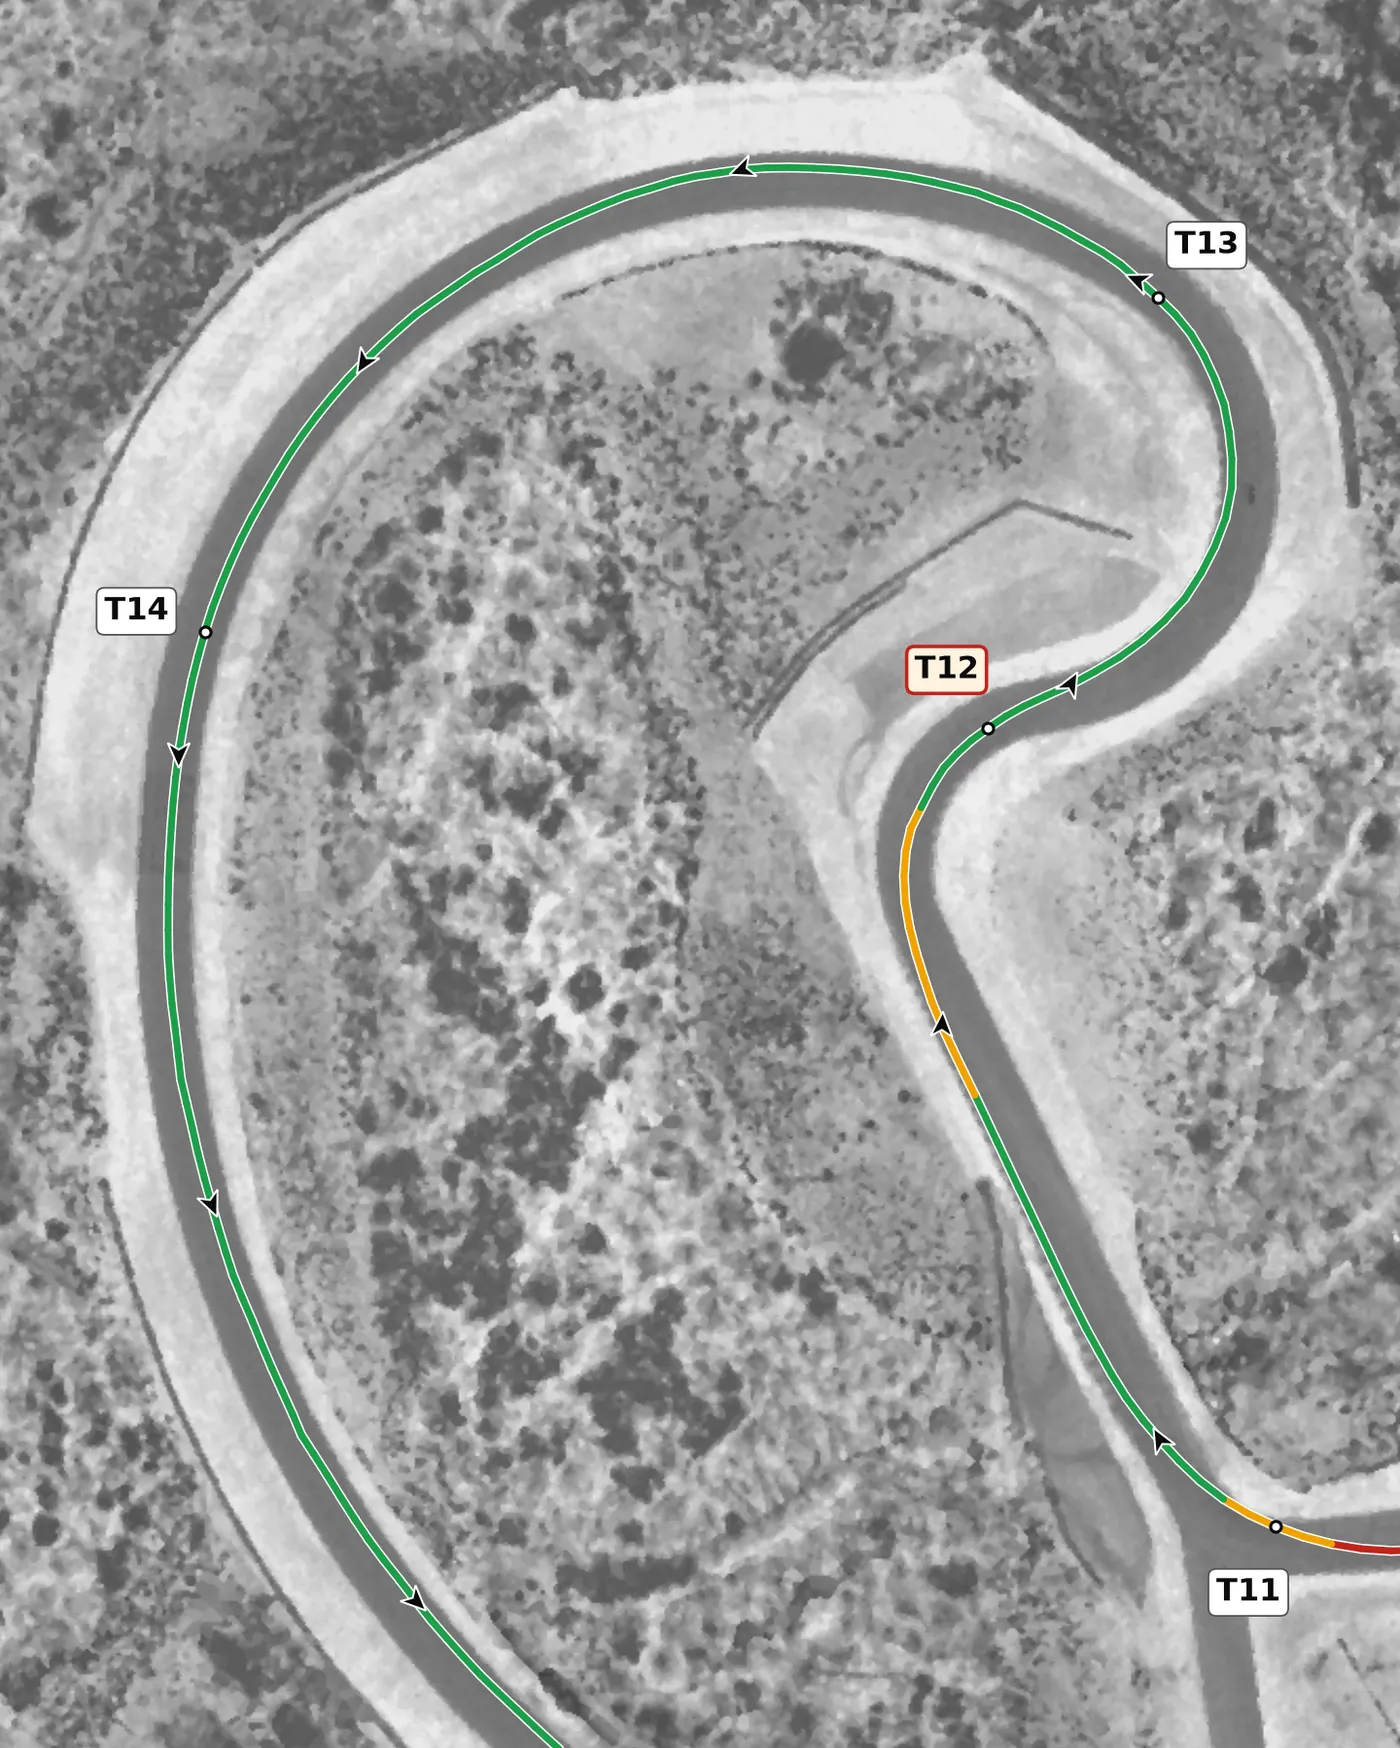
T14 starts the long left sweep that carries on through T15; come close to the inside but not necessarily all the way to the apex, then let the car drift to the middle of the track. Hold a steady steering angle and balance the car with the throttle. The mistake to avoid is a series of small steering and throttle corrections, which scrub speed through the whole sweep.
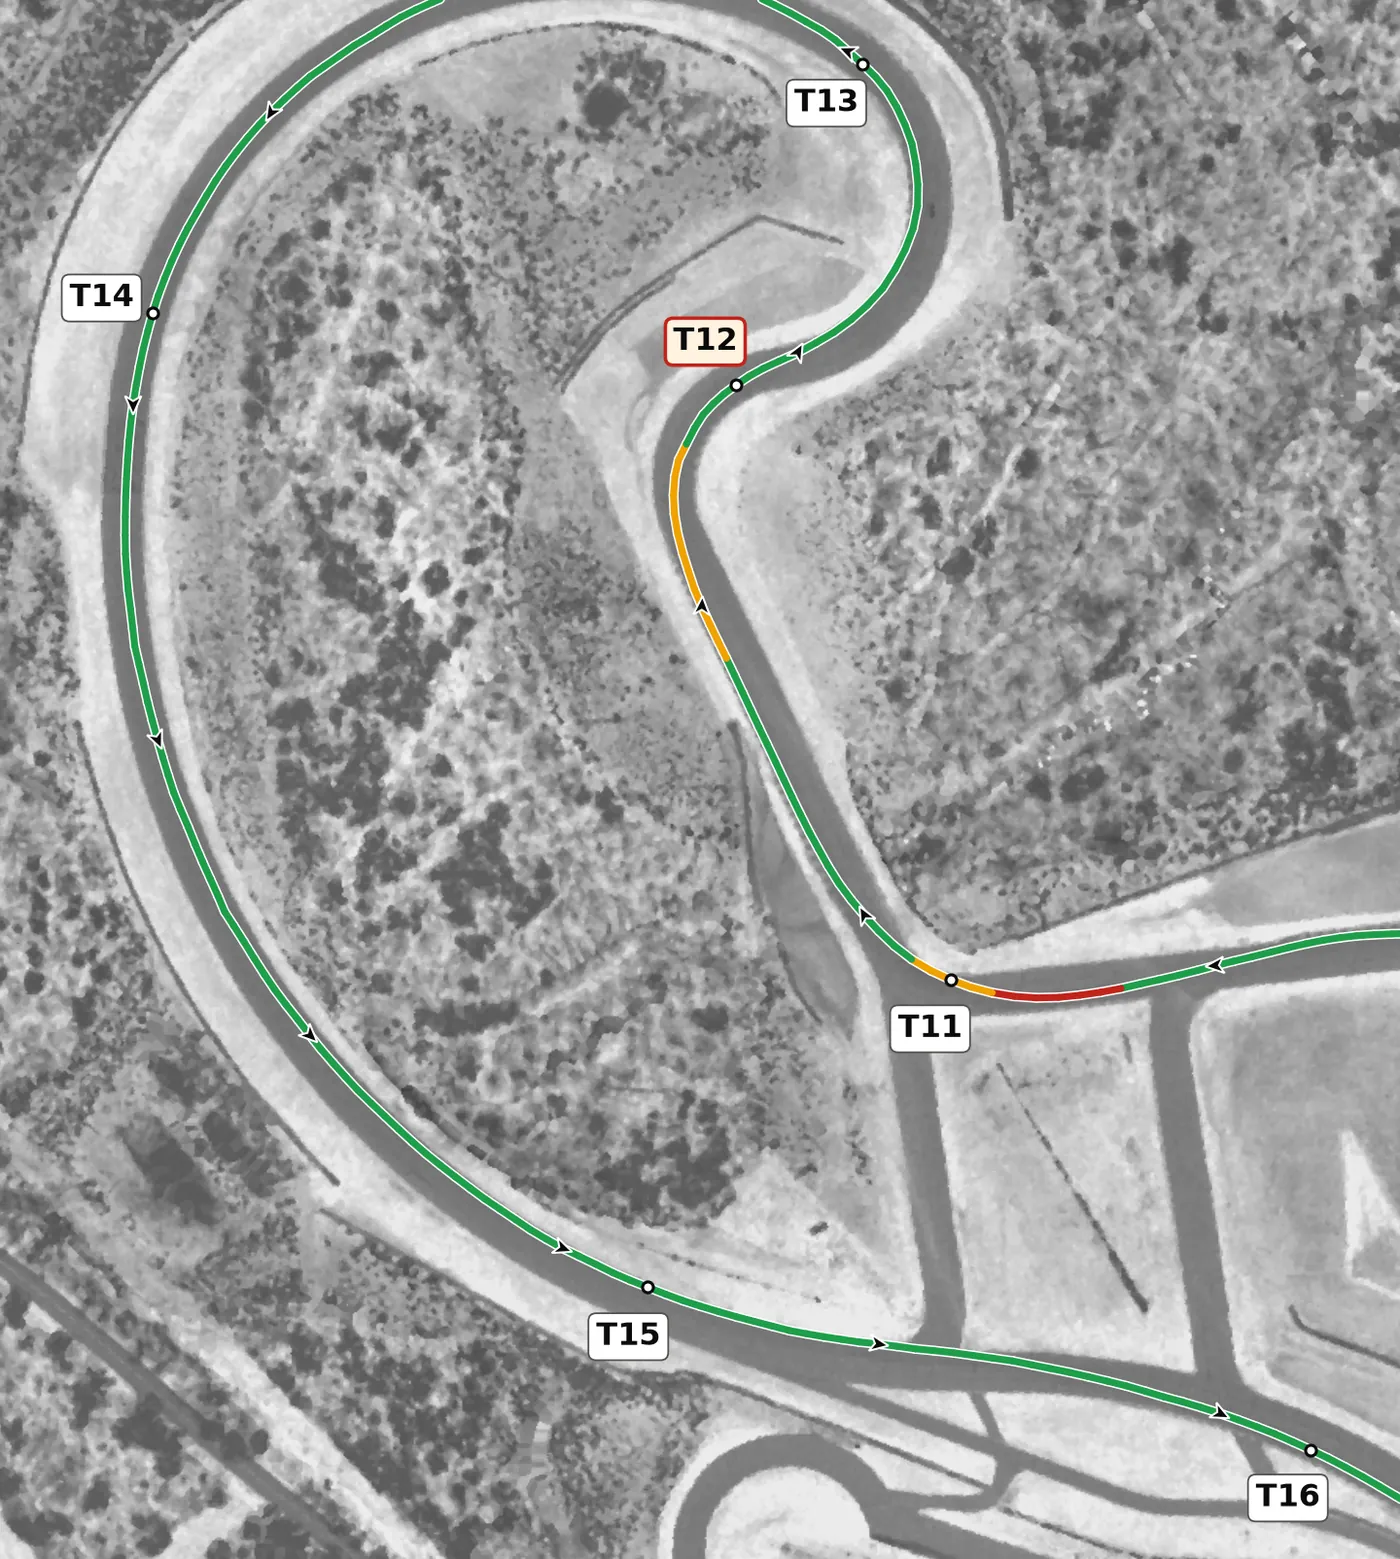
From the middle of the track after T14, come back all the way to the left-hand apex of T15, which sits just before the first access road. Keep the car on the left after the apex so you are lined up for T16, and build the throttle steadily. The mistake to avoid is letting the car run out to the right, which leaves no room for the final turn.
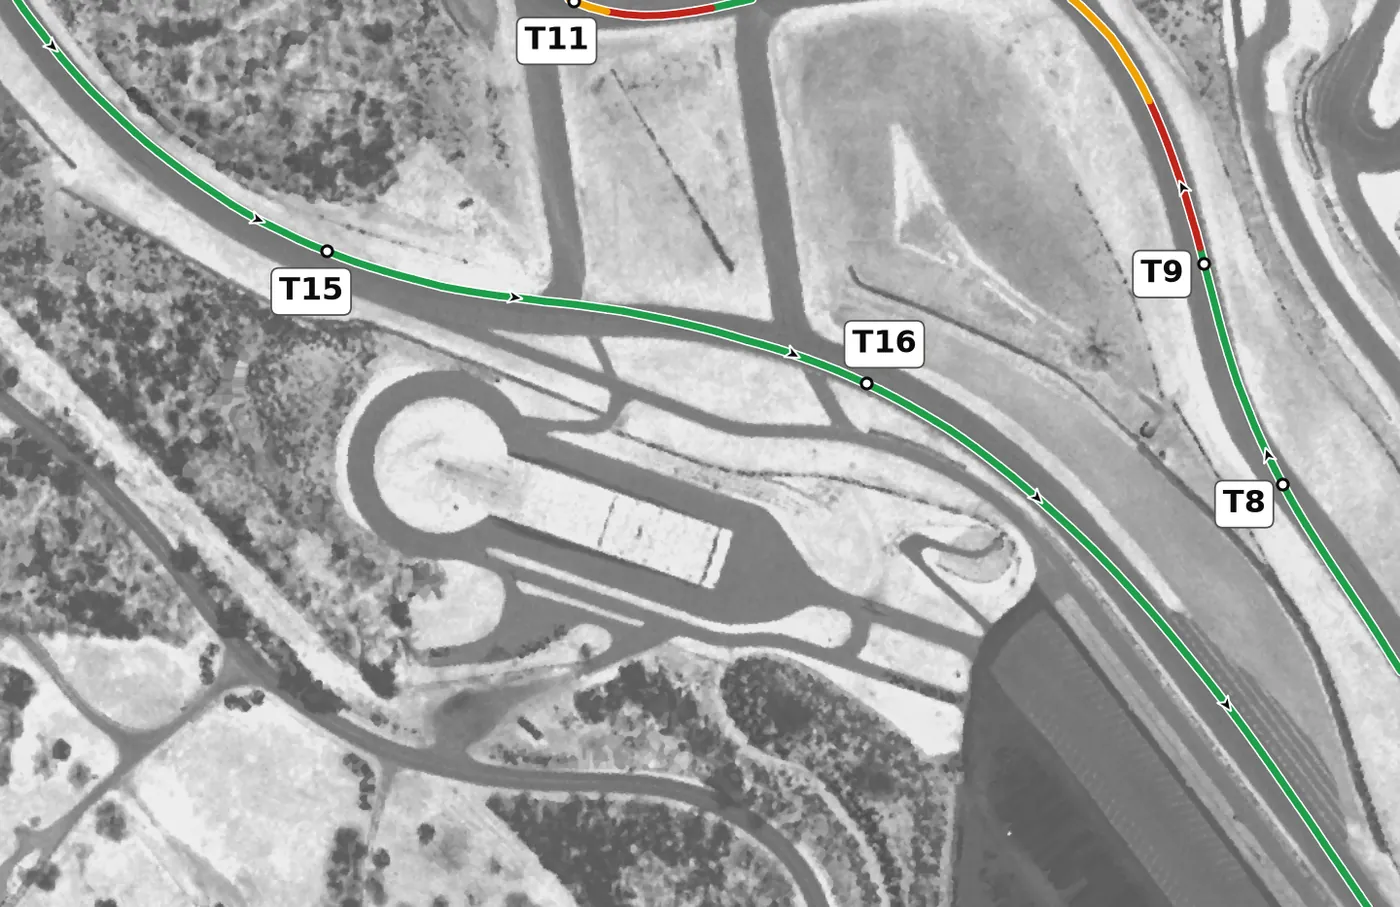
T16 is a gentle right onto the front straight, taken on the throttle from the left side to the right-hand apex. Turn in neither early nor late, and keep your inputs smooth so the car is straight and accelerating as soon as possible. Your exit speed carries all the way down the front straight, so a clean line here matters more than its modest look suggests.
Version history
- v1.2 · 2026-10-01 — T15 and T16, the long left onto the front straight and the kink before it, are now drawn as throttle rather than a lift: the car holds or gains speed through them on a rising road, which takes throttle.
- v1.1 · 2026-10-01 — Speeds and braking points rebuilt at a typical quick HPDE pace and checked against published guides: braking starts about 10 m later at T1 and 15 m later at T3 and T11, and T12 is now a lift up the hill rather than a brake. The line now goes straight from throttle to brake, with no coasting in between. Version history and feedback contributors added.
- v1.0 · 2026-10-01 — First version.
Feedback contributors
Drivers and instructors whose feedback has improved this line. Thank you.
- Mike M — no coasting between throttle and brake; braking points (v1.1)
- Brian L — corners where the car gains speed are throttle, not a lift (v1.2)