Daytona (road course) — Race Line
Estimated from data not in trackdays.ai. The speeds and braking points come from cars lapping at a typical quick HPDE pace, checked against published brake markers. If you have data you would like to contribute, please send it to upload@trackdays.ai to help improve our estimates. Turn numbers follow the 12-turn sports-car course, matched to the LiDAR corners (provisional); T7 and T12 are the oval's banked turns.
Heads up: This is an estimate of a typical quick HPDE line, not any one car's lap. Braking points are a starting point, not a target: start a little earlier and work later in small steps. The line goes straight from throttle to brake; amber only marks where you really lift or hold part throttle. The turn numbering is provisional. Daytona's 6.6 m of relief is nearly all banking — 31° in the oval turns, 18° in the tri-oval, about 3° on the straights — and the infield is flat.
- Throttle
- Coast / partial
- Braking
- Apex
- T4Off-camber corner
Arrows show the direction of the lap. The grey basemap is USGS LiDAR: dark = asphalt, light = grass. Tap any map for the full-size image.
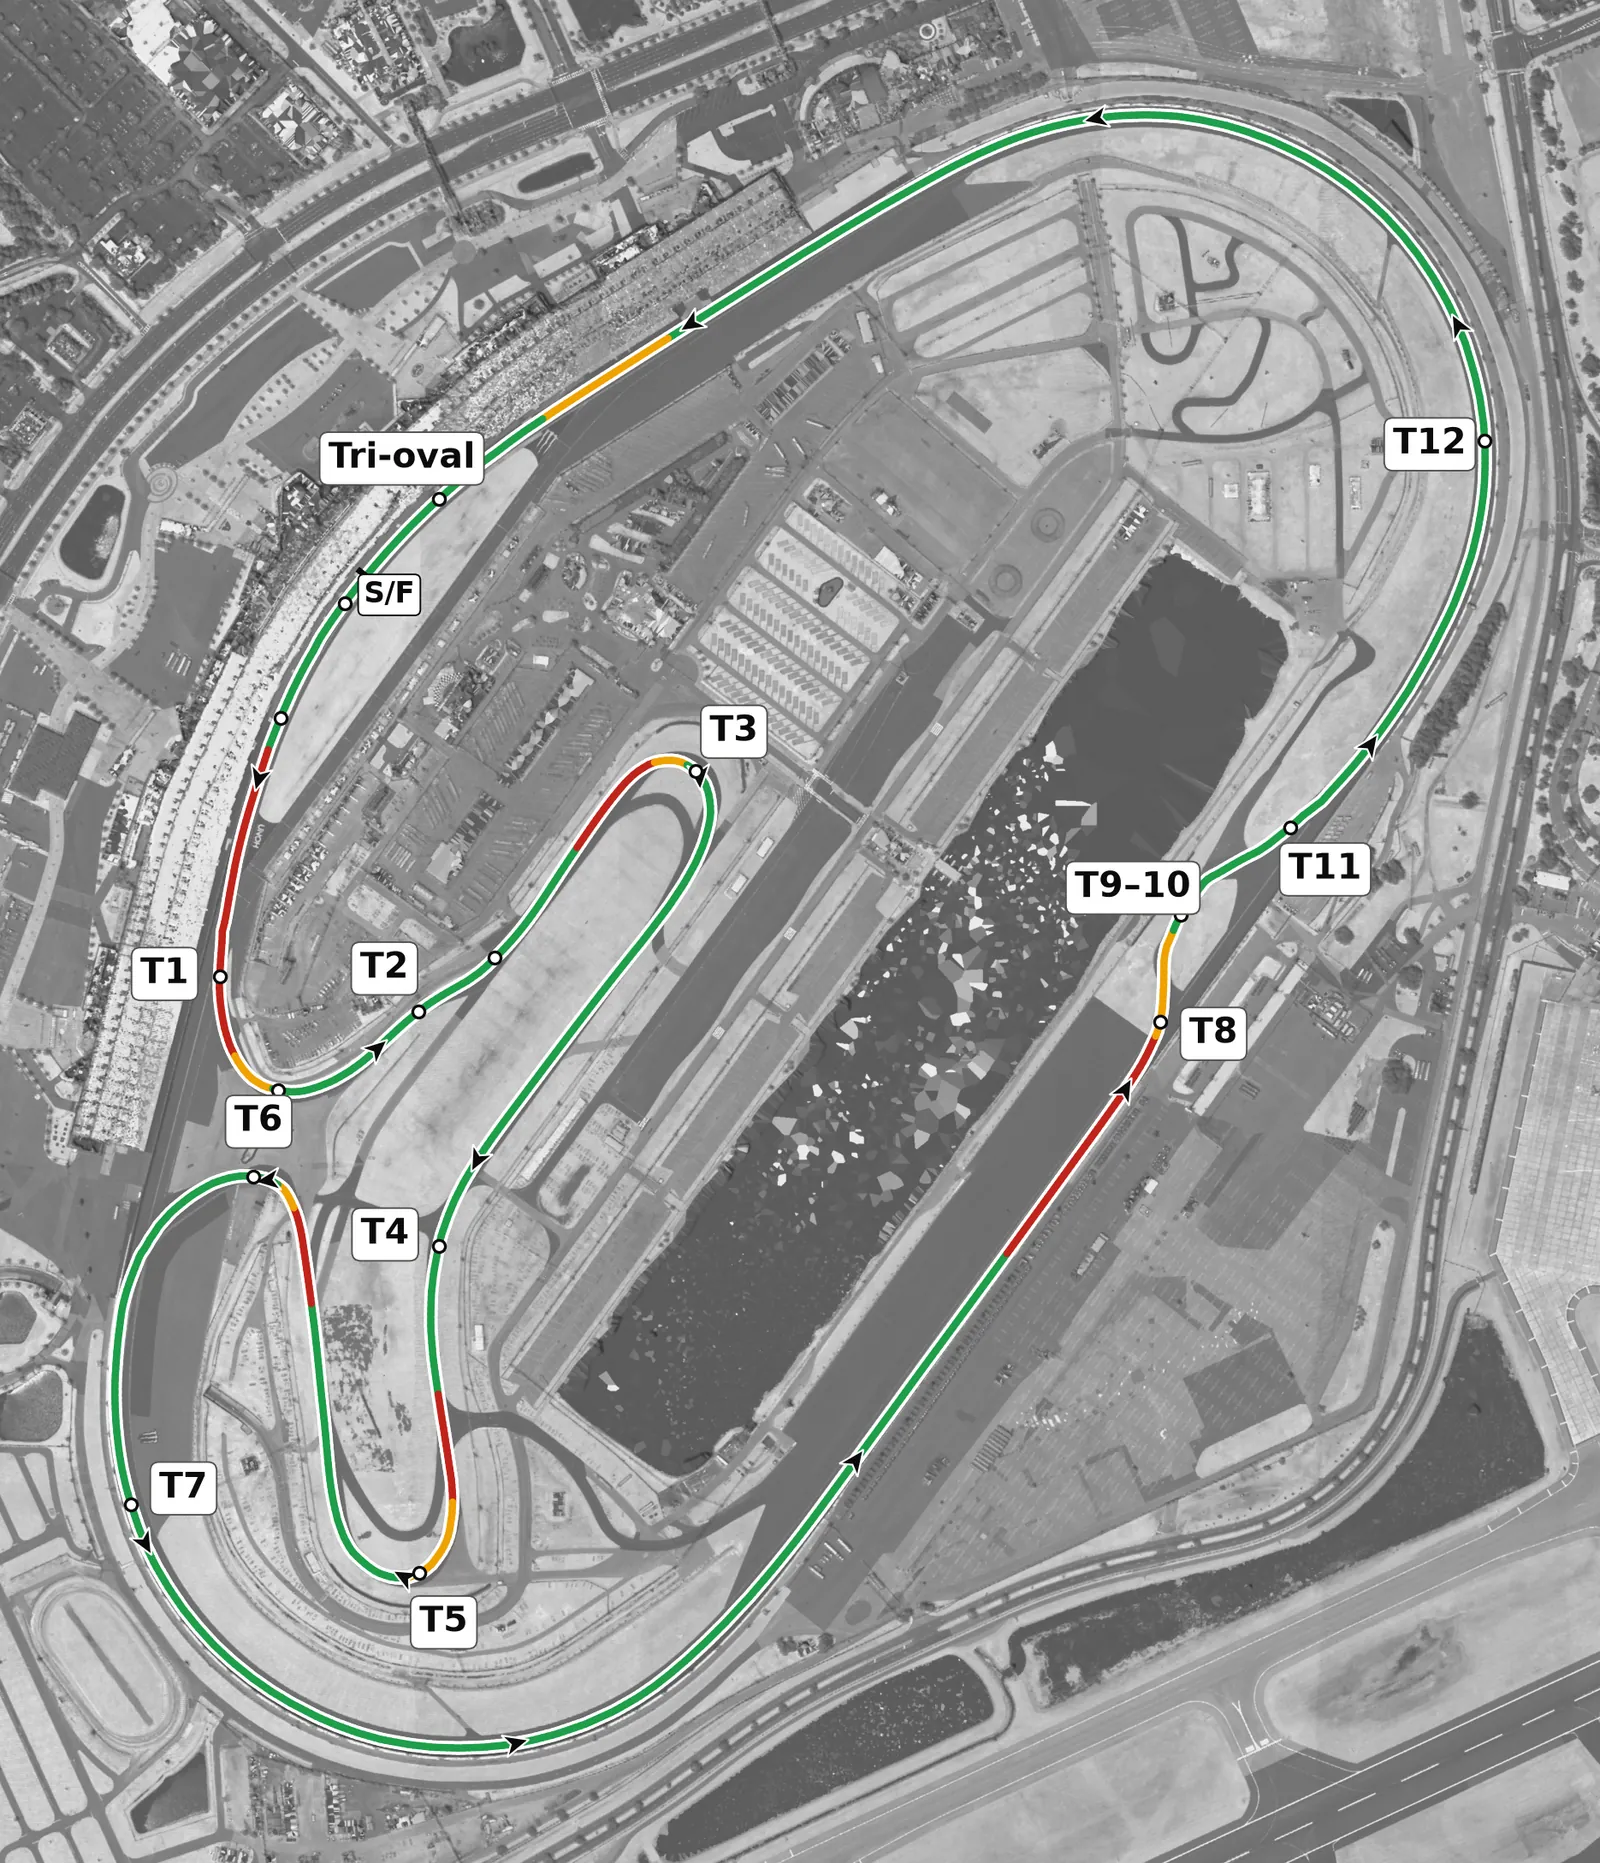
Daytona's road course is mostly the oval, run at very high speed on 31-degree banking, joined by a flat, tight infield and the Bus Stop chicane on the back straight. The lap is decided by a handful of big stops from high speed (T1, T3, T5 and the Bus Stop) and by the exits that feed the long flat-out runs, T6 onto the banking and the Bus Stop onto the final banked turn. Brakes and tires work hard, so brake in a straight line, give yourself margin at the end of each straight, and keep your steering smooth and your line predictable on the banking.
Sectors
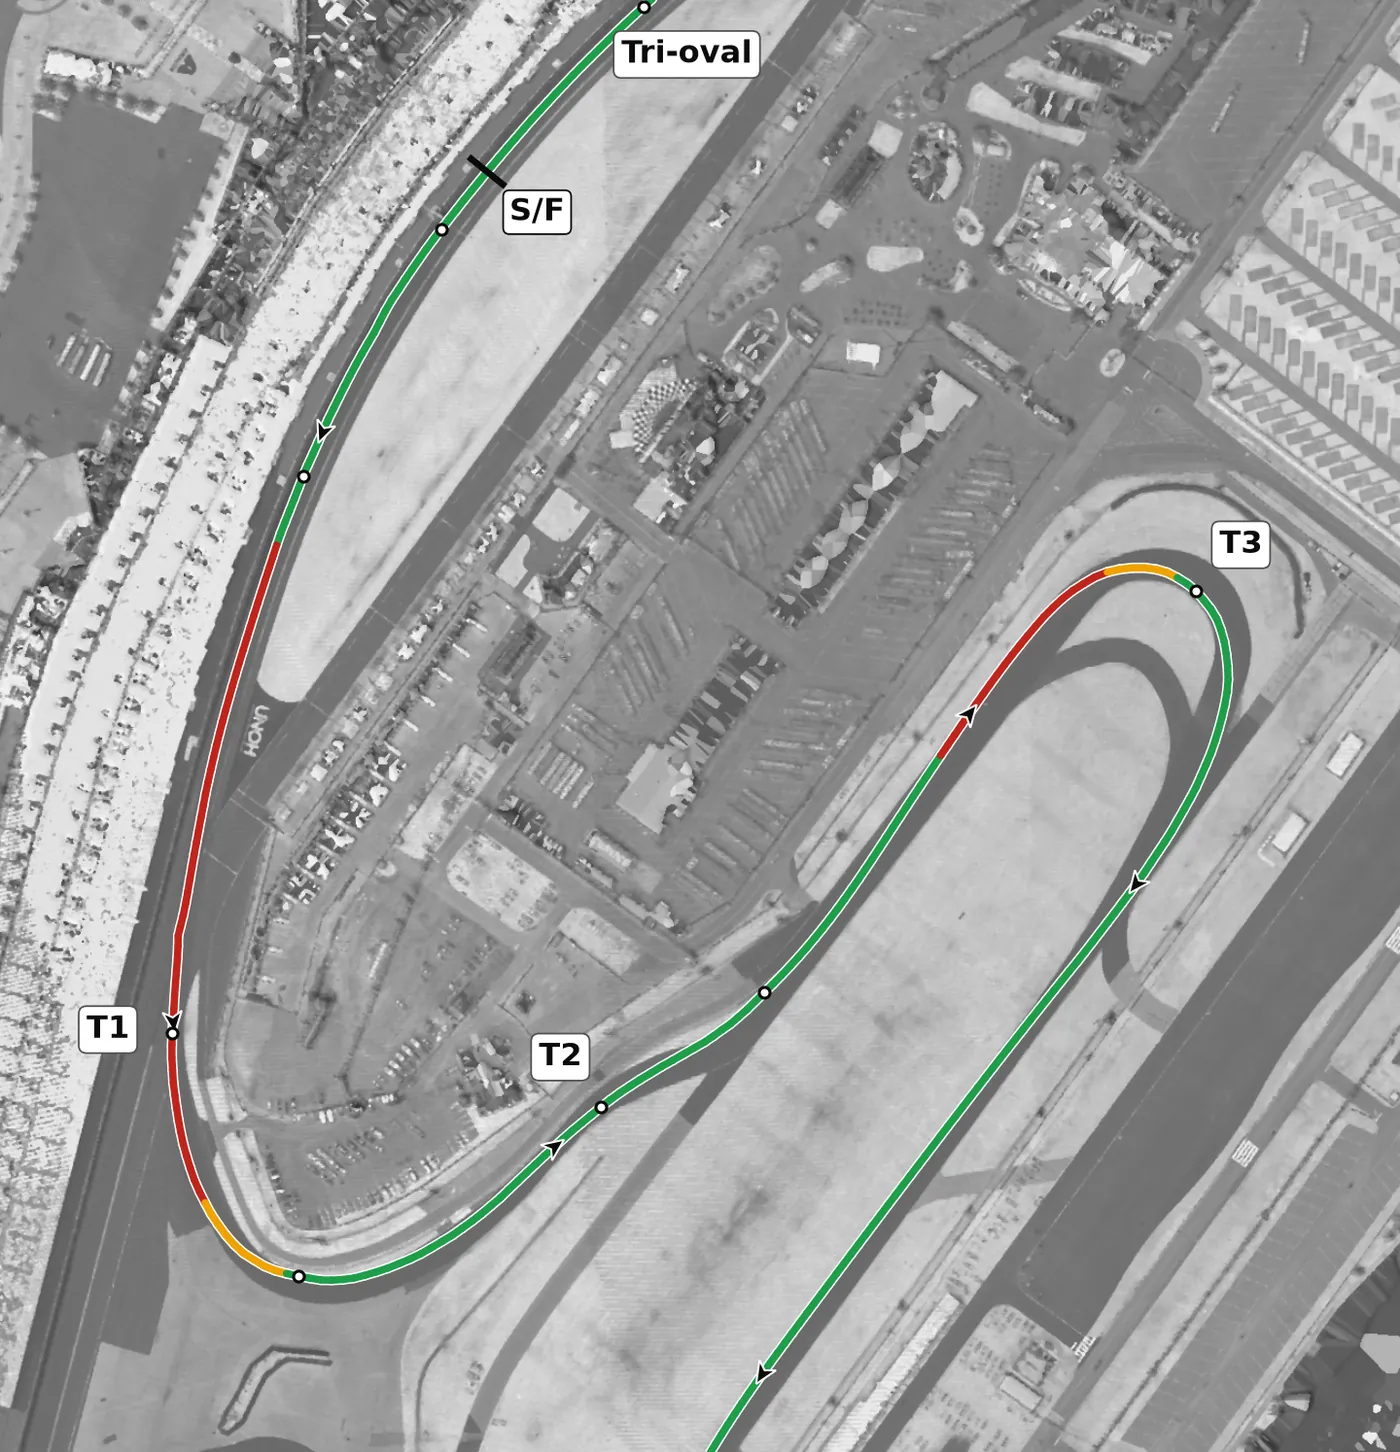
Come off the tri-oval and drift toward the outside wall so you can brake as straight as possible for T1, a long, tightening left where the banking gives way to a flat infield. T2 is a quick right-left that most cars take flat or with a small lift, and then you brake hard again for the International Horseshoe (T3), a 180-degree right that rewards a late apex.
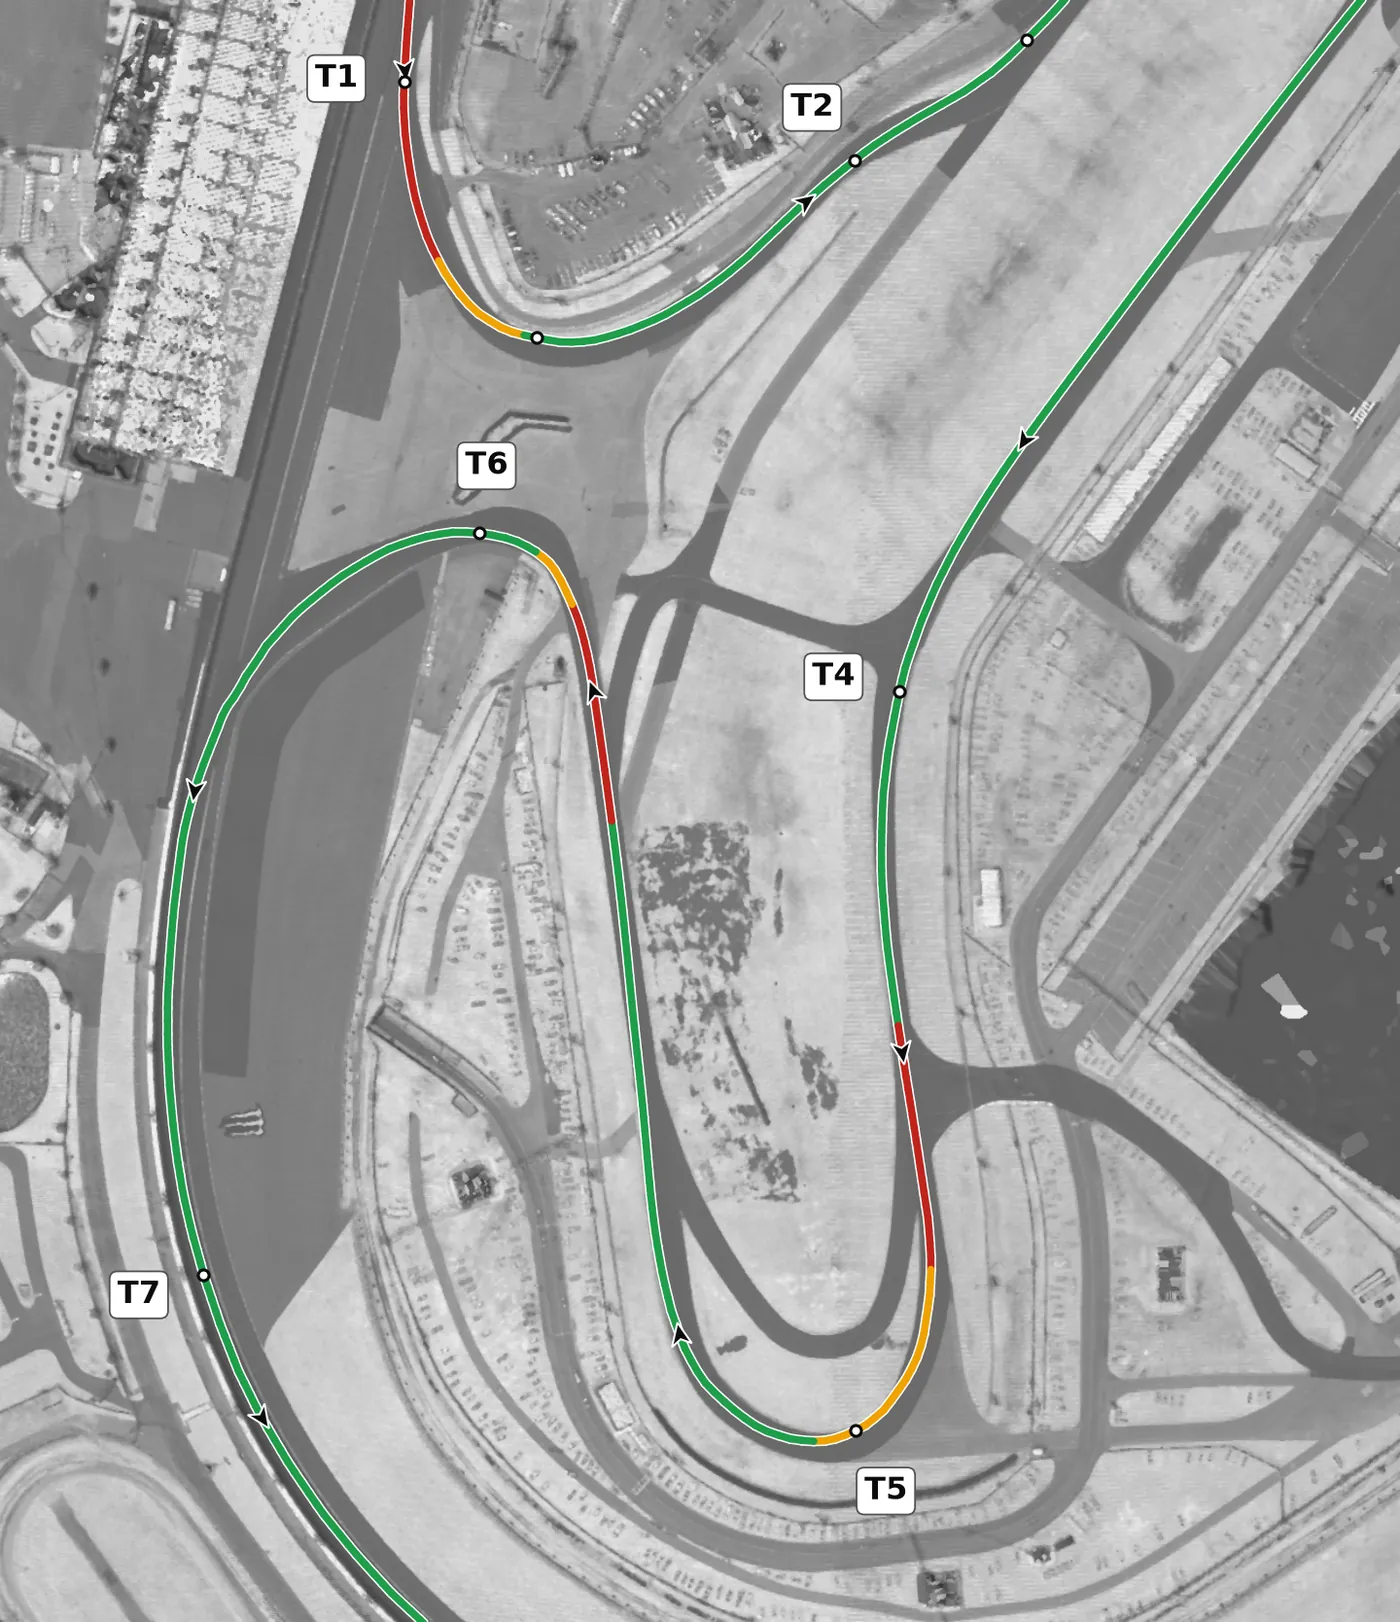
T4, the Kink, is a fast left that is nearly flat in most cars but bites if you are off line, and it leads straight into a heavy stop for the West Horseshoe (T5), another 180-degree right. T6 then takes you back onto the oval, and it is one of the most important corners on the lap: be patient for a very late apex and get to full throttle early.
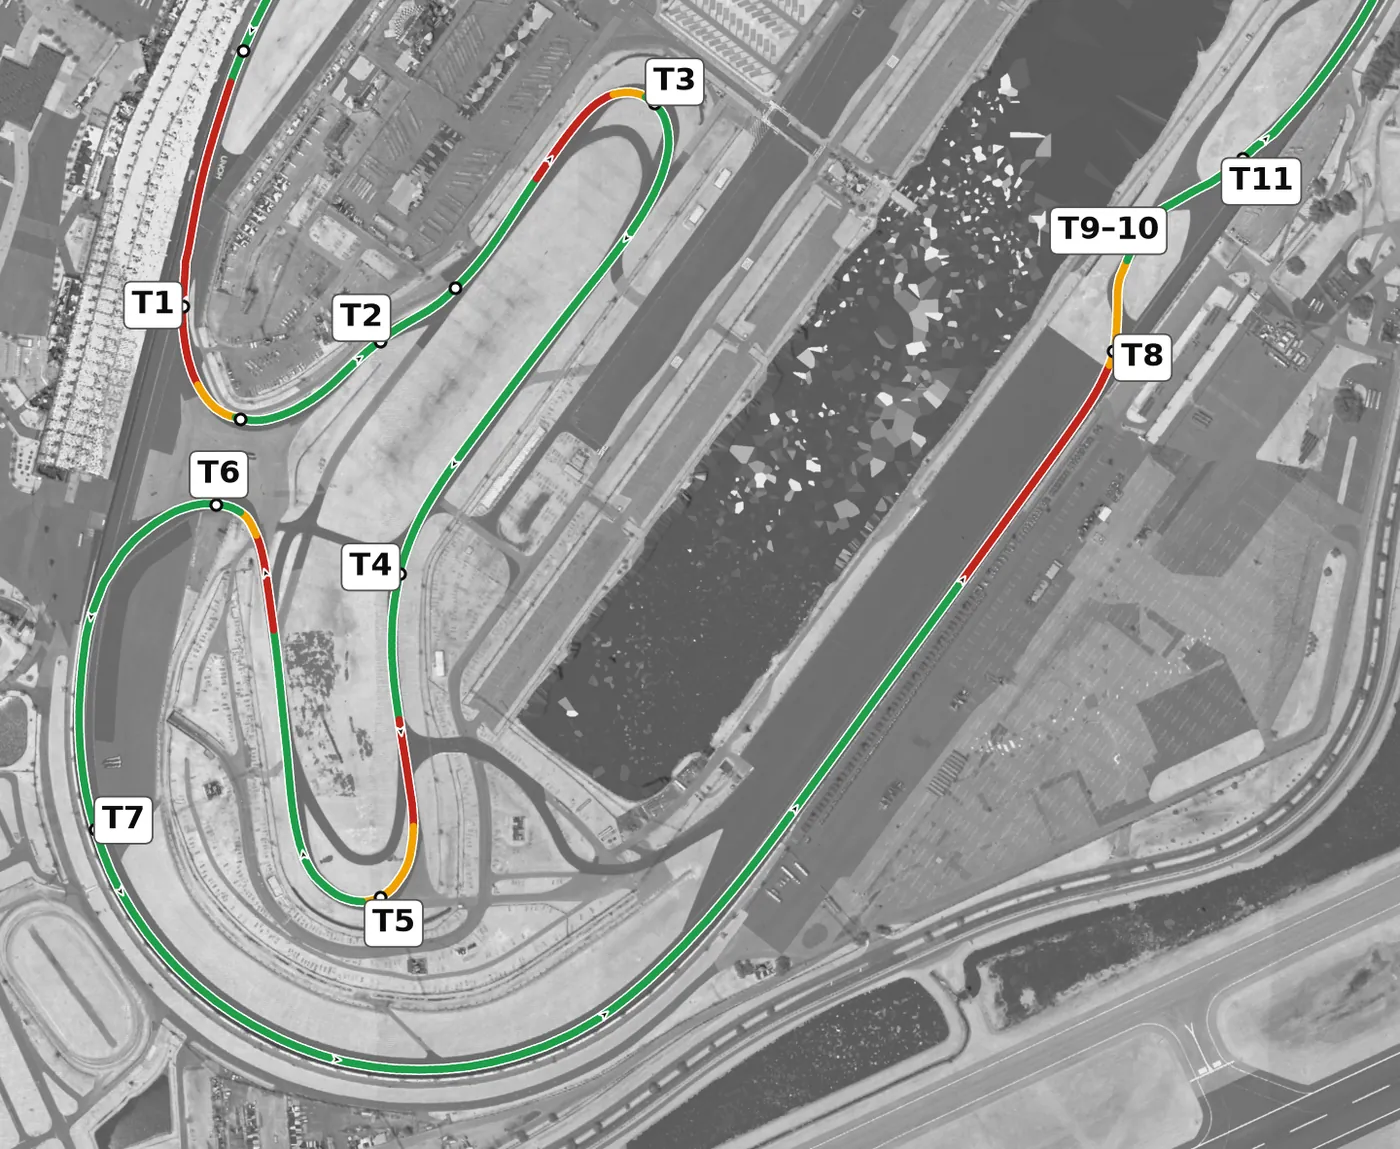
From T6 you run flat out round the 31-degree banking of the oval's Turns 1–2 (T7) and down the back straight, so keep the car settled and the steering small. Brake hard and in a straight line for the Bus Stop (T8–T11), a flat, narrow left-right-right-left chicane where using the curbs and a tidy exit matter far more than a late braking point.
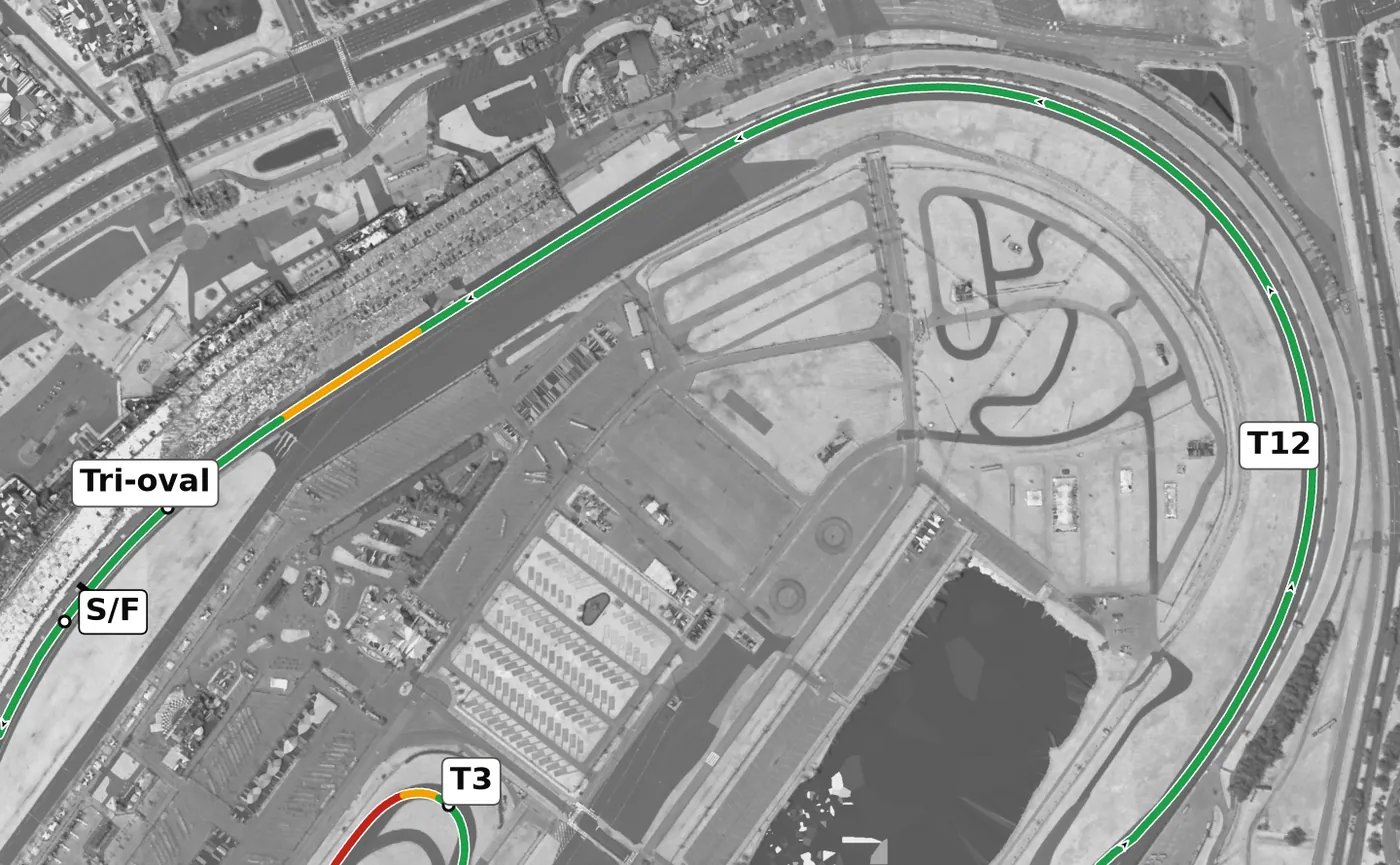
The Bus Stop exit leads onto the oval's Turns 3–4 (T12), the most steeply banked surface on the lap, flat out through the banking; at HPDE pace the line shows a brief lift as the banking ends and the tri-oval begins. Hold a smooth, steady line, keep checking your mirrors at these speeds, and start setting up for the big T1 braking zone as the tri-oval straightens.
Corners
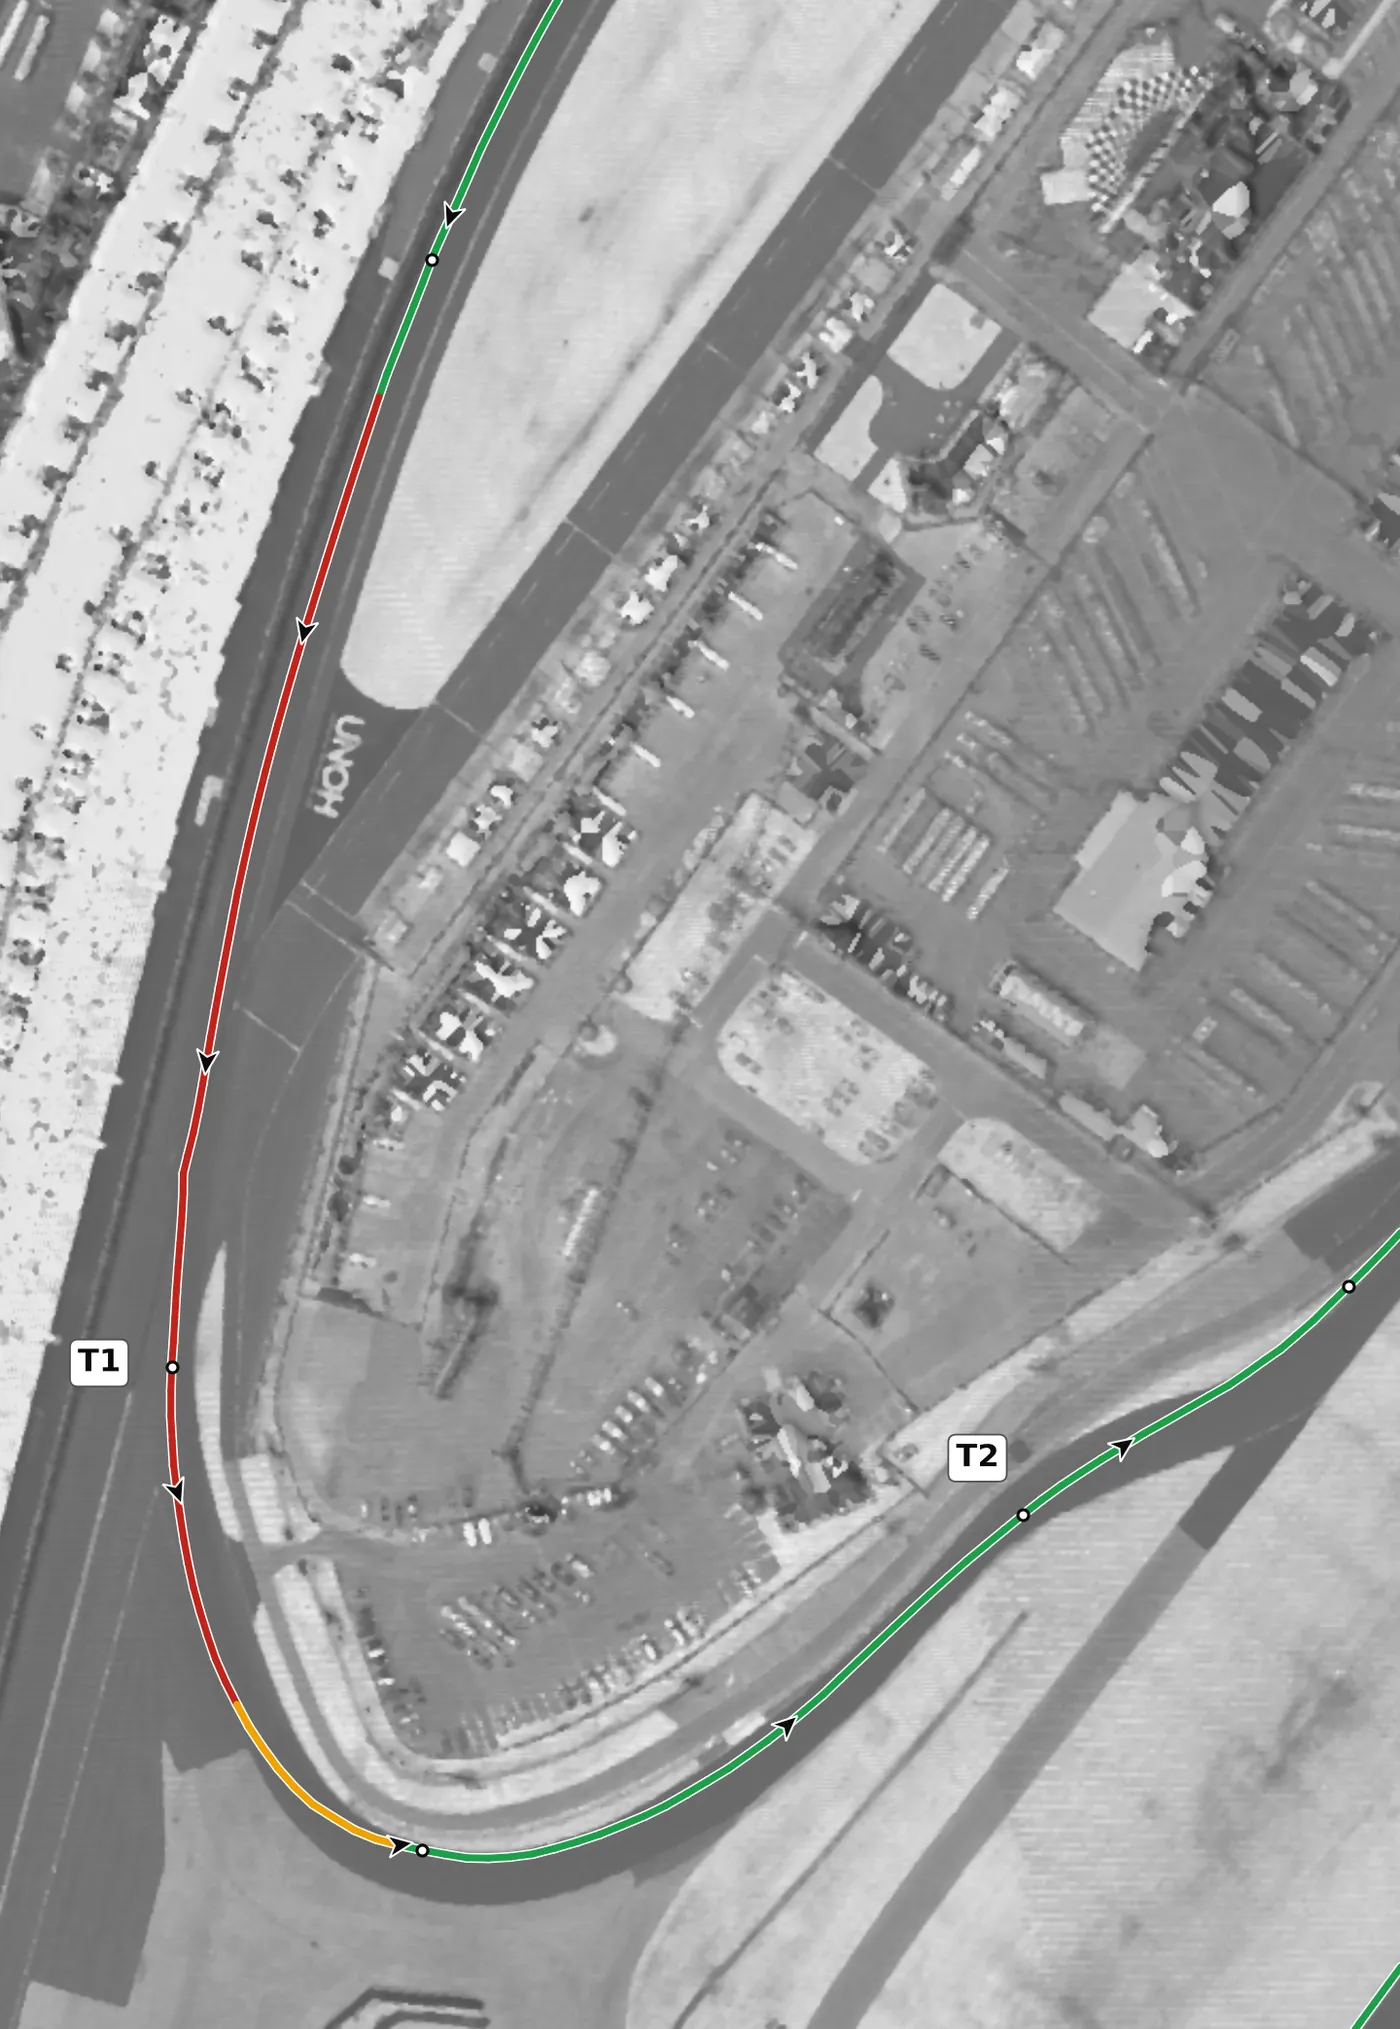
Come off the tri-oval and let the car drift toward the outside wall so you can brake as straight as possible; the braking zone is where the banking gives way to a flat infield, so the car has less help just when you need it. Brake hard, then ease off and trail into this long, tightening left, being patient for the apex. The mistake to avoid is braking while still turning on the banking, or turning in early and running out of road as the corner tightens.
From the survey: Off the 18° tri-oval onto a flat infield: camber falls from +1.6% to about zero through the turn.
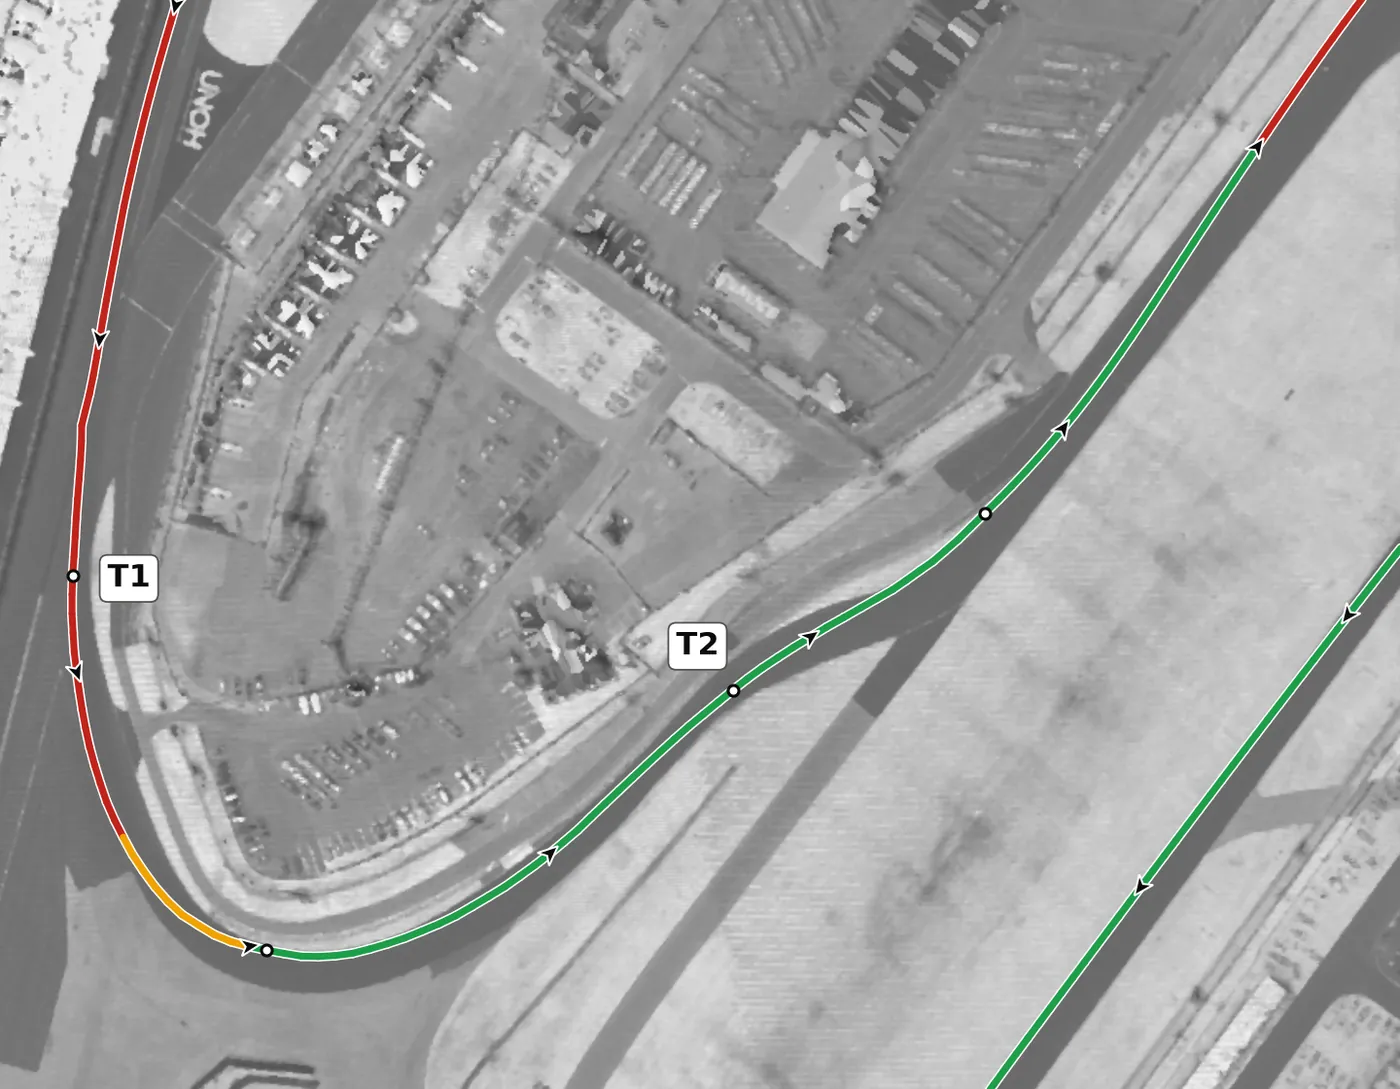
T2 is a quick right-left that most cars take flat or with a small lift, with the priority on keeping the car settled. Hold the middle of the road in a powerful car, or exit out to the right in a less powerful one, and set up for the long braking zone into T3. The mistake to avoid is a big lift or a jerky steering input here, which upsets the car for no gain.
From the survey: The only slightly negative reading in the infield (−0.9%), and just 11–12 m wide.
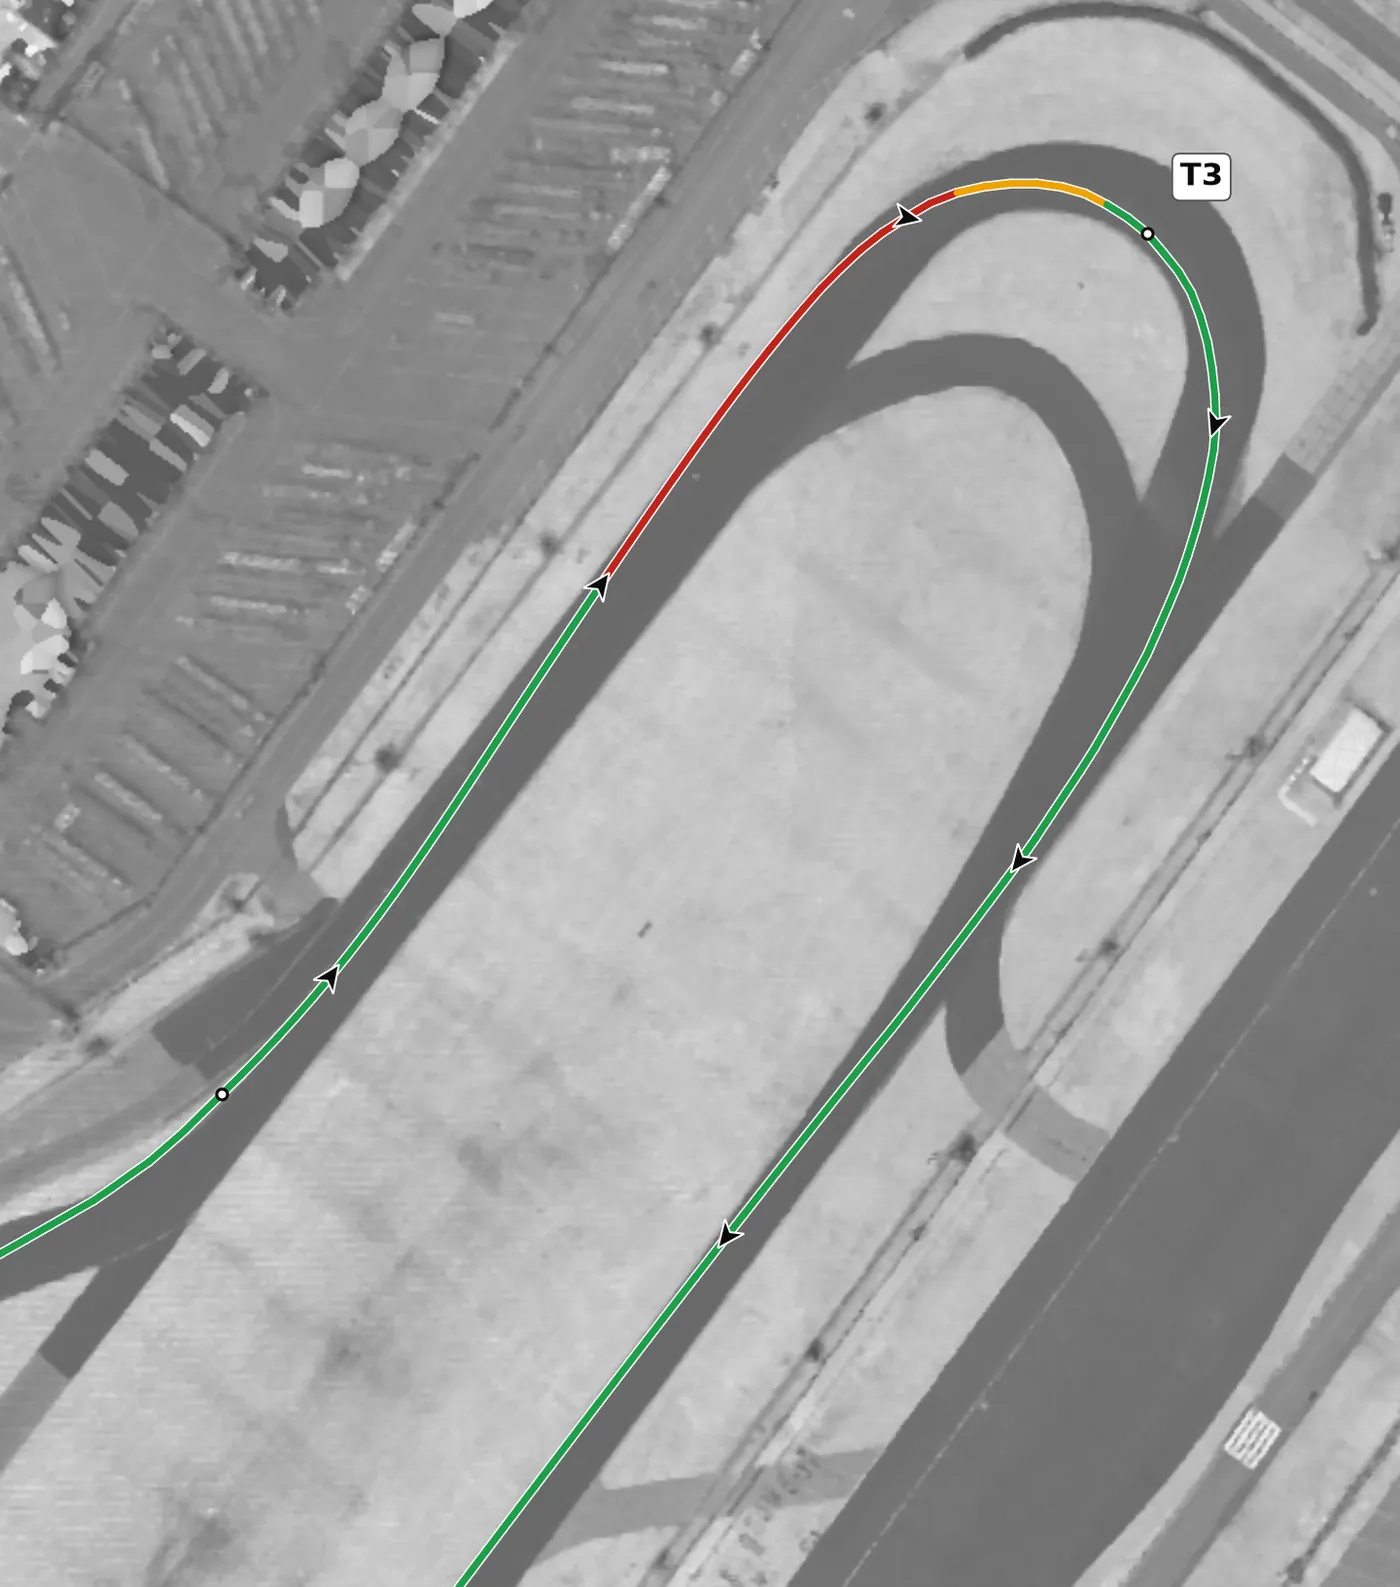
The International Horseshoe is a flat, 180-degree right that comes after a fast run, so brake hard in a straight line and trail the brakes deep toward a late apex. A late apex lets you straighten the car early and get back on the throttle for the run toward the Kink, letting the car run out to the left. The mistake to avoid is an early apex that forces you to wait for the throttle on the way out.
From the survey: +2.5% at the apex and dead flat in grade: the most on-camber corner in the infield.
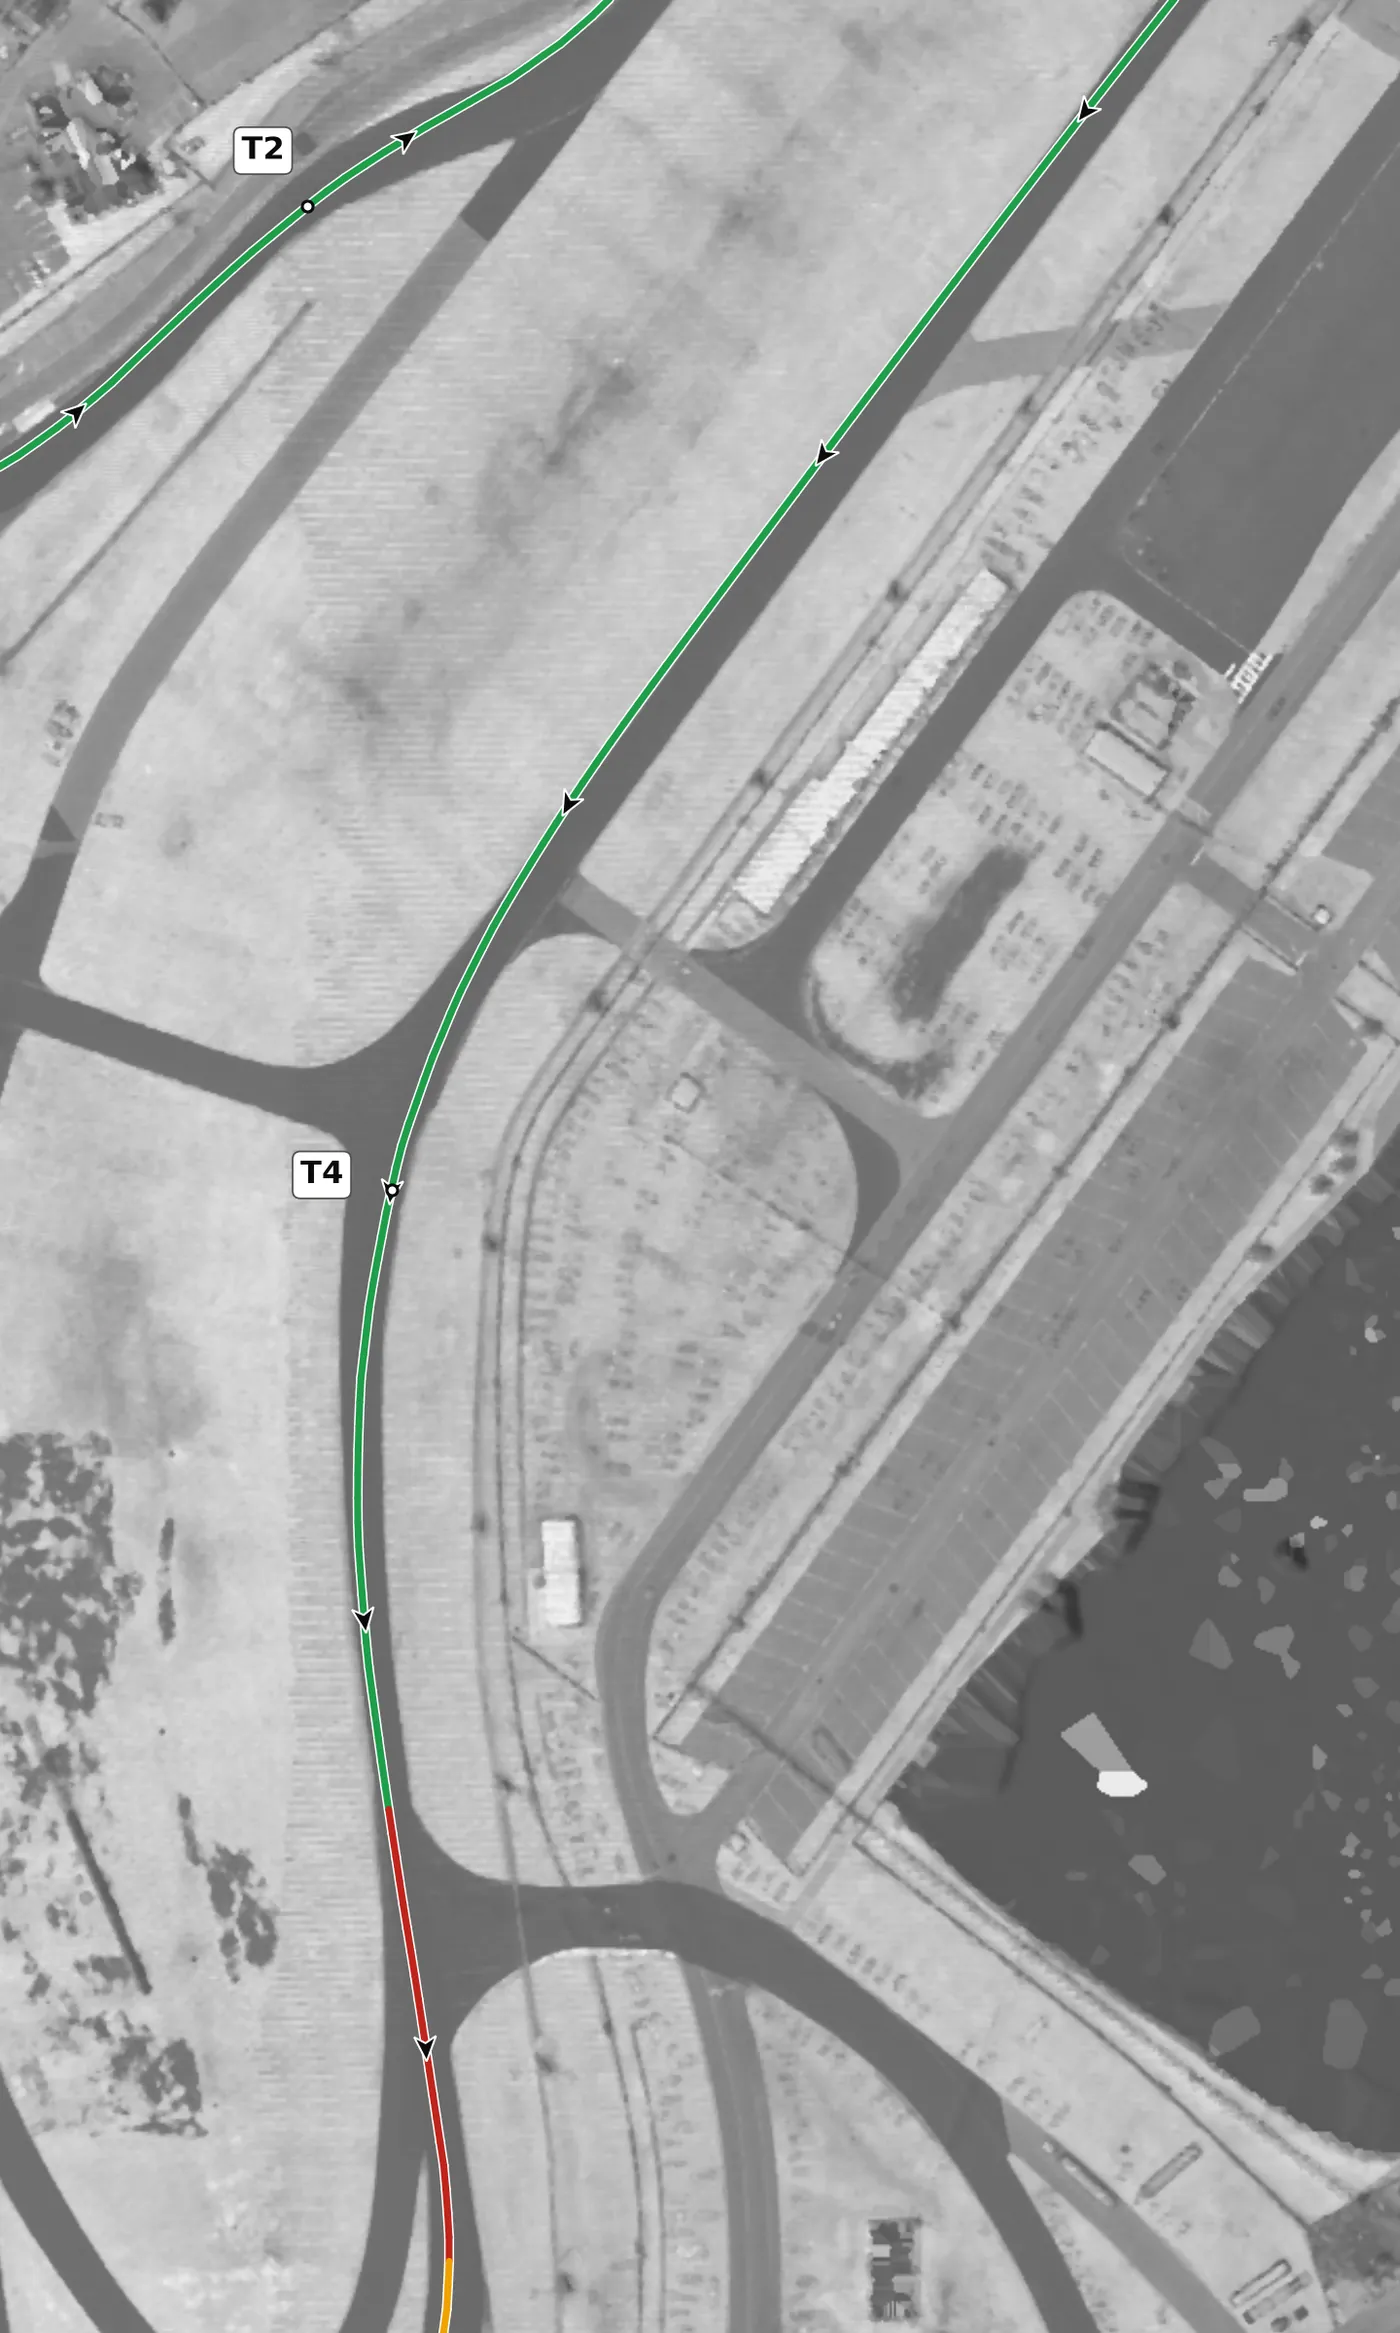
The Kink is a fast left that is close to flat in most cars, but it has a bigger bite than it looks if you are slightly off line or on tired tires. Take a smooth, shallow line, lifting briefly if your car needs it, and keep the car straight afterwards so you can brake hard for the West Horseshoe. The mistake to avoid is approaching too confidently and still turning when you need to brake.
From the survey: +2.5% on camber and 13 m wide.
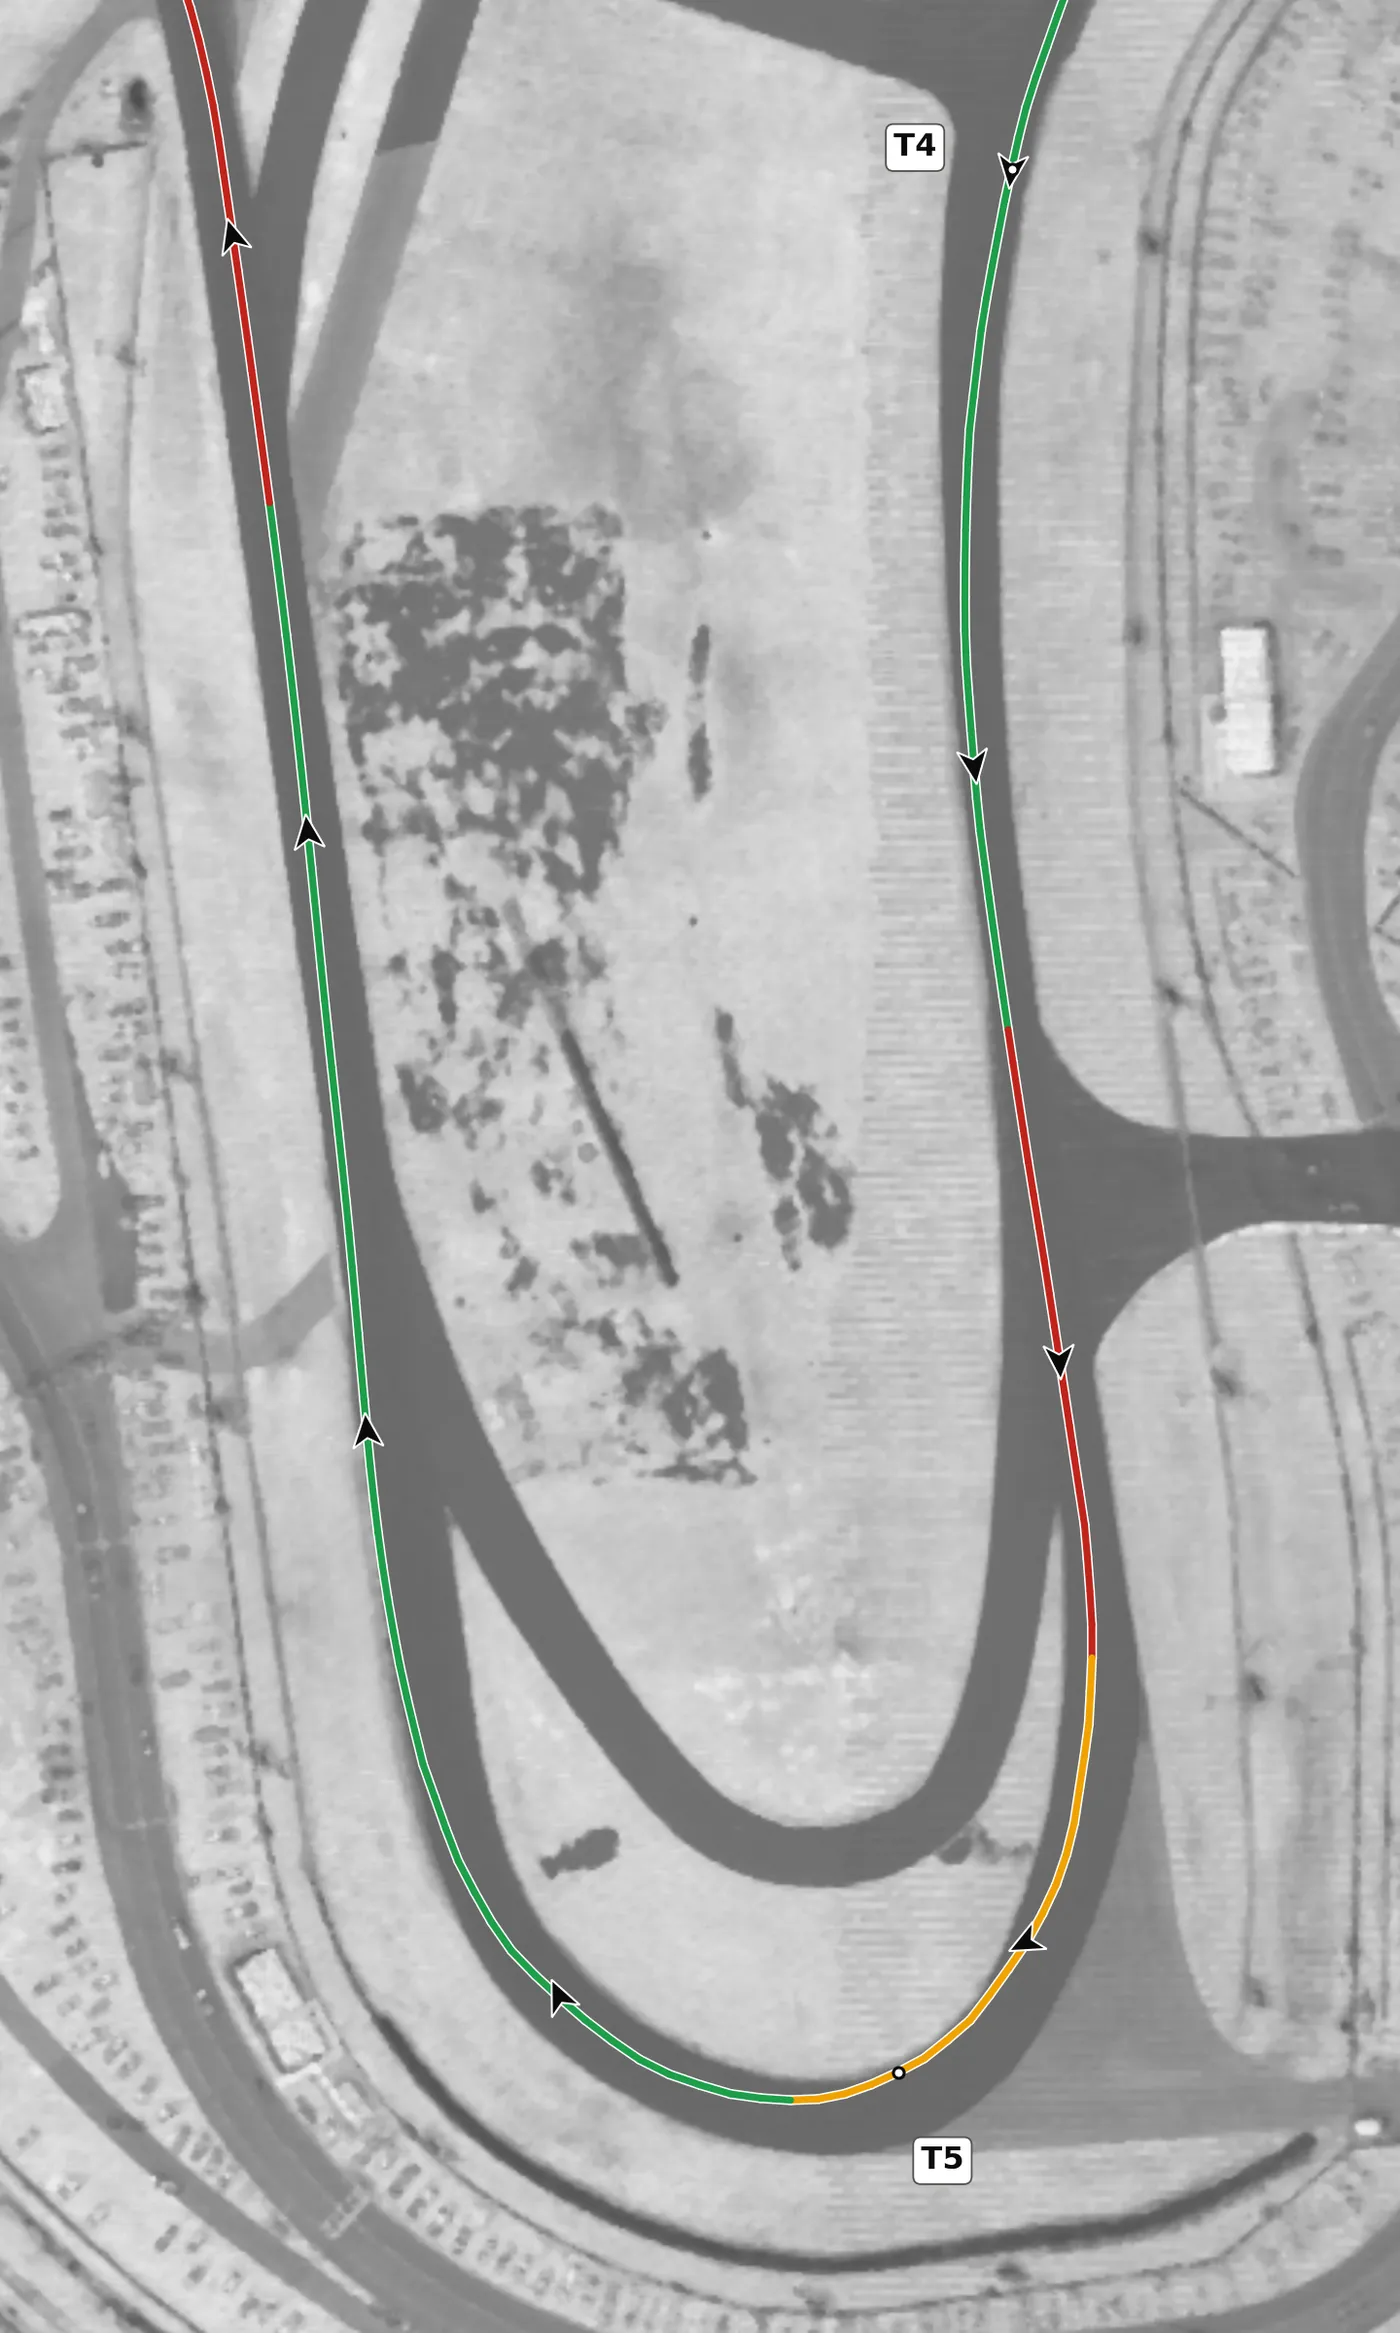
The West Horseshoe is a 180-degree right that looks as if you can brake later than you can. Brake hard with your hands straight, then trail off, and do not follow the edge of the road round, because that leads you to an early apex; be patient and apex late. The mistake to avoid is a fast entry that leaves you slow on the way out: slow in, fast out.
From the survey: +1.5% on camber; the lowest ground on the lap (7.75 m) is just after it.
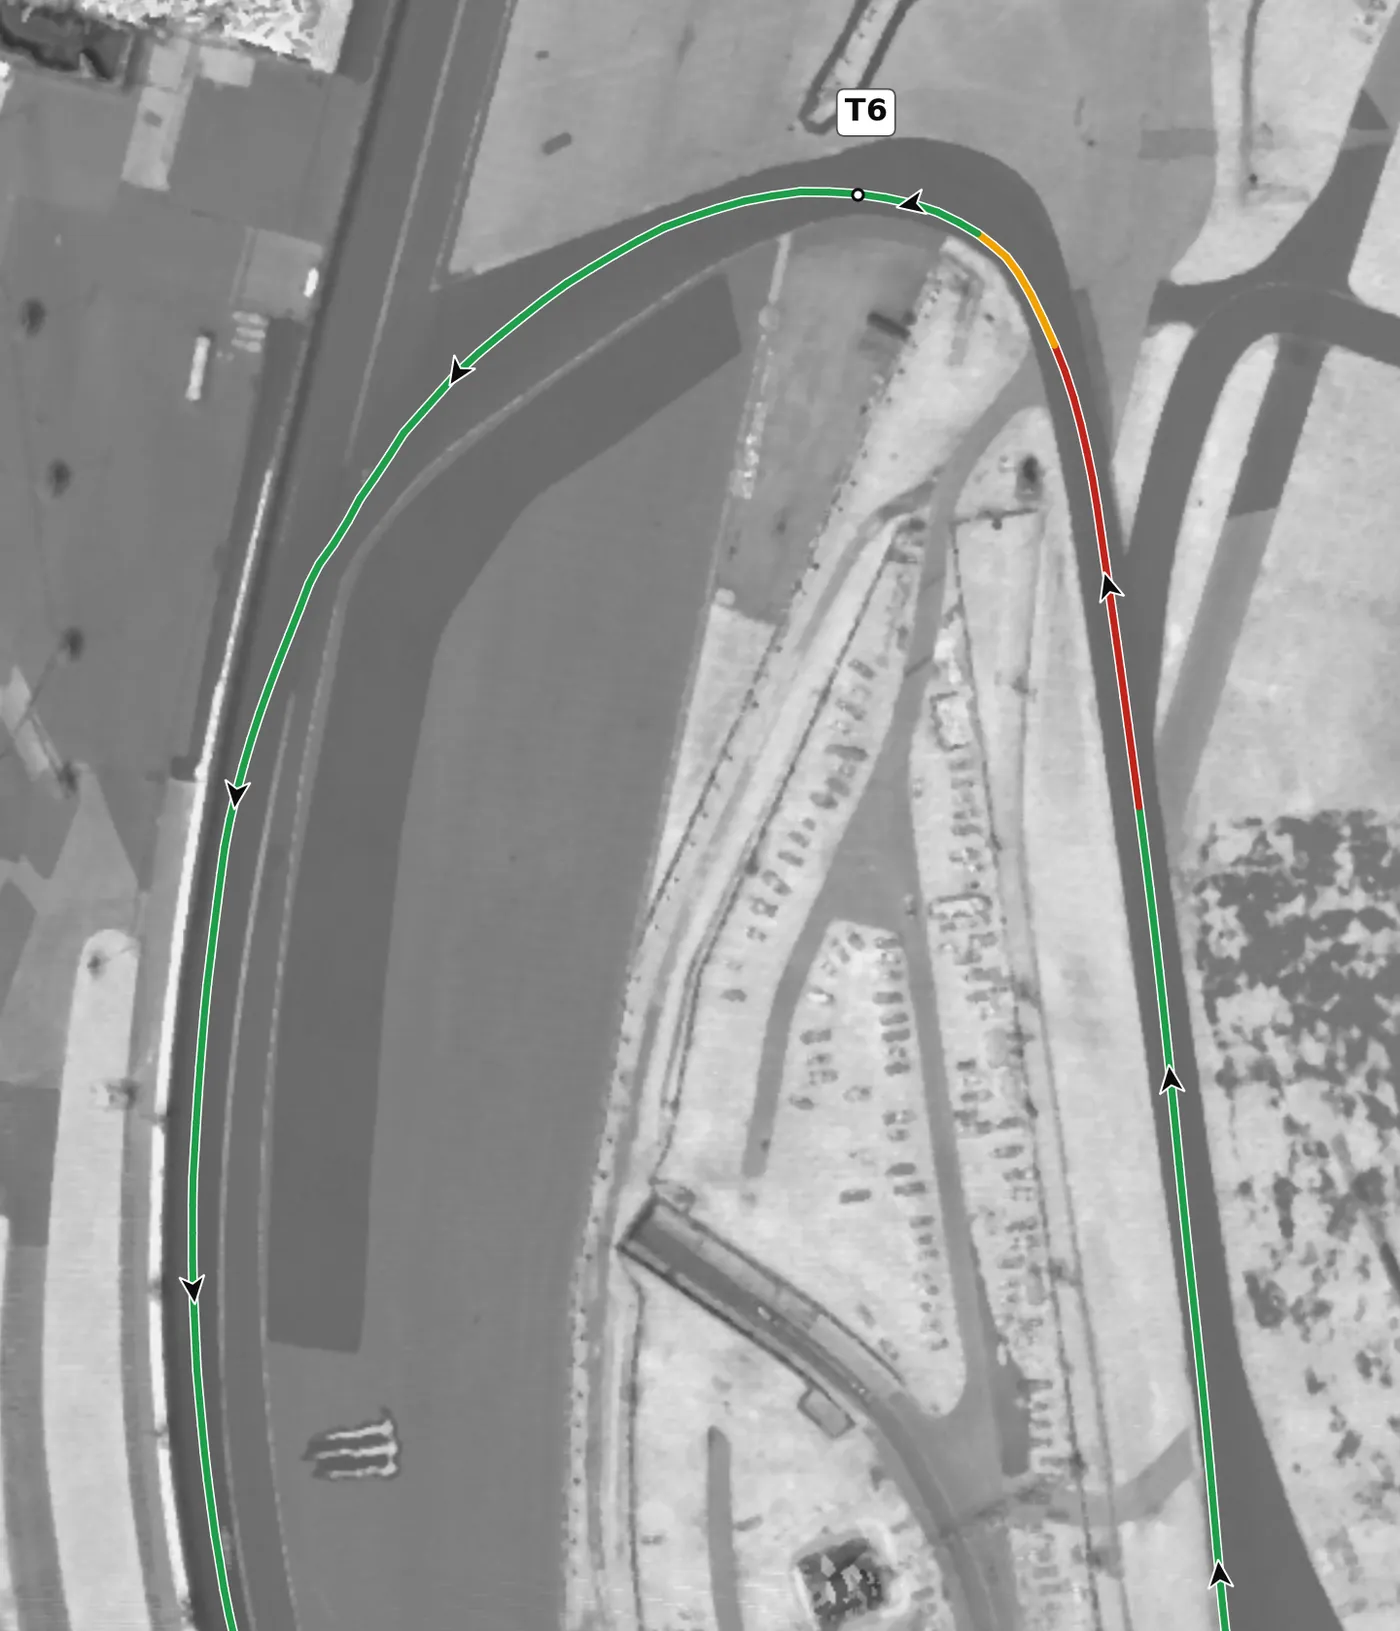
T6 is one of the most important corners on the lap because it leads onto the banking and the long run to the Bus Stop. It opens up wide, so it is easy to roll too much speed into the middle; be patient for a very late apex, about seven-eighths of the way round the inside curbing, and get back to full throttle as early as you can. The mistake to avoid is apexing early and running out of room on the exit as the road rises onto the banking.
From the survey: 34 m of pavement at the apex; the exit starts to climb onto the banking.
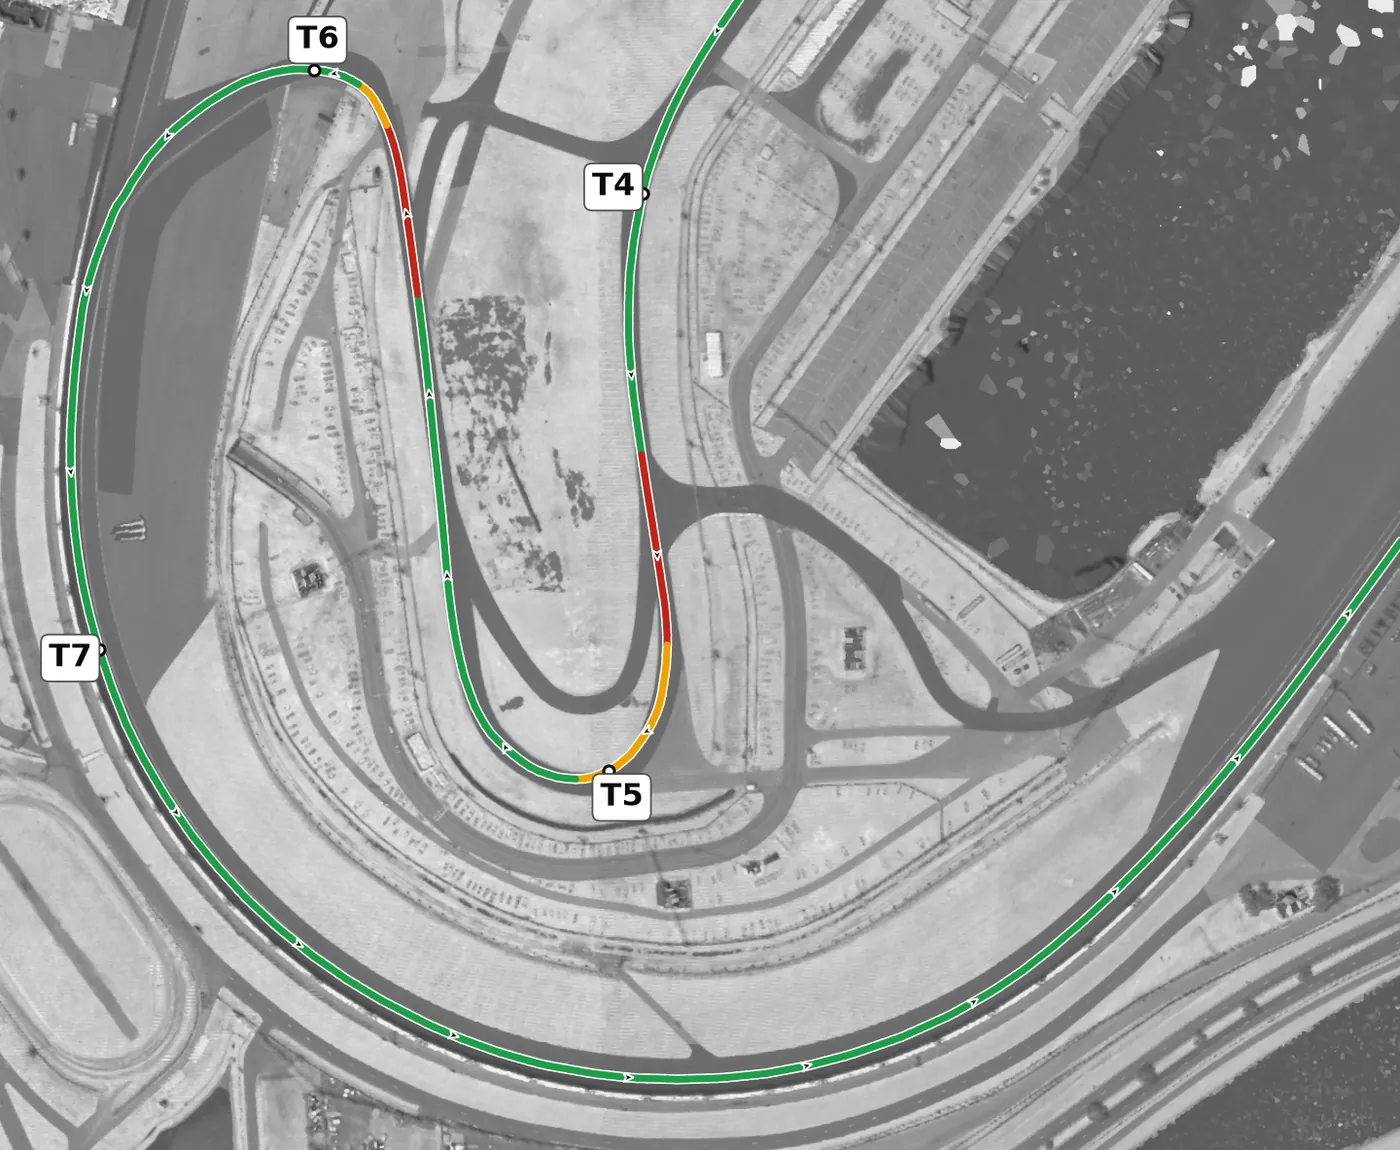
This is the oval's Turns 1–2: 31 degrees of banking that most road cars take flat out. Hold one smooth, steady line, keep your steering inputs small and let the banking carry the car, and keep checking your mirrors because closing speeds here are high. The mistake to avoid is an abrupt lift or steering correction on the banking, which can unsettle the car at very high speed.
From the survey: 31° of banking (+59.5%) for about 870 m.
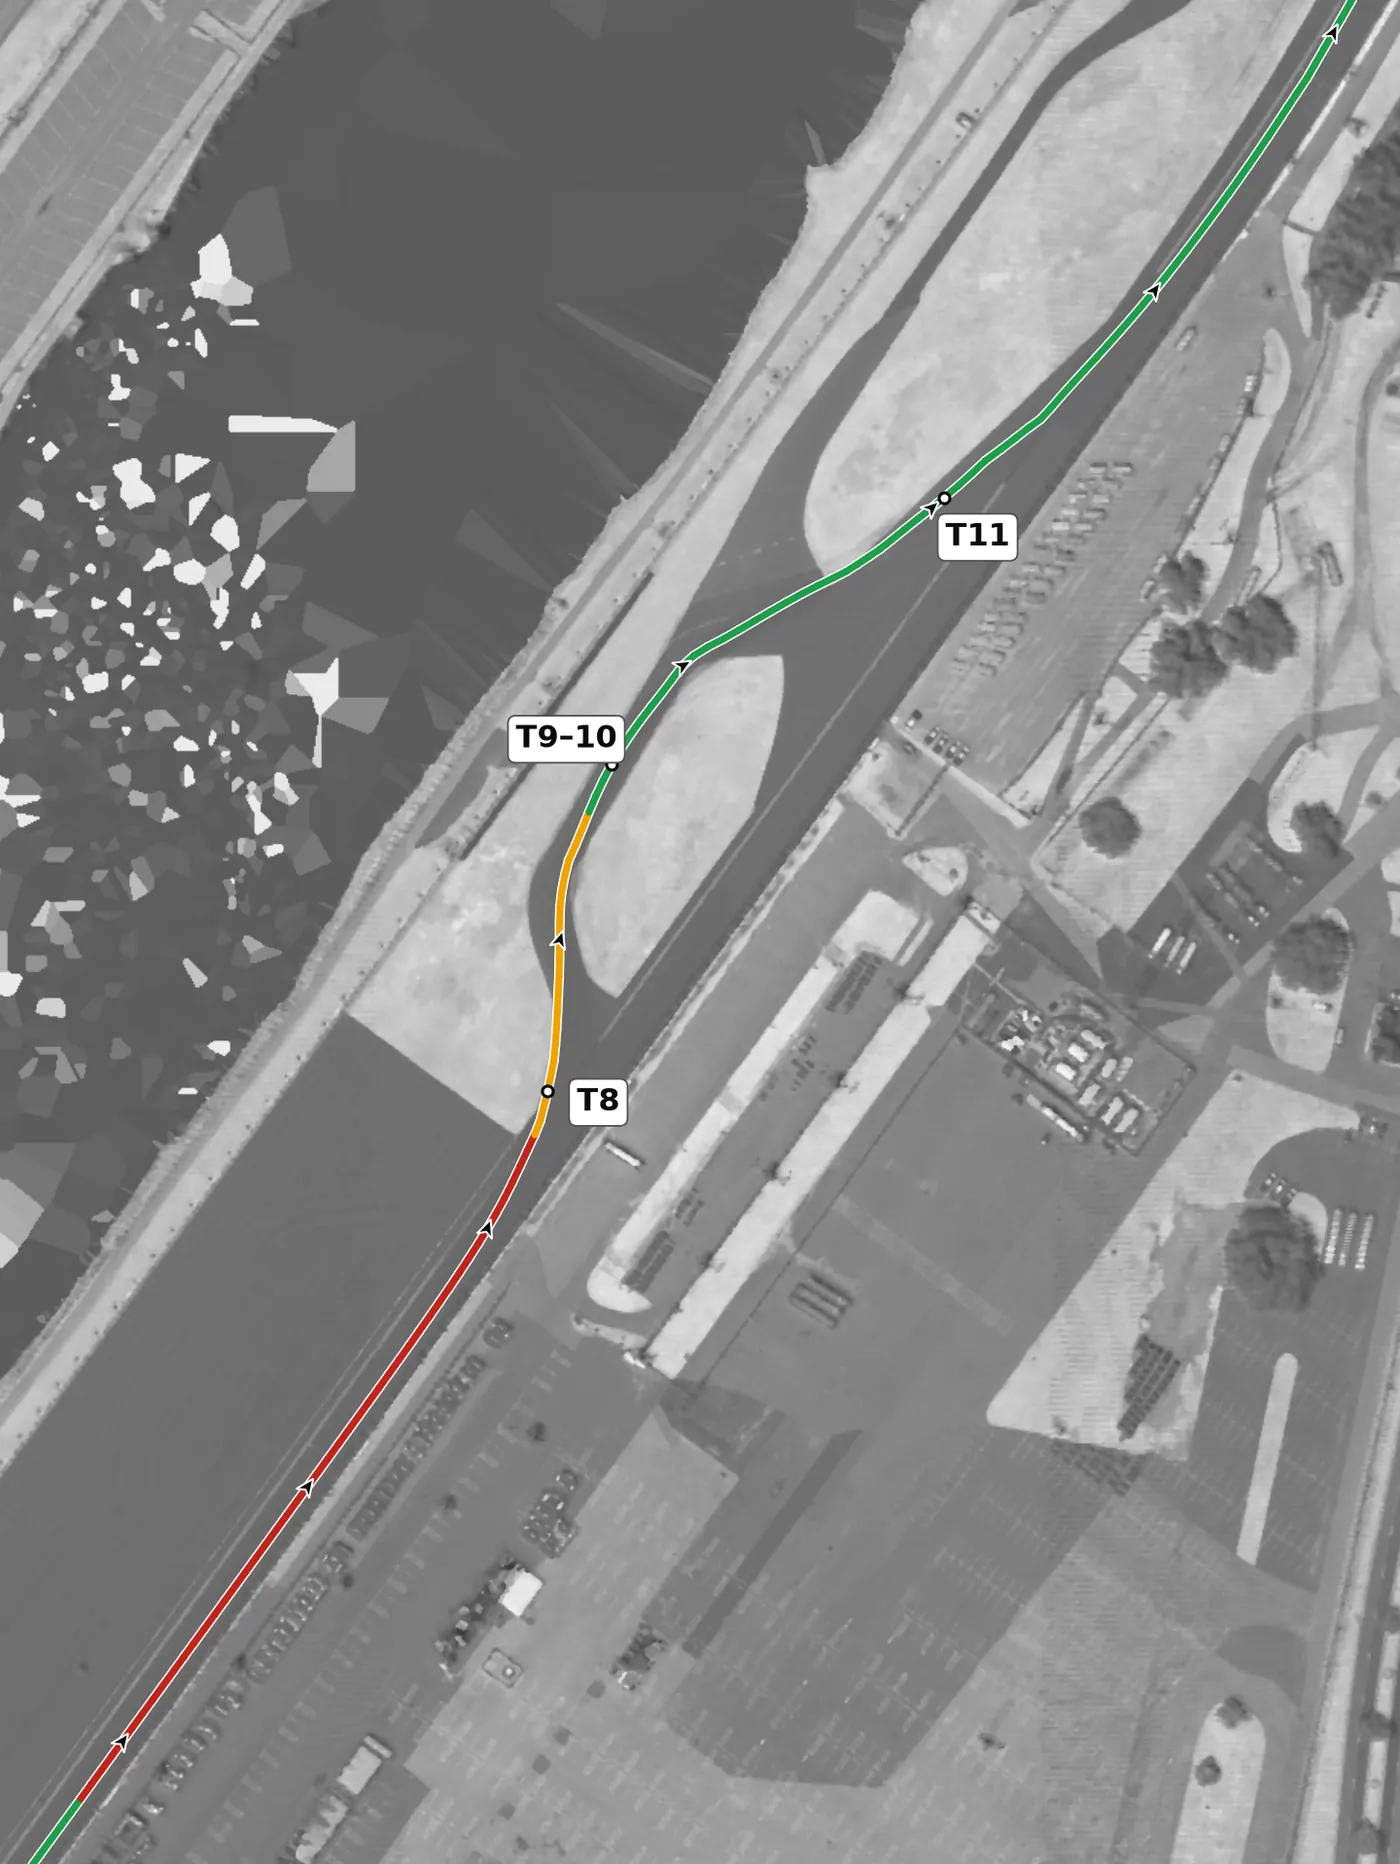
Brake hard and in a straight line at the end of the back straight, a little earlier than you think at first, because you arrive at the highest speed of the lap and the chicane is flat, narrow and gives you nothing. Use the curbs to straighten the left-right-right-left as much as you can, and set the car up so it is settled and ready for full throttle on the exit onto the banking. The mistake to avoid is braking too late, which ruins the whole chicane and the run that follows.
From the survey: The flattest stretch on the lap: its right-hand part is slightly off camber (−1.25%) and the narrowest pavement on the lap (11 m).
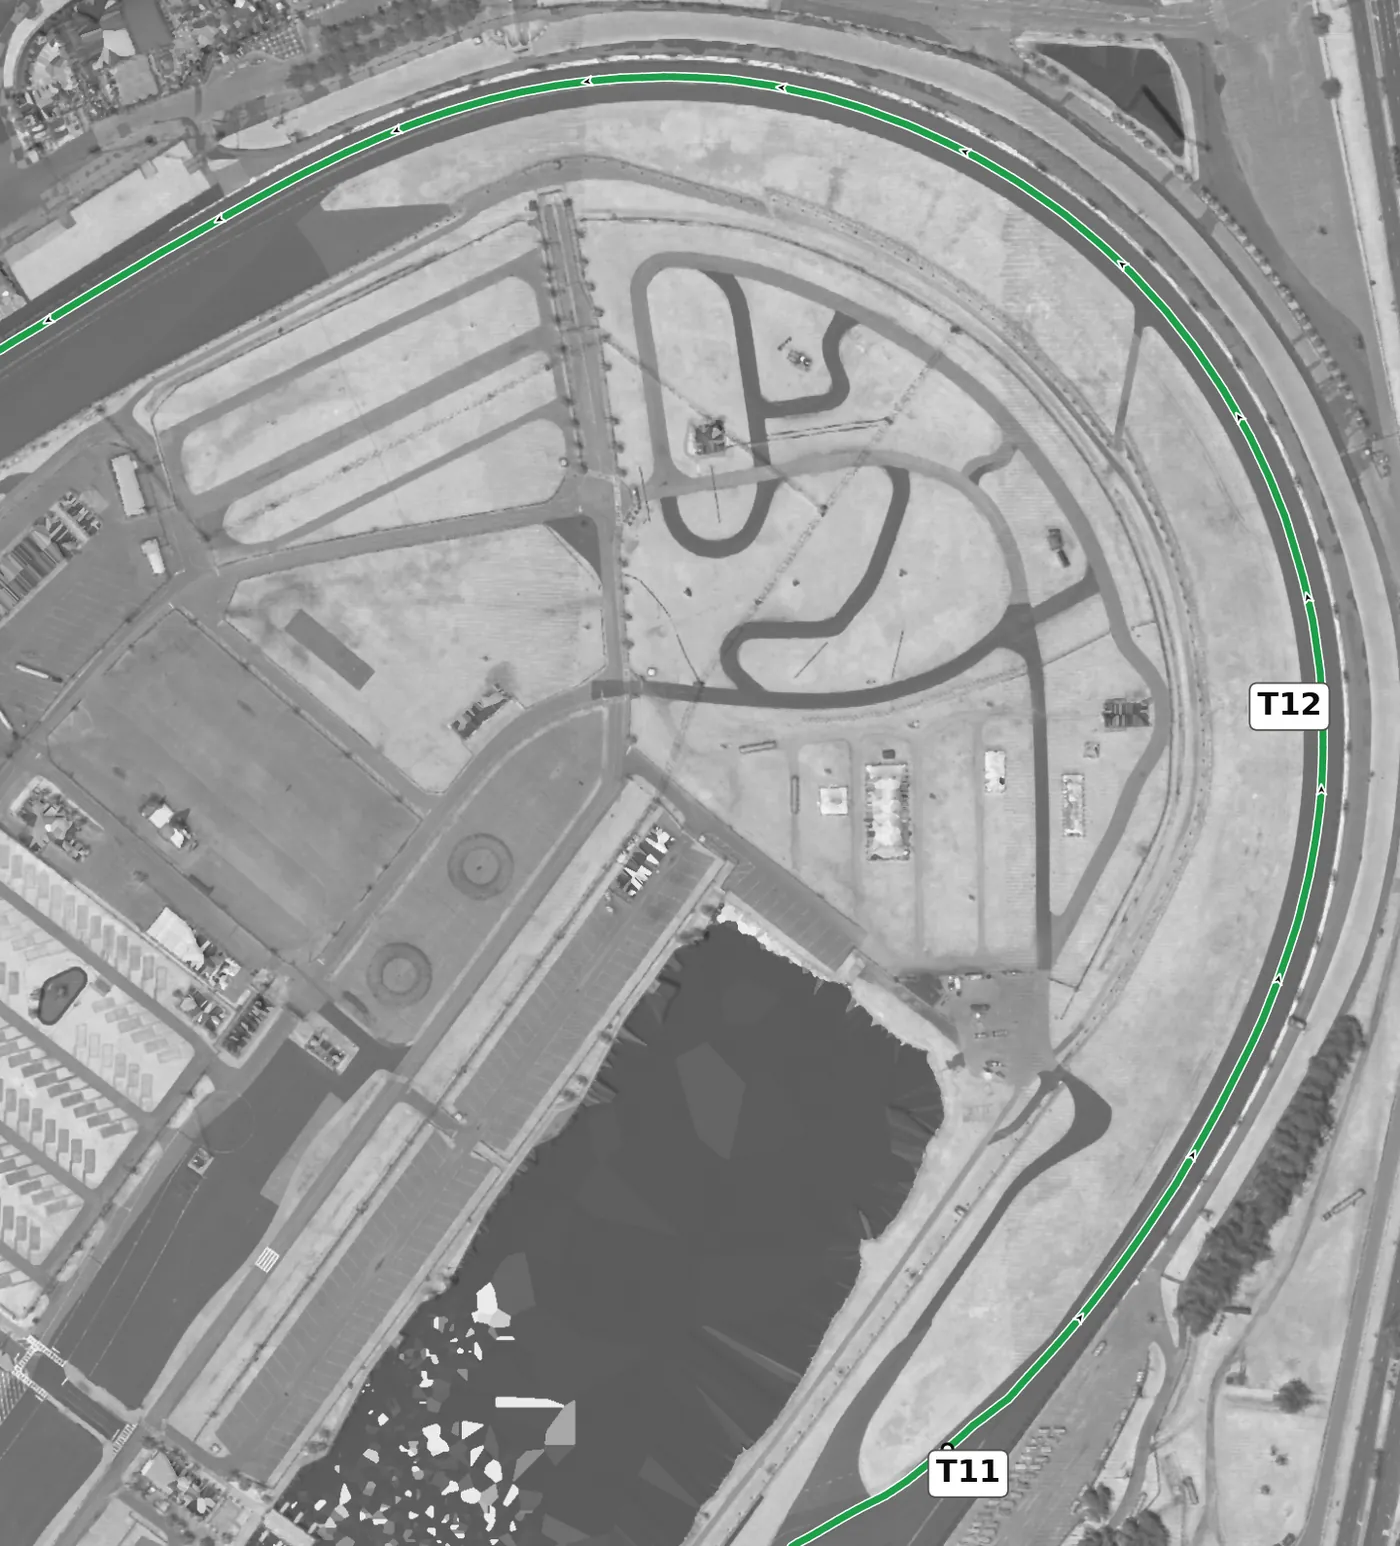
The oval's Turns 3–4 are the most steeply banked surface on the lap, and most road cars take them flat out after the Bus Stop. Hold a smooth, consistent line, let the car settle on the banking and keep the steering still, then use the tri-oval to drift toward the outside wall before braking for T1. The mistake to avoid is a messy Bus Stop exit that has you correcting the car as it loads up on the banking.
From the survey: 31° of banking (+60.25%), the steepest reading on the lap.
Version history
- v1.2 · 2026-10-01 — The Kink (T4) and the oval's Turns 1–2 (T7) are now drawn as throttle where the car is still gaining speed, instead of as a lift.
- v1.1 · 2026-10-01 — Speeds and braking points rebuilt at a typical quick HPDE pace, checked against published brake markers. Braking for T1 now starts about 155 m later, near the boards rather than back on the tri-oval; T3 about 15 m later, T5 and T6 within 10 m, and the Bus Stop about 10 m earlier. The line now goes straight from throttle to brake, with no coasting in between. Version history and feedback contributors added.
- v1.0 · 2026-10-01 — First version.
Feedback contributors
Drivers and instructors whose feedback has improved this line. Thank you.
- Mike M — no coasting between throttle and brake; braking points (v1.1)
- Brian L — corners where the car gains speed are throttle, not a lift (v1.2)