IMS road course — Race Line
Estimated from data not in trackdays.ai. If you have data you would like to contribute, please send it to upload@trackdays.ai to help improve our estimates. Turn numbers are provisional: our own, in lap order from the yard of bricks, as we have no club map to match. They agree in count and handedness with the 15-turn SCCA Runoffs layout this line follows (ten rights, five lefts), and T15 is one turn in two parts.
Heads up: This is an estimate of a typical quick HPDE line, not any one car's lap. Braking points are a starting point, not a target: start a little earlier and work later in small steps. The line goes straight from throttle to brake; amber only marks where you really lift or hold part throttle. This is the 2.59-mile Runoffs layout with the T5–T7 loop, not the 2.44-mile IndyCar and NASCAR circuit, so guides written for that layout number the corners differently after T4. Turn numbers are provisional.
- Throttle
- Coast / partial
- Braking
- Apex
- T4Off-camber corner
Arrows show the direction of the lap. The grey basemap is USGS LiDAR: dark = asphalt, light = grass. Tap any map for the full-size image.
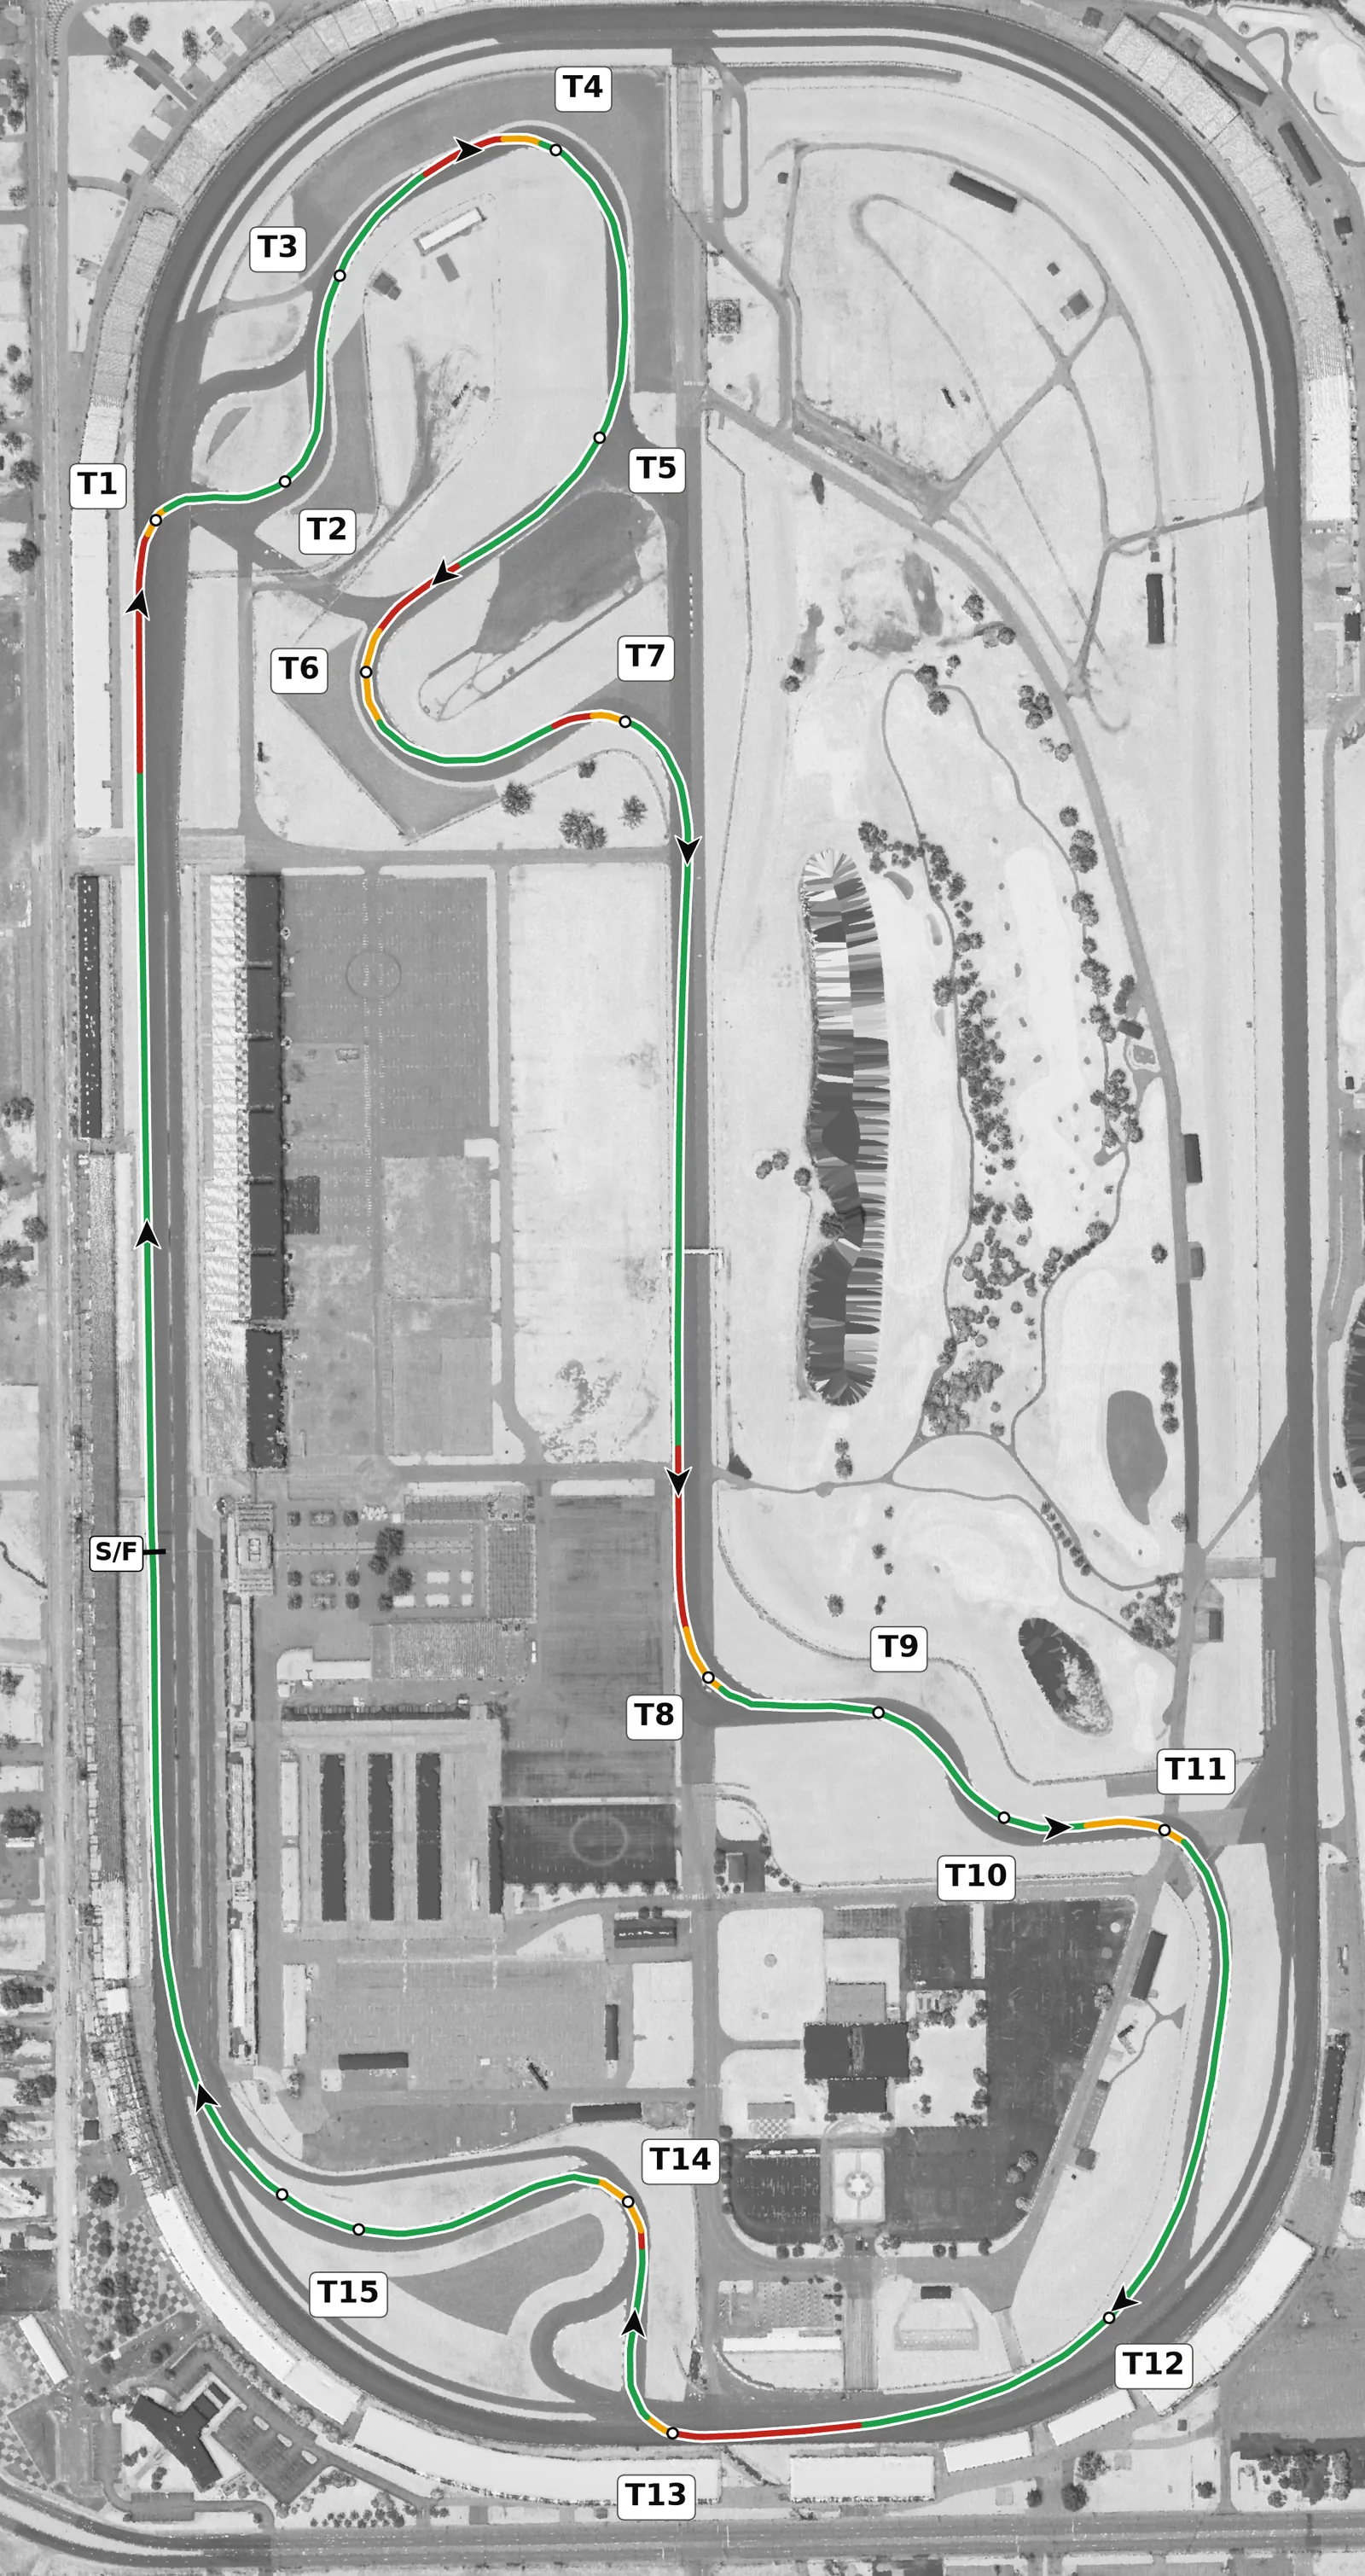
IMS runs clockwise, the opposite way to the Indy 500, and it is almost dead flat: under 4 m of relief and no crests or compressions anywhere, so the lap is about braking, line and the two short stretches of oval banking. The big stops are T1 at the end of the long front straight, the left at the end of the Hulman straight (T8) and T13 at the end of the short chute, while the drives out of T7, T12 and the final turn onto the front straight are where the lap time is. Stay off the big curbs at T1 and T13, and build up to the banked sections over several laps rather than arriving at full commitment.
Sectors
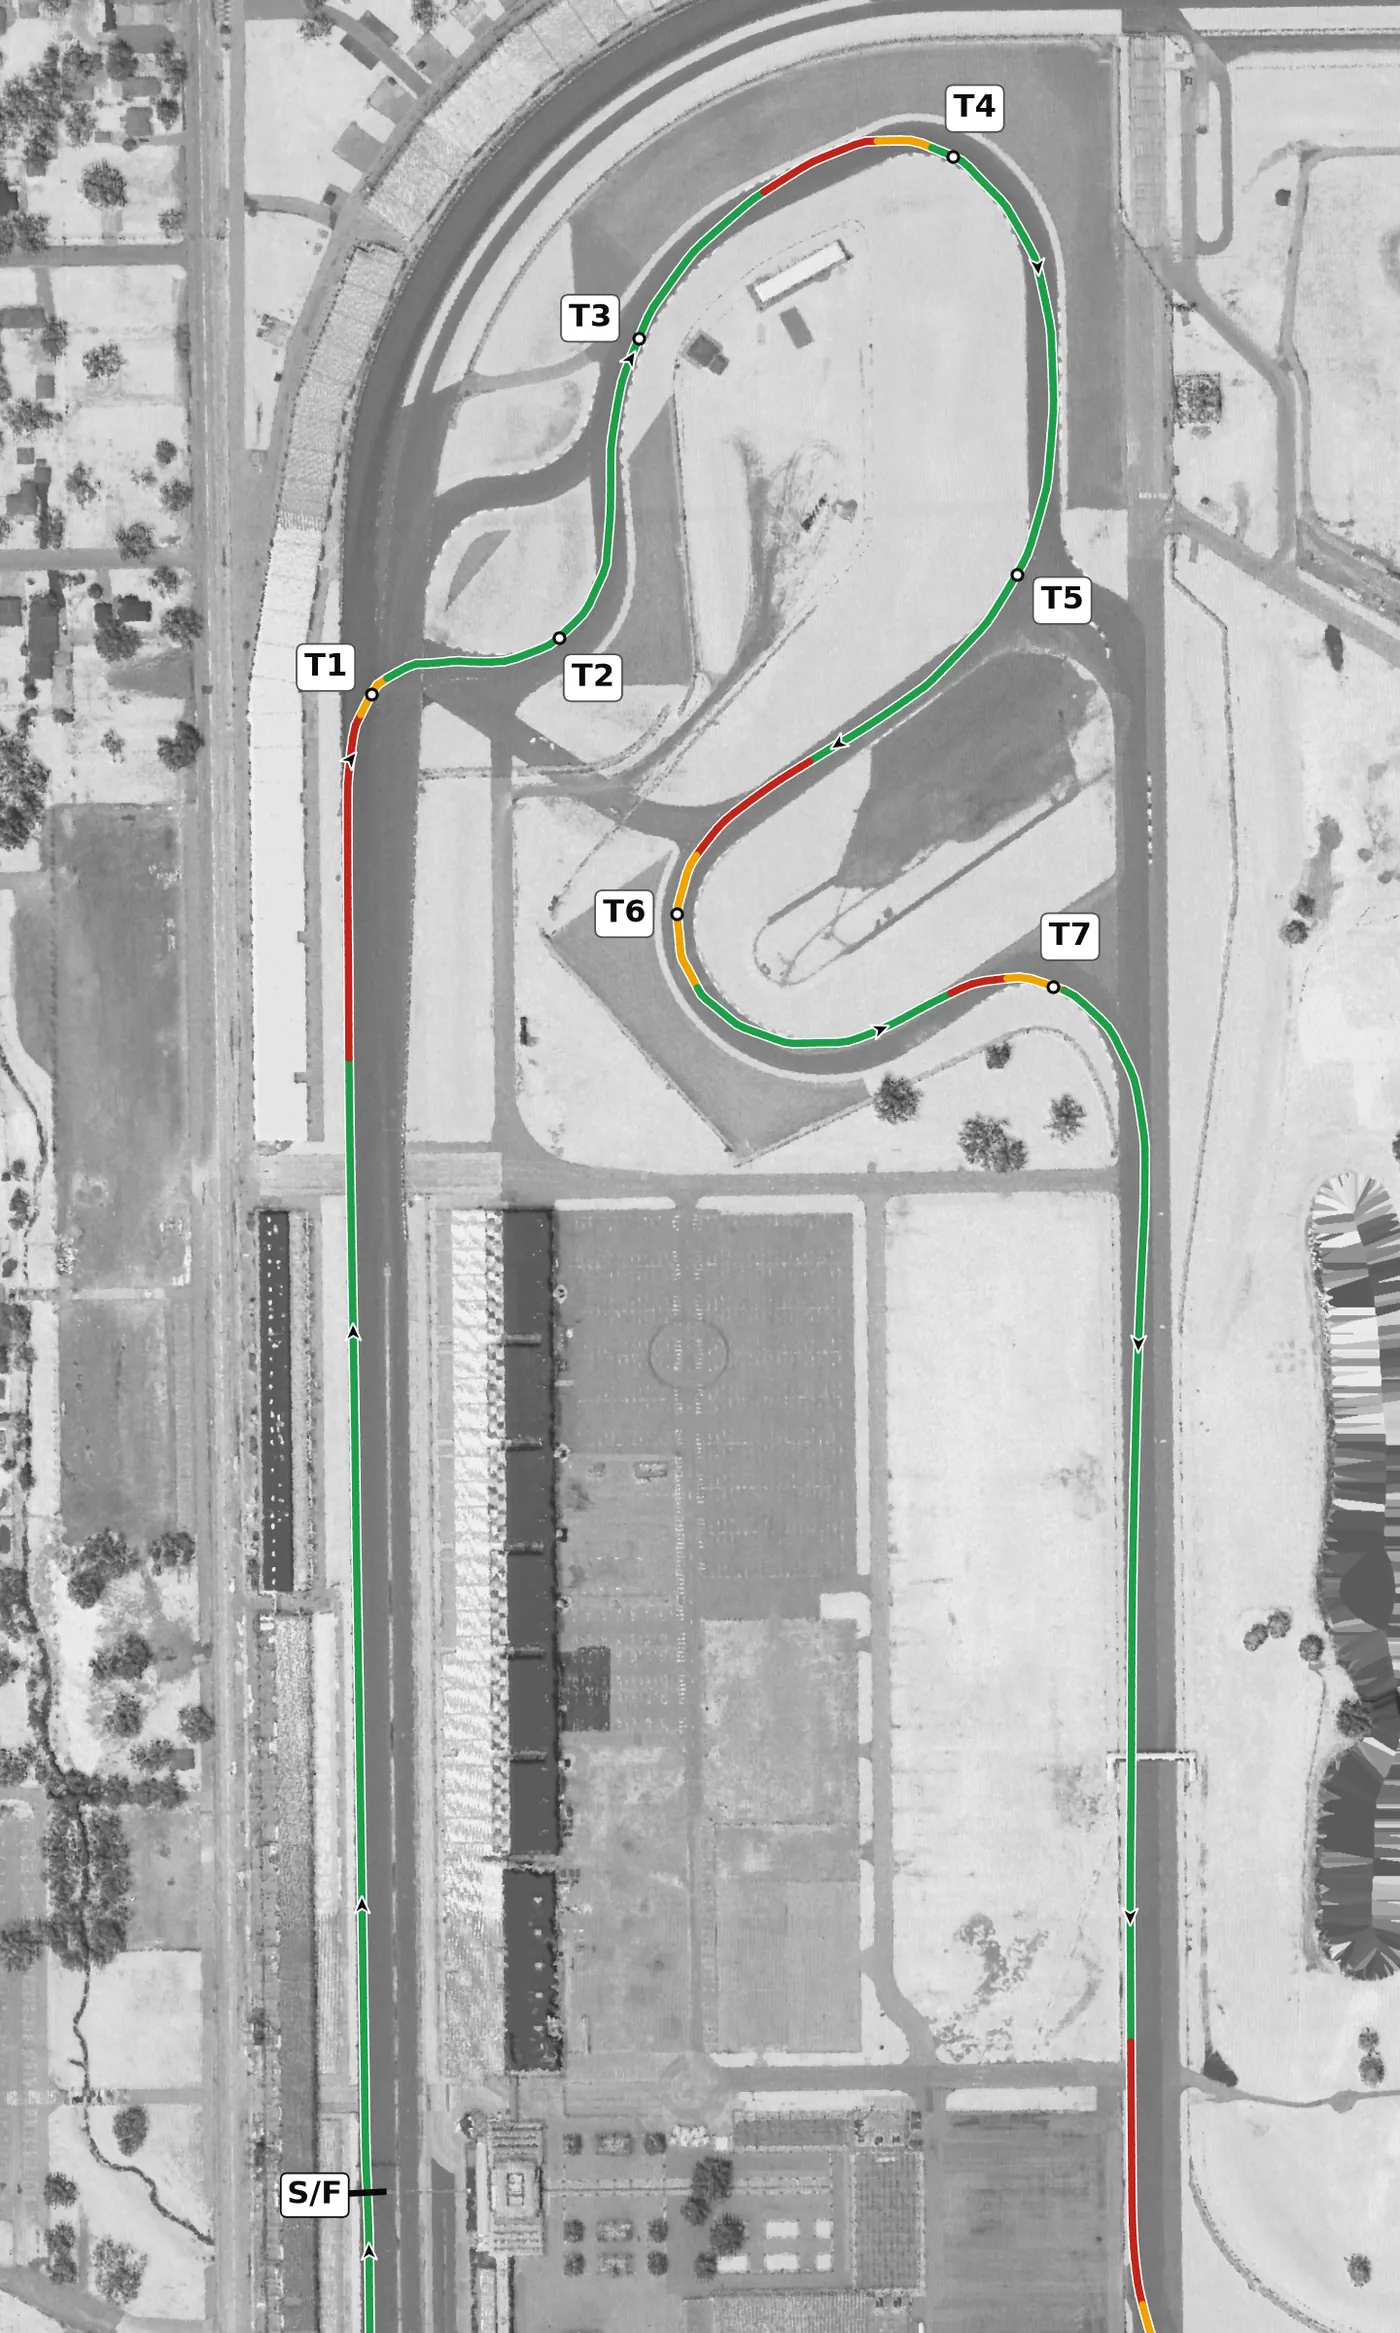
The lap starts at the yard of bricks and climbs gently up the front straight to the hardest stop on the lap, the right at T1, which is still on the oval's cambered pavement. T2 is a short uphill left straight after it, then T3 and T4 are two rights through the flat north infield, where the job is to carry speed and finish T4 out on the left.
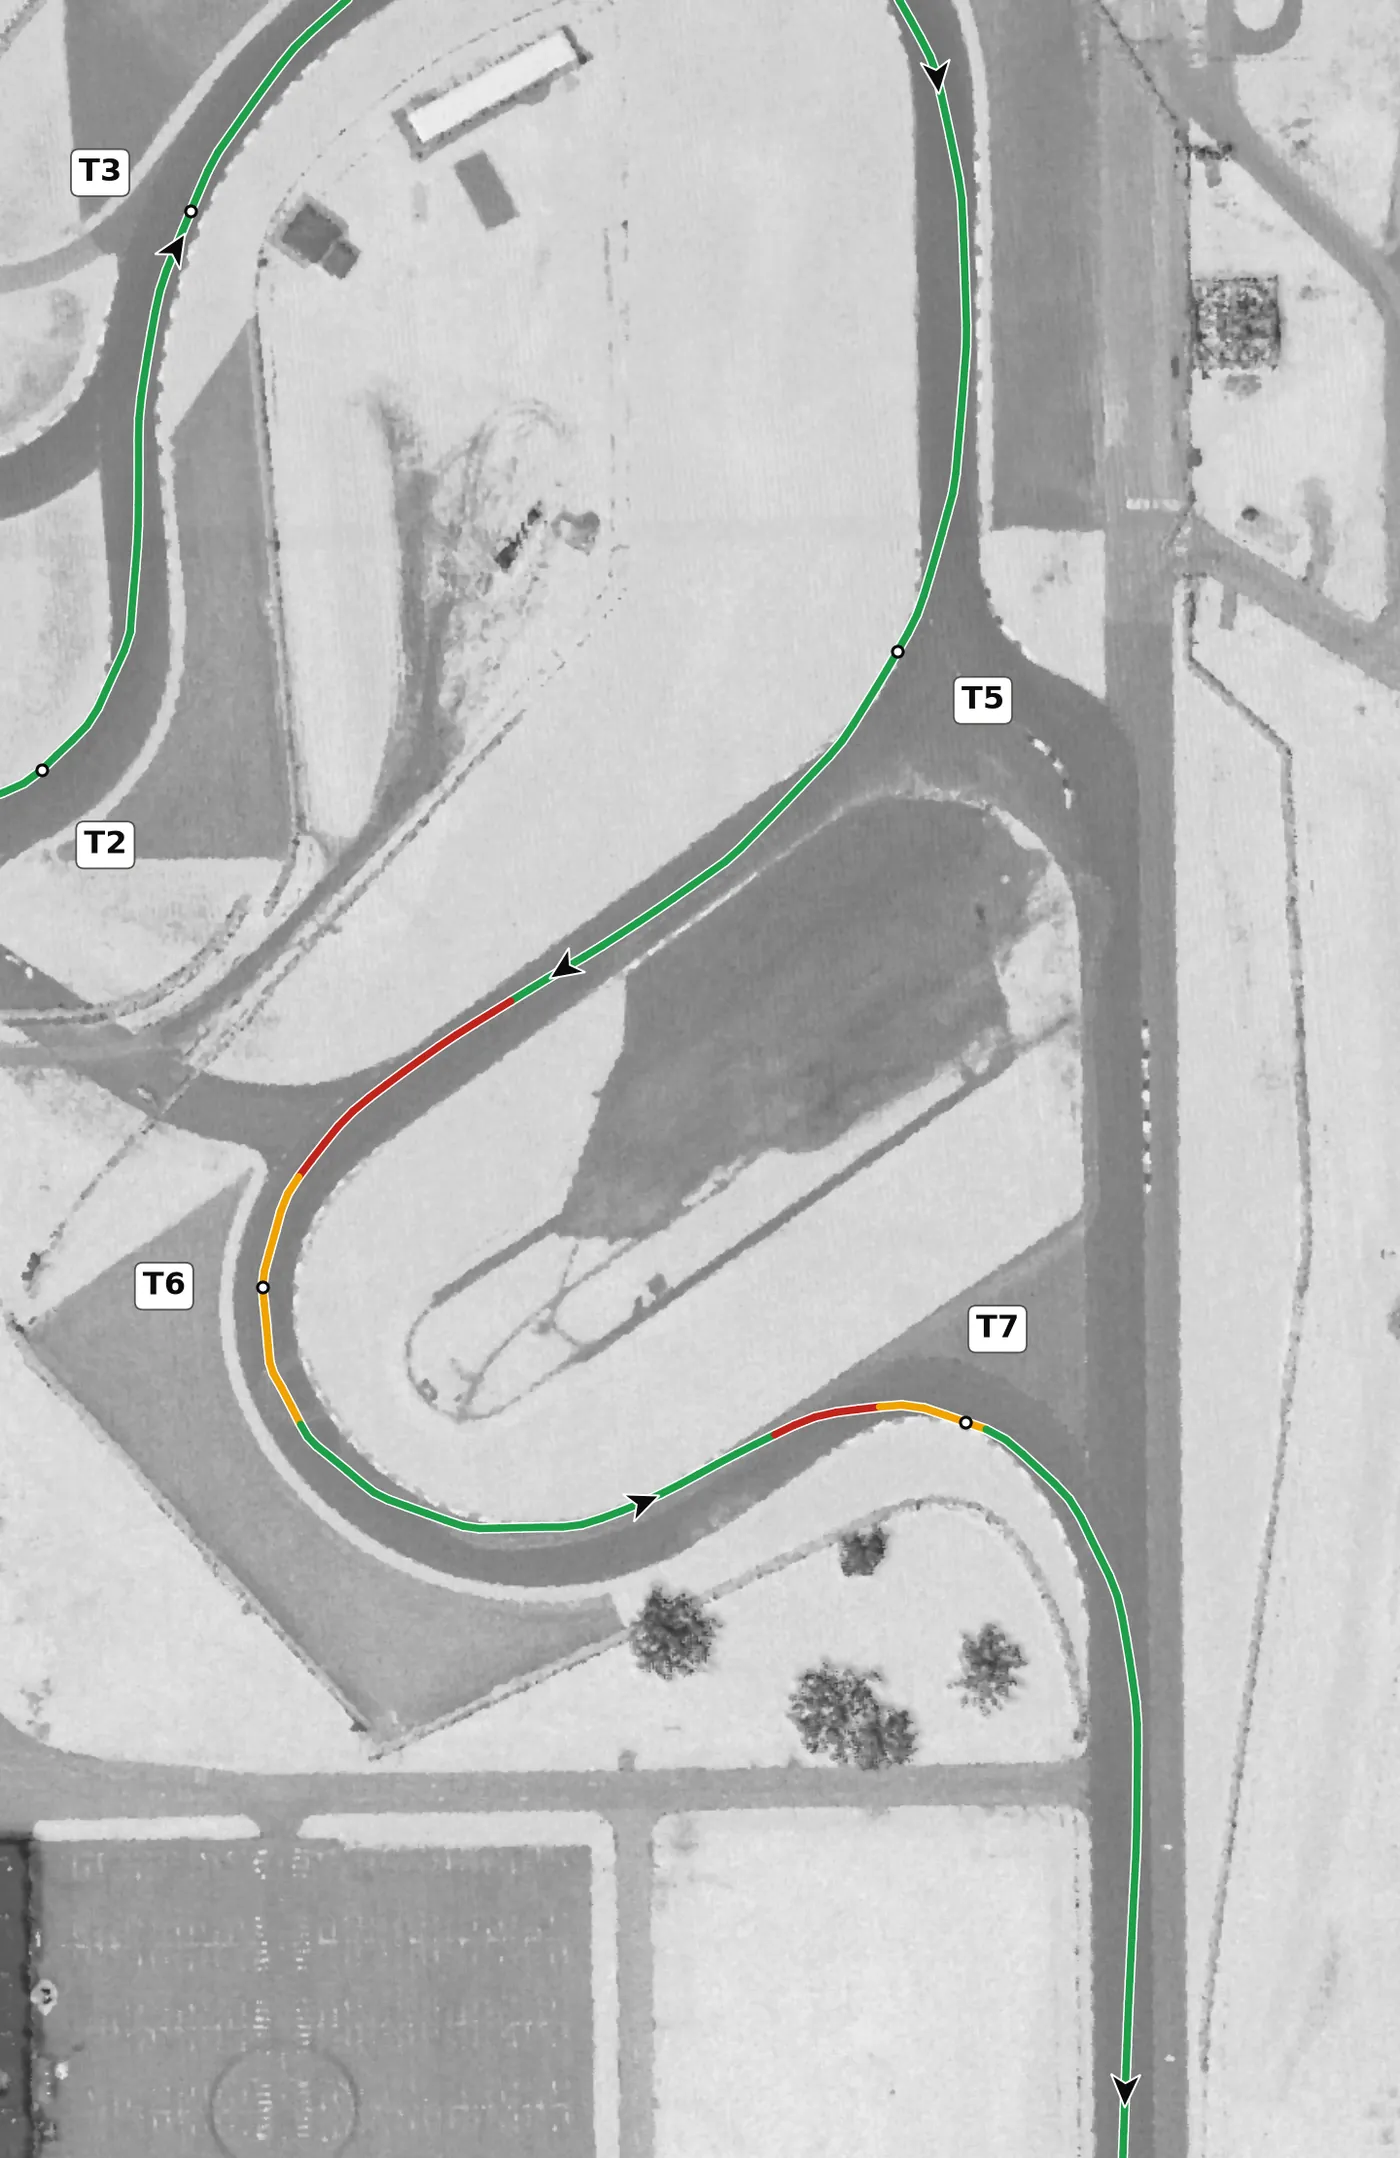
T5 is a long, fast right that opens the loop, T6 is a long left that turns you almost completely around, and T7 is the tight right that puts you onto the Hulman straight. Give up a little in T5 and T6 for a clean, early-throttle exit from T7, because the straight after it is one of the longest full-throttle runs on the lap.
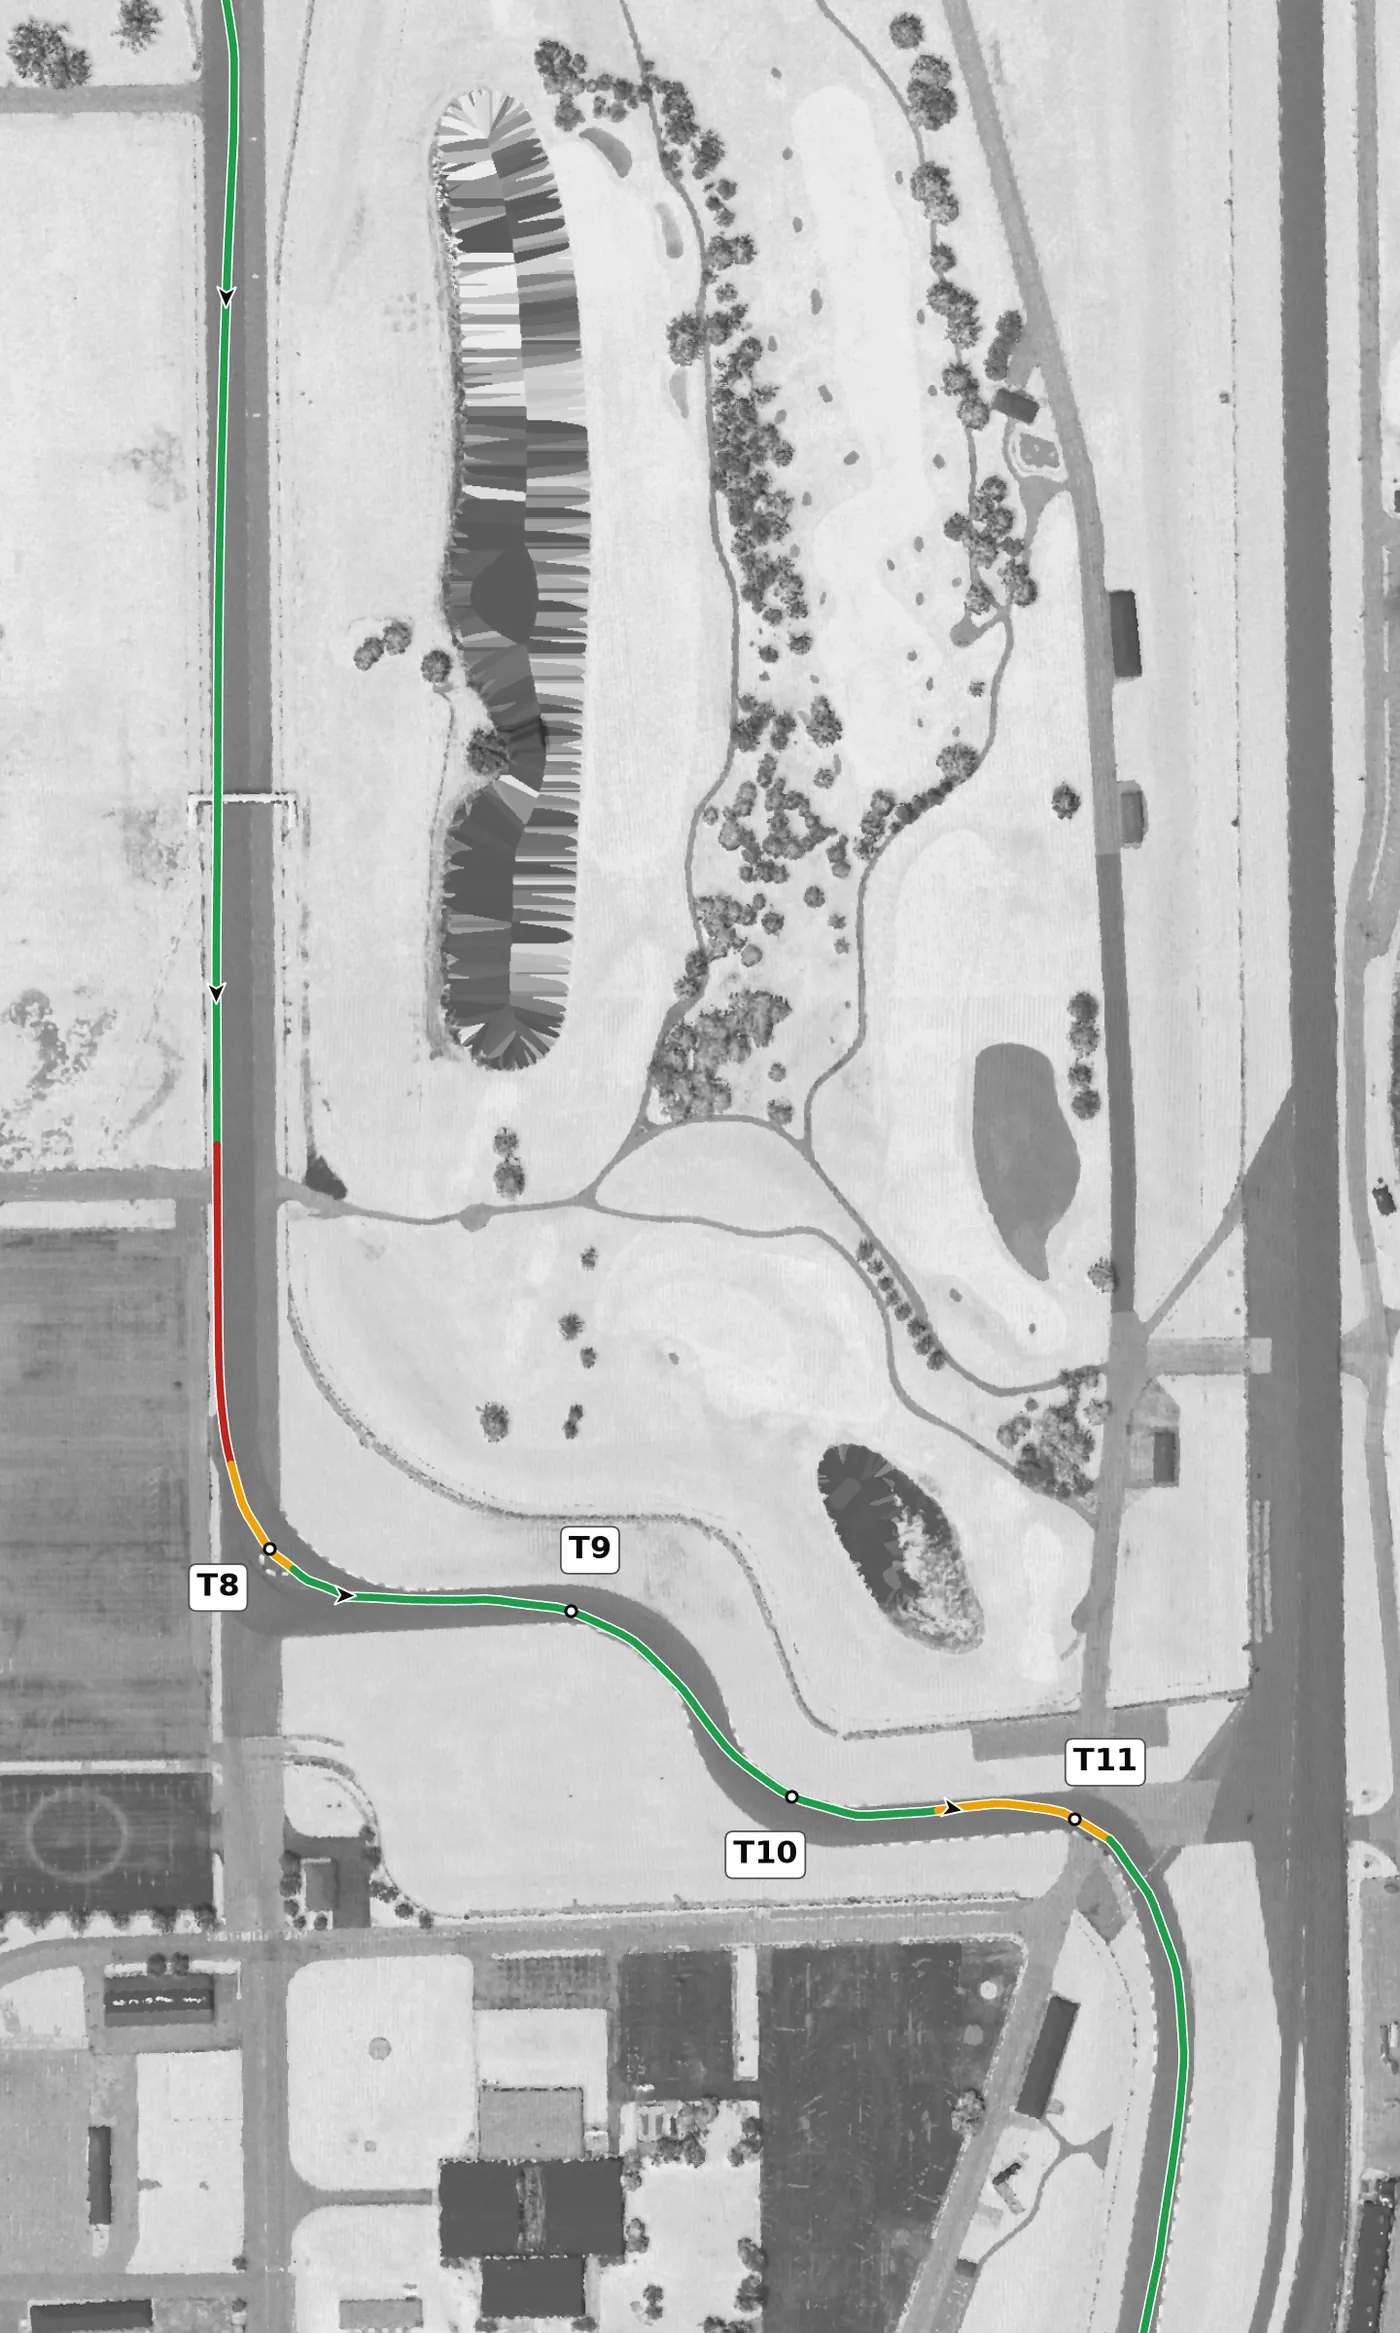
The Hulman straight ends in a heavy stop for T8, a left with a wide paved entry, and then T9, T10 and T11 flow right–left–right through the south-east esses. Everything here is within about 2% of level, so treat the esses as one rhythm: a tidy T8 exit and smooth hands through T9 and T10 set up the run through T11 toward the oval.
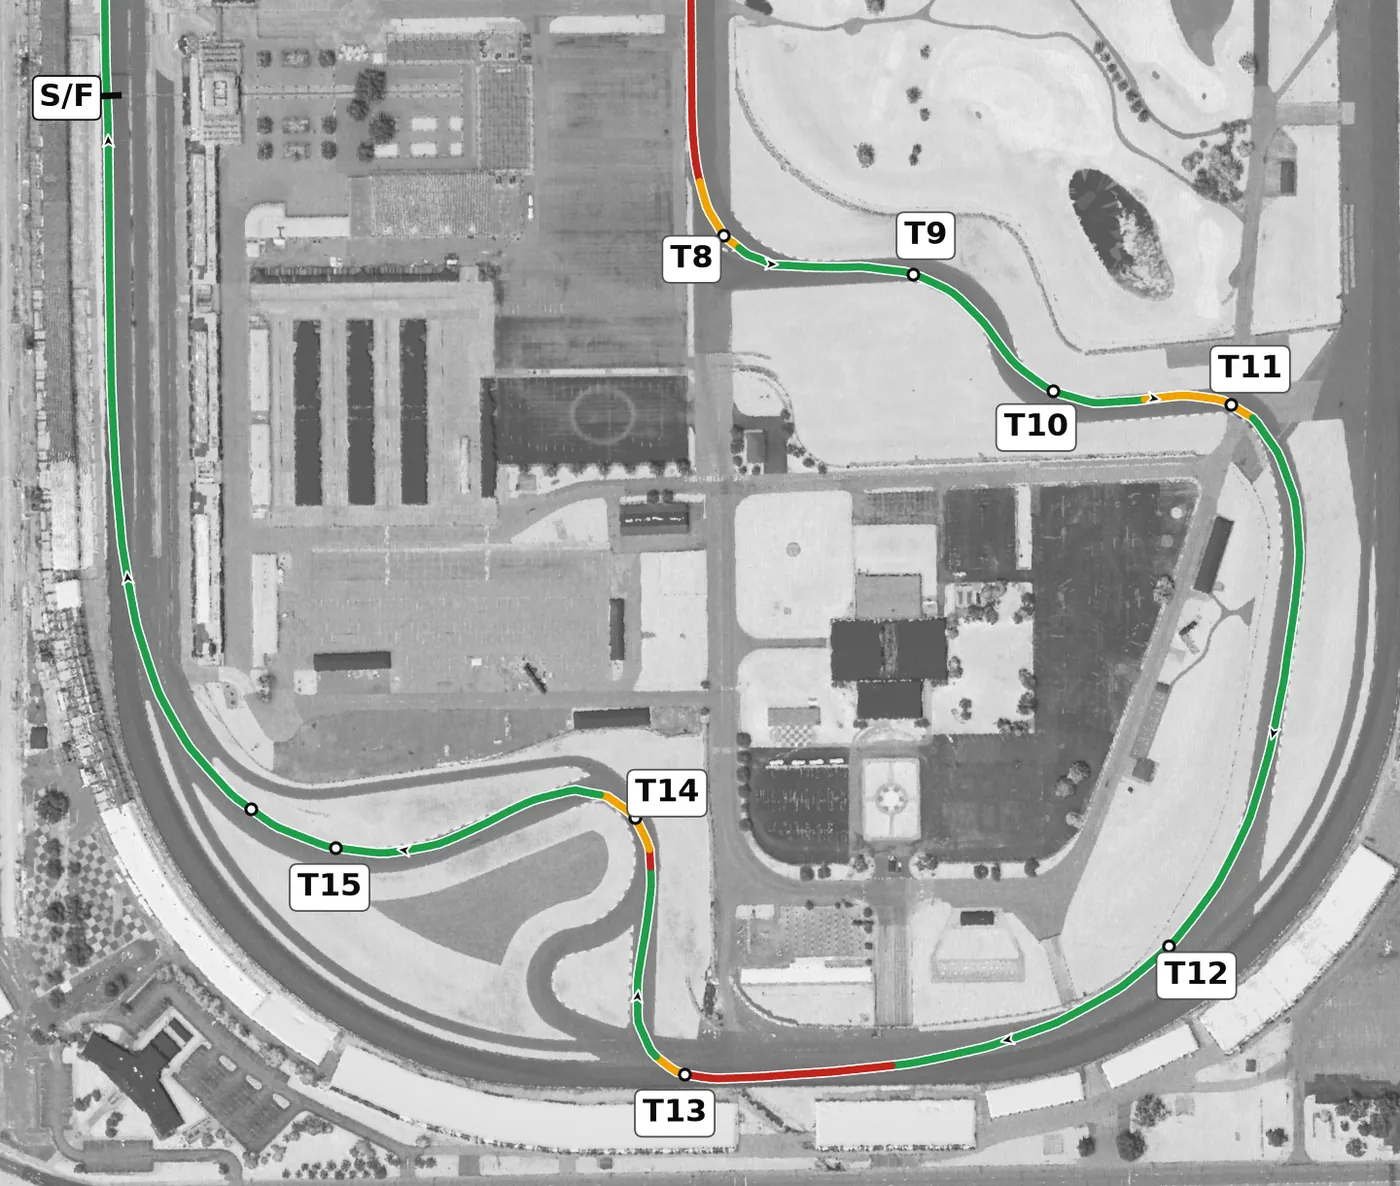
T12 is the fast right that takes you out onto oval Turn 2, where the pavement banks up toward the outside wall and running wider buys grip instead of costing it. Brake hard and straight at the end of the short chute for T13, take the tight T14 left straight after it, then make the long final right, T15, which picks up the banking of oval Turn 1 and fires you onto the front straight.
Corners
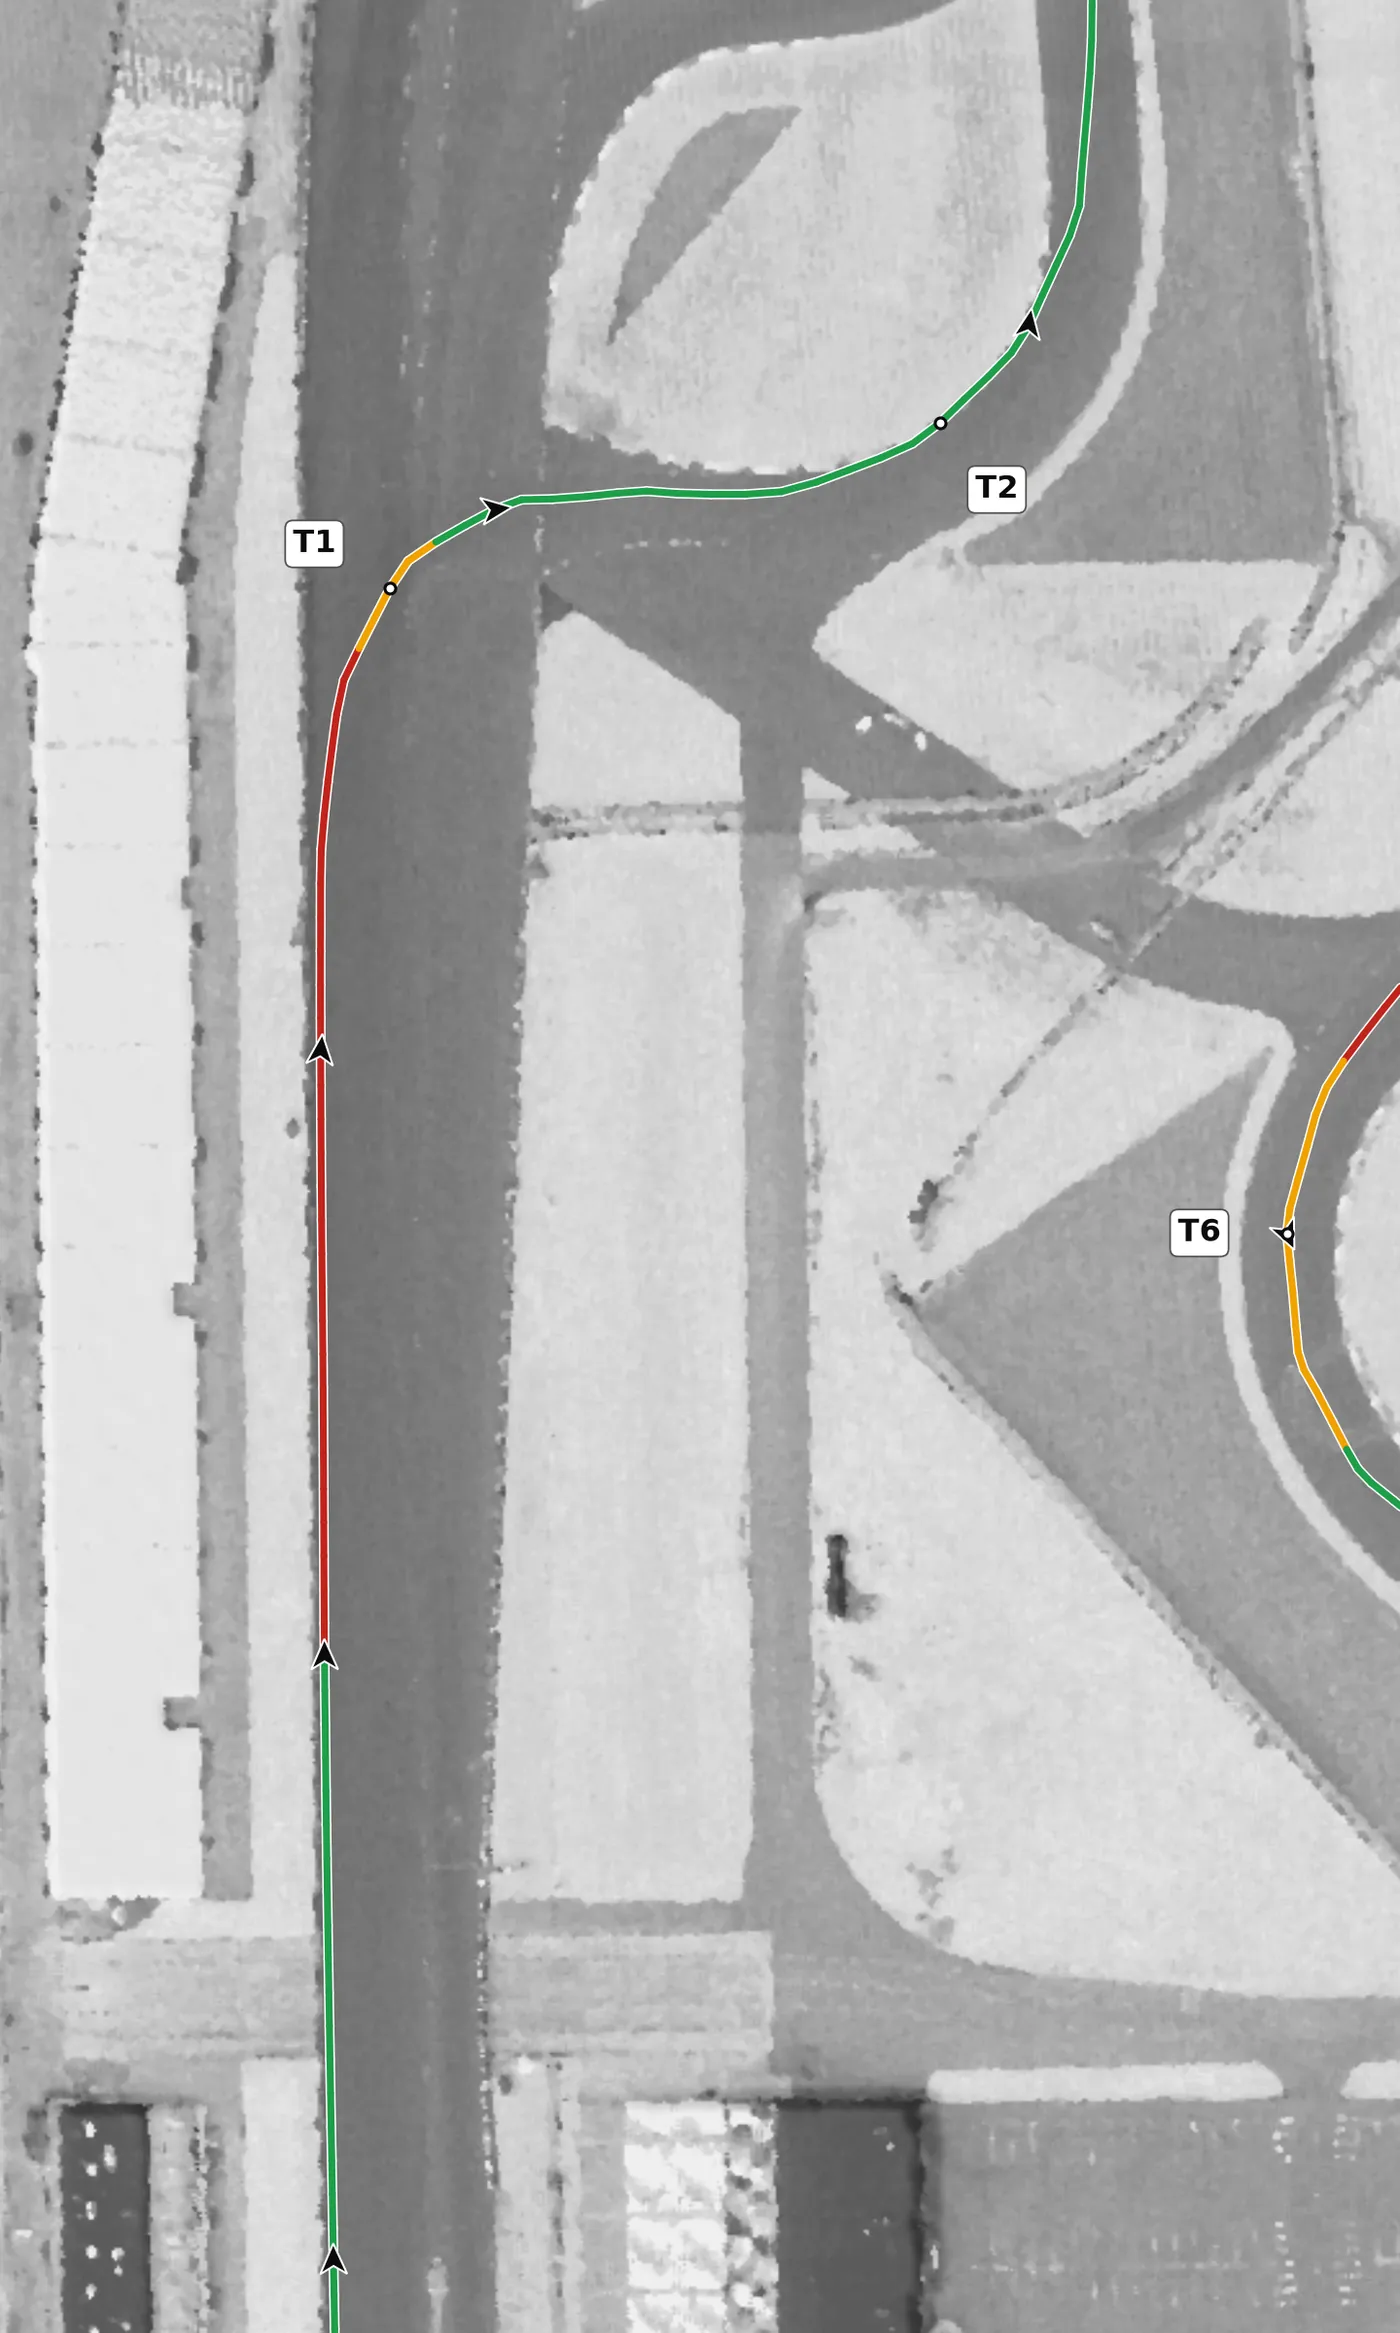
Brake hard and in a straight line from the left side of the front straight, where the road reaches its highest point, and turn in for a late apex on this sharp right, which still has the oval's camber tipping toward the inside. The road falls away steeply just after the apex, so let the car settle before full throttle, and don't let it run all the way out to the left because the uphill T2 left comes almost at once. The mistake to avoid is braking late and riding the big apex curb, which unsettles the car just as it goes light over the drop.
From the survey: On camber at the apex (+4.7%), on the oval's pavement. The highest point on the lap is in its braking zone, and the exit falls at −3.9%, the steepest grade on the lap.
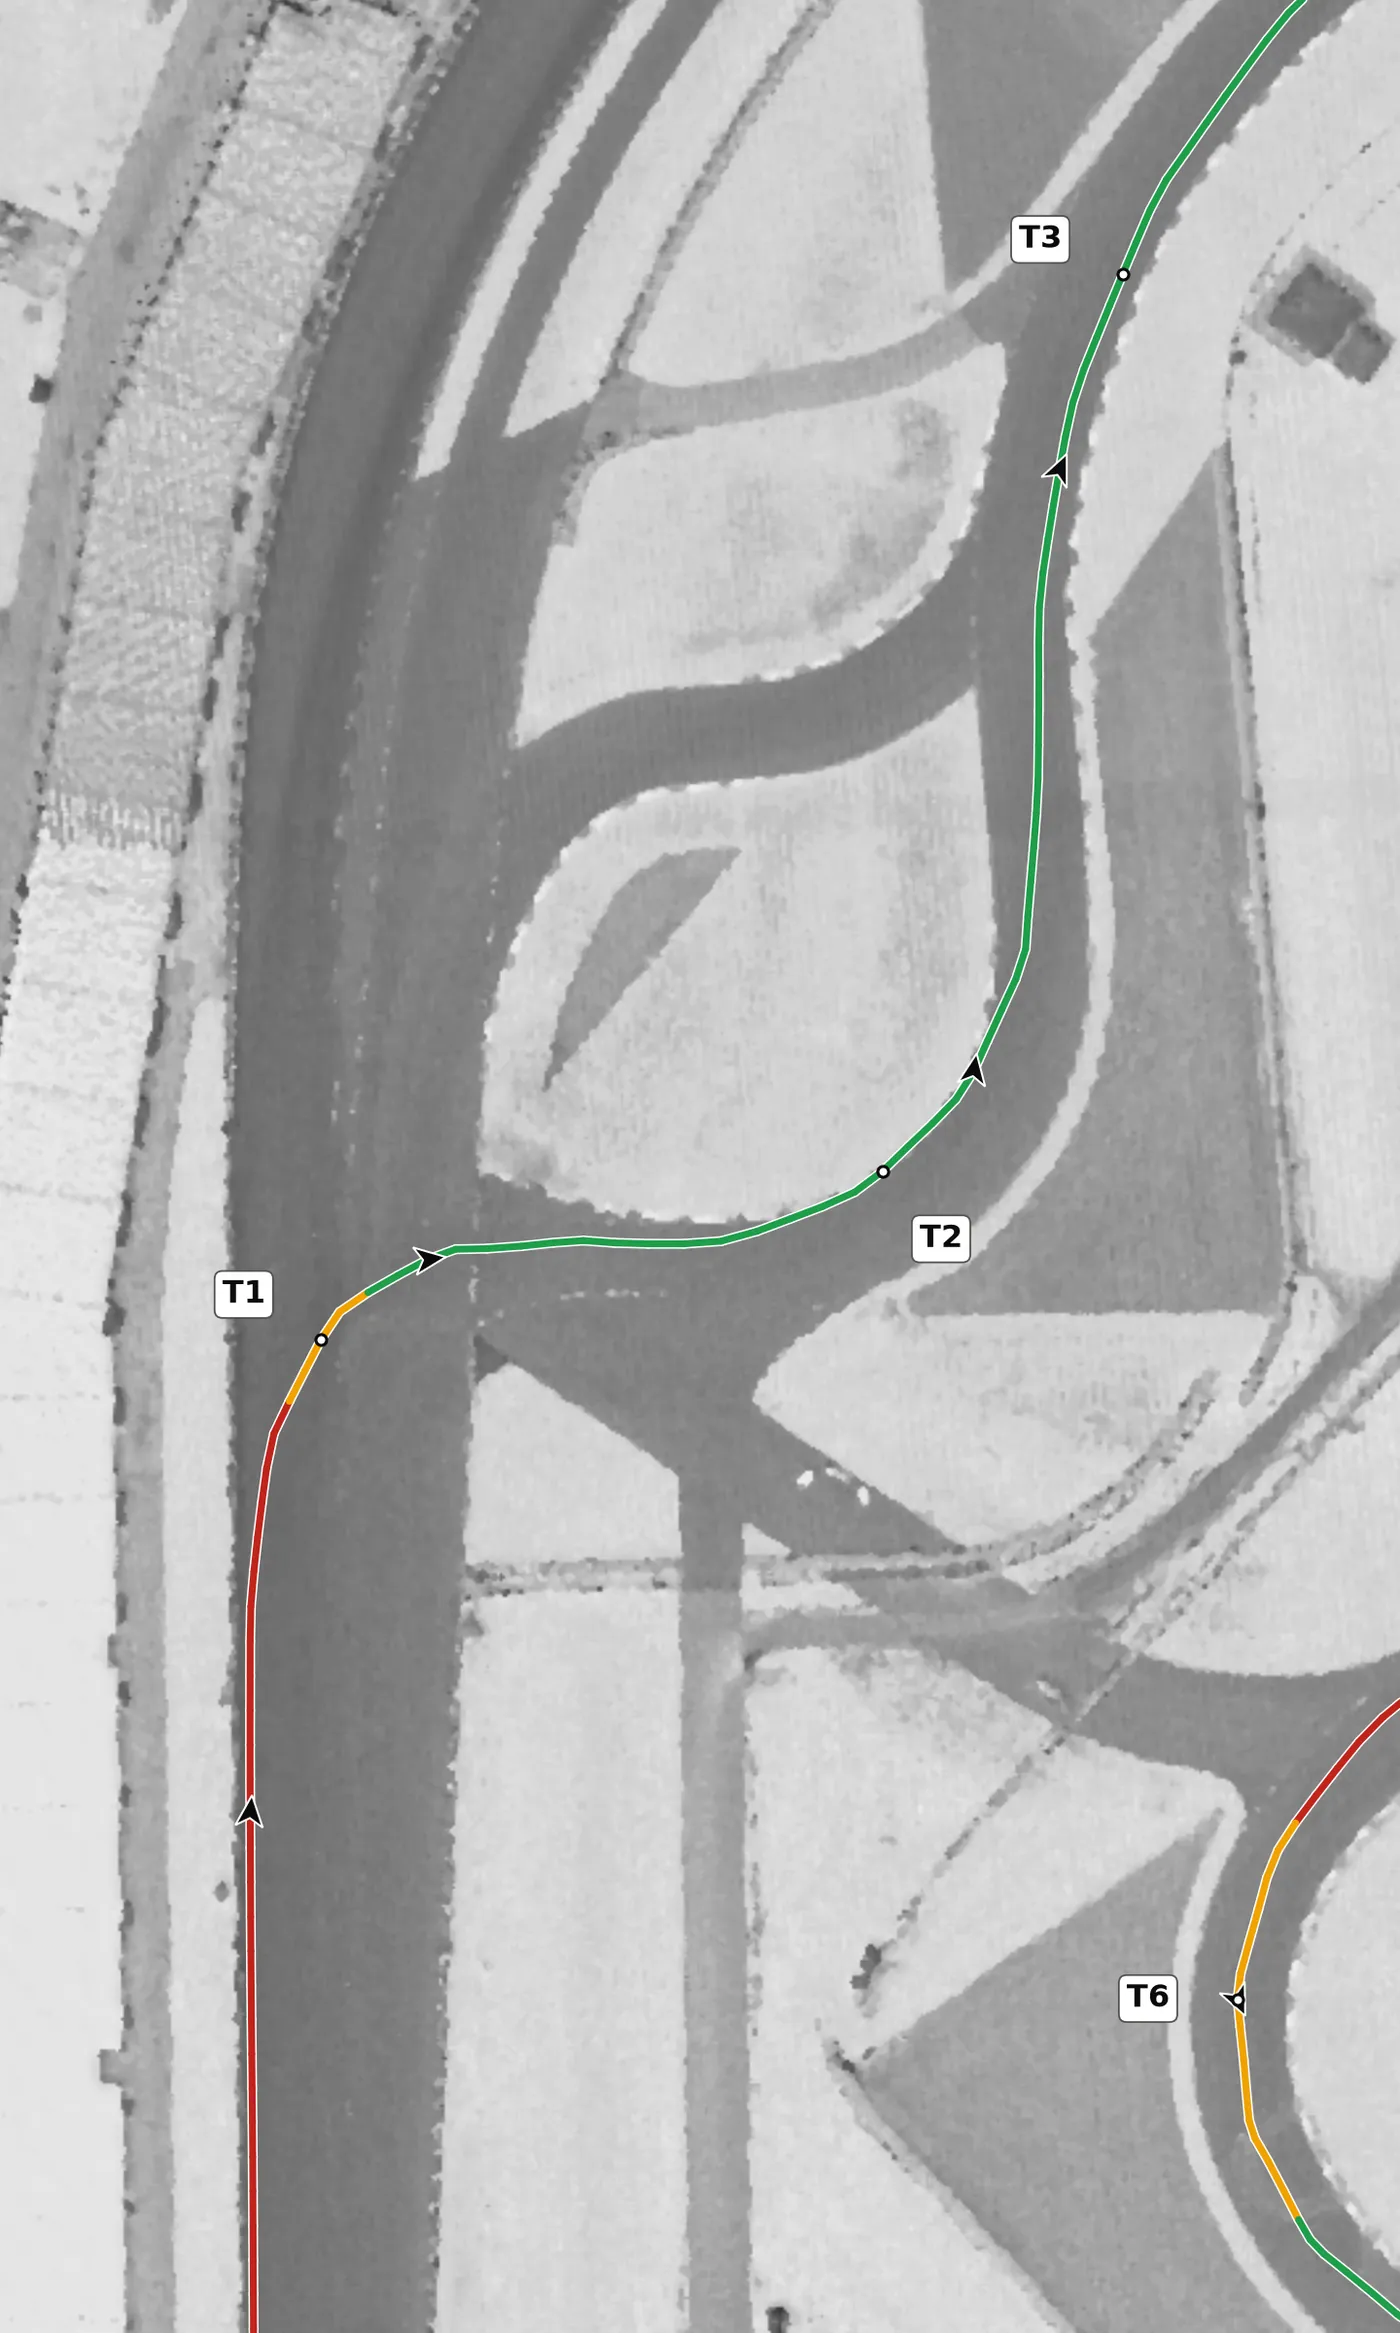
This left comes almost straight out of T1 and climbs to the apex, so the hill helps you slow and it takes more brake than it looks. Turn in from the right side, take a late apex and let the car run out only as far to the right as it needs to. The mistake to avoid is carrying T1's exit speed into the turn-in and running wide, which spoils the run through the north infield.
From the survey: Climbs about 0.8 m from entry to apex.
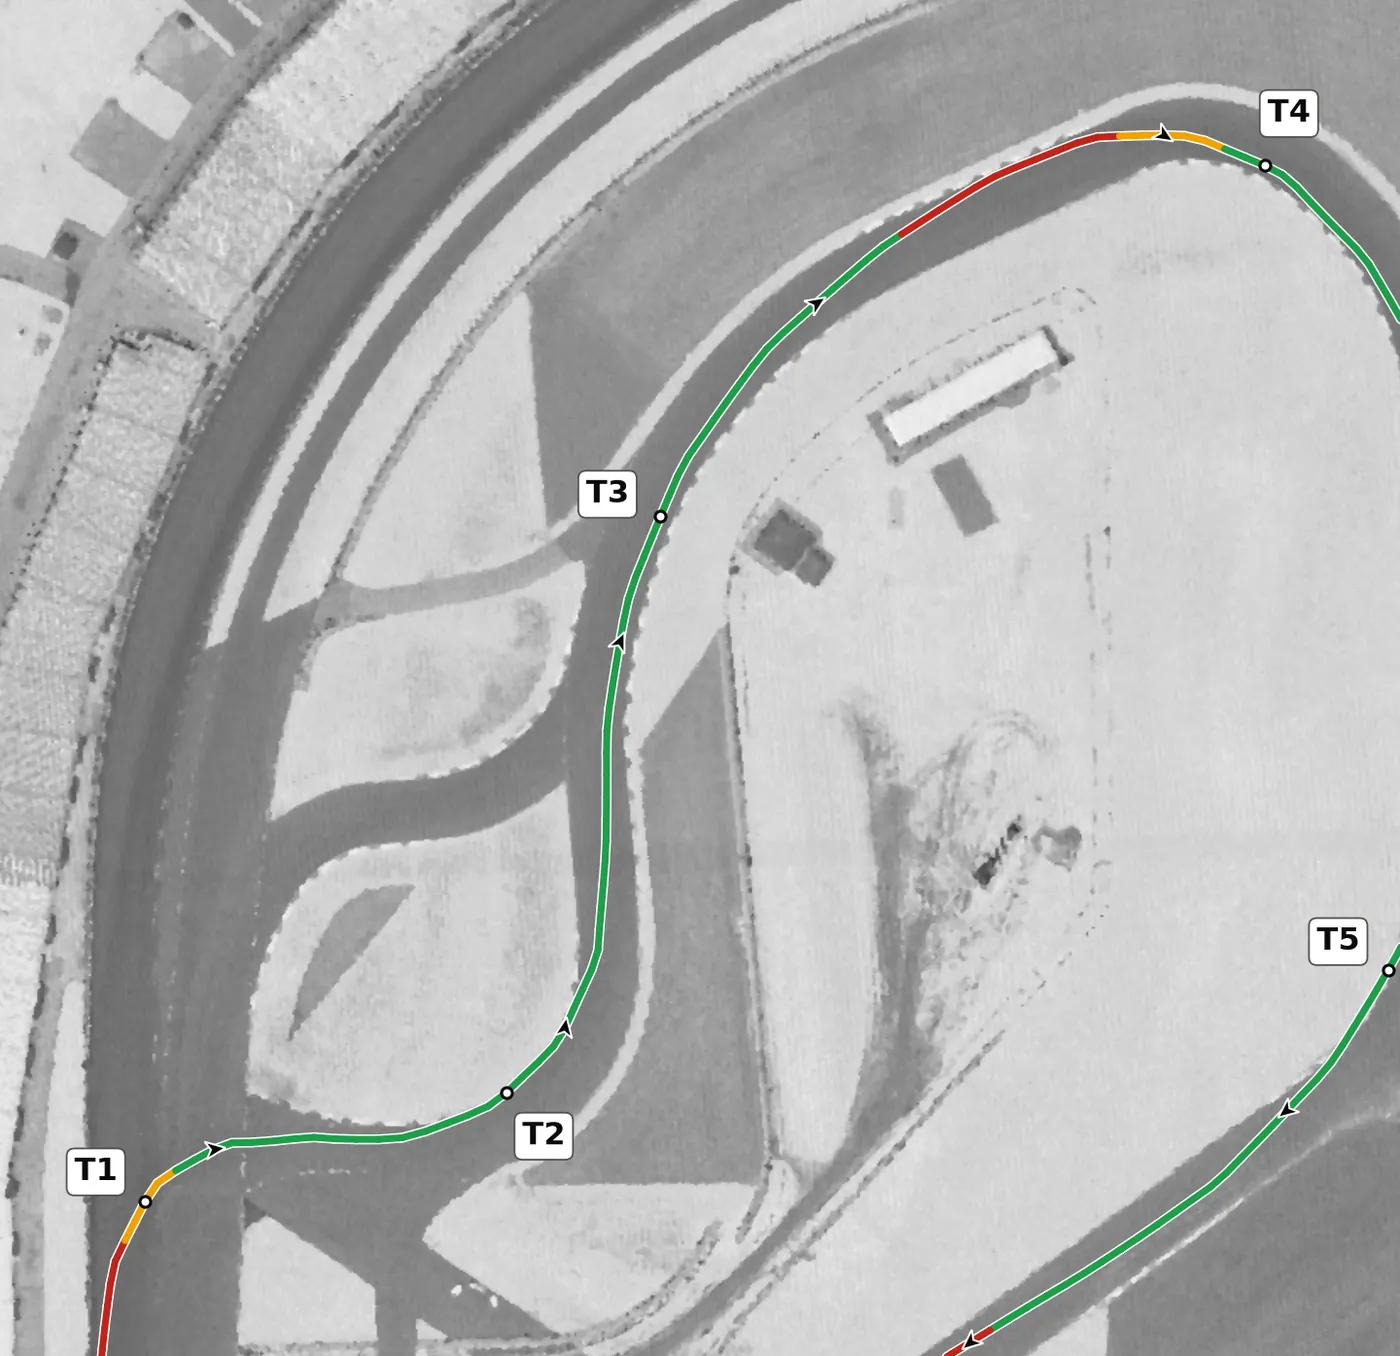
A gentle right through the flat north infield, mildly banked at the apex and taken at speed on the throttle, with at most a breath off it. Use one smooth steering input to a late apex and let the car run out to the left, which is where you want to be for the next right at T4. The mistake to avoid is over-slowing here: there is grip and room, and the time is in carrying speed.
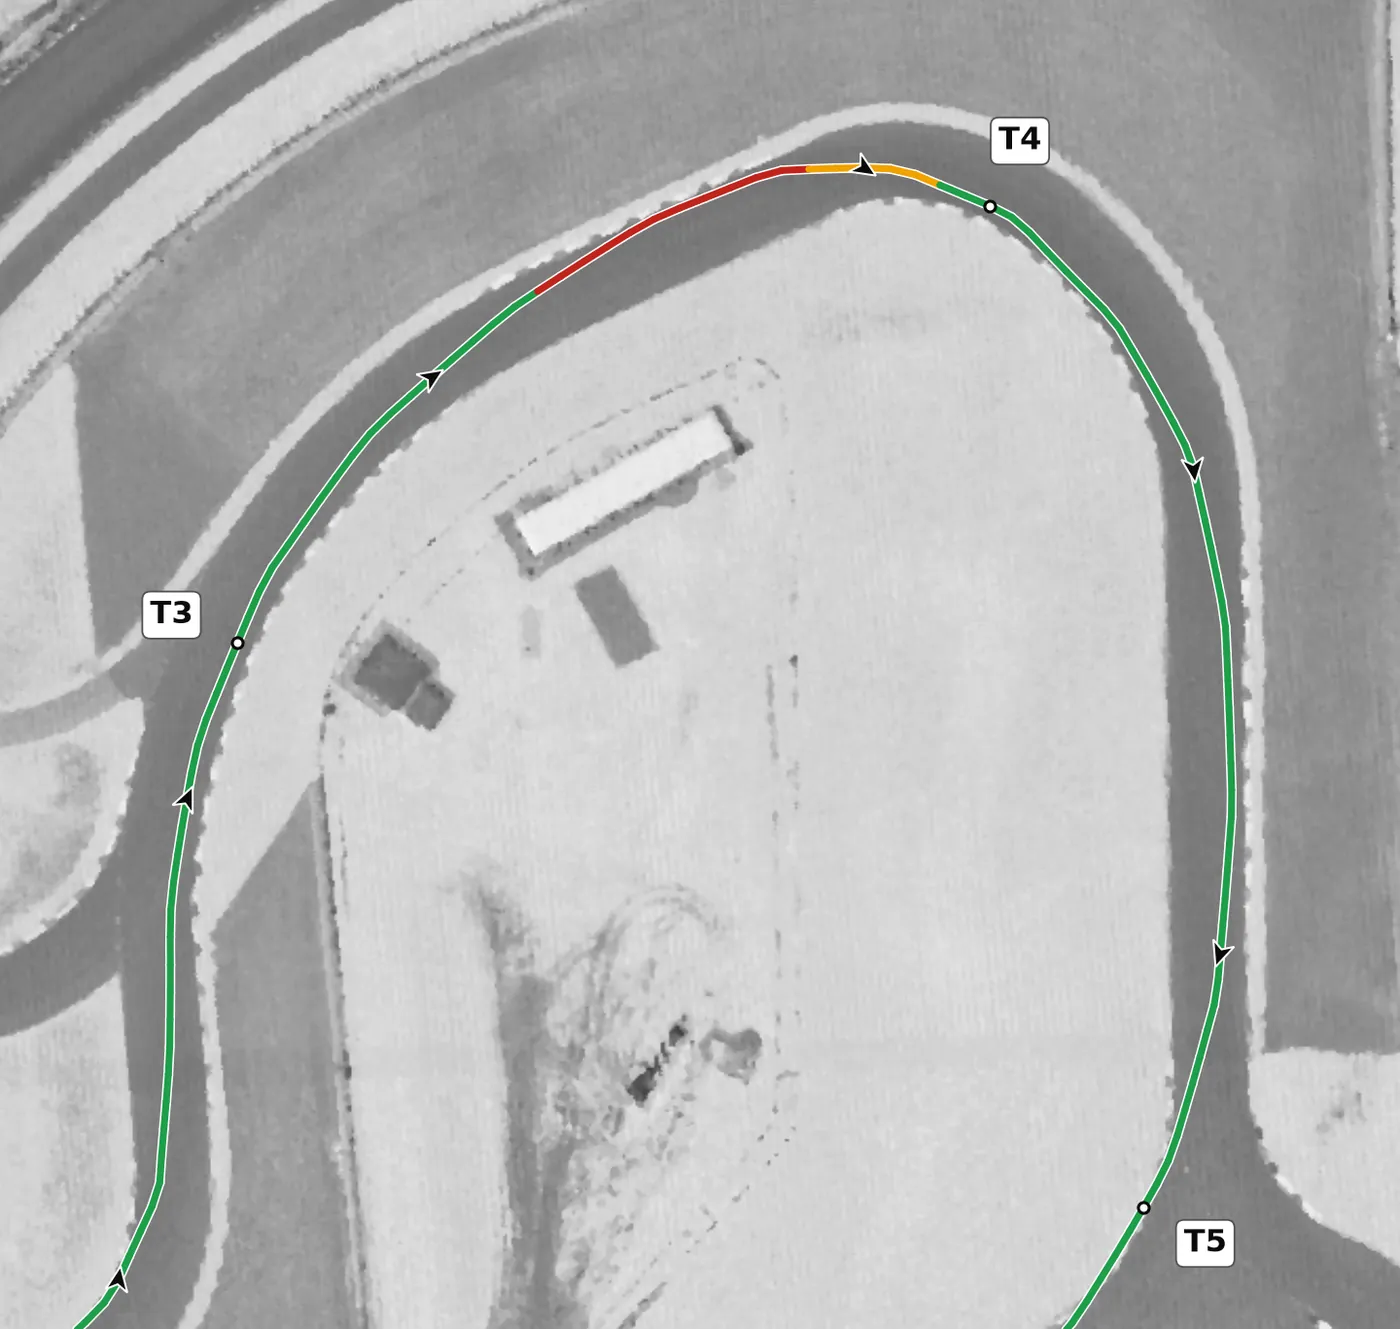
T4 is a tighter right at the top of the infield that turns you back south, slightly banked and dead level. Brake in a straight line from the left side, turn in for a late apex and use the whole road on the exit to the left, which is also the side you want for T5. The mistake to avoid is an early apex, which runs you out of road on the exit and makes you lift.
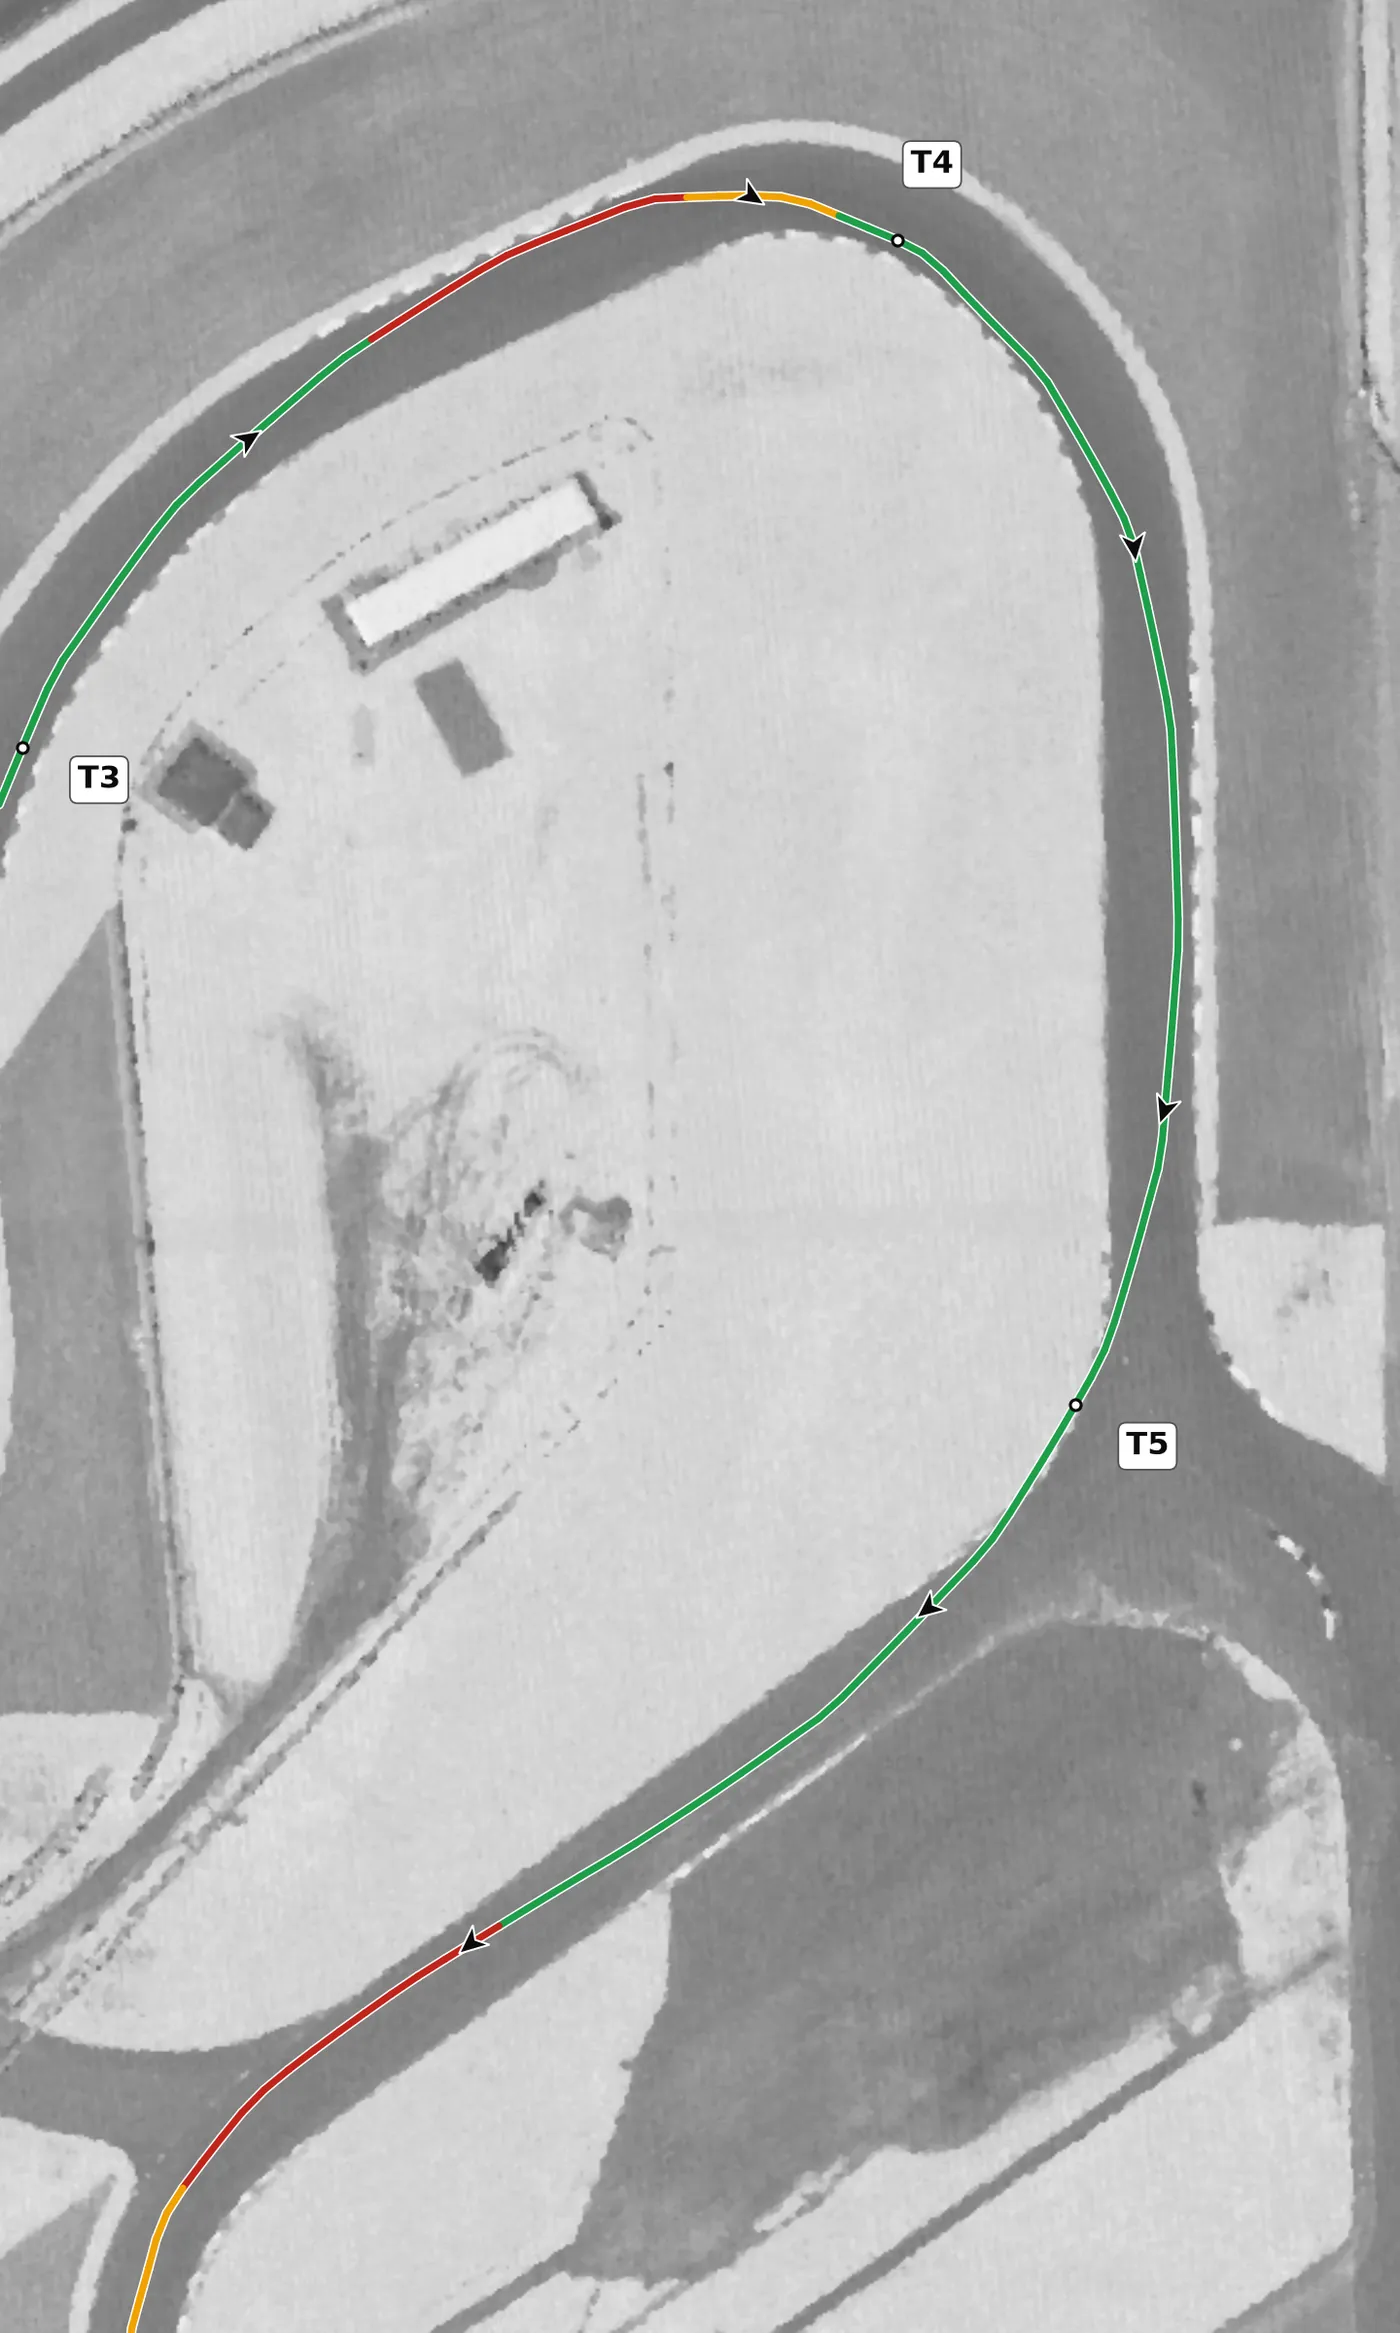
This long, fast right opens the loop and is only lightly banked, so treat it as a fast sweeper: at most a small lift on the way in, a late apex and a gradual exit to the left. Then use the run after it to move back to the right-hand side and brake in a straight line for the long left at T6. The mistake to avoid is turning in early and then fighting a car that is running wide on the exit.
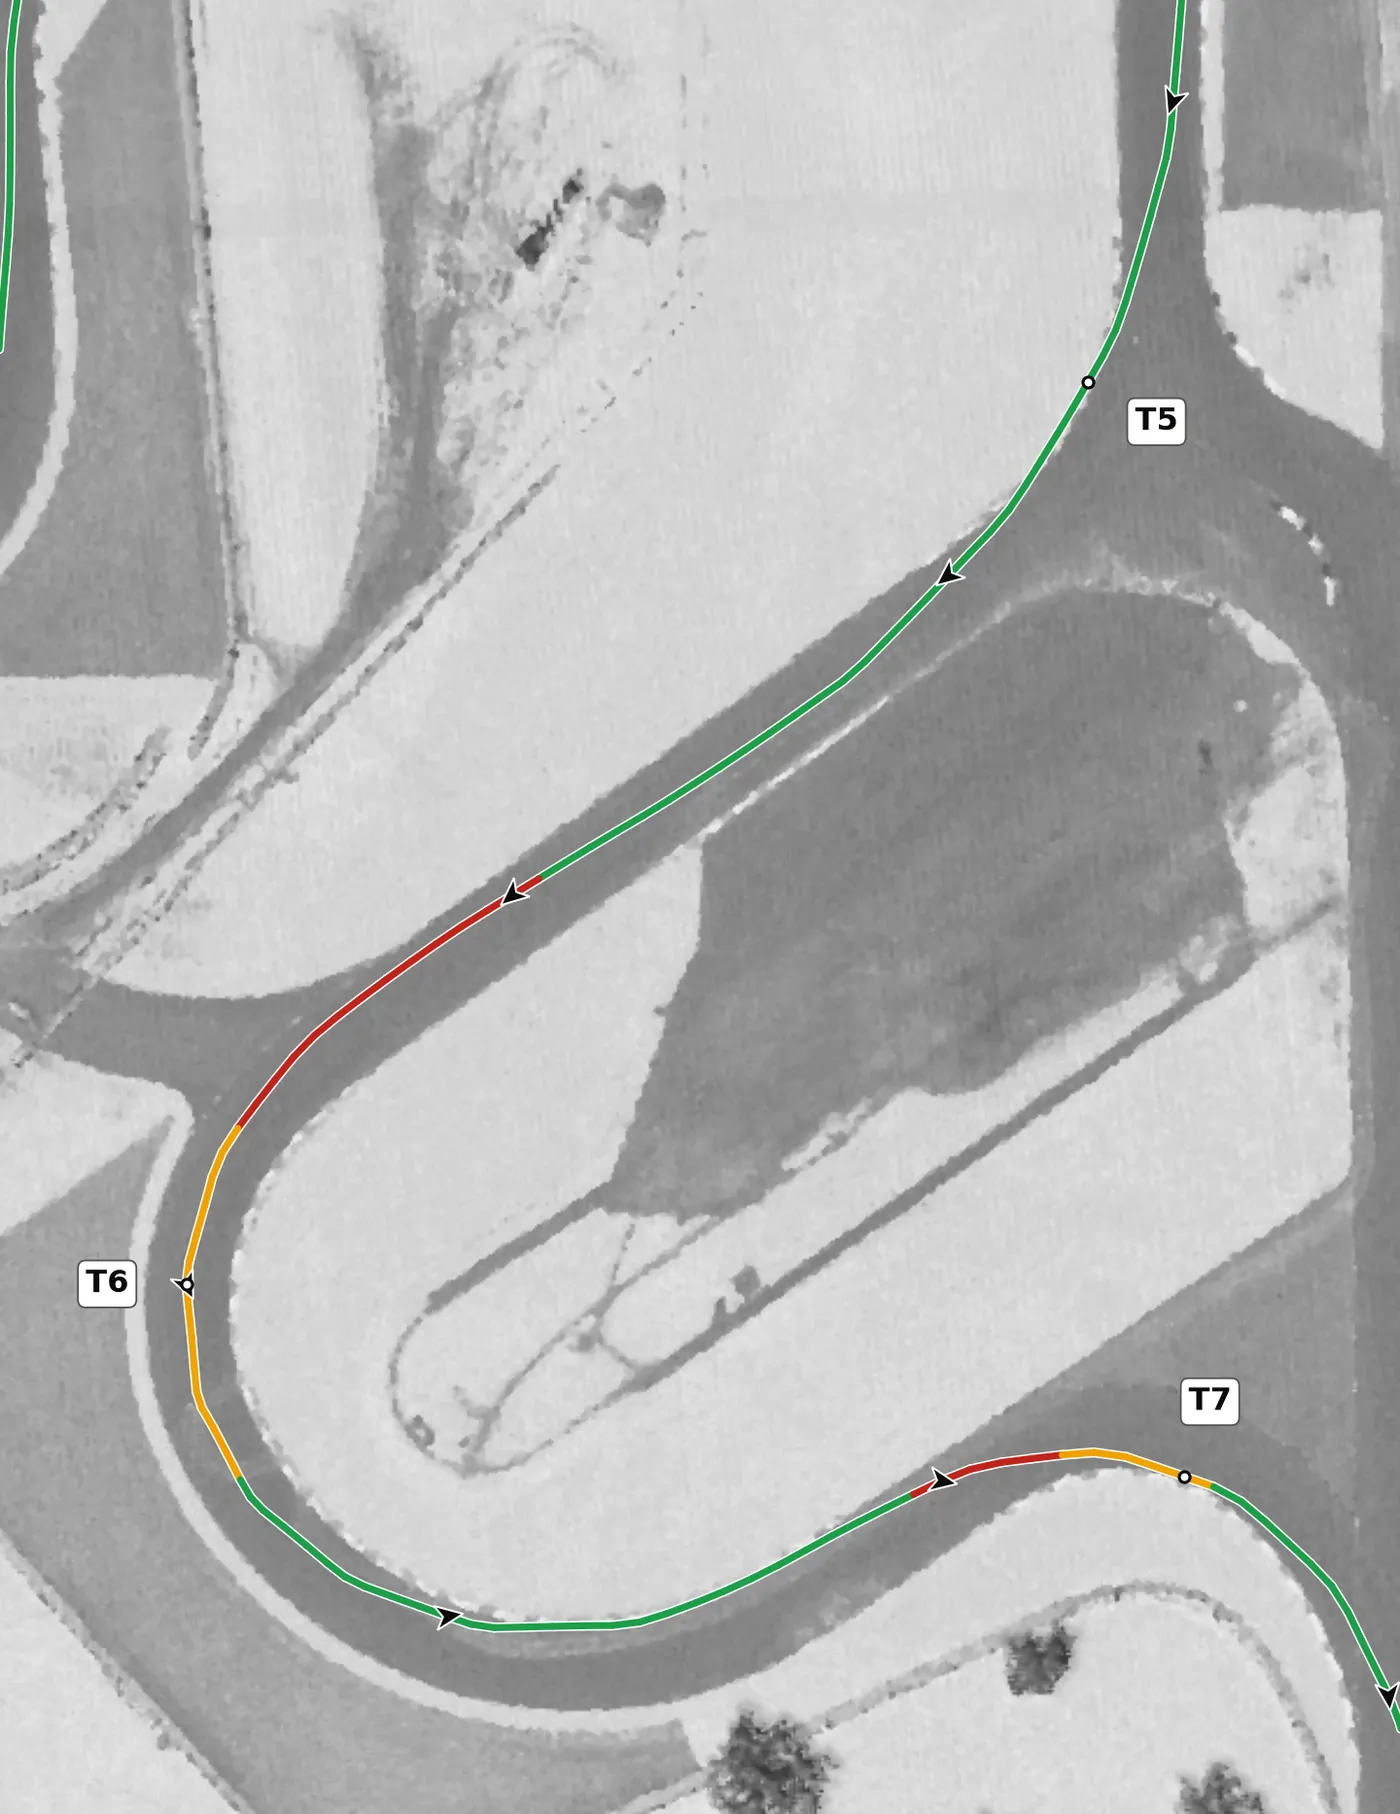
T6 is a long left that turns you almost completely around, the biggest change of direction on the lap, and it is level and mildly on camber. Brake in a straight line from the right side, be patient on the turn-in and aim for a late apex so you can unwind the wheel early, then move back to the left before T7. The mistake to avoid is turning in early, which forces a second turn-in partway around and costs you the exit.
From the survey: The biggest change of direction on the lap: about 178°.
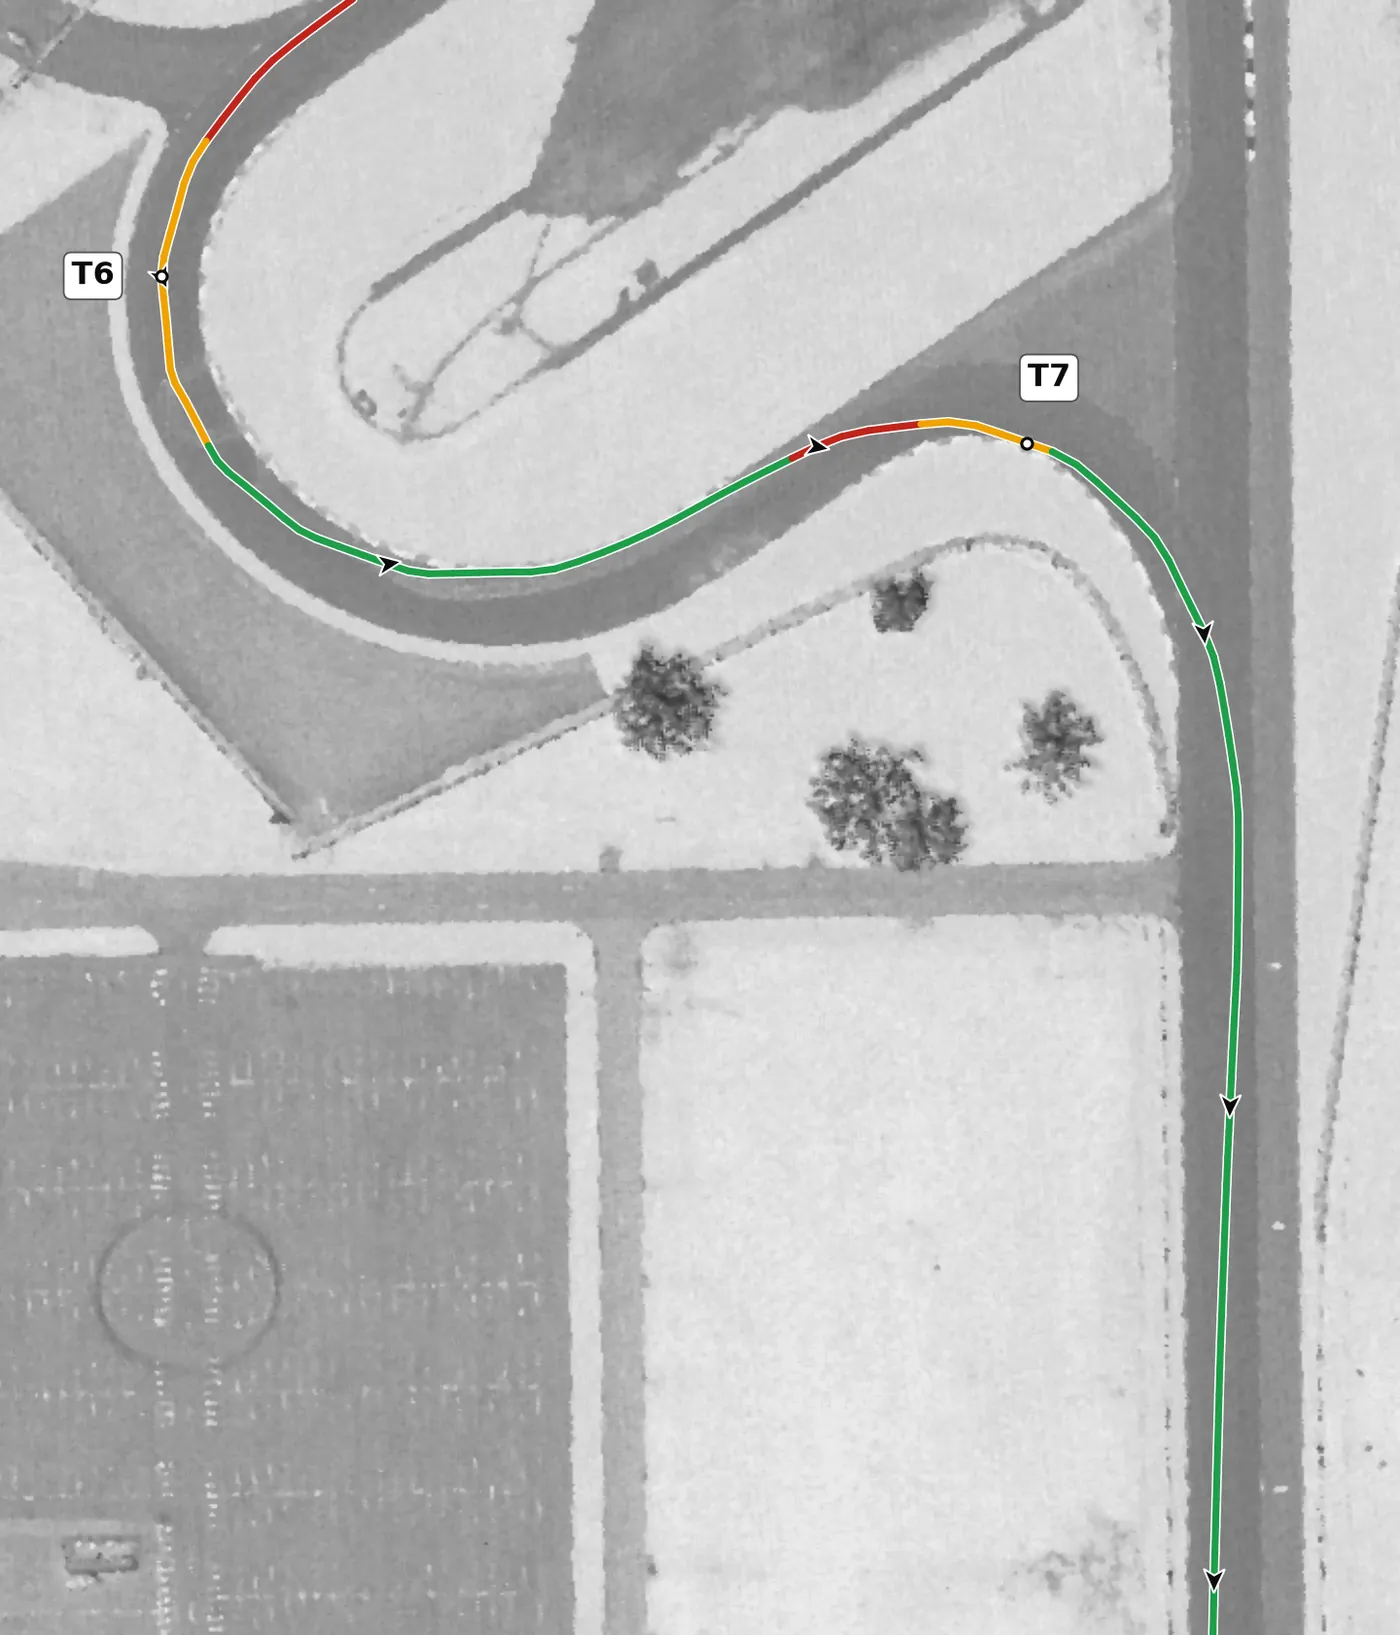
This tight right takes you onto the Hulman straight, one of the longest full-throttle runs on the lap, so it is a classic exit corner. Brake in a straight line from the left side, turn in late, apex late and be back to full throttle early as the car runs out to the left. The mistake to avoid is attacking the entry: a slow, tidy exit here is worth far more than a late braking point.
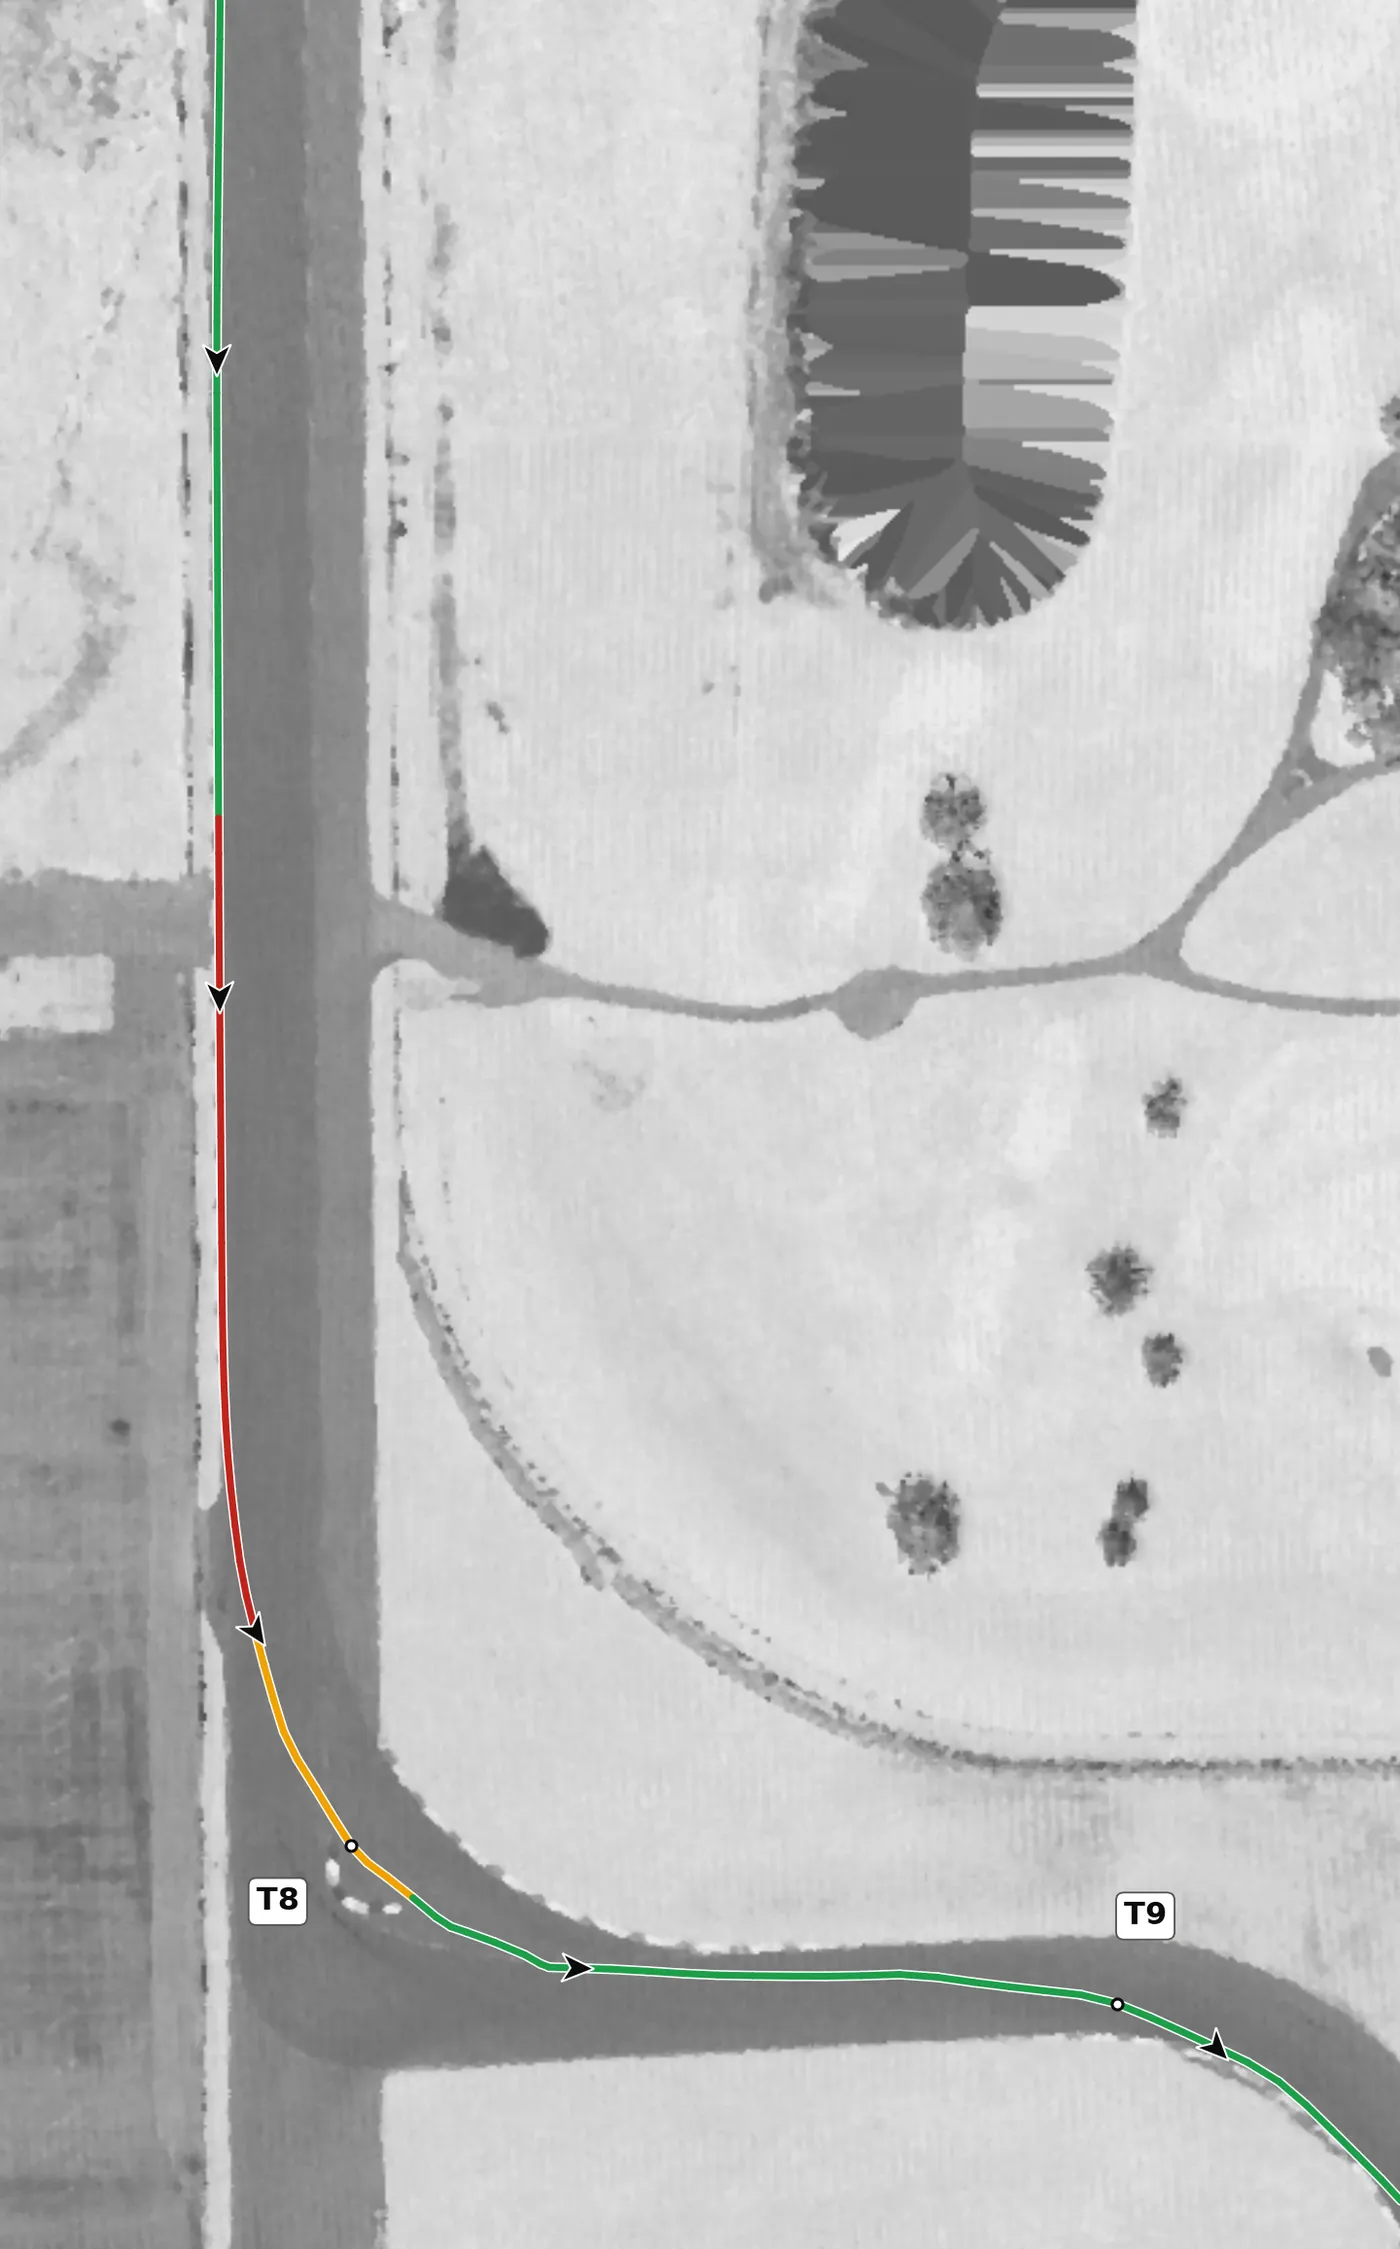
The Hulman straight ends in one of the heaviest stops on the lap, the main passing zone, into a left with a wide paved entry. Brake hard and straight from the right side, turn in smoothly using the flowing entry rather than squaring the corner off, and aim for a late apex before letting the car run out to the right. The mistake to avoid is braking too late and missing the apex, because this is where people overcook it most.
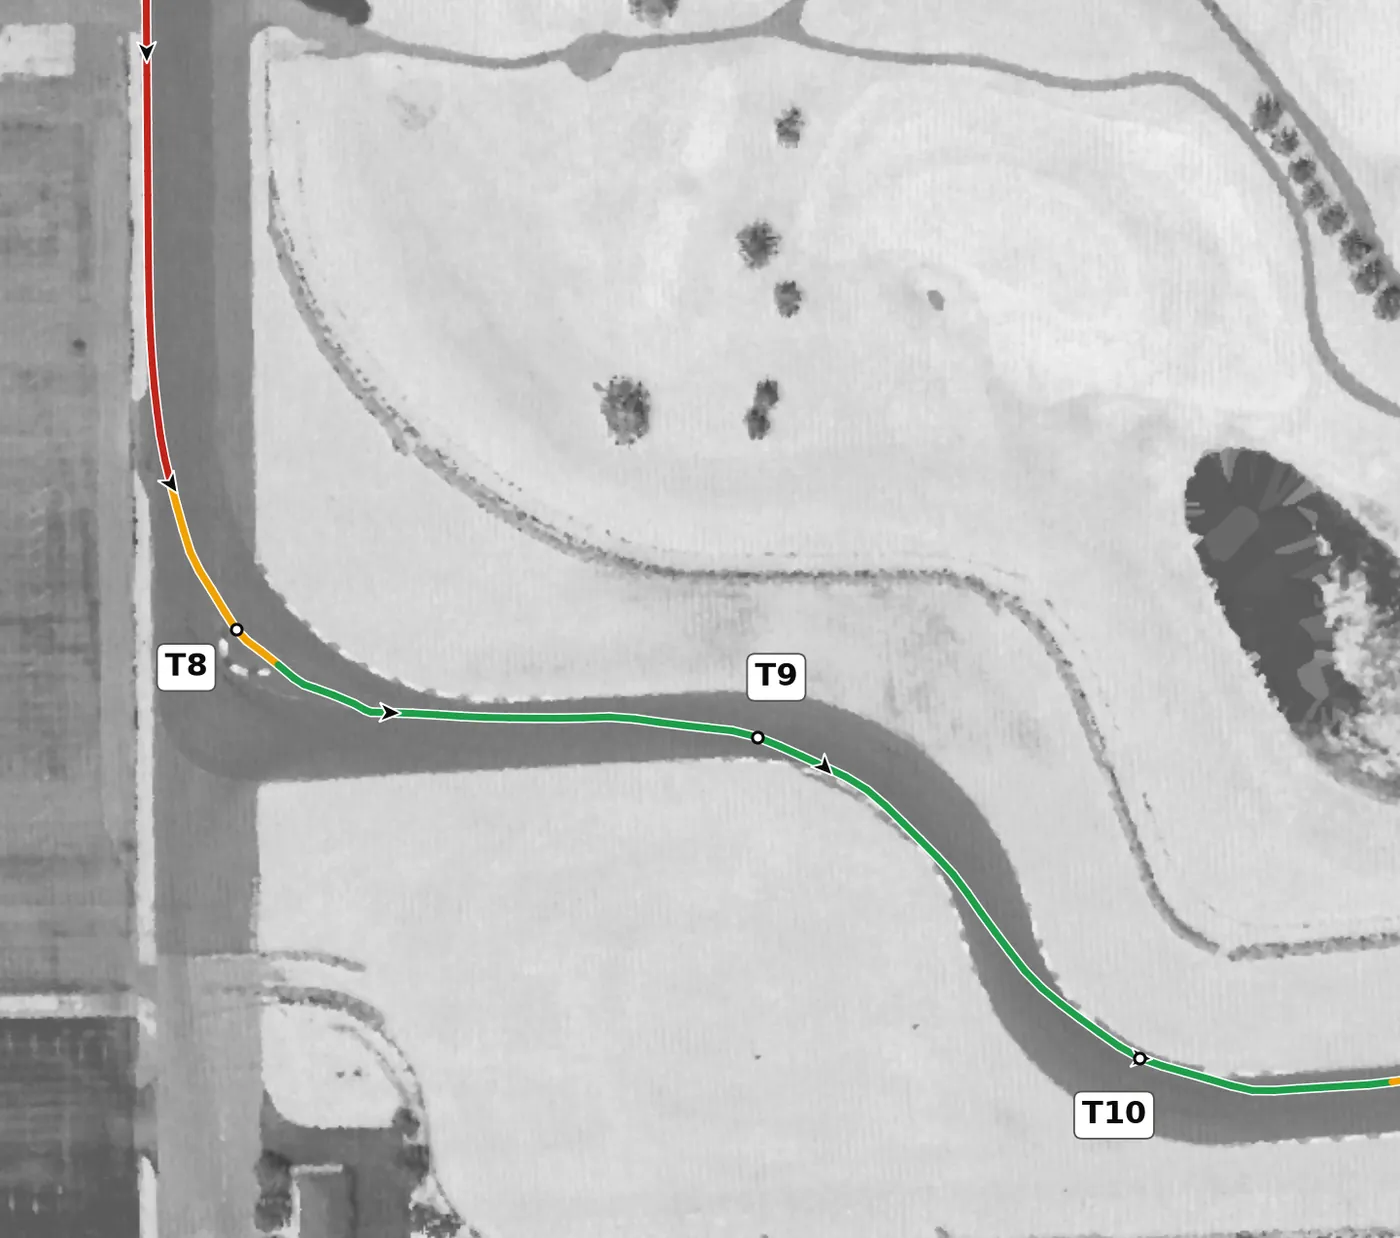
T9 is the first of the south-east esses, a right that flows on from the T8 exit and is nearly level and only lightly cambered. You are still building speed through it, so stay on the throttle, keep your hands smooth to a late apex and bring the car back toward the middle on the exit, because T10 follows quickly. The mistake to avoid is a sudden input here that leaves the car unsettled for the next two turns.
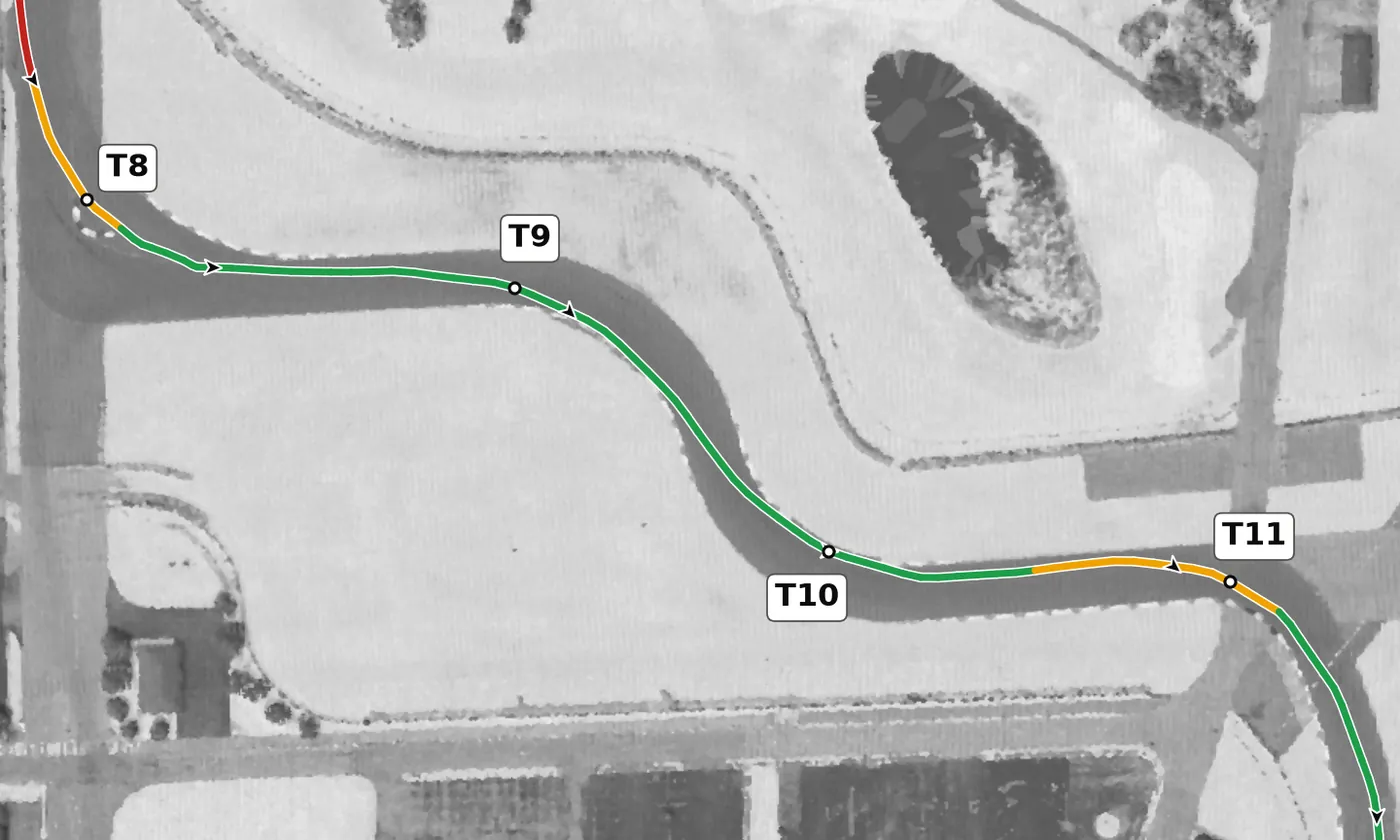
This left in the middle of the esses is level and gently on camber, and the time comes from linking it to its neighbours rather than from the corner itself. Take a slightly later apex than feels natural and use only as much road on the exit as you need, so you are already placed for the right at T11. The mistake to avoid is unwinding the wheel early and running wide toward the edge.
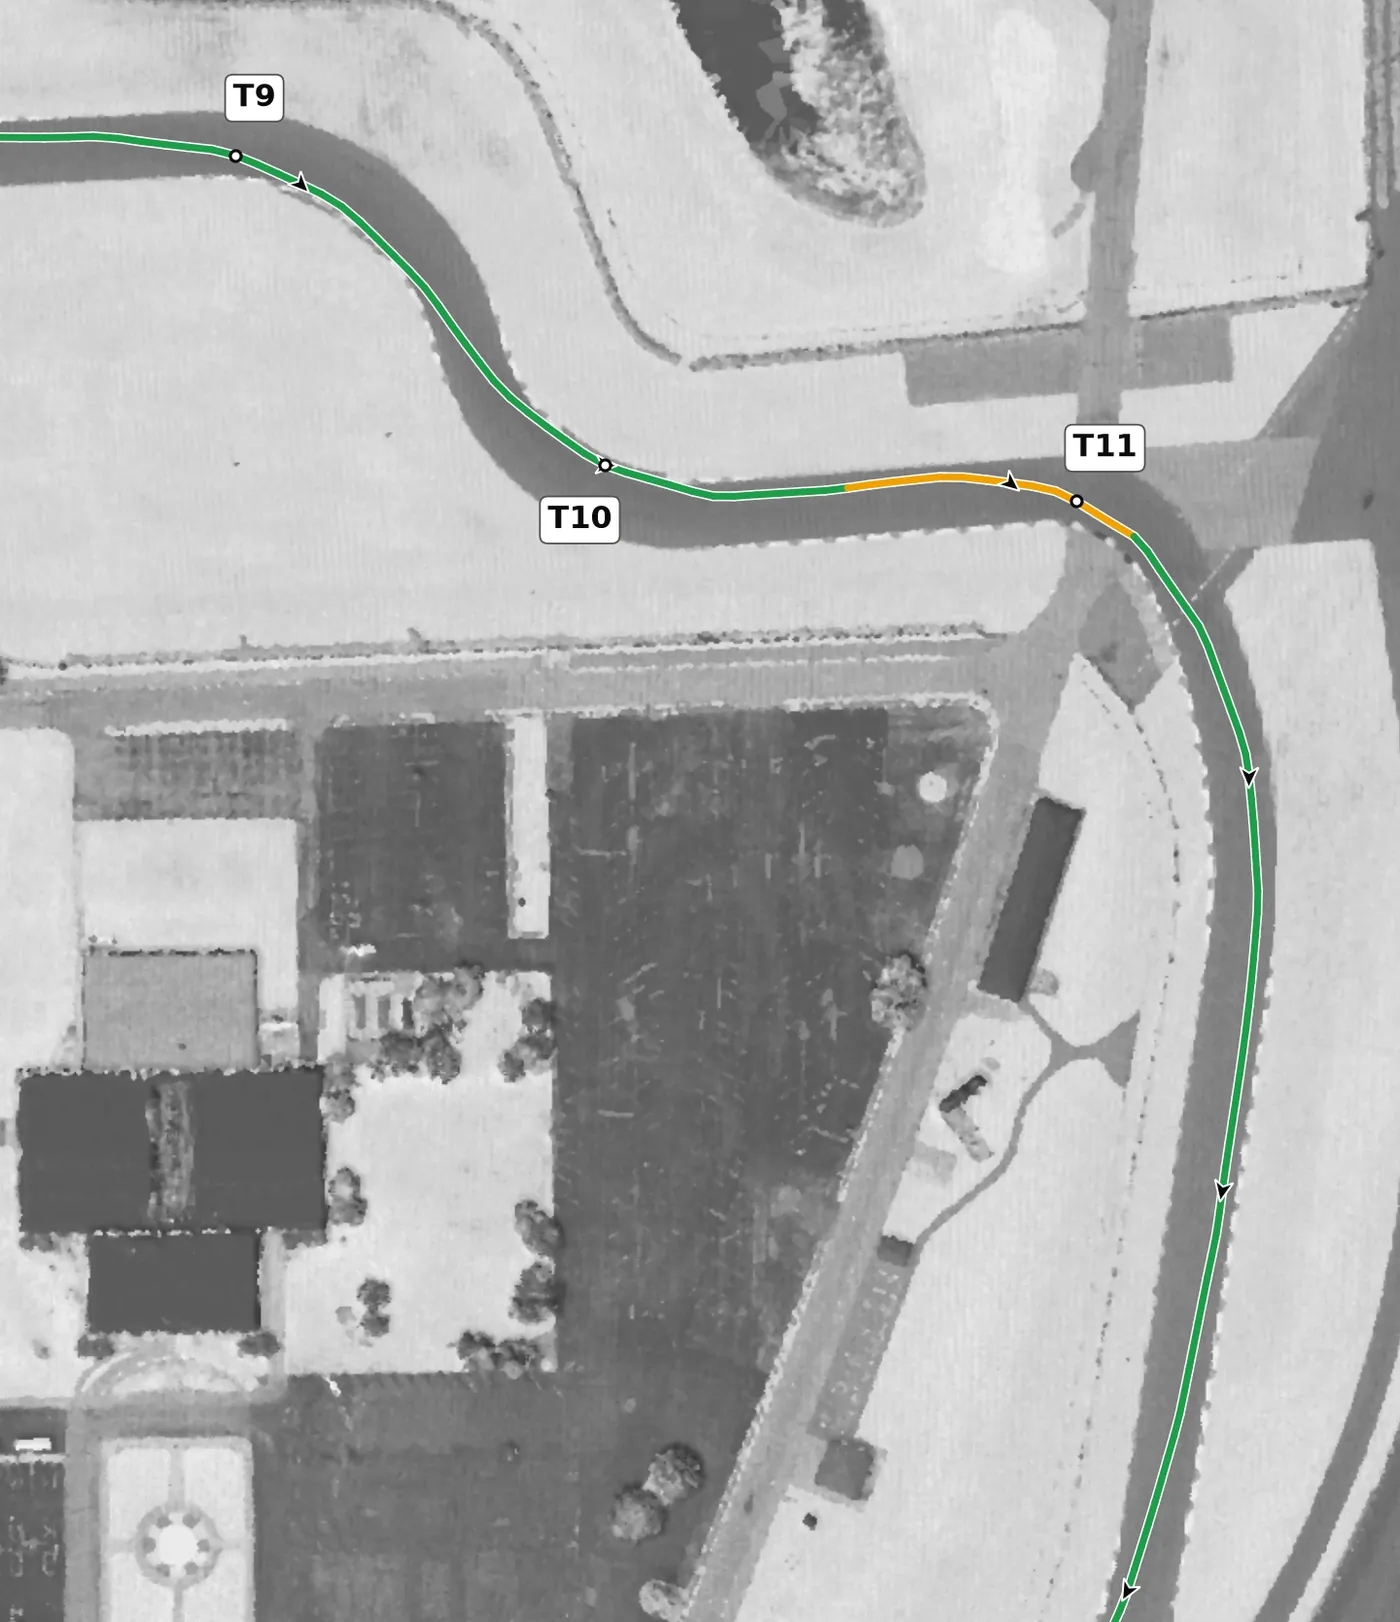
T11 is the right that ends the esses and sends you toward the oval, so treat it as an exit corner and let it build into the throttle. Take a late apex, unwind smoothly and let the car run out to the left, the side you want for the fast right at T12. The mistake to avoid is braking hard here; it needs little or no braking once you know it.
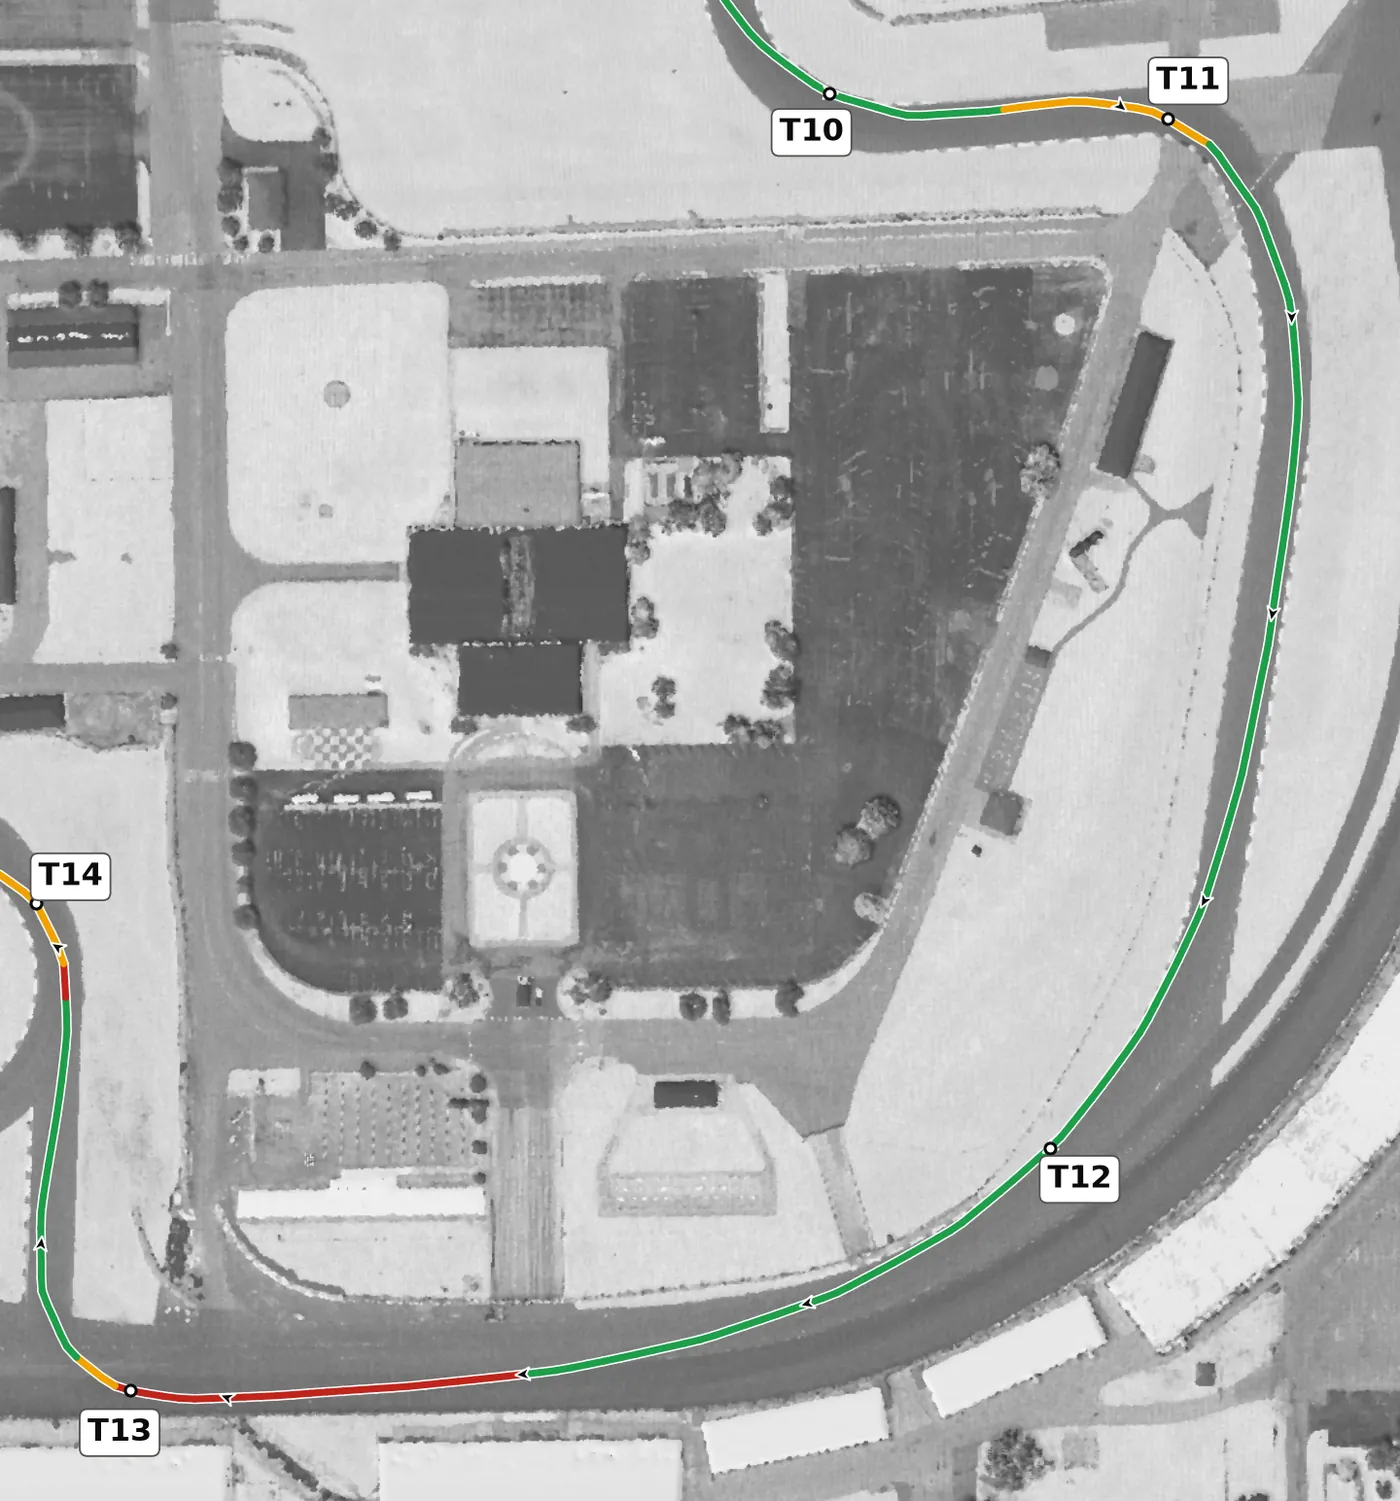
T12 is the long, fast right onto oval Turn 2, and the banking only starts out toward the wall: on the usual line the camber climbs from about +2.6% at the apex to more than +10% where the road meets the oval. It needs no braking and at most a small lift to settle the car; take a late apex and let the car run out to the left onto the banking, which supports you more the wider you go. The mistake to avoid is fighting to stay low on the flat inside when the banked pavement further out gives more grip.
From the survey: Oval Turn 2: camber on the line rises from +2.6% at the apex to +10.7%, and the full pavement reaches about +15%. The lowest point on the lap is on the way in.
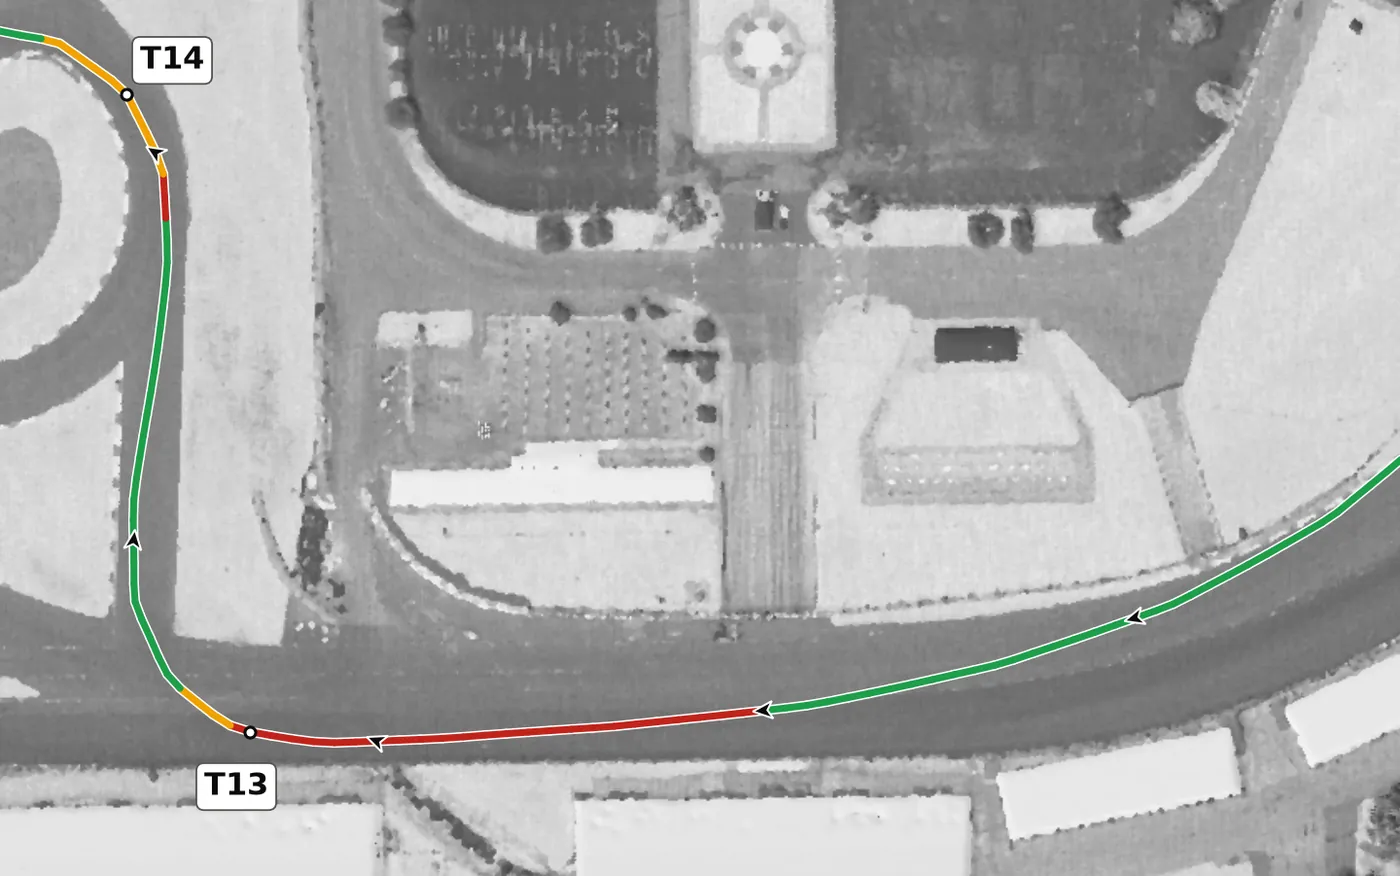
The short chute ends in a heavy stop for T13, a sharp right that still carries some of the oval's cross-fall at the apex. Brake hard and straight from the left side, mind the pit-entry lip in the braking zone, and give yourself a good angle with a late apex, because the sharper T14 left follows almost at once. The mistake to avoid is running over the big apex curb, which upsets the car right where you need it settled.
From the survey: On camber at the apex (+4.7%): the last of the oval's cross-fall.
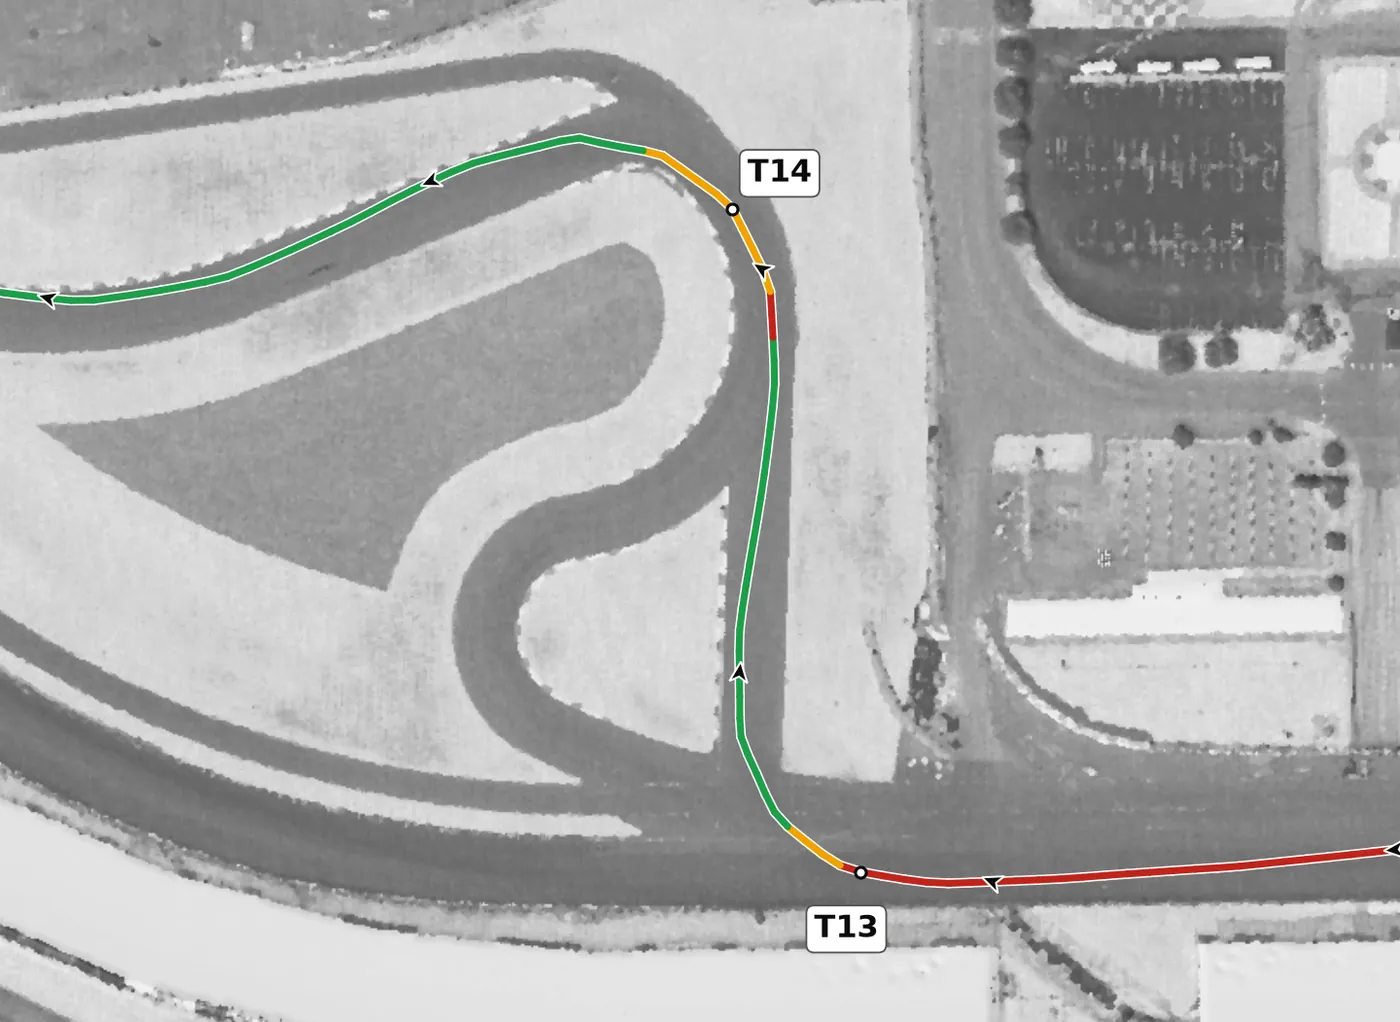
T14 is a tight left that comes straight after T13, so you won't use much throttle between them. Let the car straighten for a moment after T13, brake briefly in a straight line, then turn in for a late apex on the left and let the car run out to the right. The mistake to avoid is joining T13 and T14 into one long, slow arc that leaves you badly placed for the final turn.
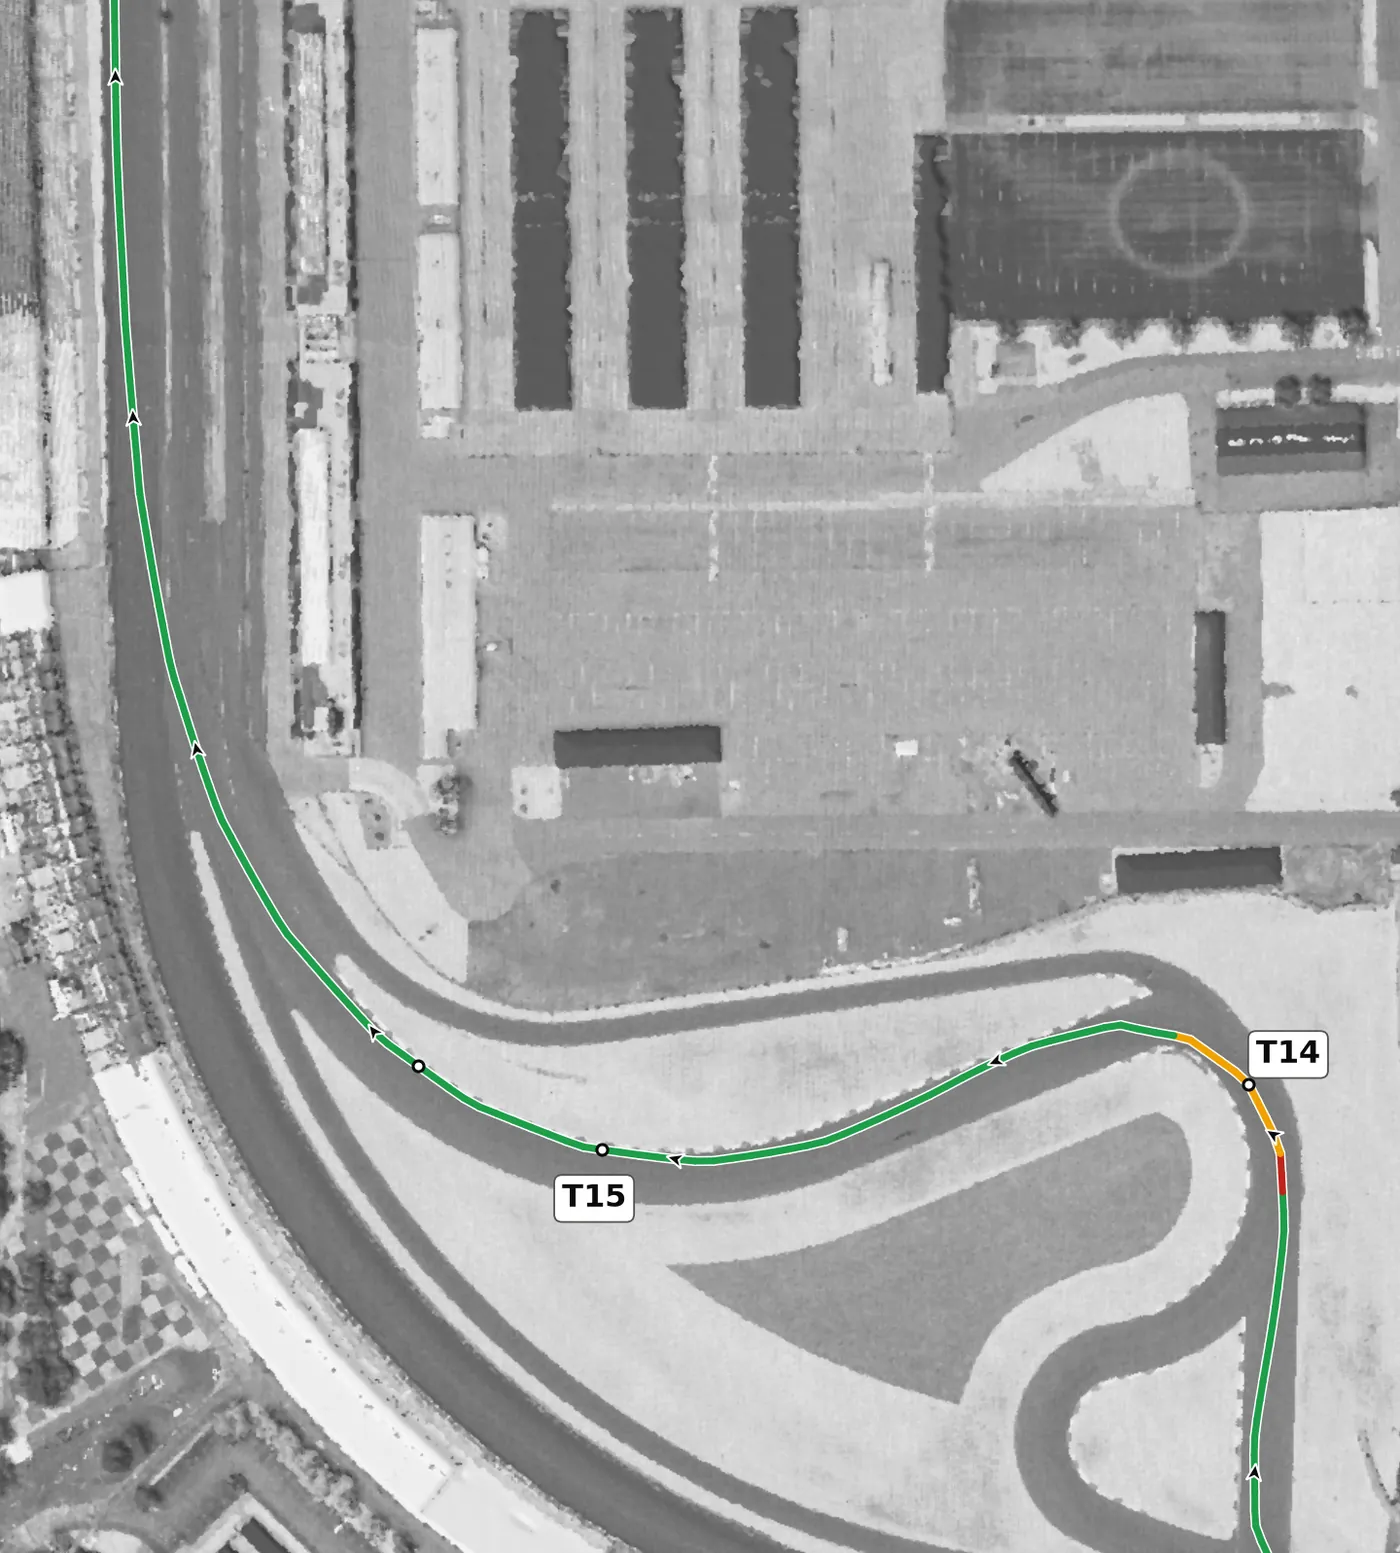
The last turn is a long right in two parts: a tighter first apex in the infield, then a second part that runs out through oval Turn 1, where the camber goes from slightly off to strongly on as the banking arrives. Settle the car while the surface is still flat or off camber, take the first apex late and feed in the throttle as the banking loads the car, letting it run out toward the outside wall onto the front straight. The mistake to avoid is going to full throttle too early on the flat section, before the banking is there to help.
From the survey: Off camber where the second part starts (−0.7%); the oval Turn 1 banking then reaches +7.3% on the line.
Version history
- v1.2 · 2026-10-01 — T9 is now drawn as throttle where the car is still gaining speed through the esses, instead of as a lift.
- v1.1 · 2026-10-01 — The line now goes straight from throttle to brake, with no coasting in between: the amber run-up to the brakes is gone at T1 (about 150 m of it), T4, T6, T7, T8, T13 and T14. Braking points are unchanged in this version. Guide text for T3, T5, T9 and T12 now matches the line. Version history and feedback contributors added.
- v1.0 · 2026-10-01 — First version.
Feedback contributors
Drivers and instructors whose feedback has improved this line. Thank you.
- Mike M — no coasting between throttle and brake (v1.1)
- Brian L — corners where the car gains speed are throttle, not a lift (v1.2)