Sonoma Raceway — Race Line
Estimated from data not in trackdays.ai. The speeds and braking points come from cars lapping at a typical quick HPDE pace, checked against published brake markers. If you have data you would like to contribute, please send it to upload@trackdays.ai to help improve our estimates. Turn numbers are our match of the 12-turn track map to the LiDAR corners, not a confirmed canon; unlabelled apex dots are bends with no number.
Heads up: This is an estimate of a typical quick HPDE line, not any one car's lap. Braking points are a starting point, not a target: start a little earlier and work later in small steps. The line goes straight from throttle to brake; amber only marks where you really lift or hold part throttle. The turn numbering is provisional. Sonoma climbs and falls 50 m (163 ft) a lap, so read the corner notes: crests, compressions and camber matter here as much as the line.
- Throttle
- Coast / partial
- Braking
- Apex
- T4Off-camber corner
Arrows show the direction of the lap. The grey basemap is USGS LiDAR: dark = asphalt, light = grass. Tap any map for the full-size image.
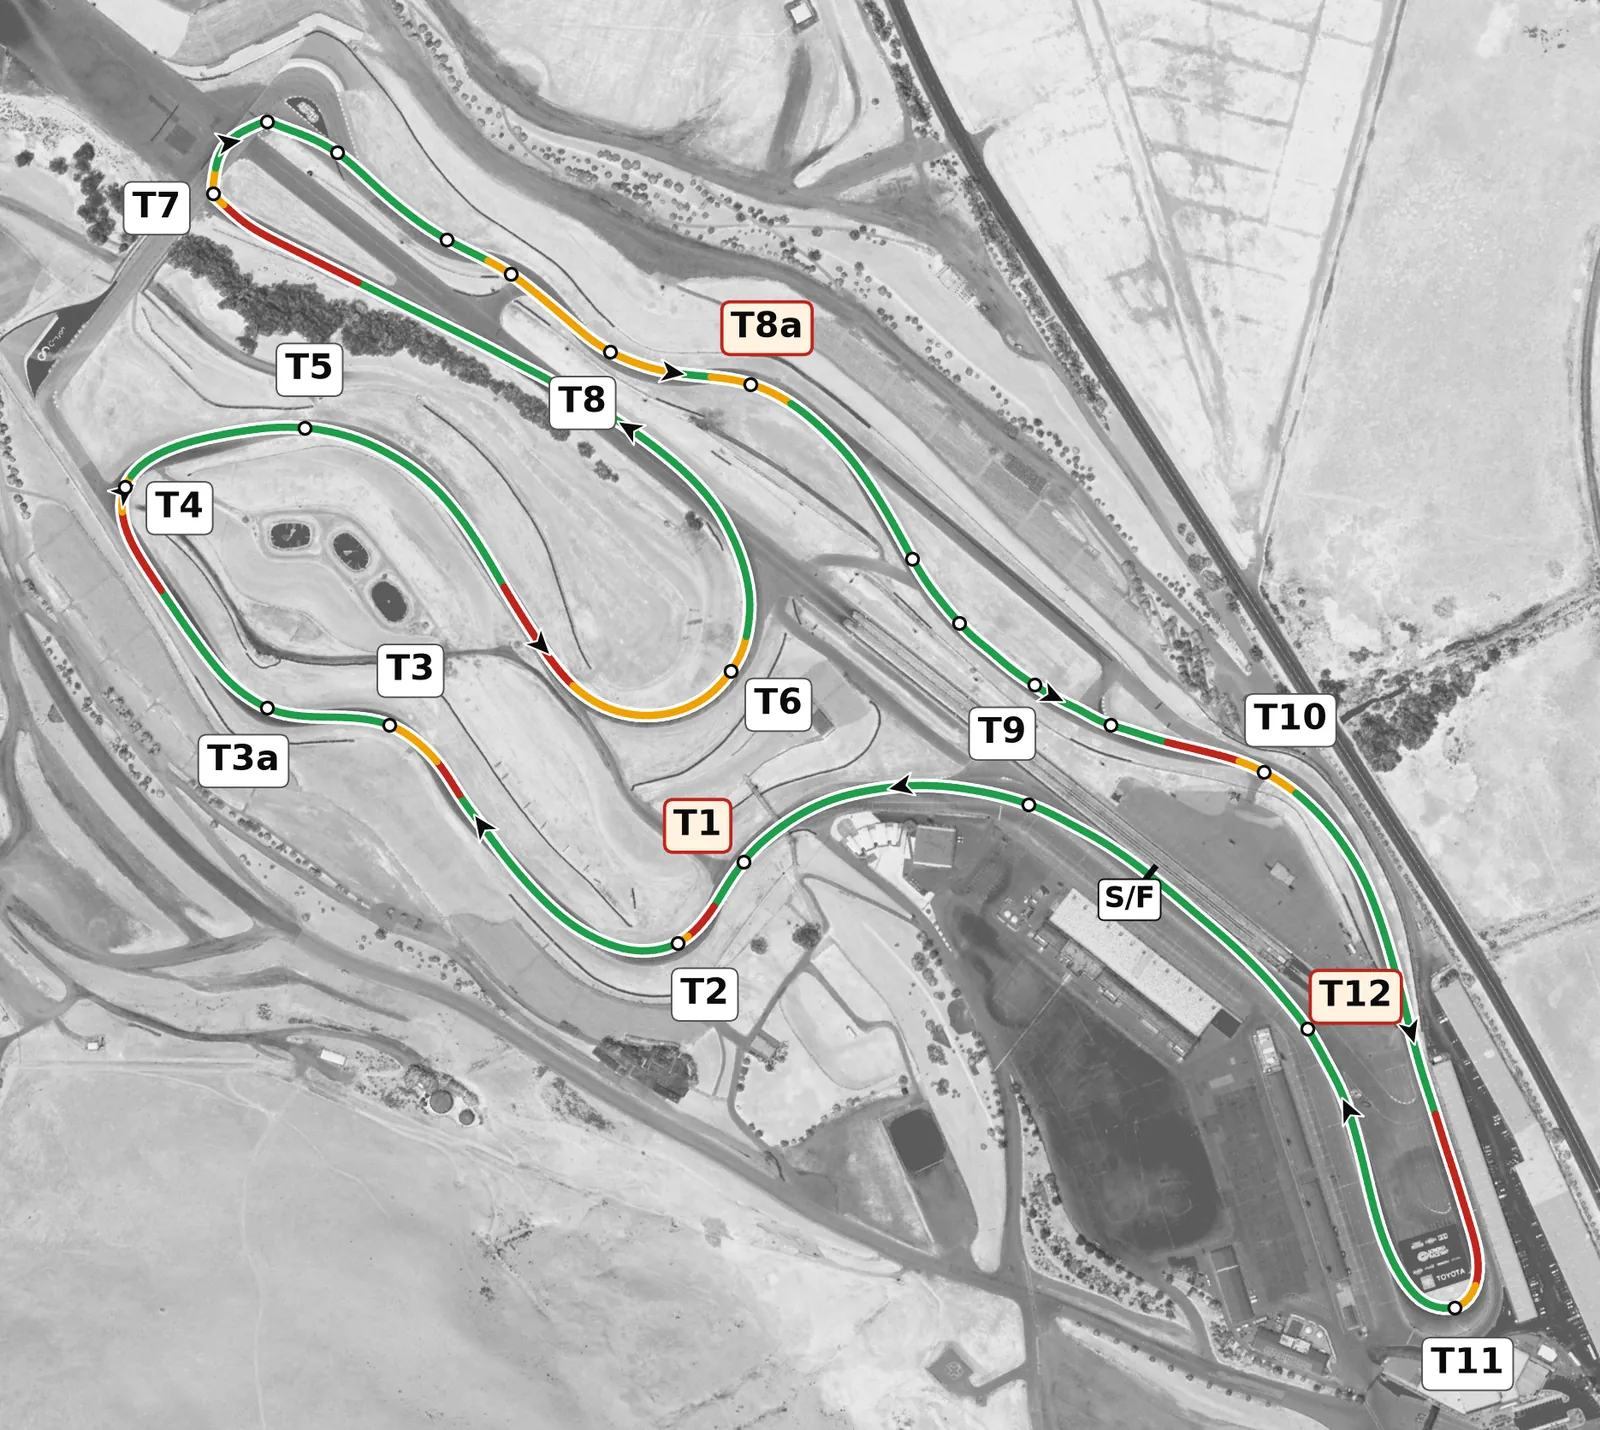
Sonoma climbs and falls about 50 m a lap, so its corners are shaped as much by blind crests, compressions and steep grades as by their radius, and the runoff is tight in places. The opening climb through T1 to T3a and the plunge through T4 into the Carousel reward smooth, early braking in a straight line before each crest, while the two hairpins (T7 and T11) decide your speed down the straights that follow. Build up gradually: several corners look slower or faster than they are, and T8a and the bend before it are off camber on a descent.
Sectors
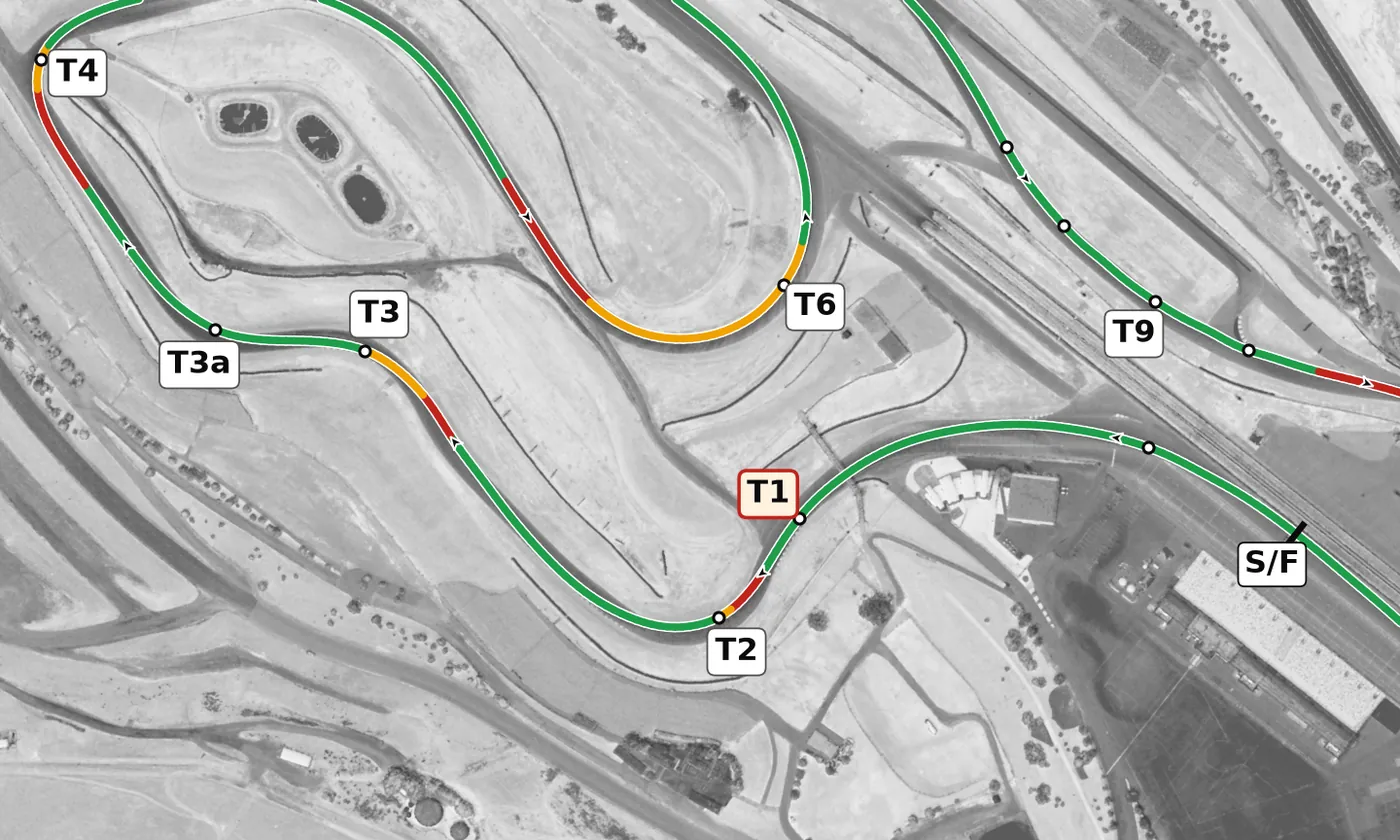
The lap starts with a long uphill left at T1 and a hard climb to the braking zone for T2, a right that you take over a crest, so finish your braking before the road rolls over. The road then dips into the quick left at T3 and climbs again to T3a, a blind right at the highest point of the lap; stay on the left going up the hill and turn in as the road crests.
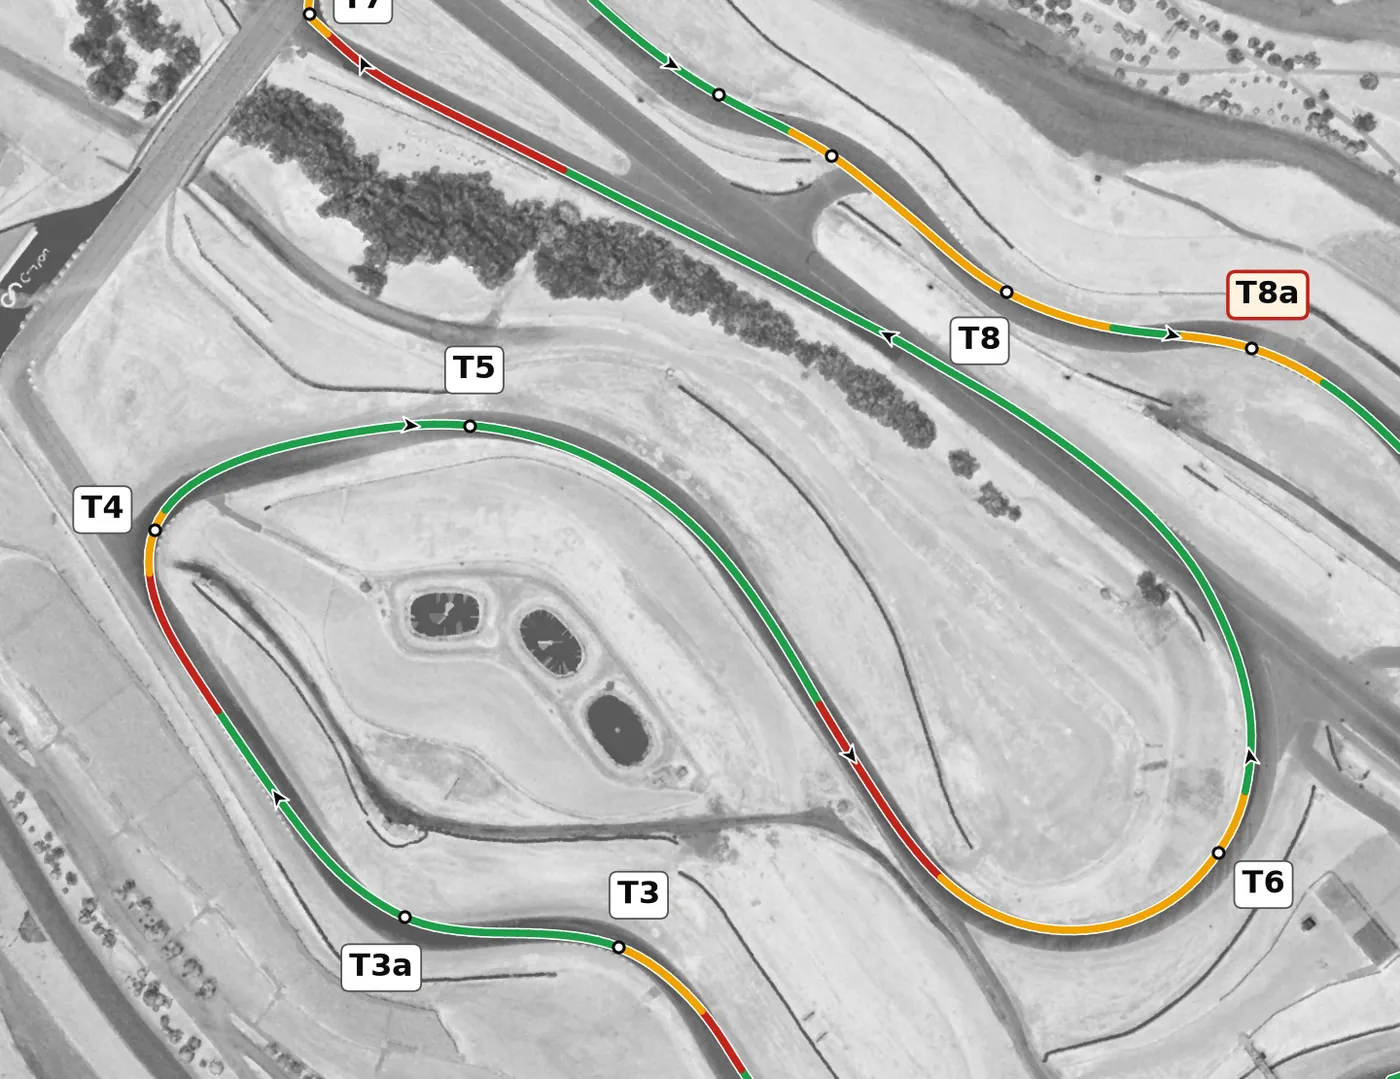
From the top of the hill the road plunges: T4 is a tight downhill right that is easy to overshoot, and T5 is a fast right that you take close to flat while keeping the car to the right. Brake before the crest that leads into the Carousel (T6), a long downhill left that is heavily banked on entry and flat on exit, then use all the road on the way out onto the long straight to T7.
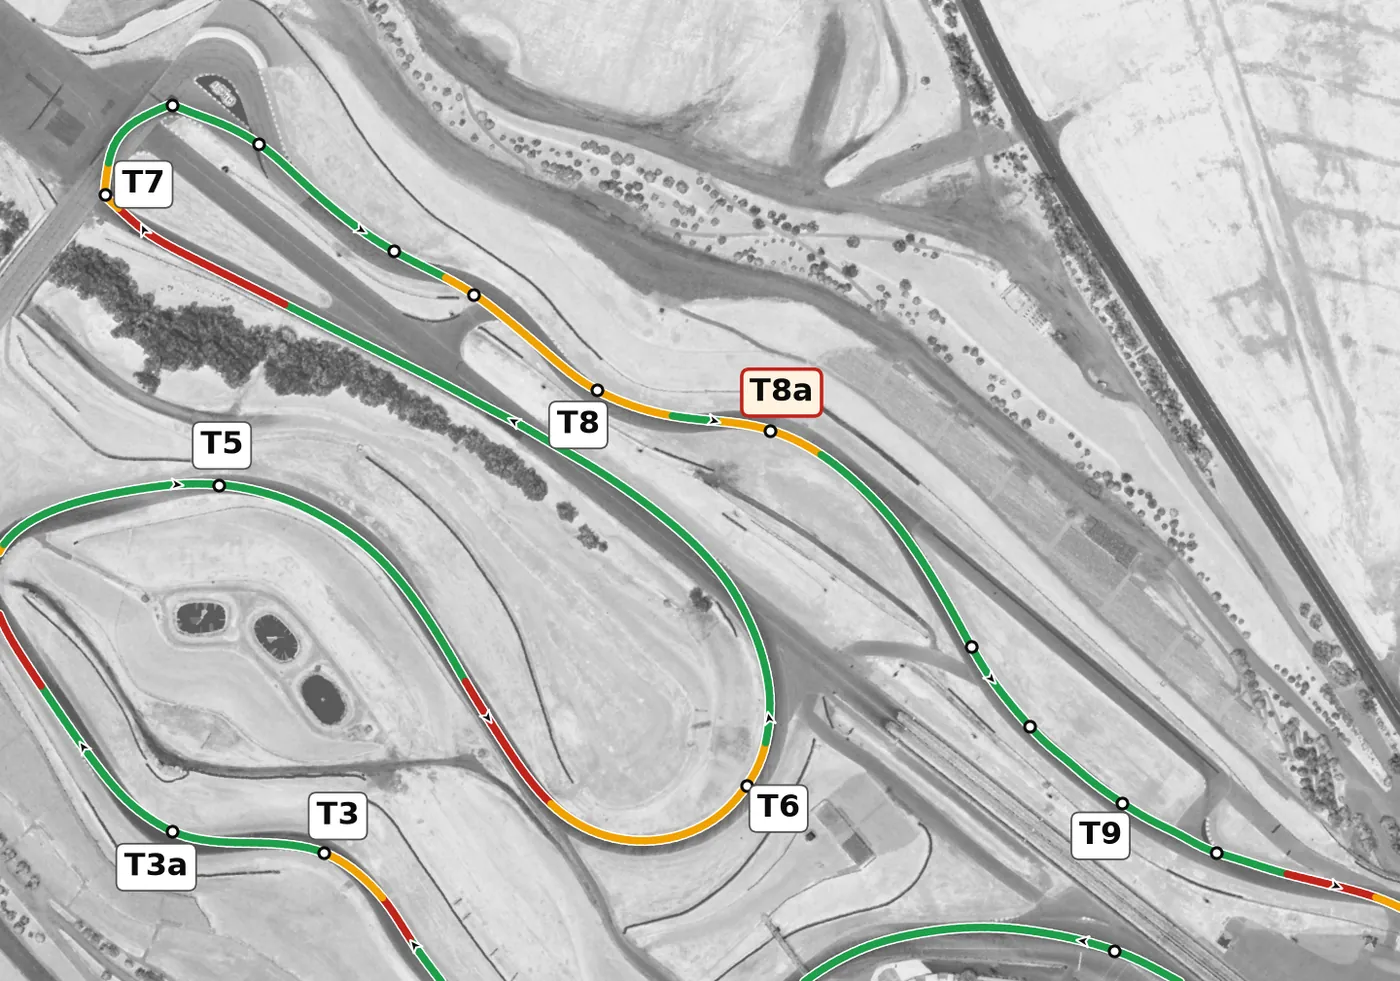
T7 is a heavy braking zone into a two-apex right-hand hairpin, and the exit from its second apex is what matters. The Esses (T8 and T8a) are a quick left-right on a gentle descent where a smooth, early speed correction pays off, and T9 is a long fast left that most cars take near flat, so keep your hands smooth and use all of the track.
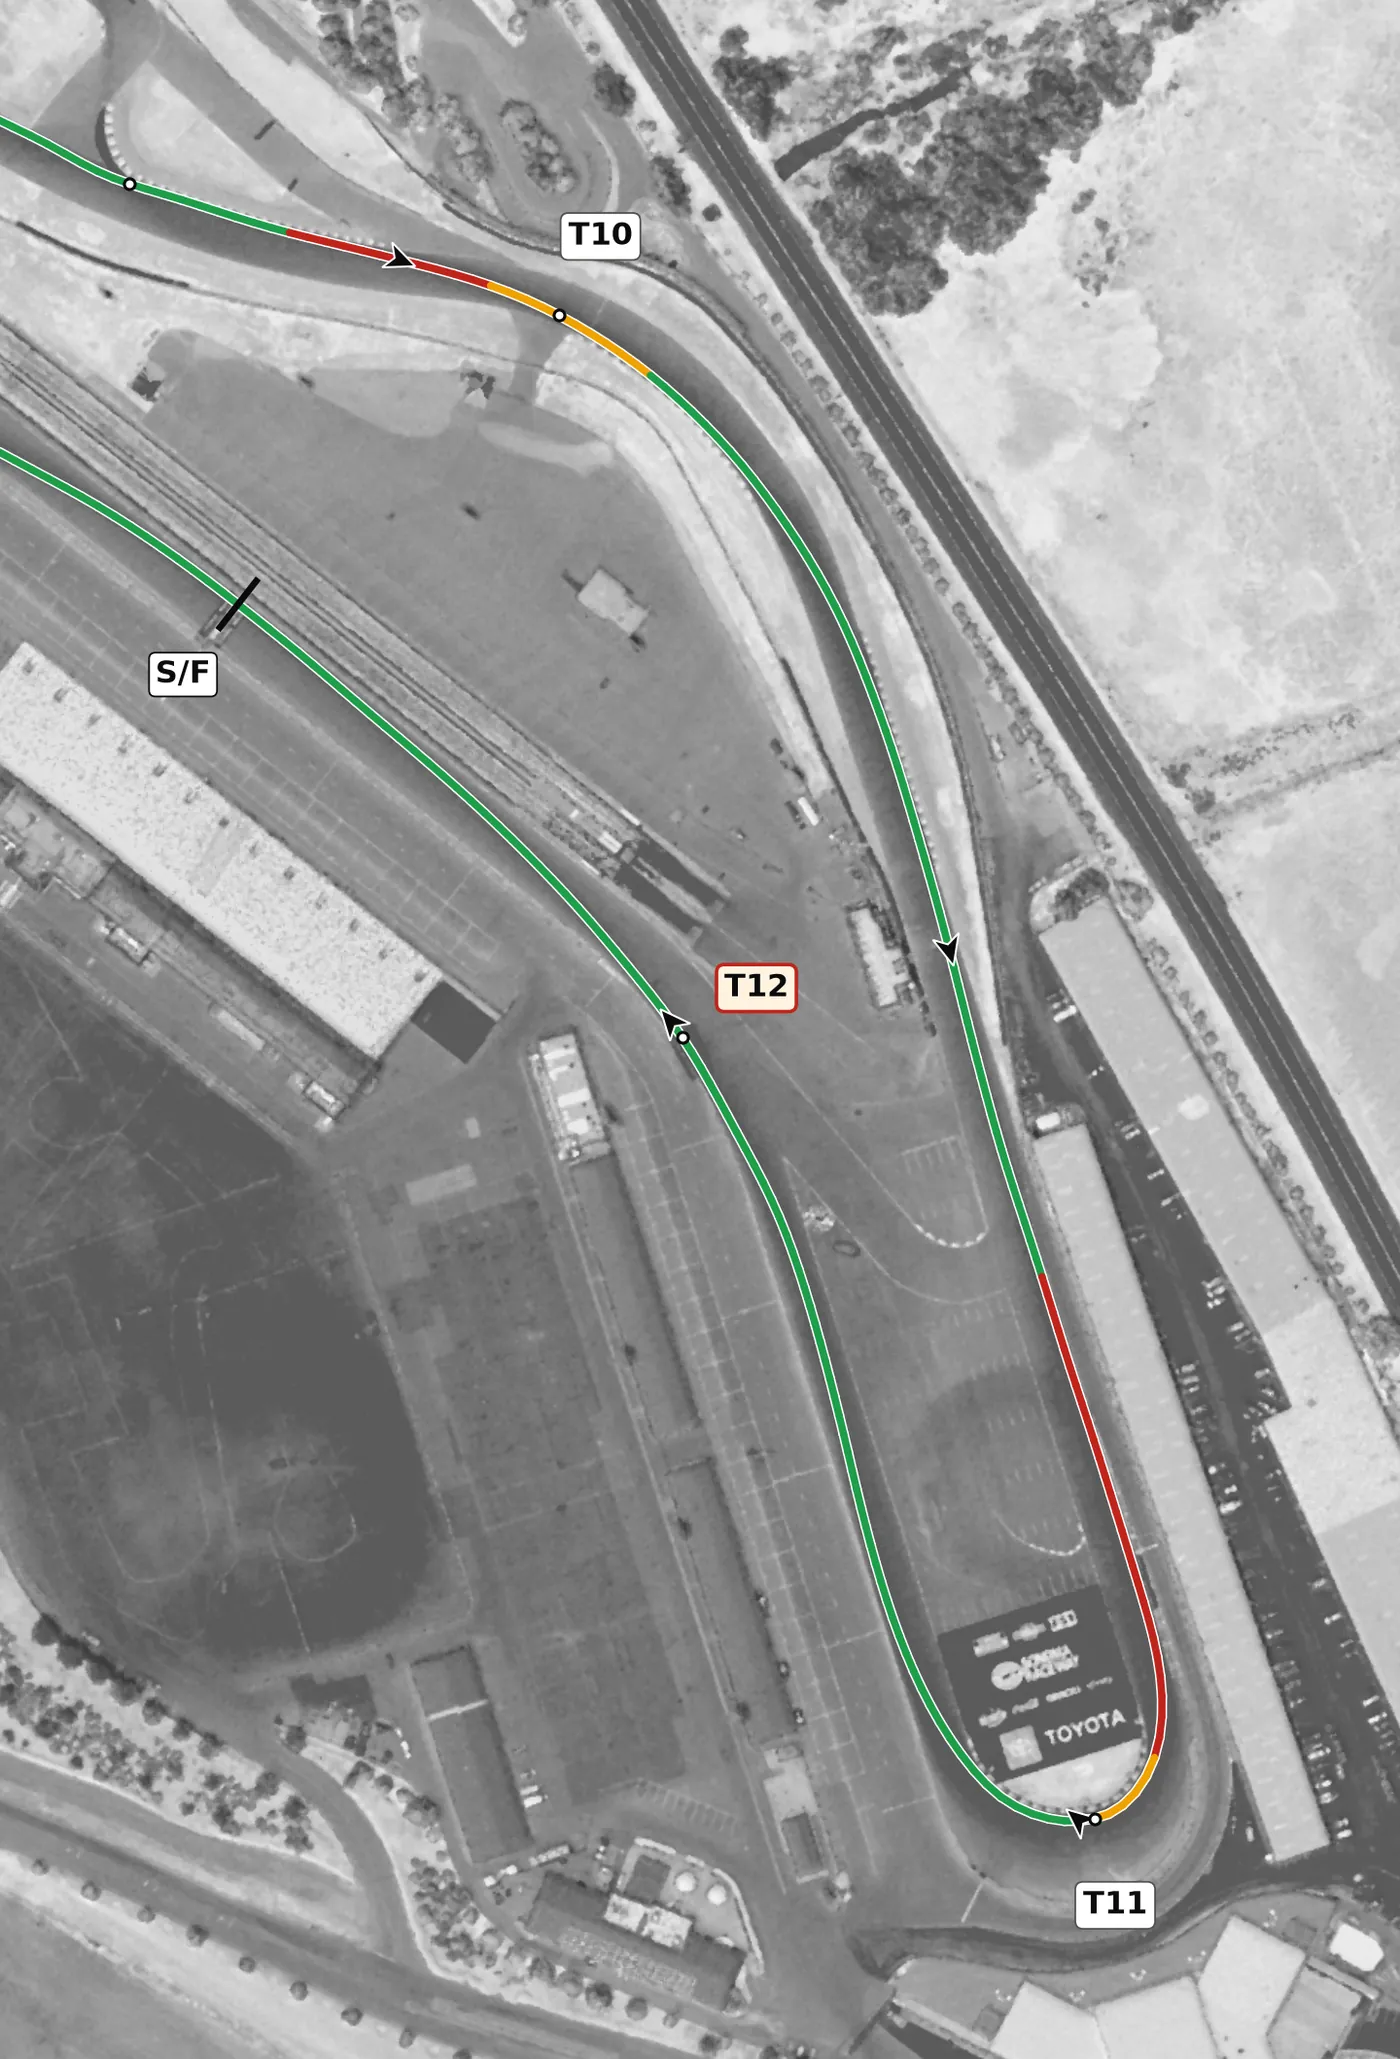
T10 is a fast right at the bottom of the hill with little runoff, so be settled and on line before you turn in. Brake hard and straight for T11, a flat right-hand hairpin at the lowest point of the lap, and be patient for a late apex, then accelerate through the T12 left onto the front straight.
Corners
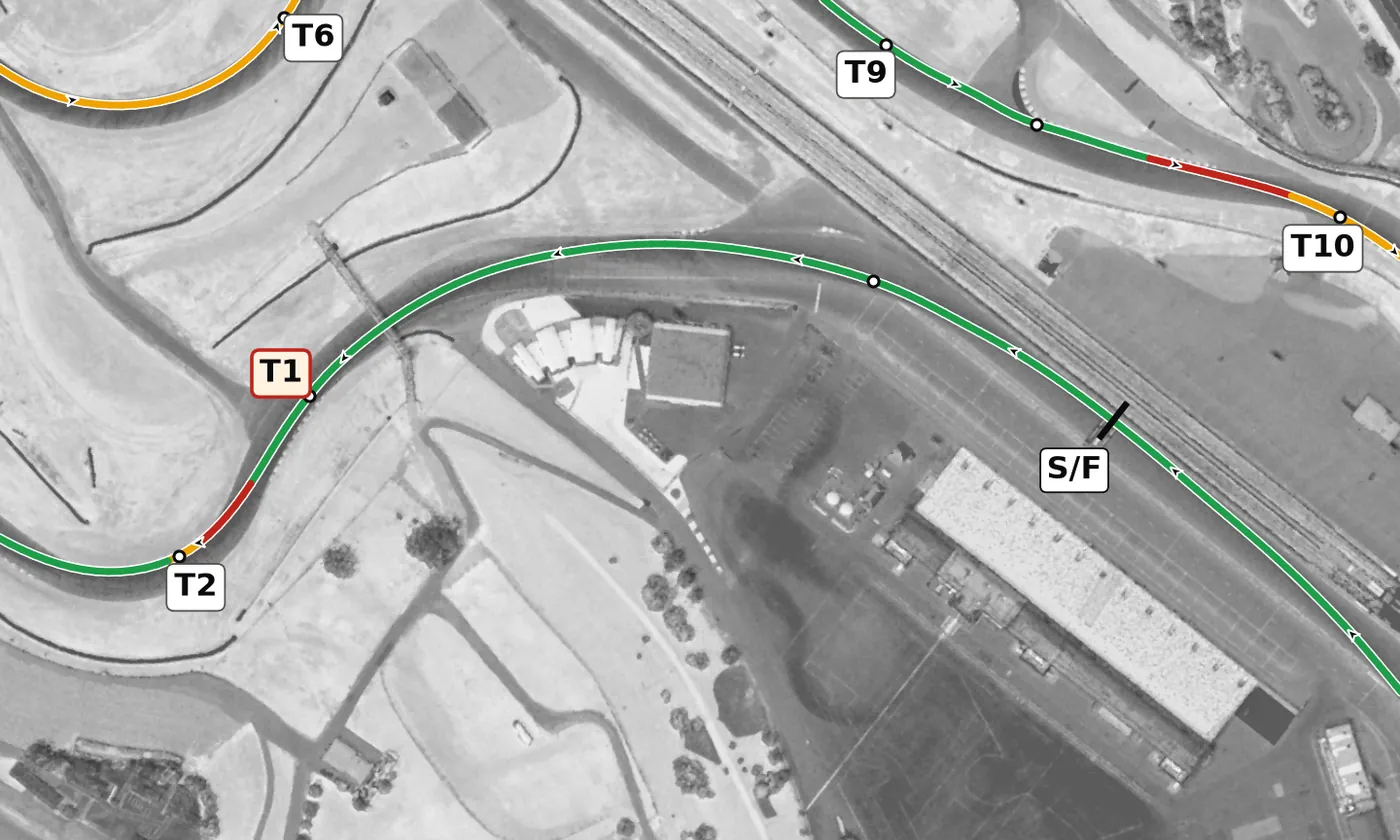
T1 is a long left that begins on the front straight and climbs steeply up the hill, with a compression at the bottom and a slightly off-camber apex. Take it smoothly and let the car finish on the left side of the road so you can brake in a straight line, uphill, for T2. The mistake to avoid is braking or steering hard while the car is light on the climb.
From the survey: Climbs at up to +16%; slightly off camber (−0.9%) at the apex.
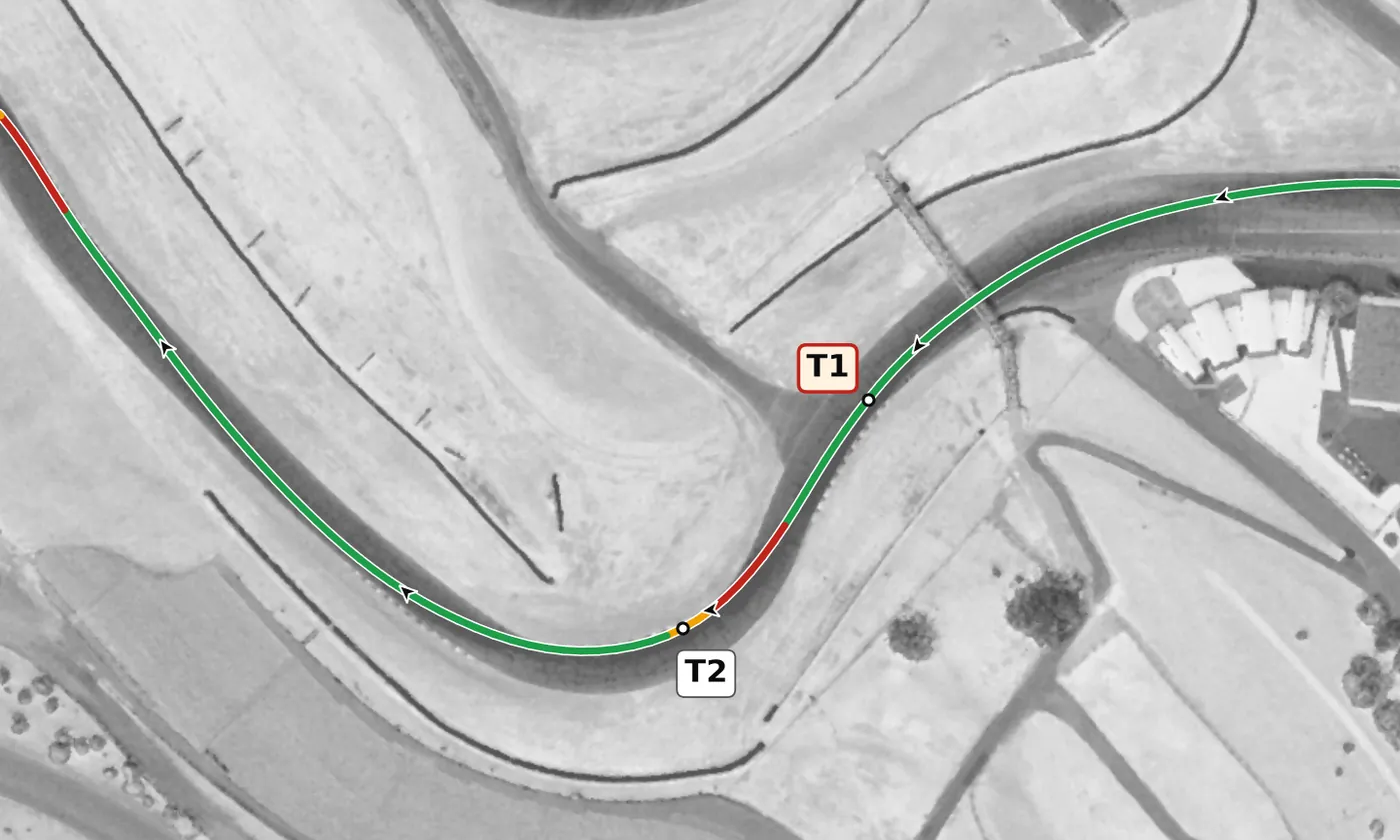
Brake briefly and straight up the hill, letting the steep climb do most of the slowing, and finish it before the crest; then turn in from mid-track and clip the apex toward the second half of the inside curbing. Unwind the wheel as soon as you can and add throttle as the road levels out, letting the car run out to the left and then drift back to the right for T3. The mistake to avoid is braking late and turning at the same time as the car goes light over the top.
From the survey: Over a crest: the car goes light. Mildly on camber (+1.9%).
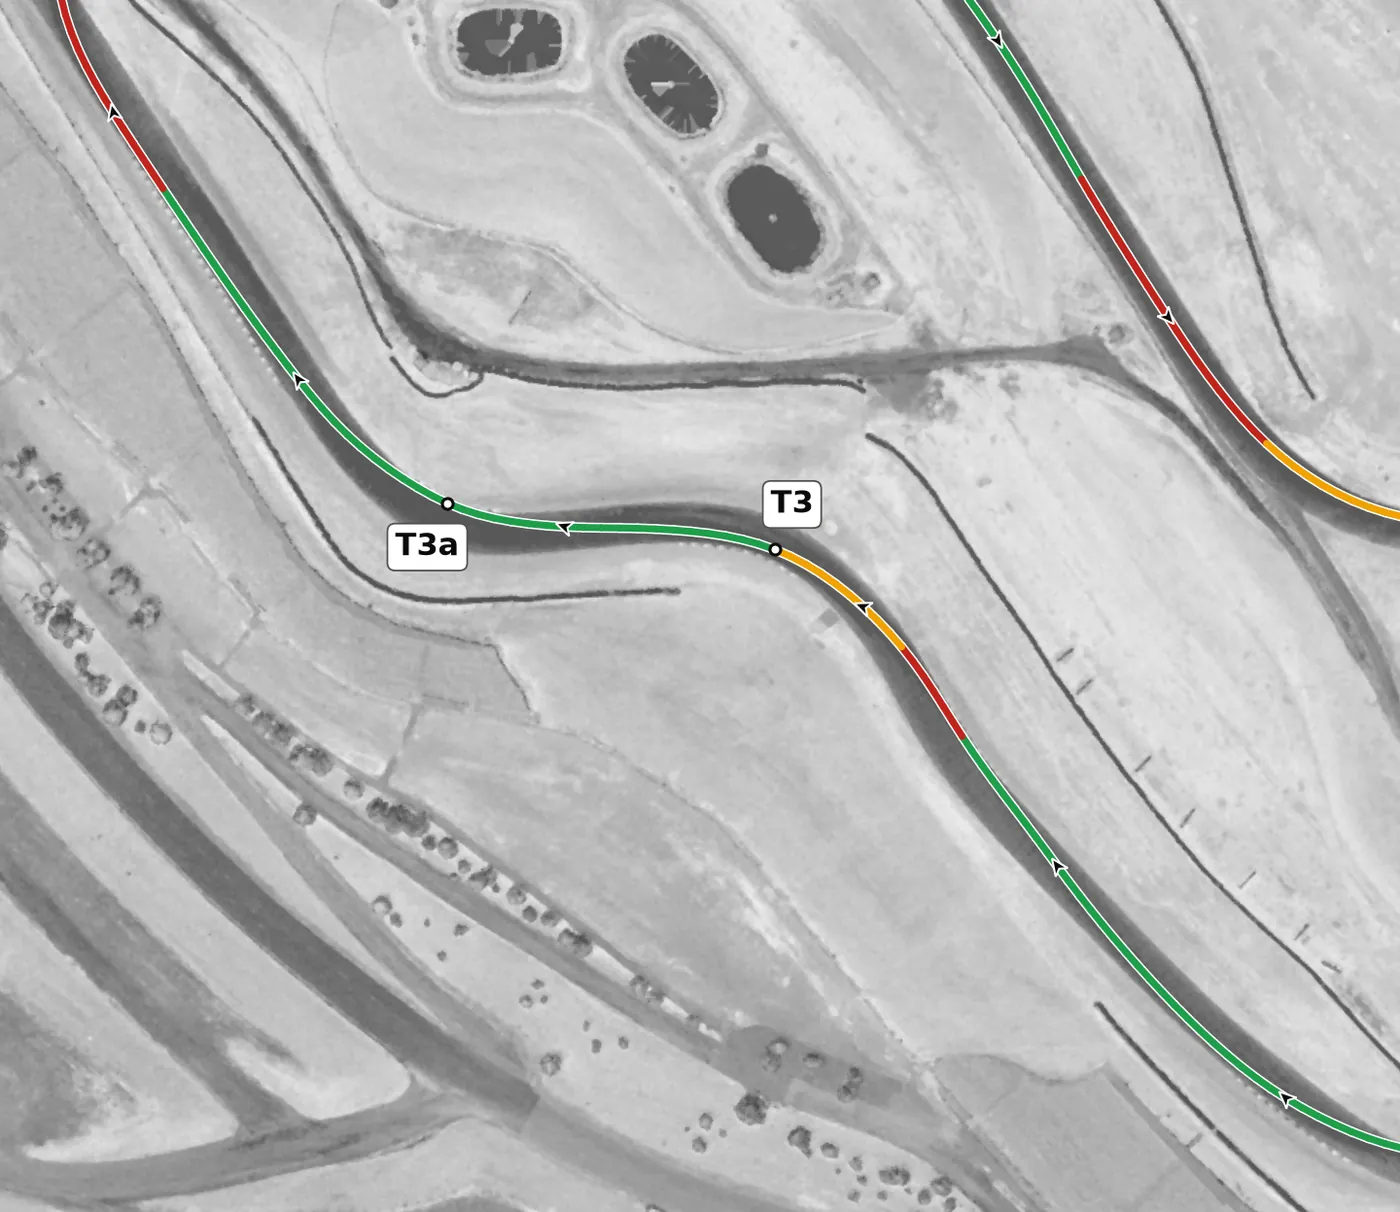
Brake early and straight for T3, a quick left in a dip, and be all the way over to the right so you can straighten it out; the compression at the bottom gives you grip. Then stay on the left side as the road climbs and turn in for T3a, a blind right at the highest point of the lap, aiming for the inside curbing as the road crests. The mistake to avoid is guessing at the T3a apex before you can see it: build up to it over several laps.
From the survey: T3 sits in a compression; T3a is the lap's high point (52.8 m), banked +4.8% on a crest.
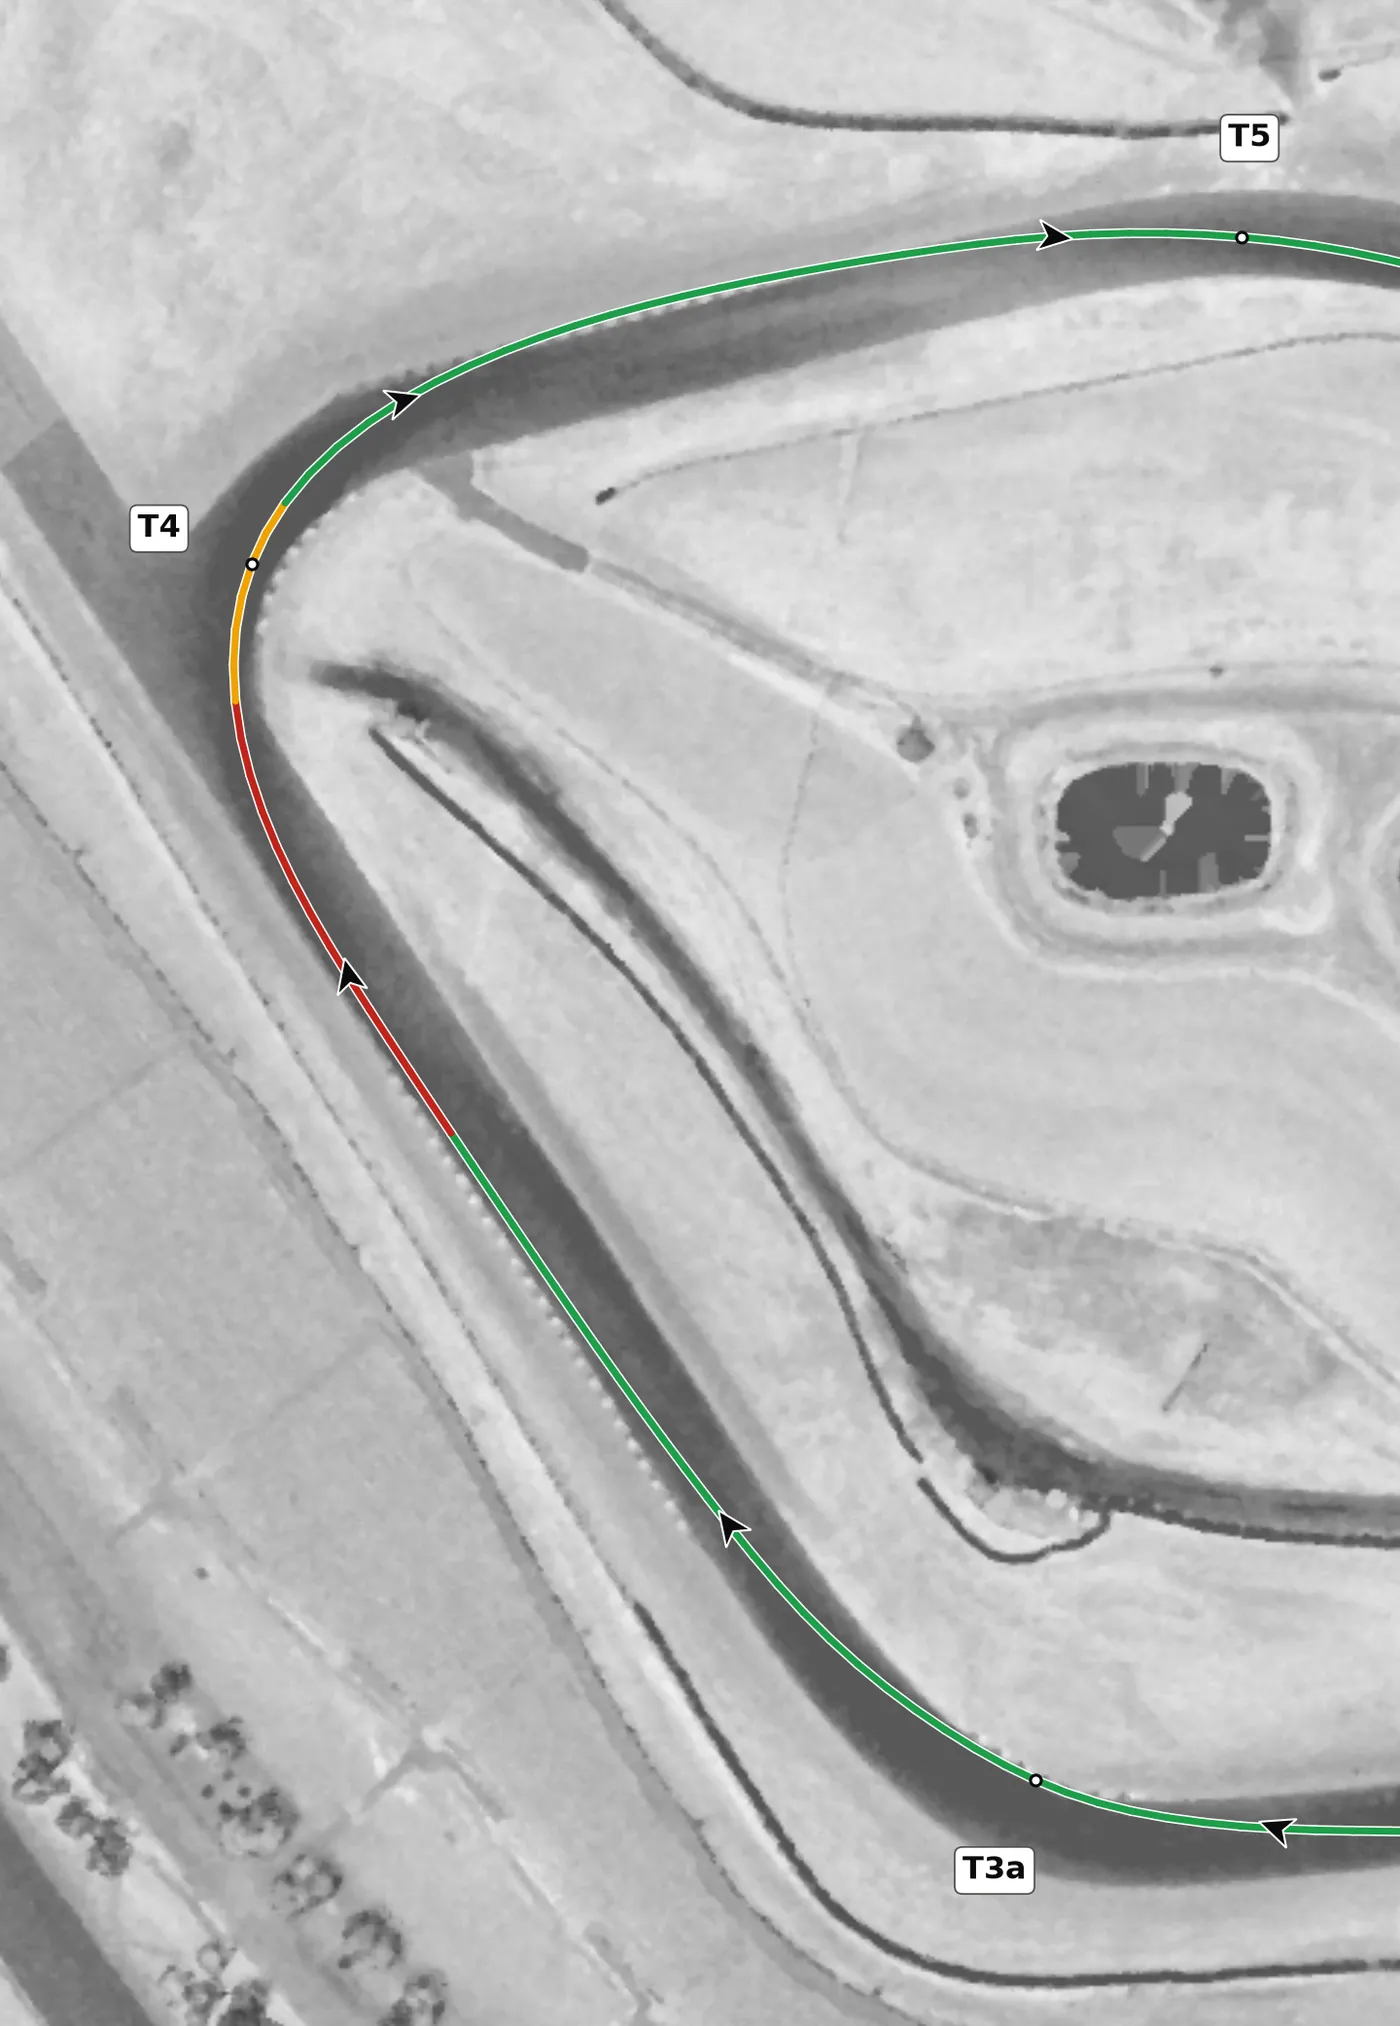
T4 is a tight right that starts the plunge down the hill, and the downhill run into it makes it easy to overshoot your brake point. Brake early in a straight line, let the tires scrub some speed on entry, and aim for one early, clean throttle application on the way out as the road keeps dropping. The mistake to avoid is turning in with too much speed and having to brake again on the steep descent.
From the survey: The plunge starts here: −12.6% on exit, and the steepest descent on the lap (−13.8%) follows.
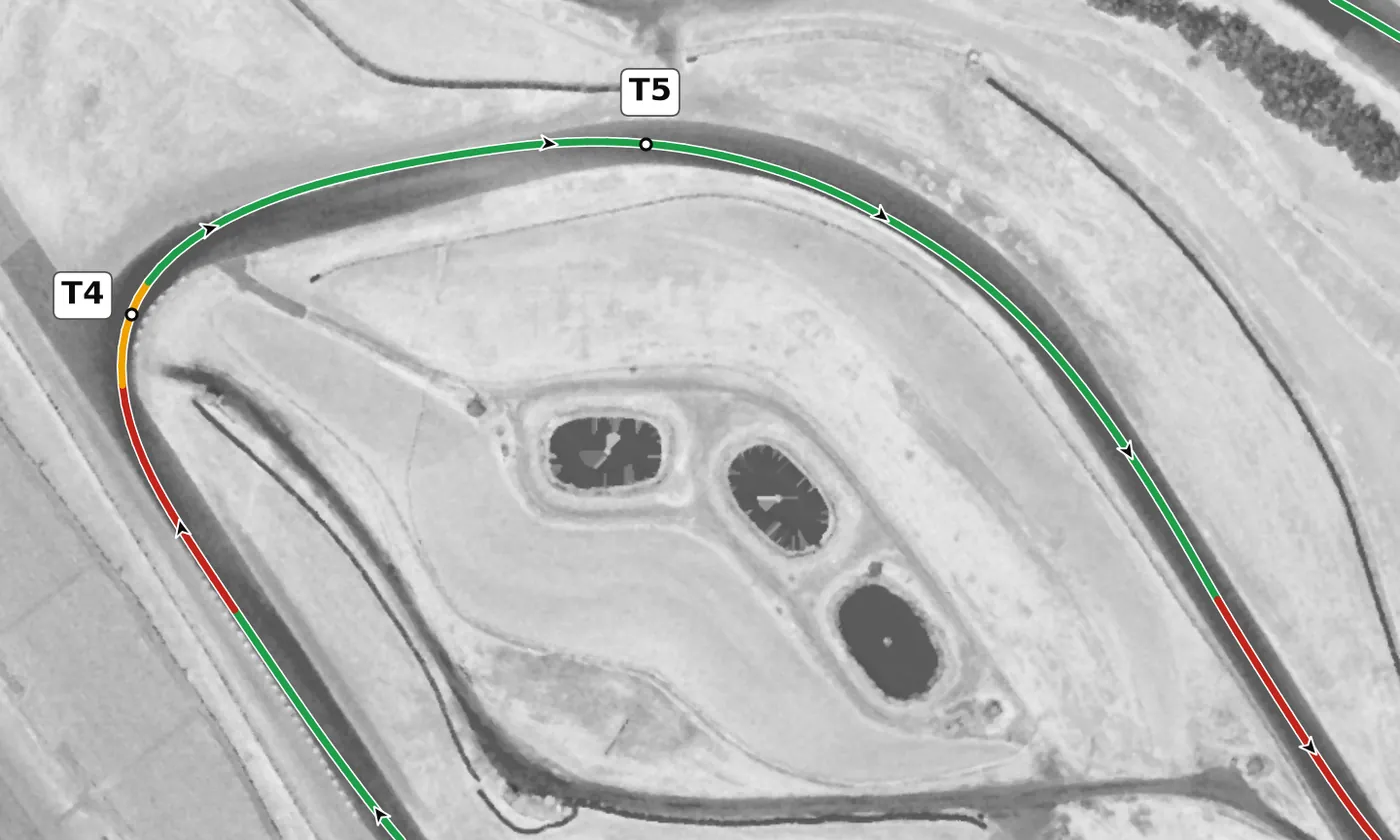
T5 is a fast, gentle right on a descent that most cars take flat or with a small lift. Keep the car as tight and as far right as it will go around the bend so you are set up on the right for the left-hand Carousel. The mistake to avoid is drifting out to the left here, which leaves you on the wrong side of the road for T6.
From the survey: Gently on camber (+1%), still dropping about 4%.
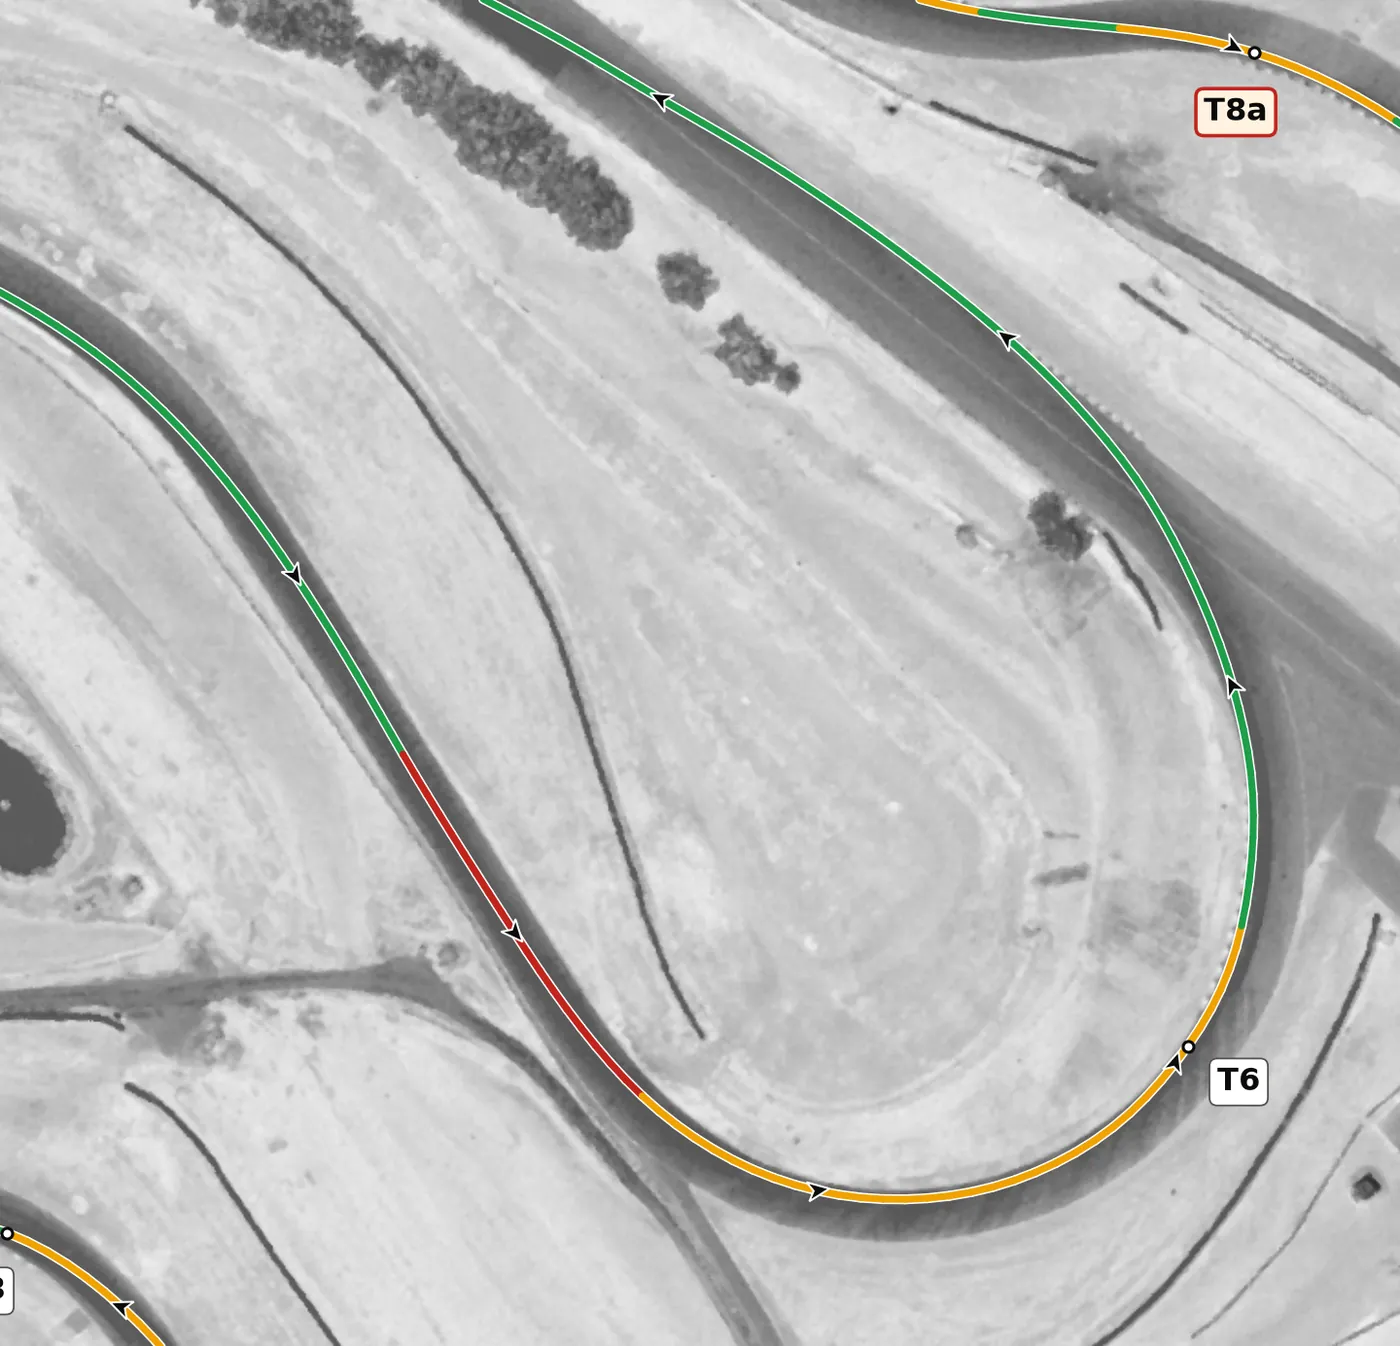
Brake before the crest that leads into the Carousel, then turn in from about mid-road as the road drops away and use the banking on entry to carry speed into this long left. Treat it as two apexes, starting the throttle at the beginning of the inside curbing and unwinding early, because the banking runs out and the exit is flat and starts to climb. The mistake to avoid is driving the exit with the grip the entry gave you; let the car use all the road on the way out.
From the survey: Banked +11.6% at entry, +7.4% at the apex and −0.9% at the exit, dropping 16 m.
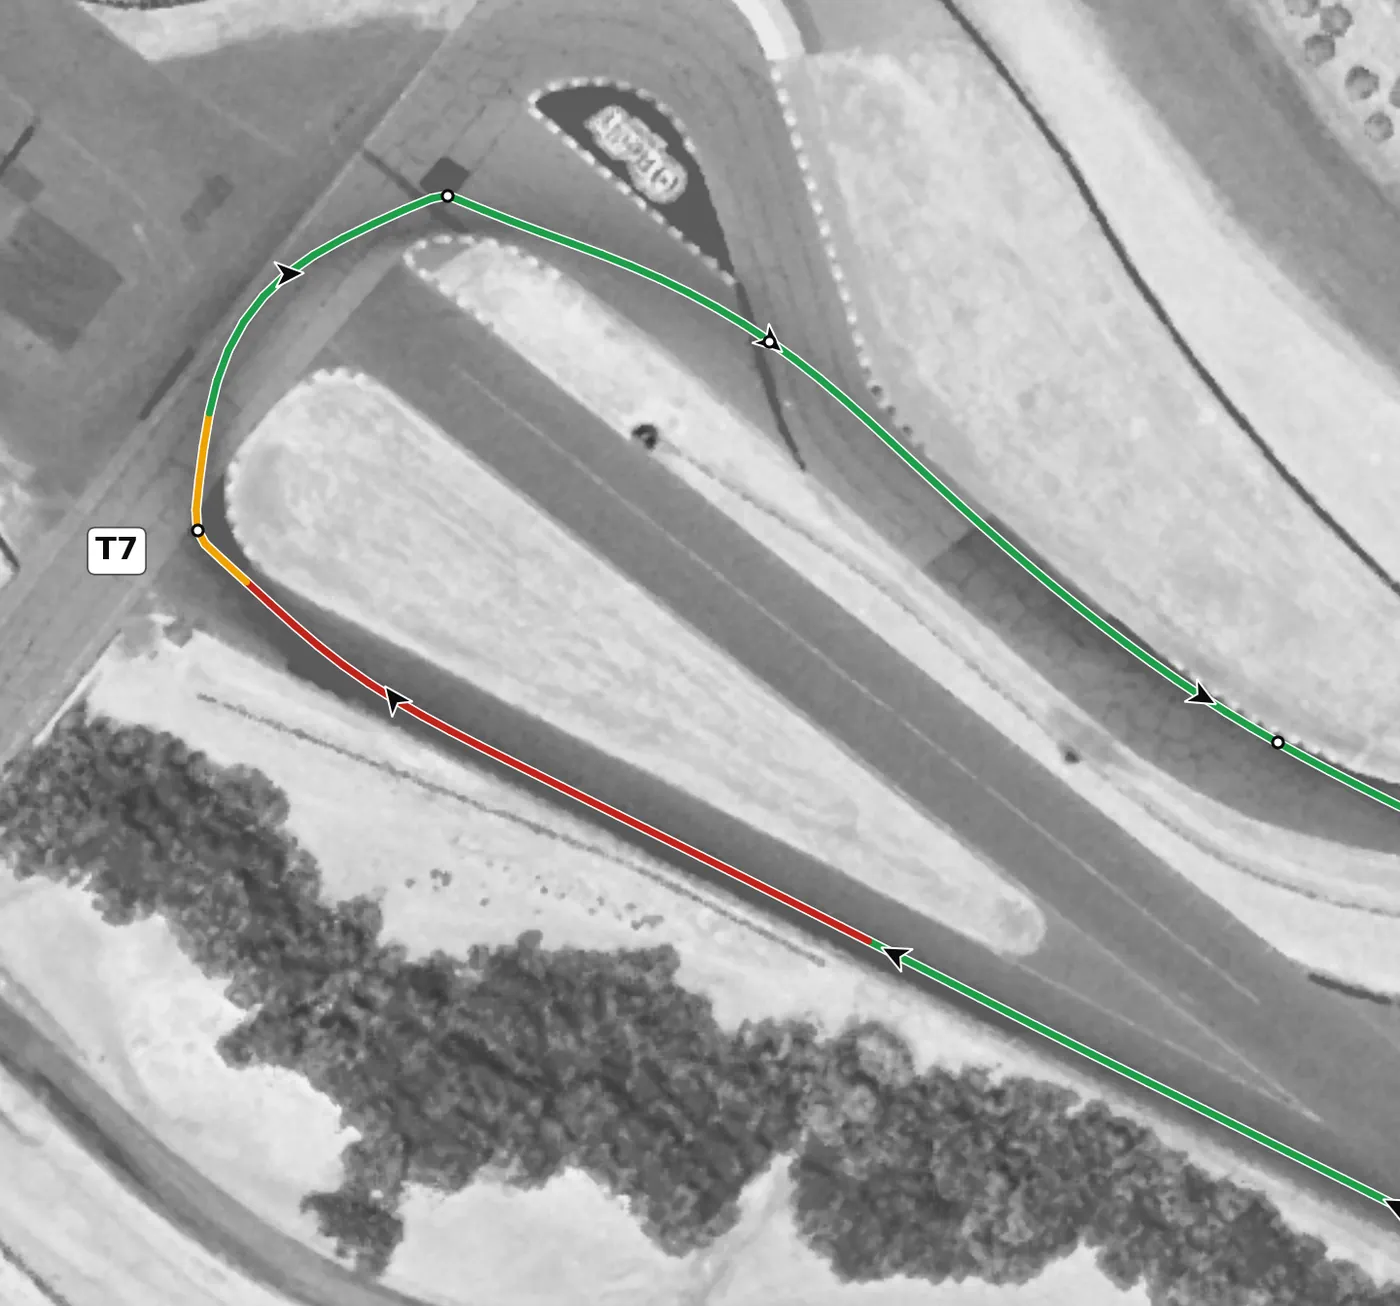
Move to the left side of the straight, brake hard and straight, and turn in late for this two-apex right-hand hairpin. Roll past the first apex a little rather than clipping it tight, and focus on a late second apex so you can drive out cleanly; the corner is banked, so the car will rotate for you. The mistake to avoid is braking too late and missing the second apex, which costs you all the way to T8.
From the survey: The two tightest apexes on the lap, both banked (+3.7% and +4.2%).
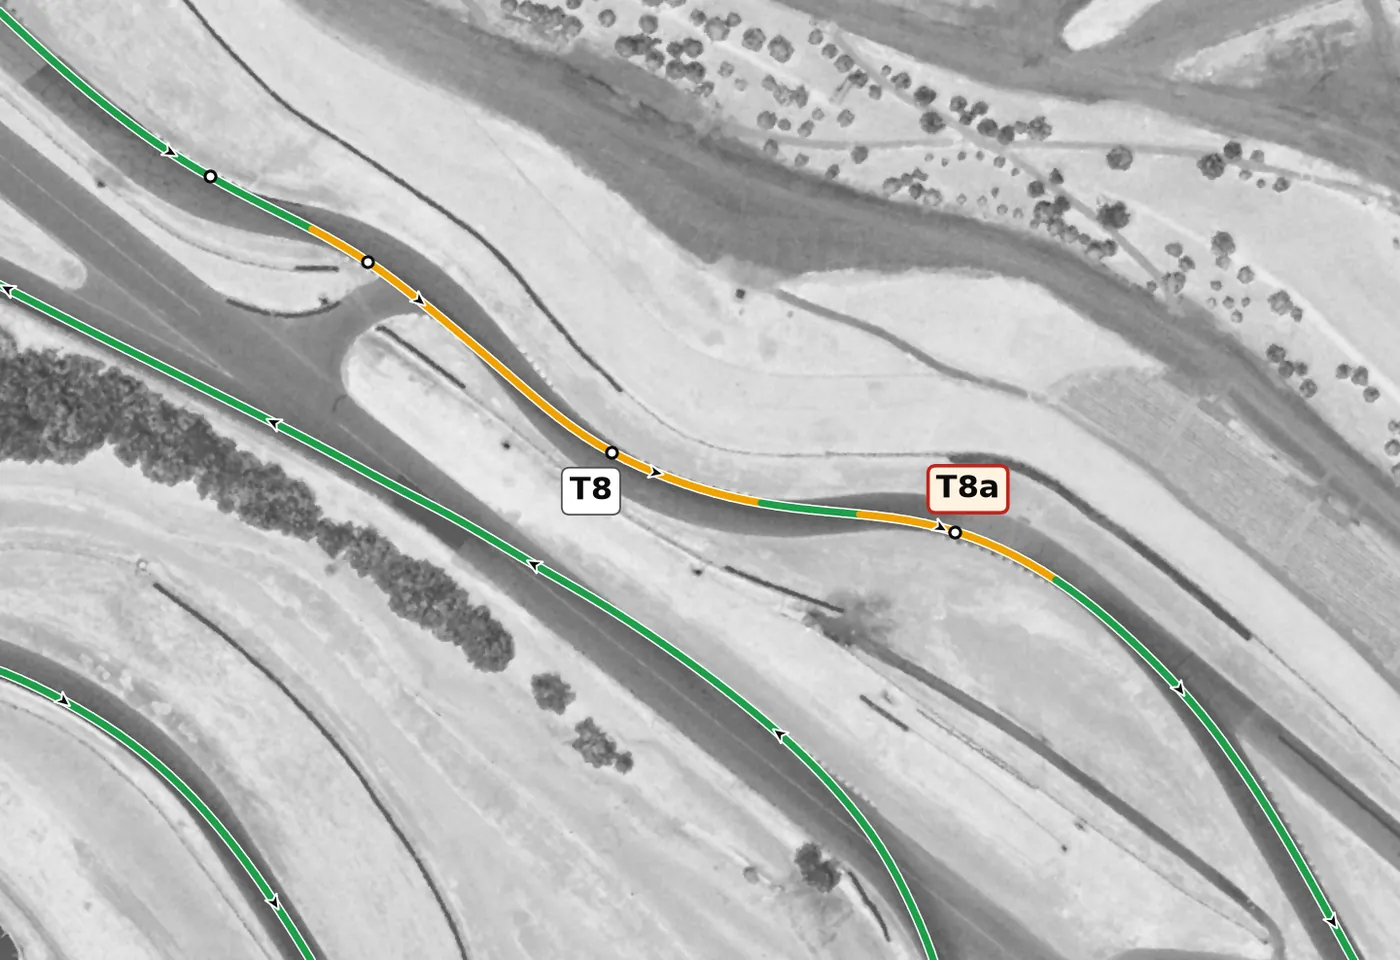
Keep the car as far right as possible before the T8 left, lift to settle the nose, and make your speed correction early, before you turn in. Hit the T8 apex on the left, then take a later apex at T8a, a right that is off camber on a descent, and be near full throttle by the time you reach it. The mistake to avoid is arriving too fast and lifting between the two, which kills your speed through T9.
From the survey: T8a is off camber (−1.3%) on a 4% descent; so is the unnumbered right just before T8.
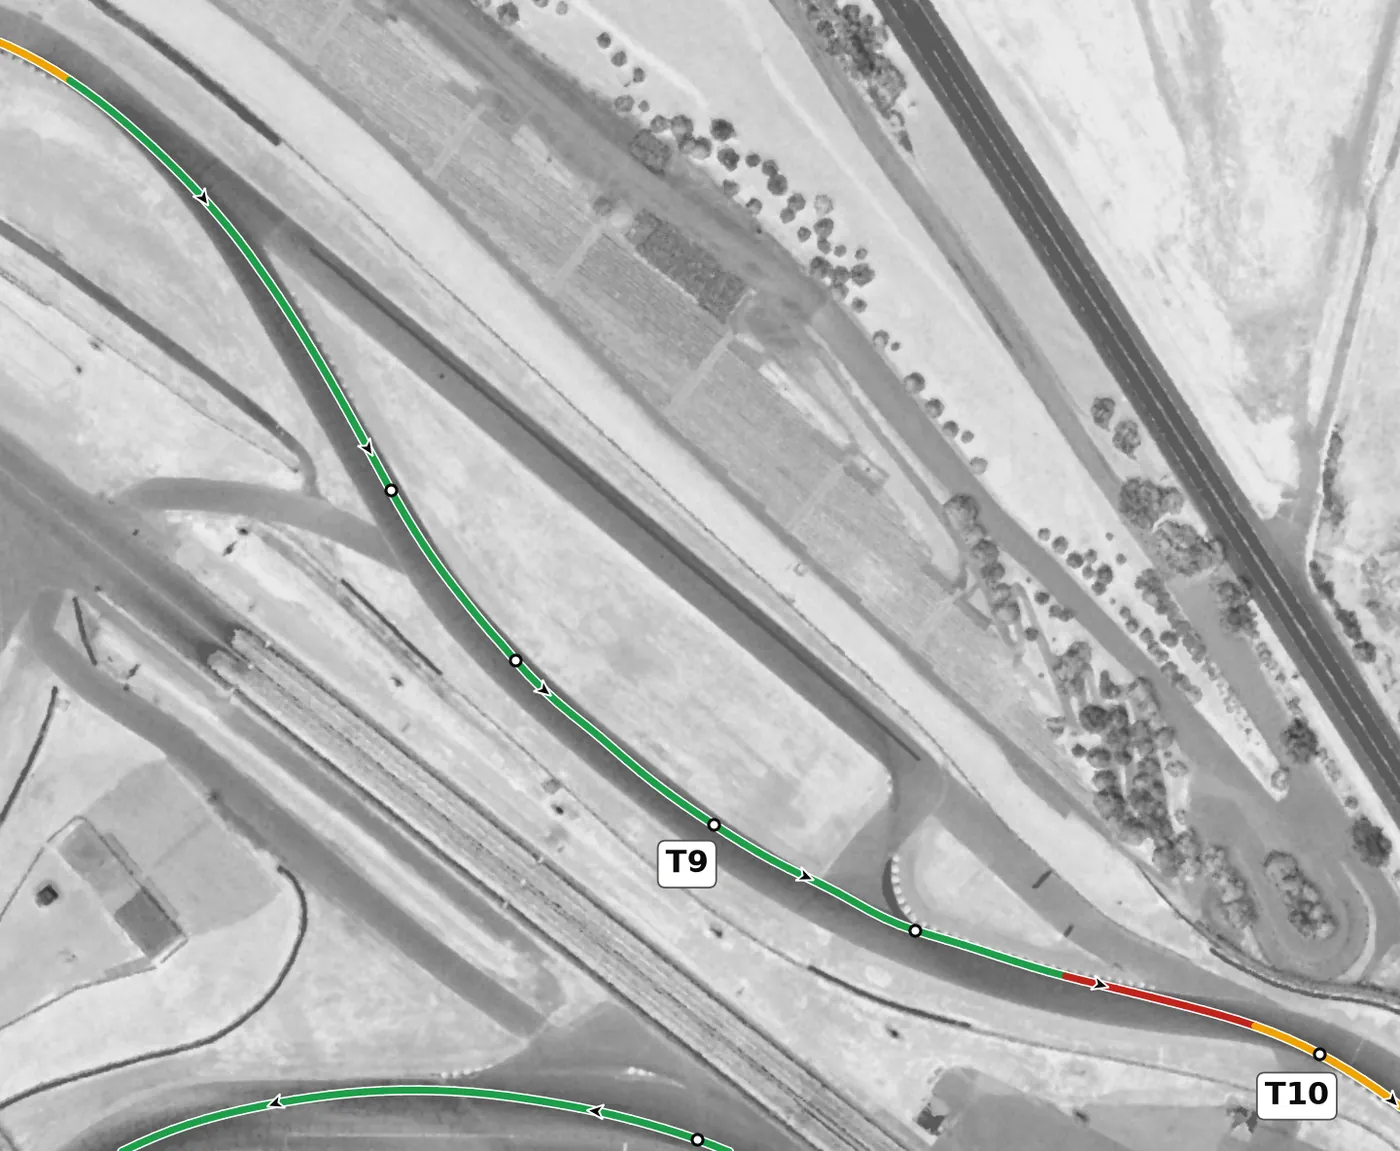
T9 is a long, fast left that most cars take near flat, so come out of T8a on the left side and keep your steering smooth and quick through the transition. A car with less power can stay tighter on the inside; a faster car will use more of the road and line up parallel to the left-hand curbing at the end, ready for T10. The mistake to avoid is making sudden steering corrections at this speed.
From the survey: Mildly on camber (+0.7 to +0.9%) and gently downhill.
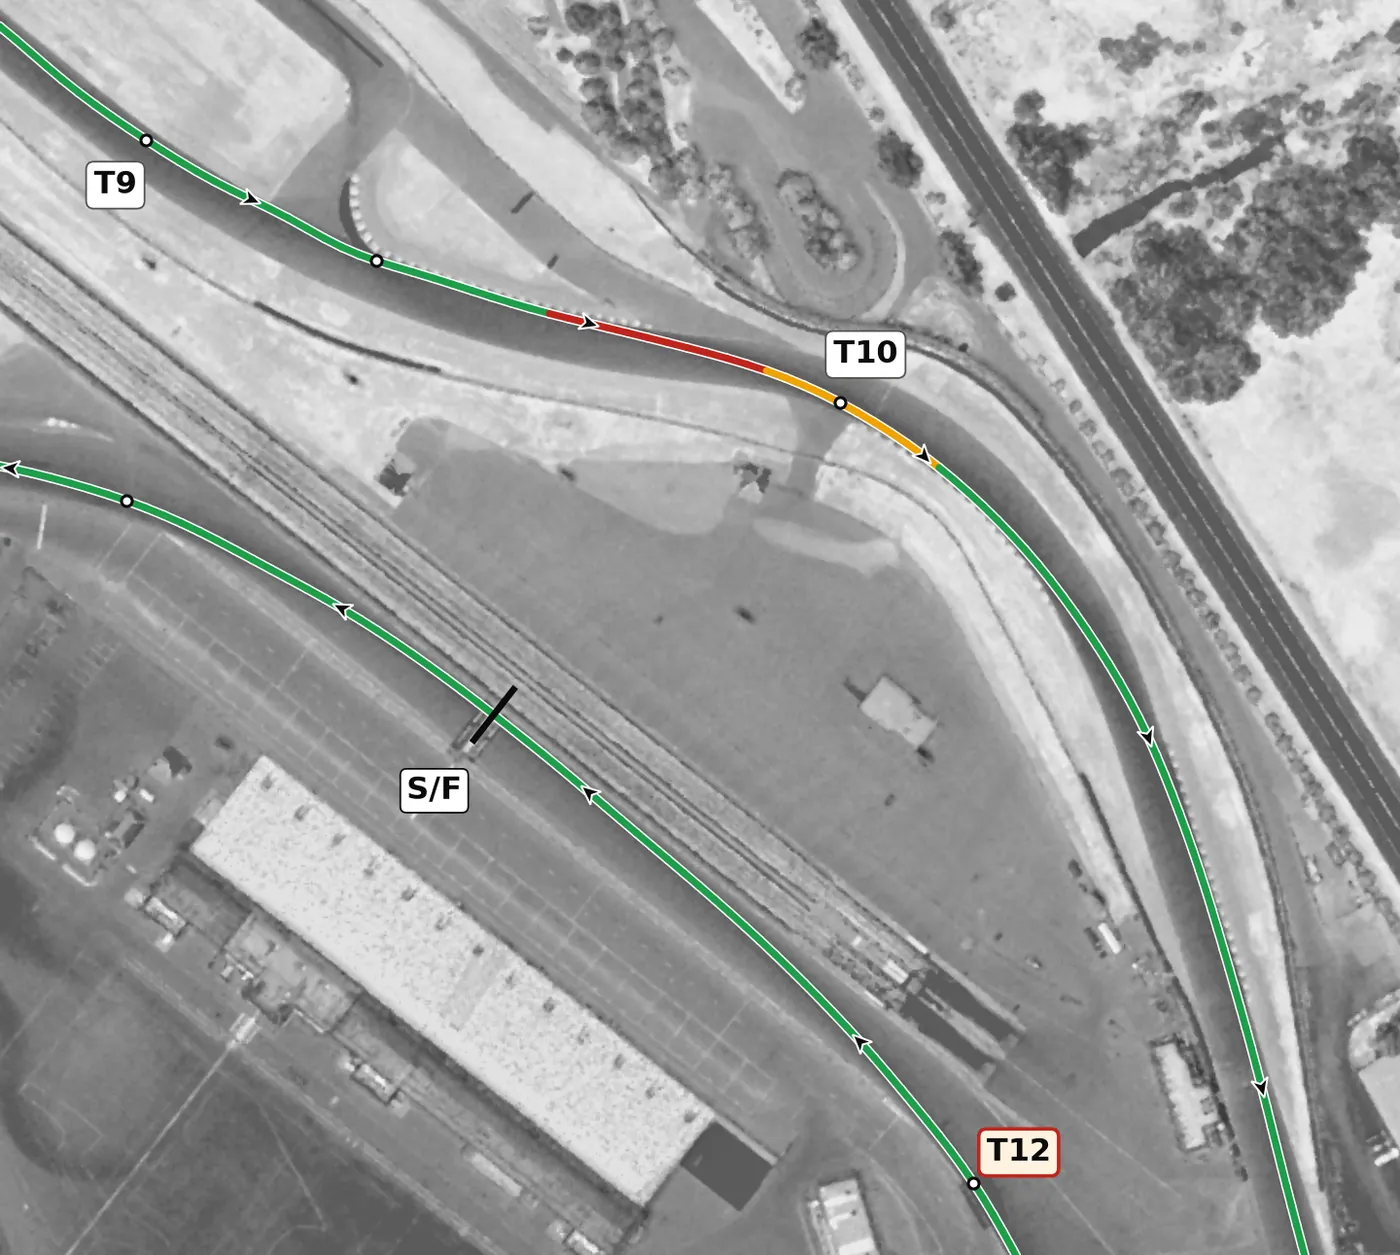
T10 is a fast right at the bottom of the hill with very little runoff, and its surface is close to flat, so it gives you no help. Approach from the left, make any speed correction in a straight line before you turn in, and settle the car before adding throttle; you will exit on the left. The mistake to avoid is overcommitting here before you know the corner, since a mistake has nowhere to go.
From the survey: Camber near zero (+0.3%, dipping to −1.1%) at the bottom of the hill.
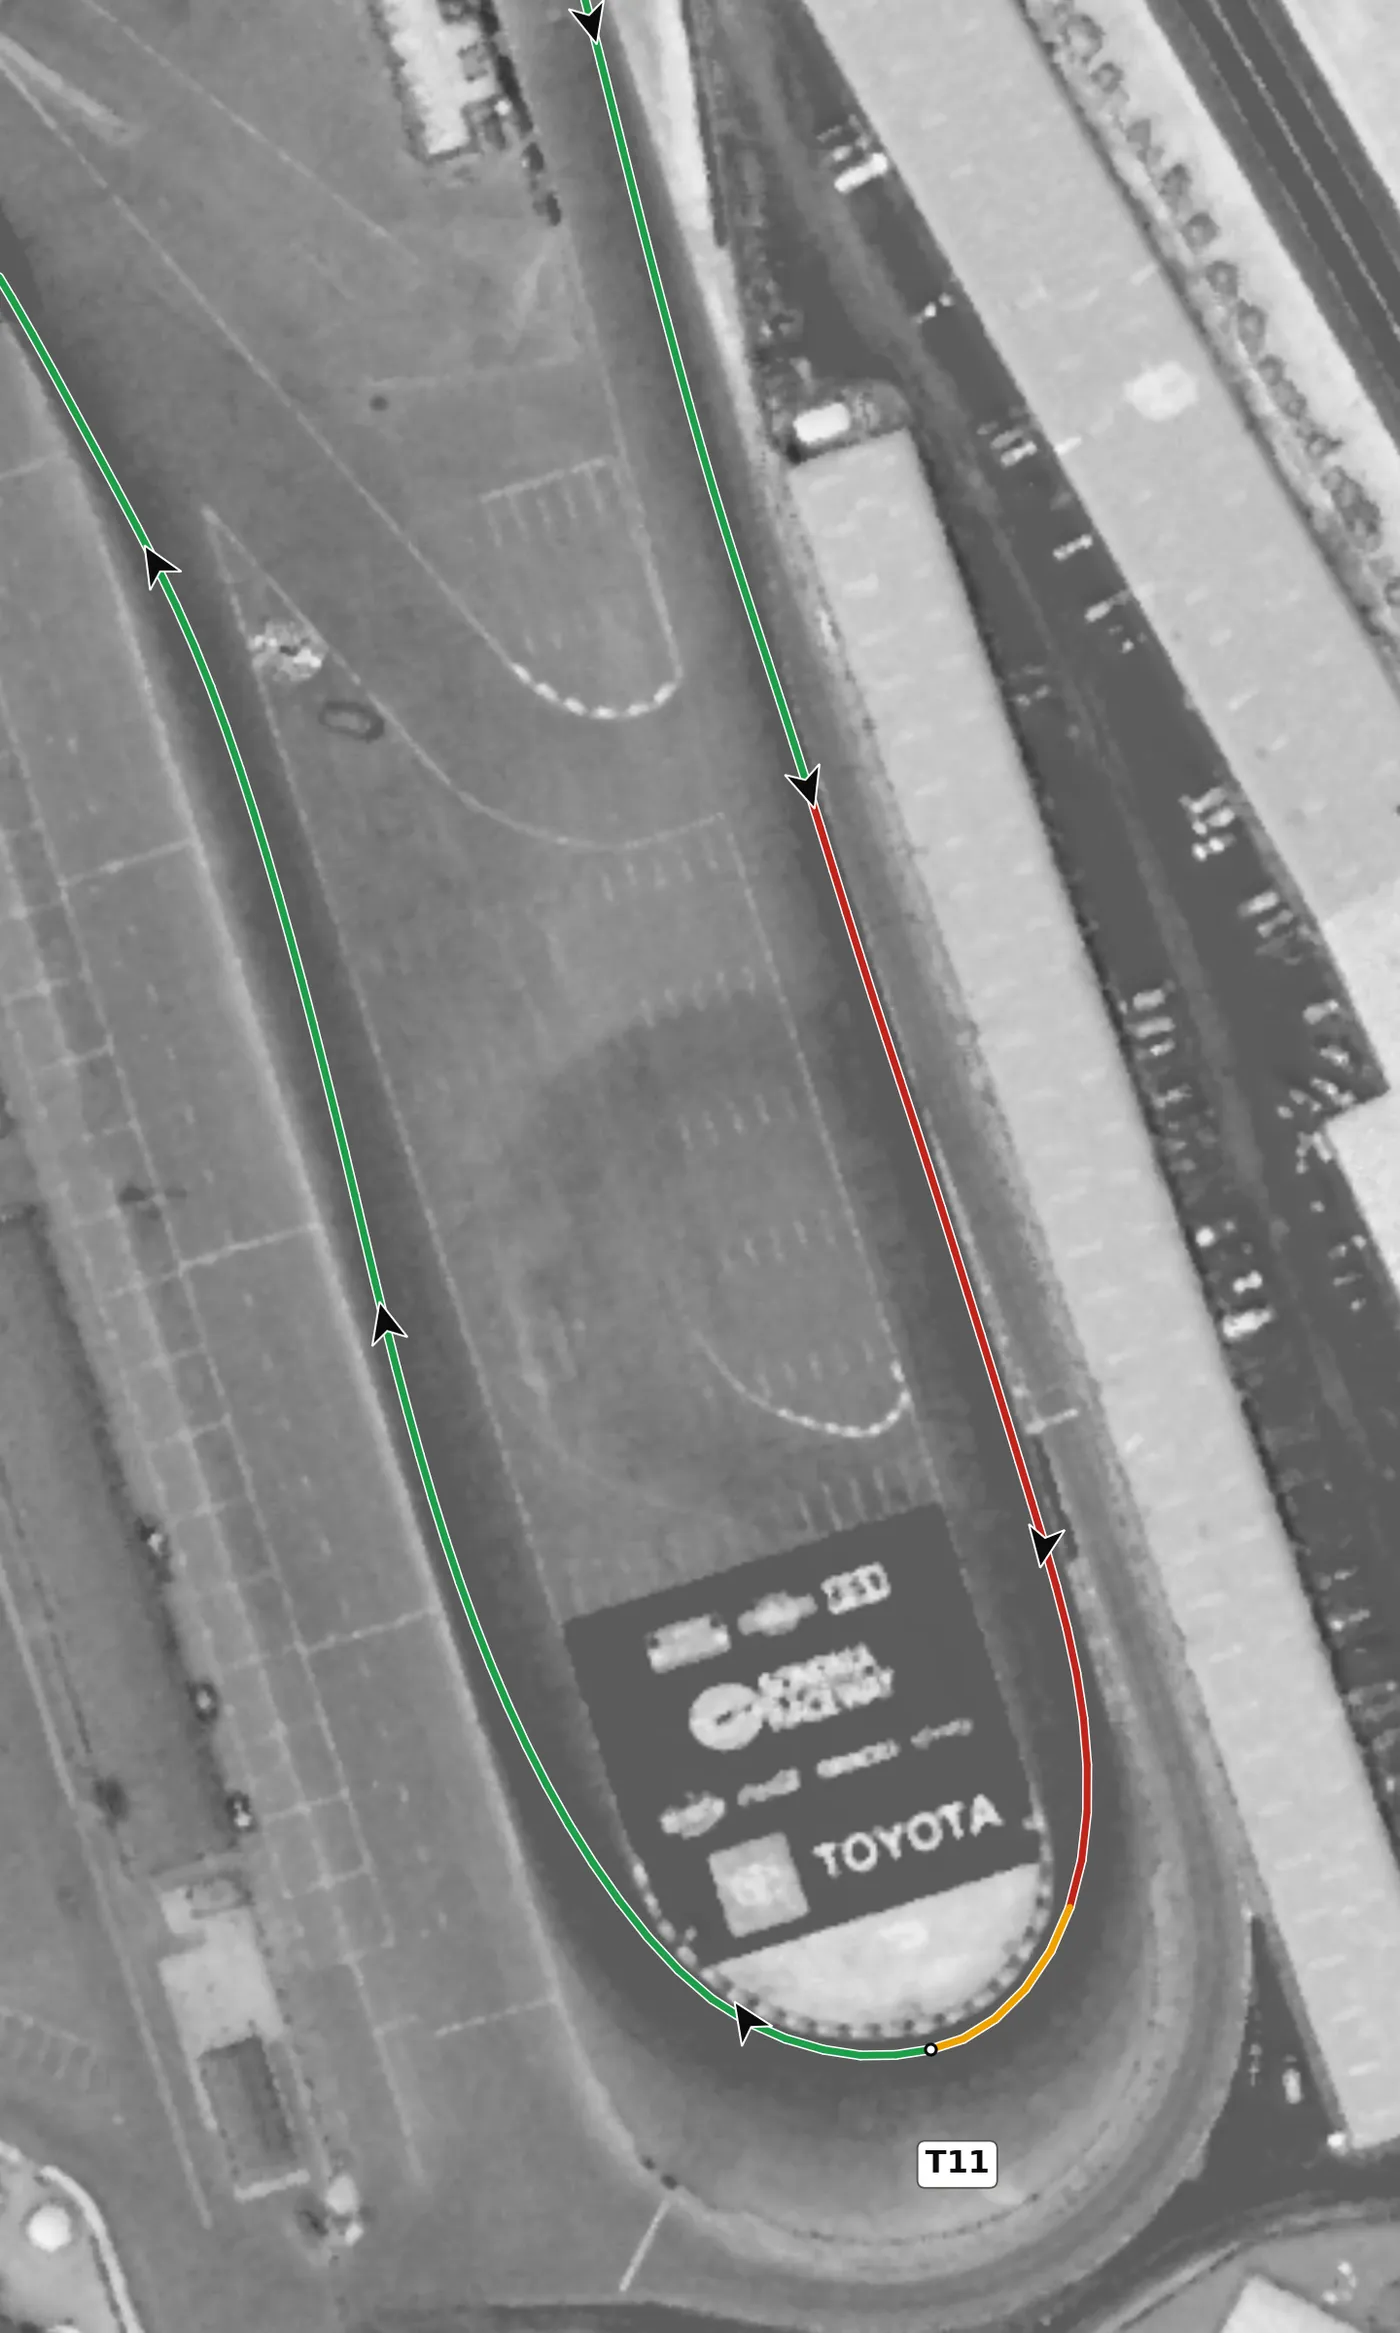
Move slightly right after T10 to keep clear of the pit entry, then brake hard and straight for this flat, right-hand hairpin at the lowest point of the lap, where it is hard to pick out markers. Turn in late, trail the brakes down slowly to a late apex and don't touch the throttle until you get there. The mistake to avoid is getting on the power early and running wide on the way out.
From the survey: The lowest ground on the lap (5.5 m), flat in both grade and camber.
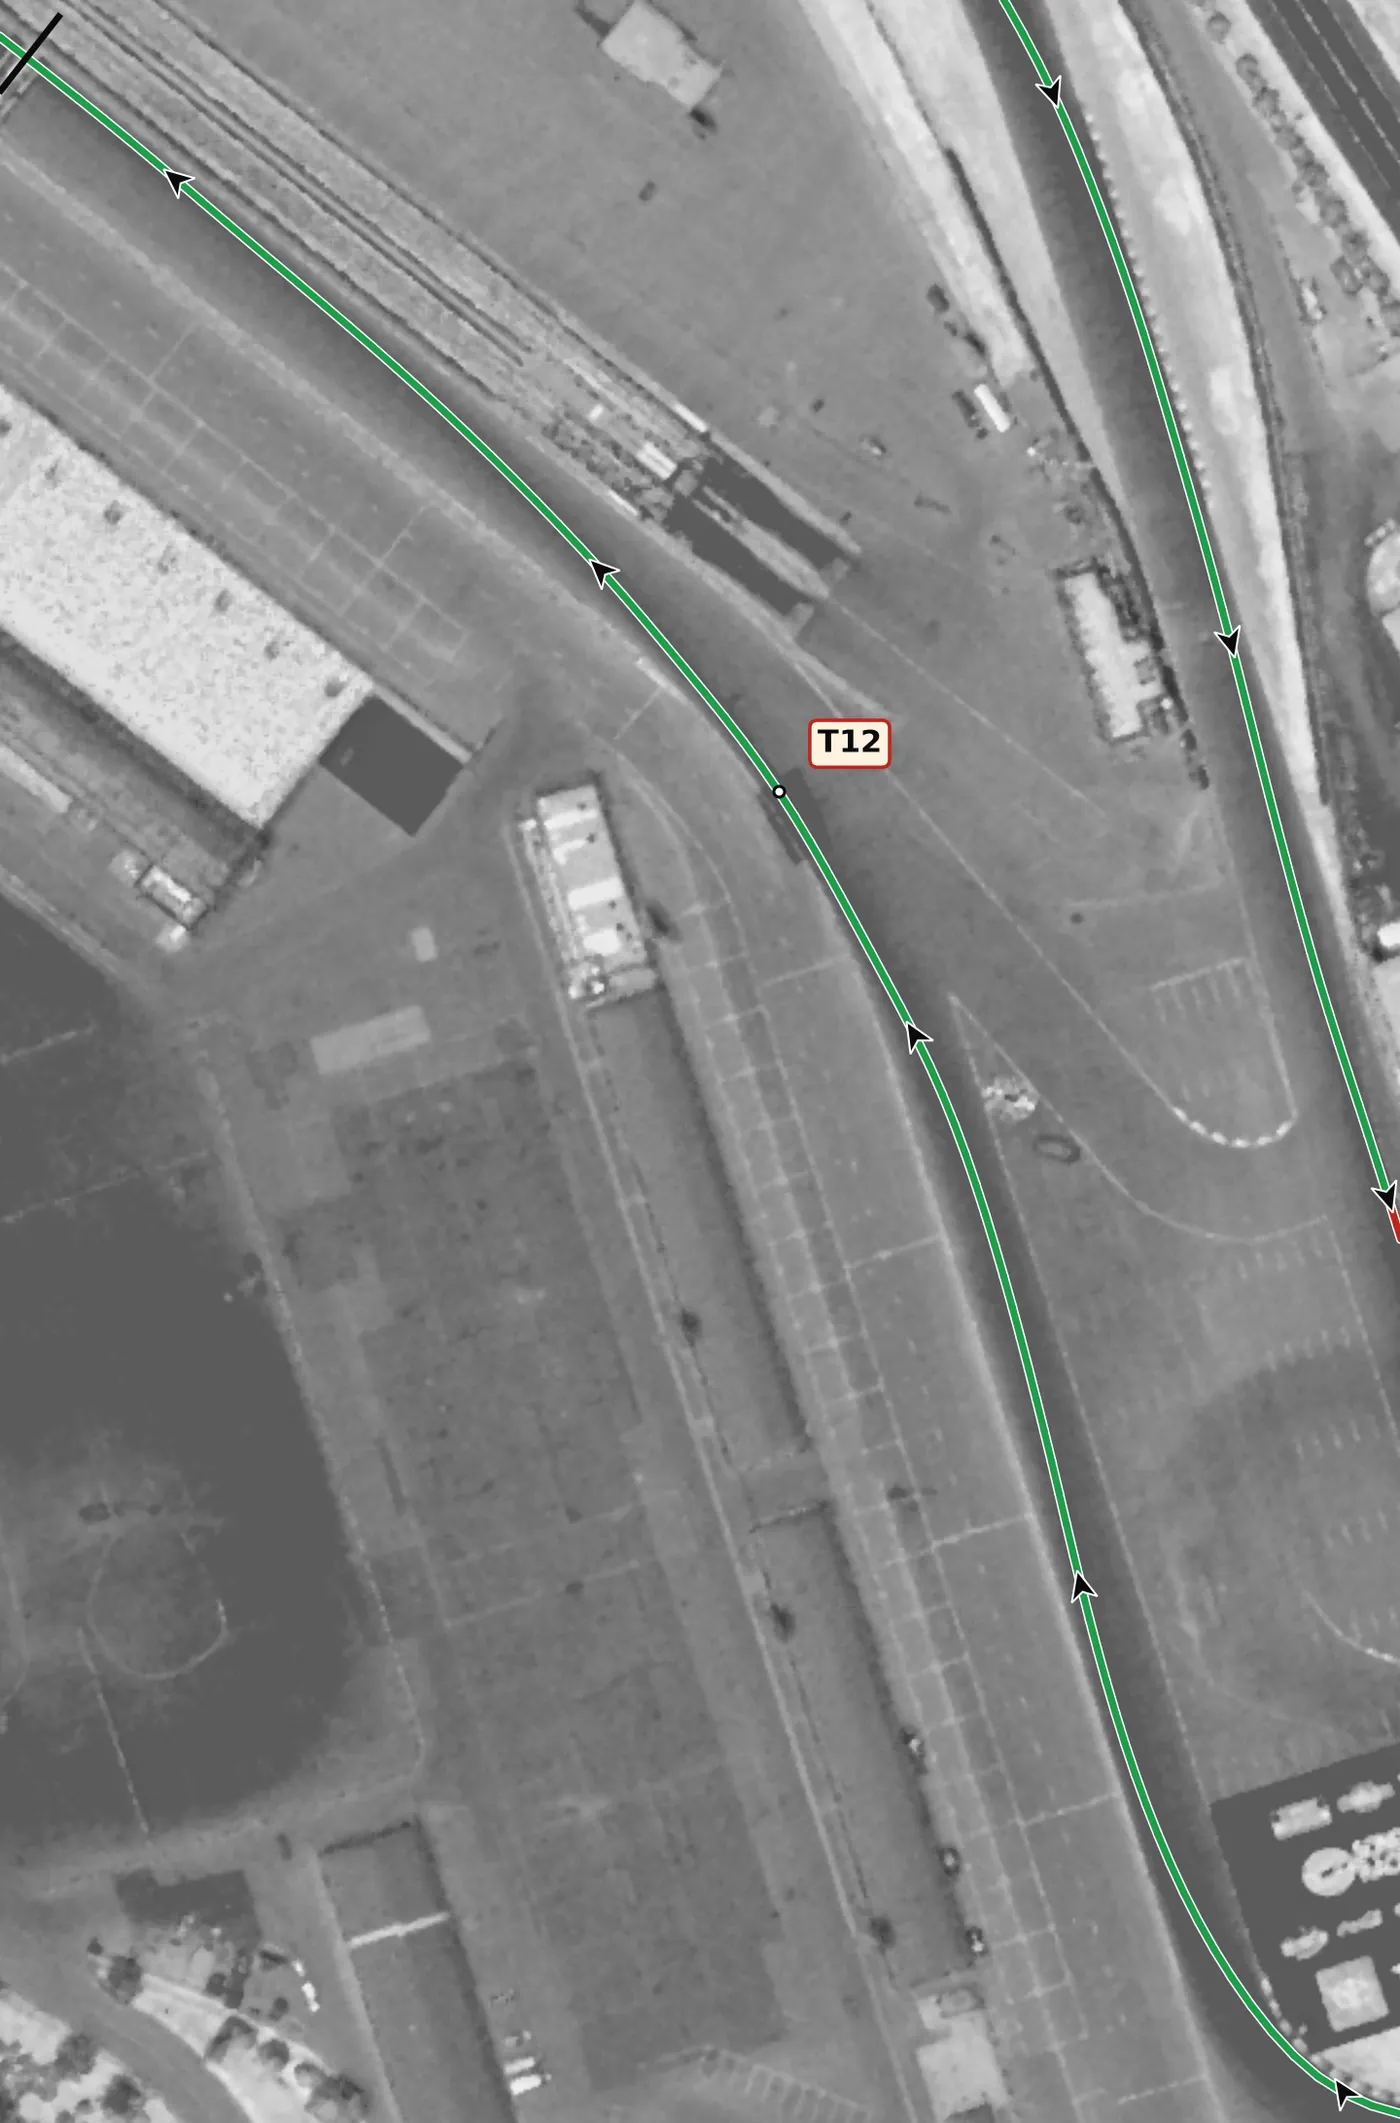
T12 is a left that you take while still accelerating out of T11, onto the front straight. Keep the line smooth and let the car run to the outside on exit; the apex is slightly off camber and the road starts to climb. The mistake to avoid is a ragged T11 exit that leaves you fighting the car here instead of driving straight onto the straight.
From the survey: Slightly off camber at the apex (−0.3%), starting to climb onto the straight.
Version history
- v1.2 · 2026-10-01 — T5 is now drawn as throttle: the car gains speed through it, so it is not a lift.
- v1.1 · 2026-10-01 — Speeds rebuilt from cars at a typical quick HPDE pace: about 20 km/h lower at the end of the straights and 5–20 km/h lower at corner minimums. Braking points were checked against published markers and stayed within 10 m of v1.0: T7 and T10 5 m later, T3 5 m and T6 10 m earlier, and T2 is now a short brake because the steep climb does most of the slowing. The line now goes straight from throttle to brake, with no coasting in between.
- v1.0 · 2026-10-01 — First version.
Feedback contributors
Drivers and instructors whose feedback has improved this line. Thank you.
- Mike M — no coasting between throttle and brake; braking points (v1.1)
- Brian L — corners where the car gains speed are throttle, not a lift (v1.2)