Mid-Ohio — Race Line
Estimated from data not in trackdays.ai. The line, speeds and braking points come from cars lapping at a typical quick HPDE pace, cross-checked against published brake markers. If you have data you would like to contribute, please send it to upload@trackdays.ai to help improve our estimates. Turn numbers count the 13-turn no-chicane layout from start/finish and are not the club's.
Heads up: This is an estimate of a typical quick HPDE line, not any one car's lap. Braking points are a starting point, not a target: start a little earlier and work later in small steps. The line goes straight from throttle to brake; amber only marks where you really lift or hold part throttle. China Beach was reprofiled in late 2024, after the survey, so it has less banking than the corner notes show.
- Throttle
- Coast / partial
- Braking
- Apex
- T4Off-camber corner
Arrows show the direction of the lap. The grey basemap is USGS LiDAR: dark = asphalt, light = grass. Tap any map for the full-size image.
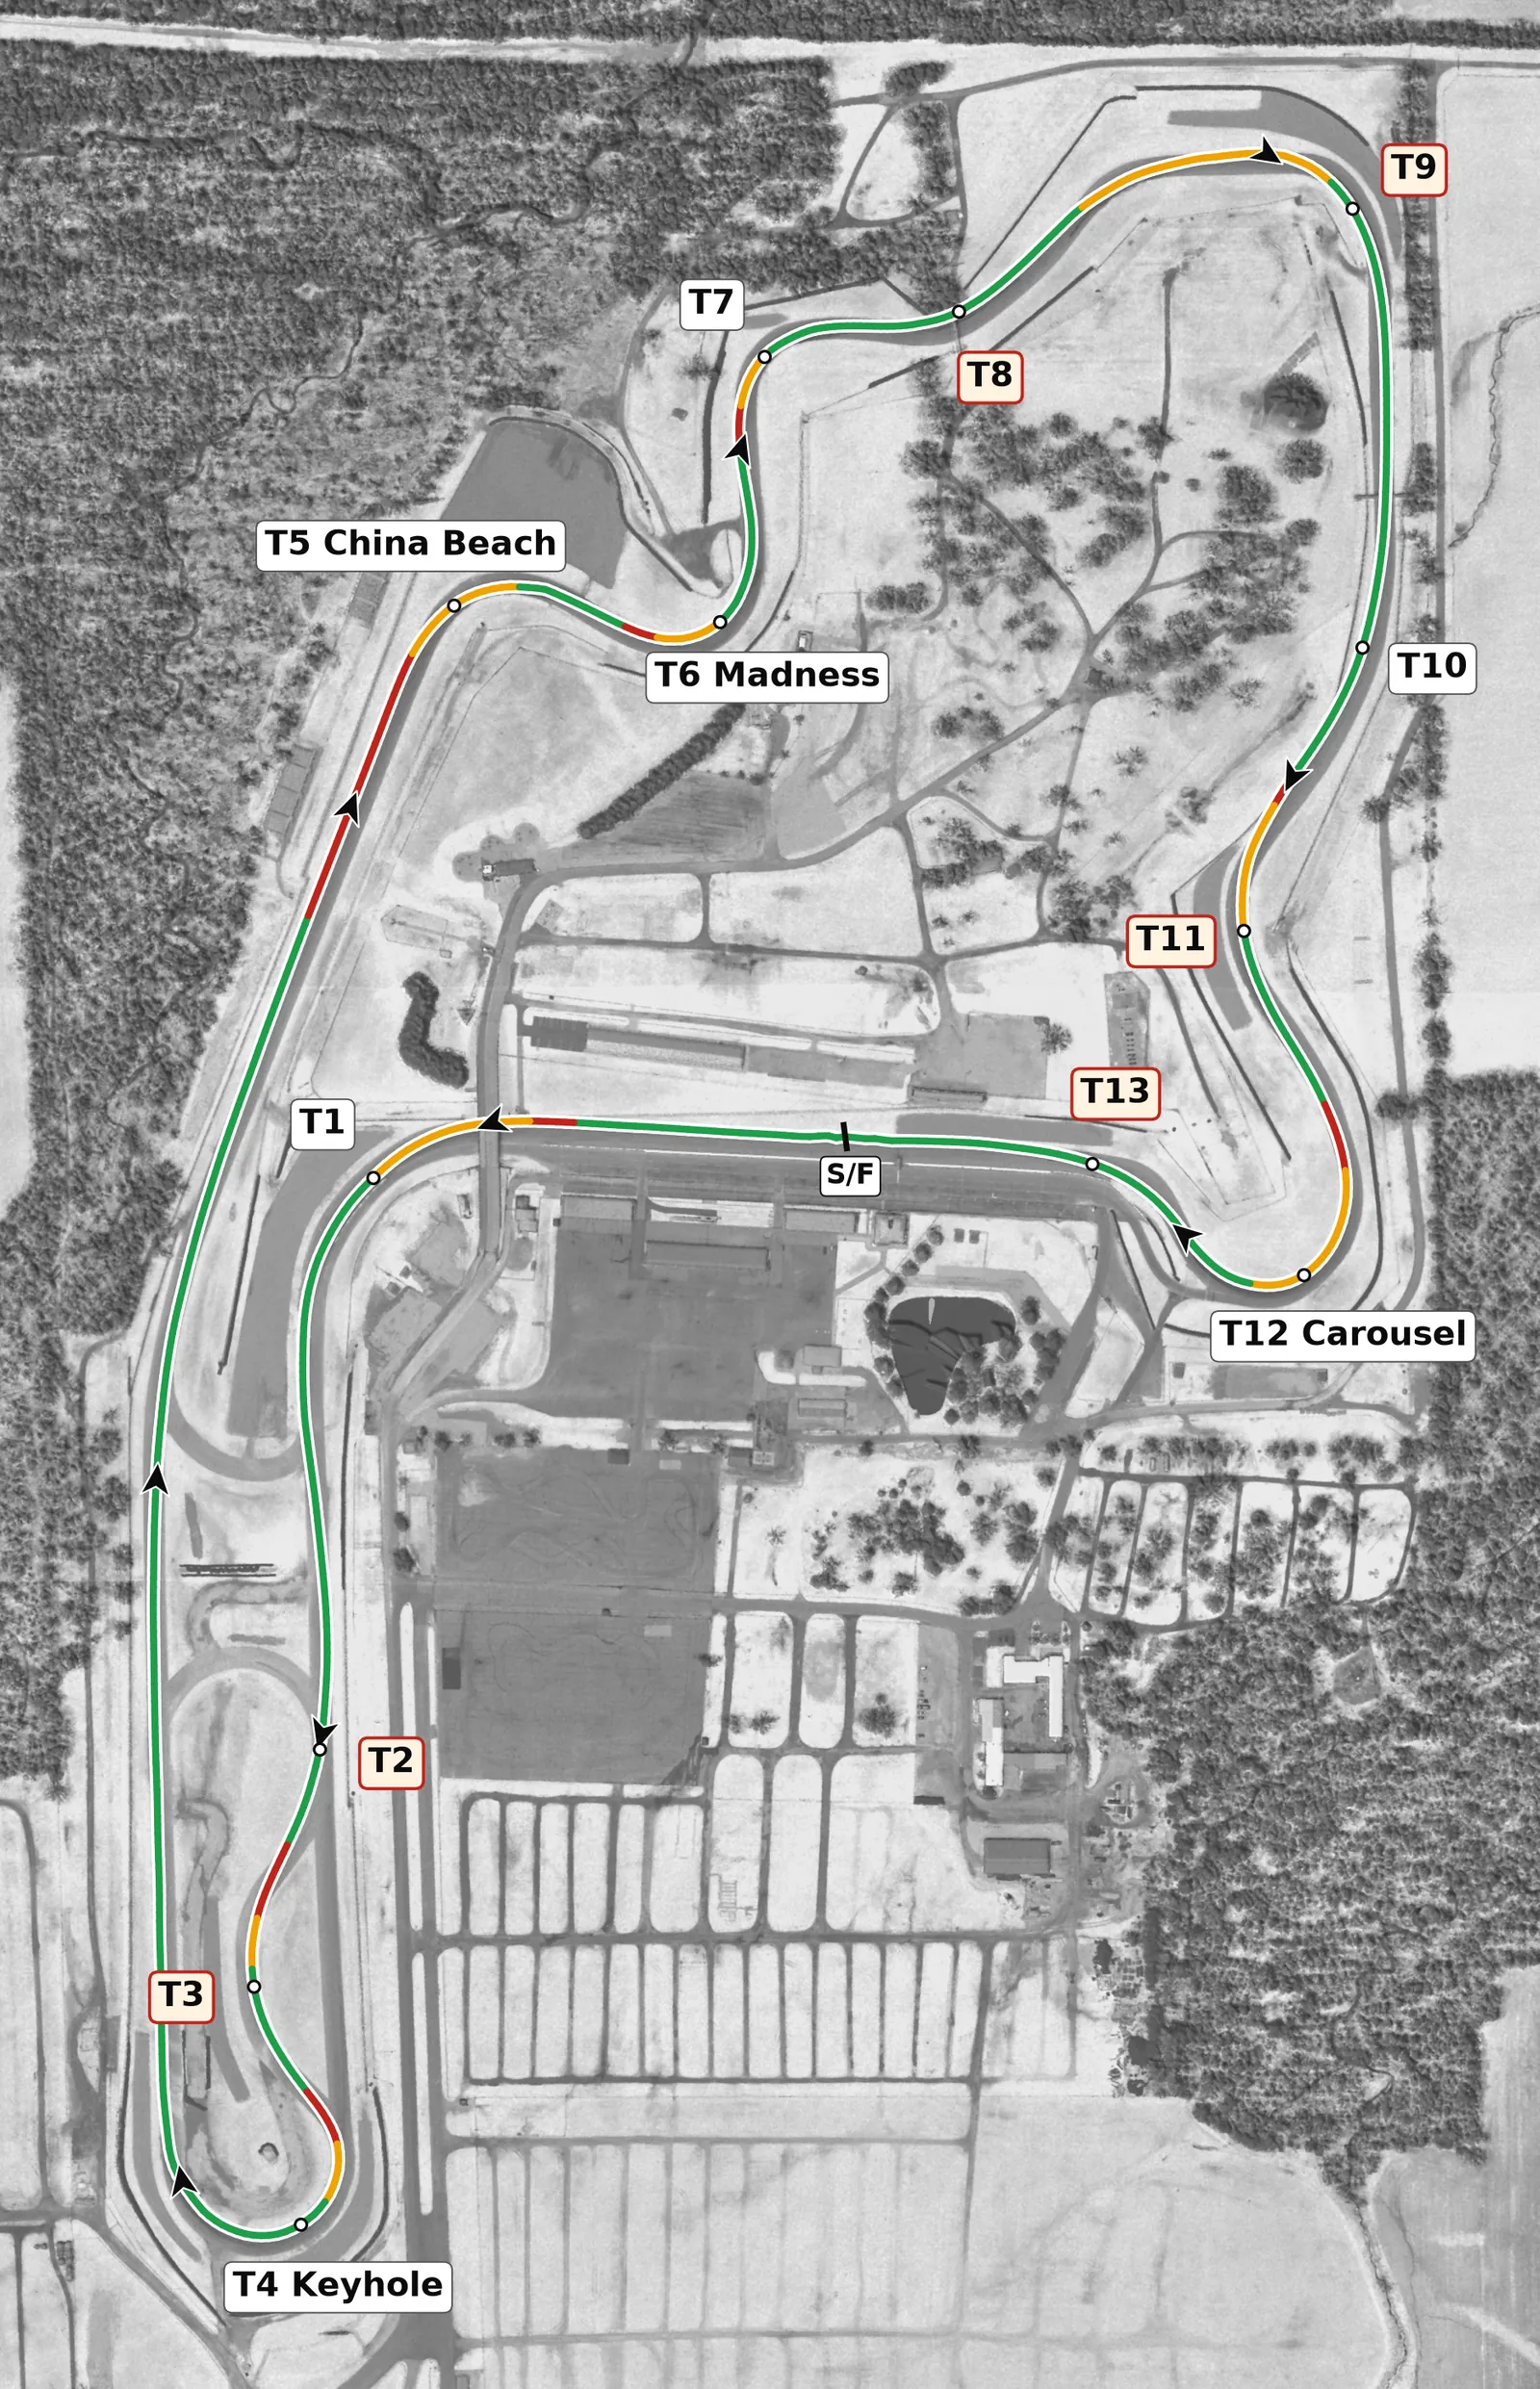
Mid-Ohio is a tight, technical, clockwise circuit with real elevation change, blind crests and narrow pavement, so precision and patience matter more than bravery. Our turn numbers count every corner from the start/finish line on the layout without the back-straight chicane, so they differ from the official map: our T4, the Keyhole, is the official T2, China Beach is the official T4, and Madness is the official T5. The two exits that matter most are the Keyhole onto the long back straight and the Carousel onto the front straight, and the crests through Madness and T8–T9 should be built up to over several laps, never rushed.
Sectors
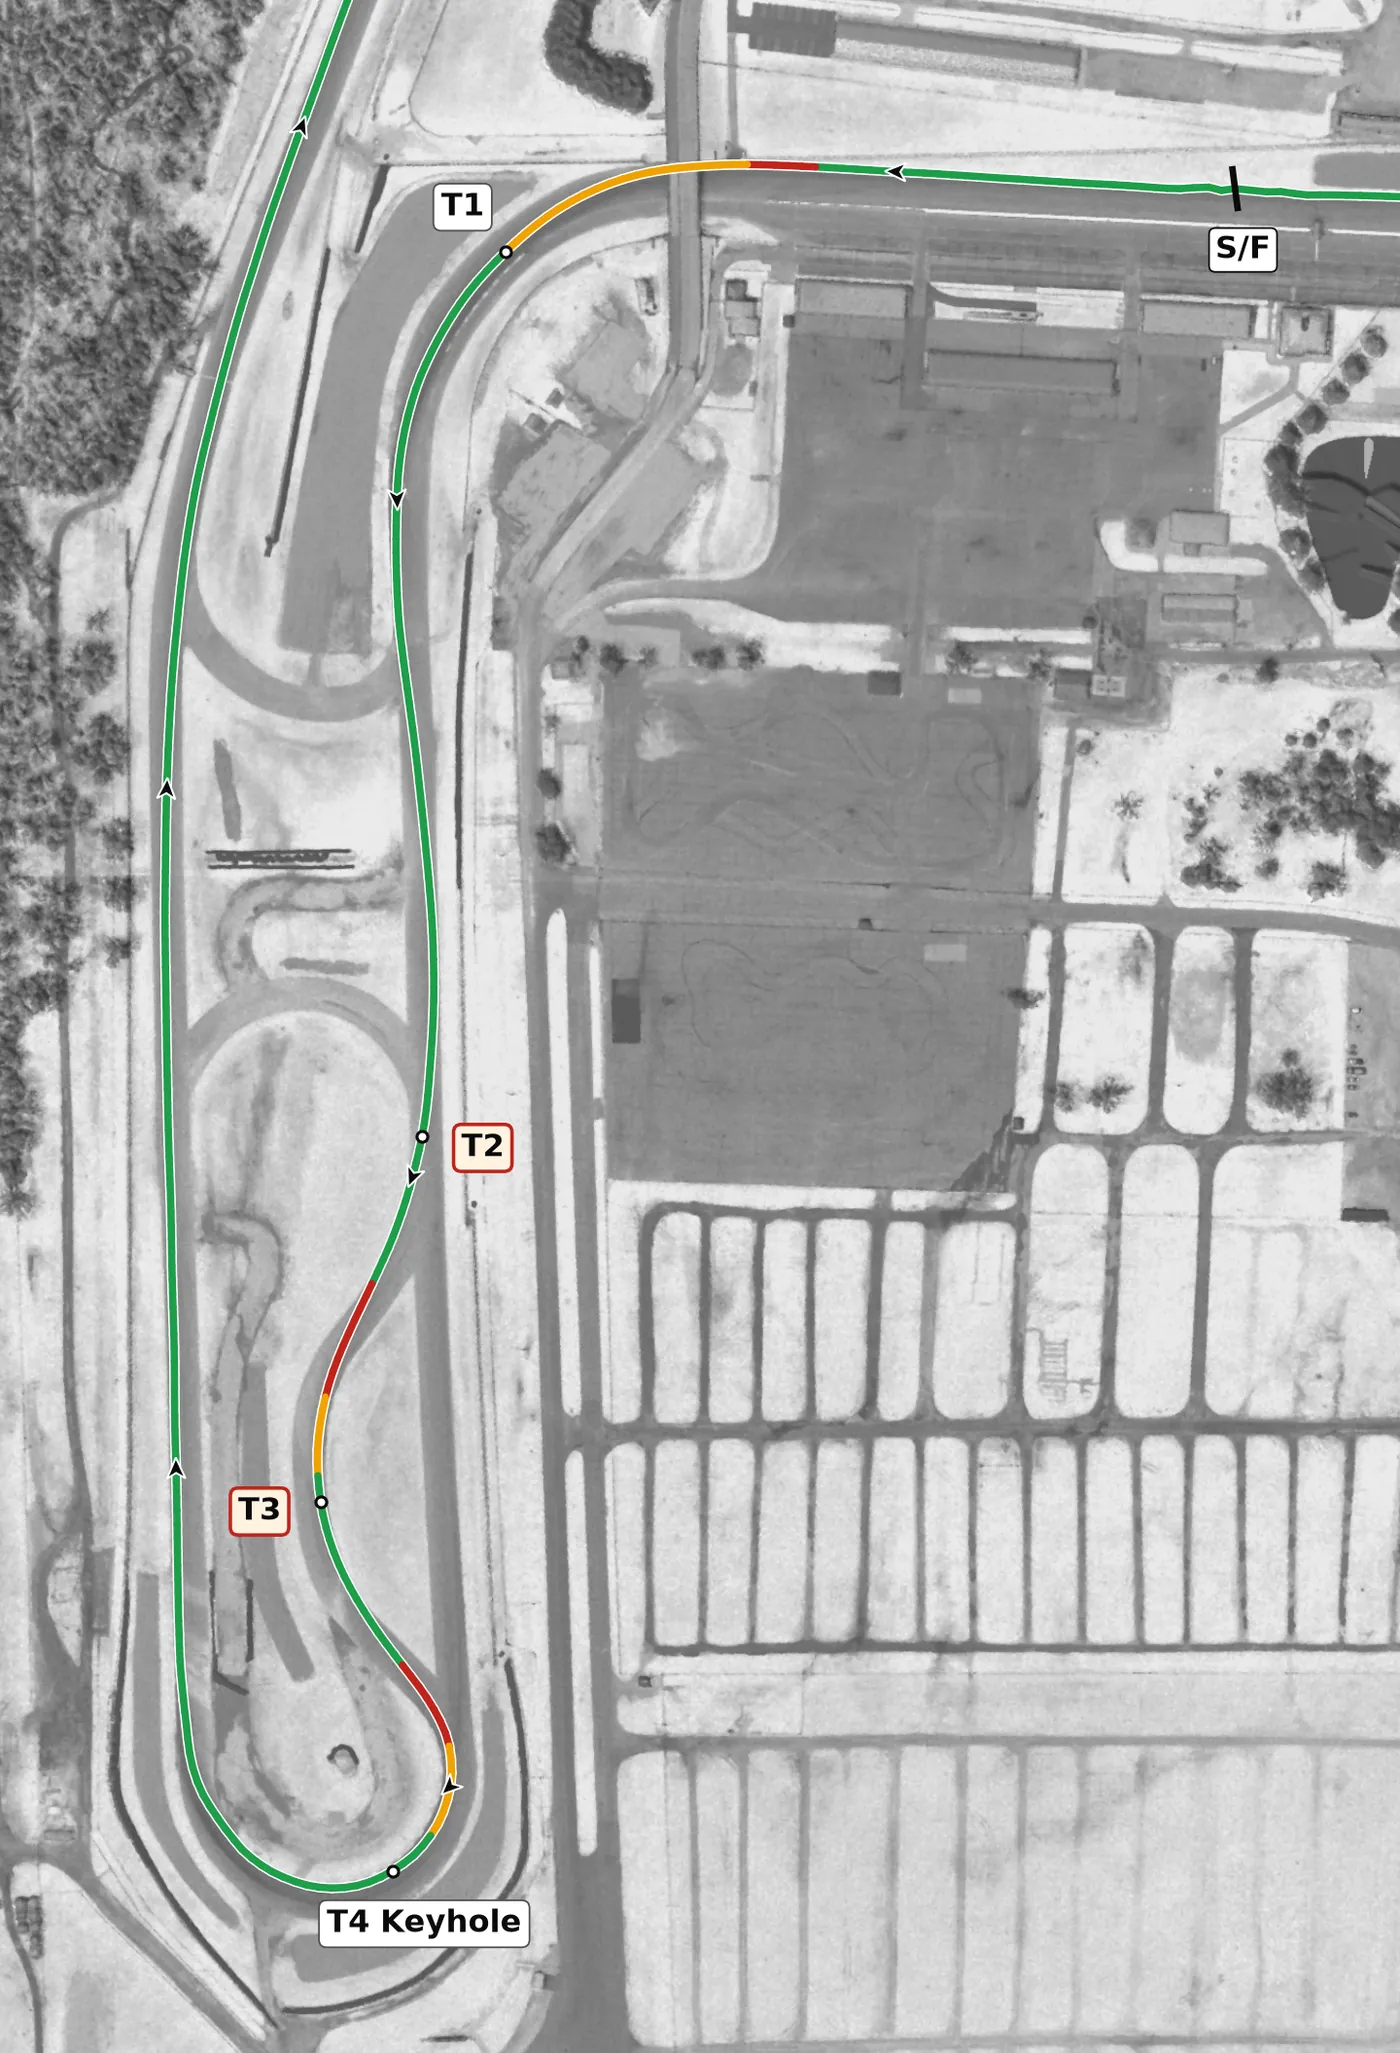
The lap starts with the fast, blind left of T1, then an uphill, off-camber right–left at T2 and T3 that sets you up for the Keyhole. The Keyhole is a long right that climbs to a crest at the apex and drops away on exit, and it launches you onto the longest straight on the circuit, so trade entry speed for an early, committed exit.
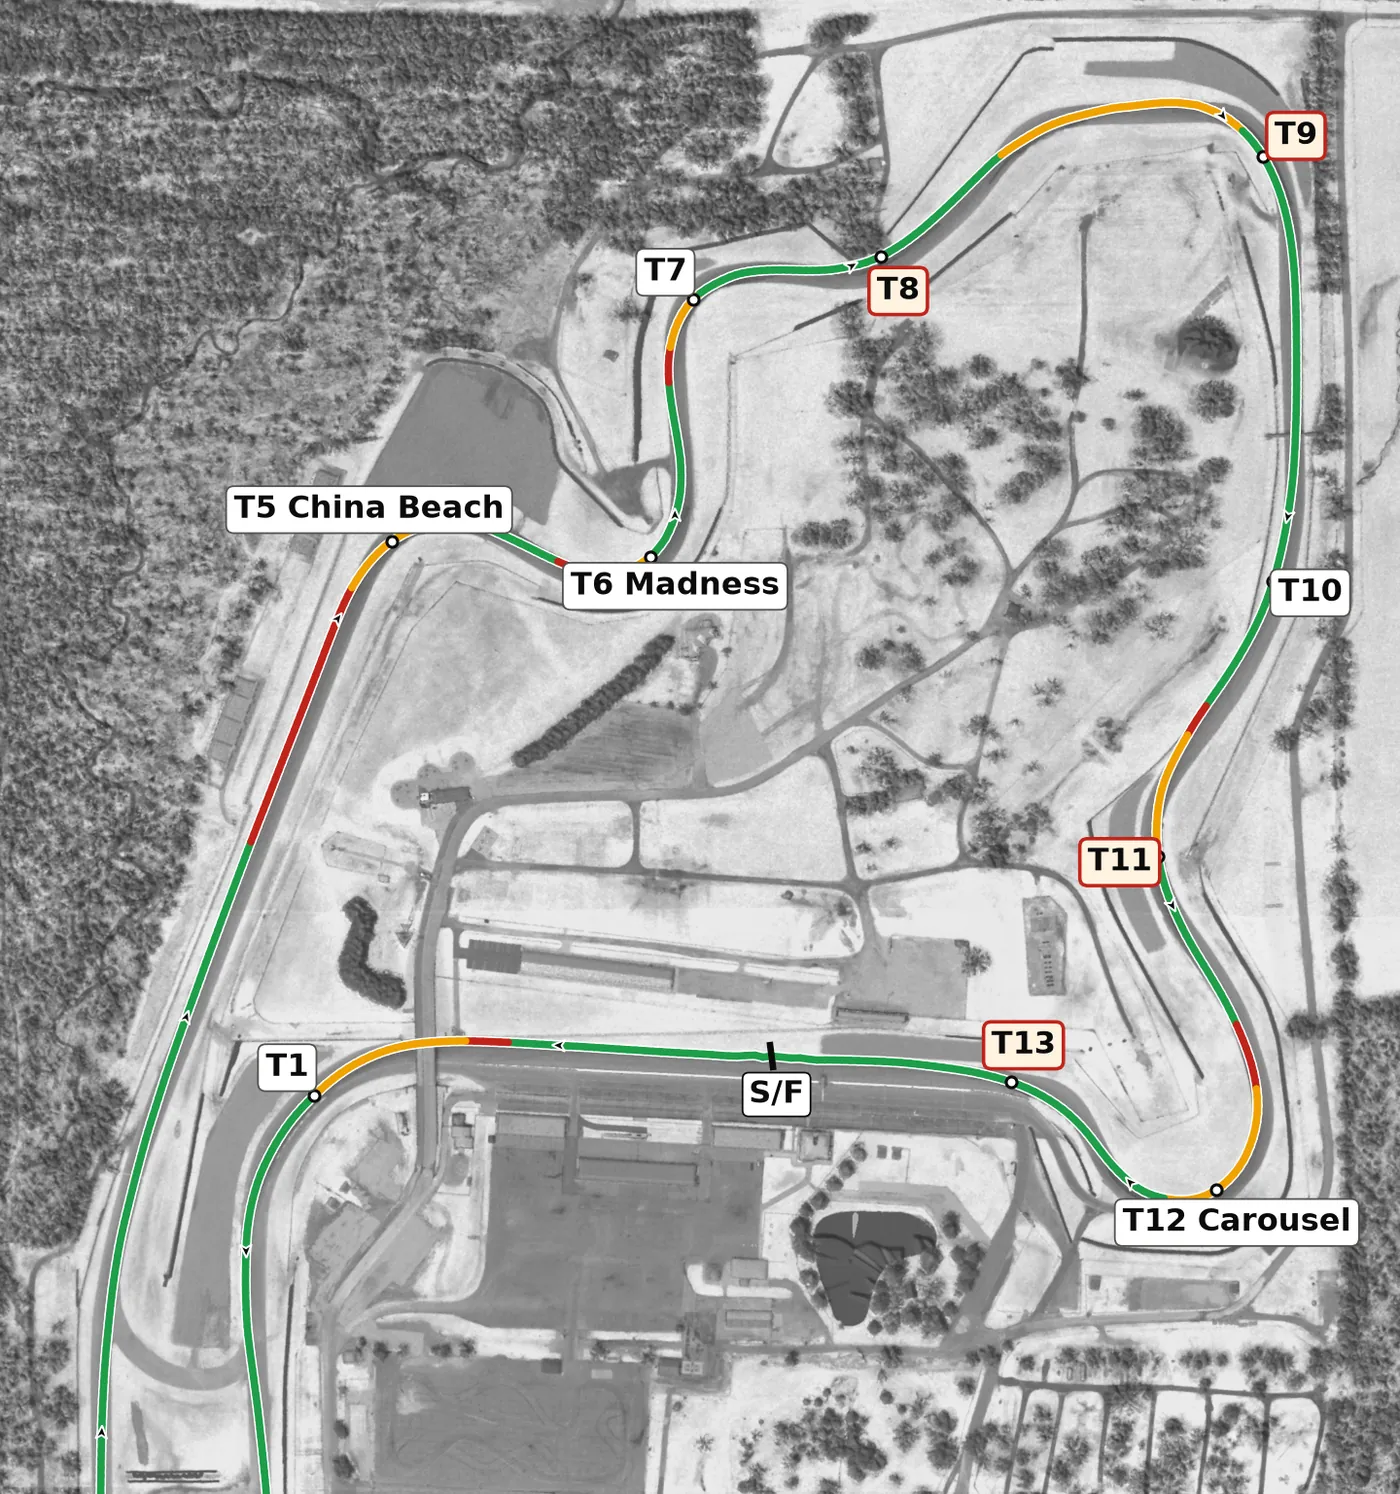
Brake hard and early for China Beach at the end of the back straight, because the braking zone runs downhill. Madness follows as a run of crests and compressions, a banked left over a crest, a right in a compression, then an off-camber left and right over two more crests, where the car goes light and moves around. Place the car precisely, keep your inputs gentle over each crest, and save your commitment for where the car is settled.
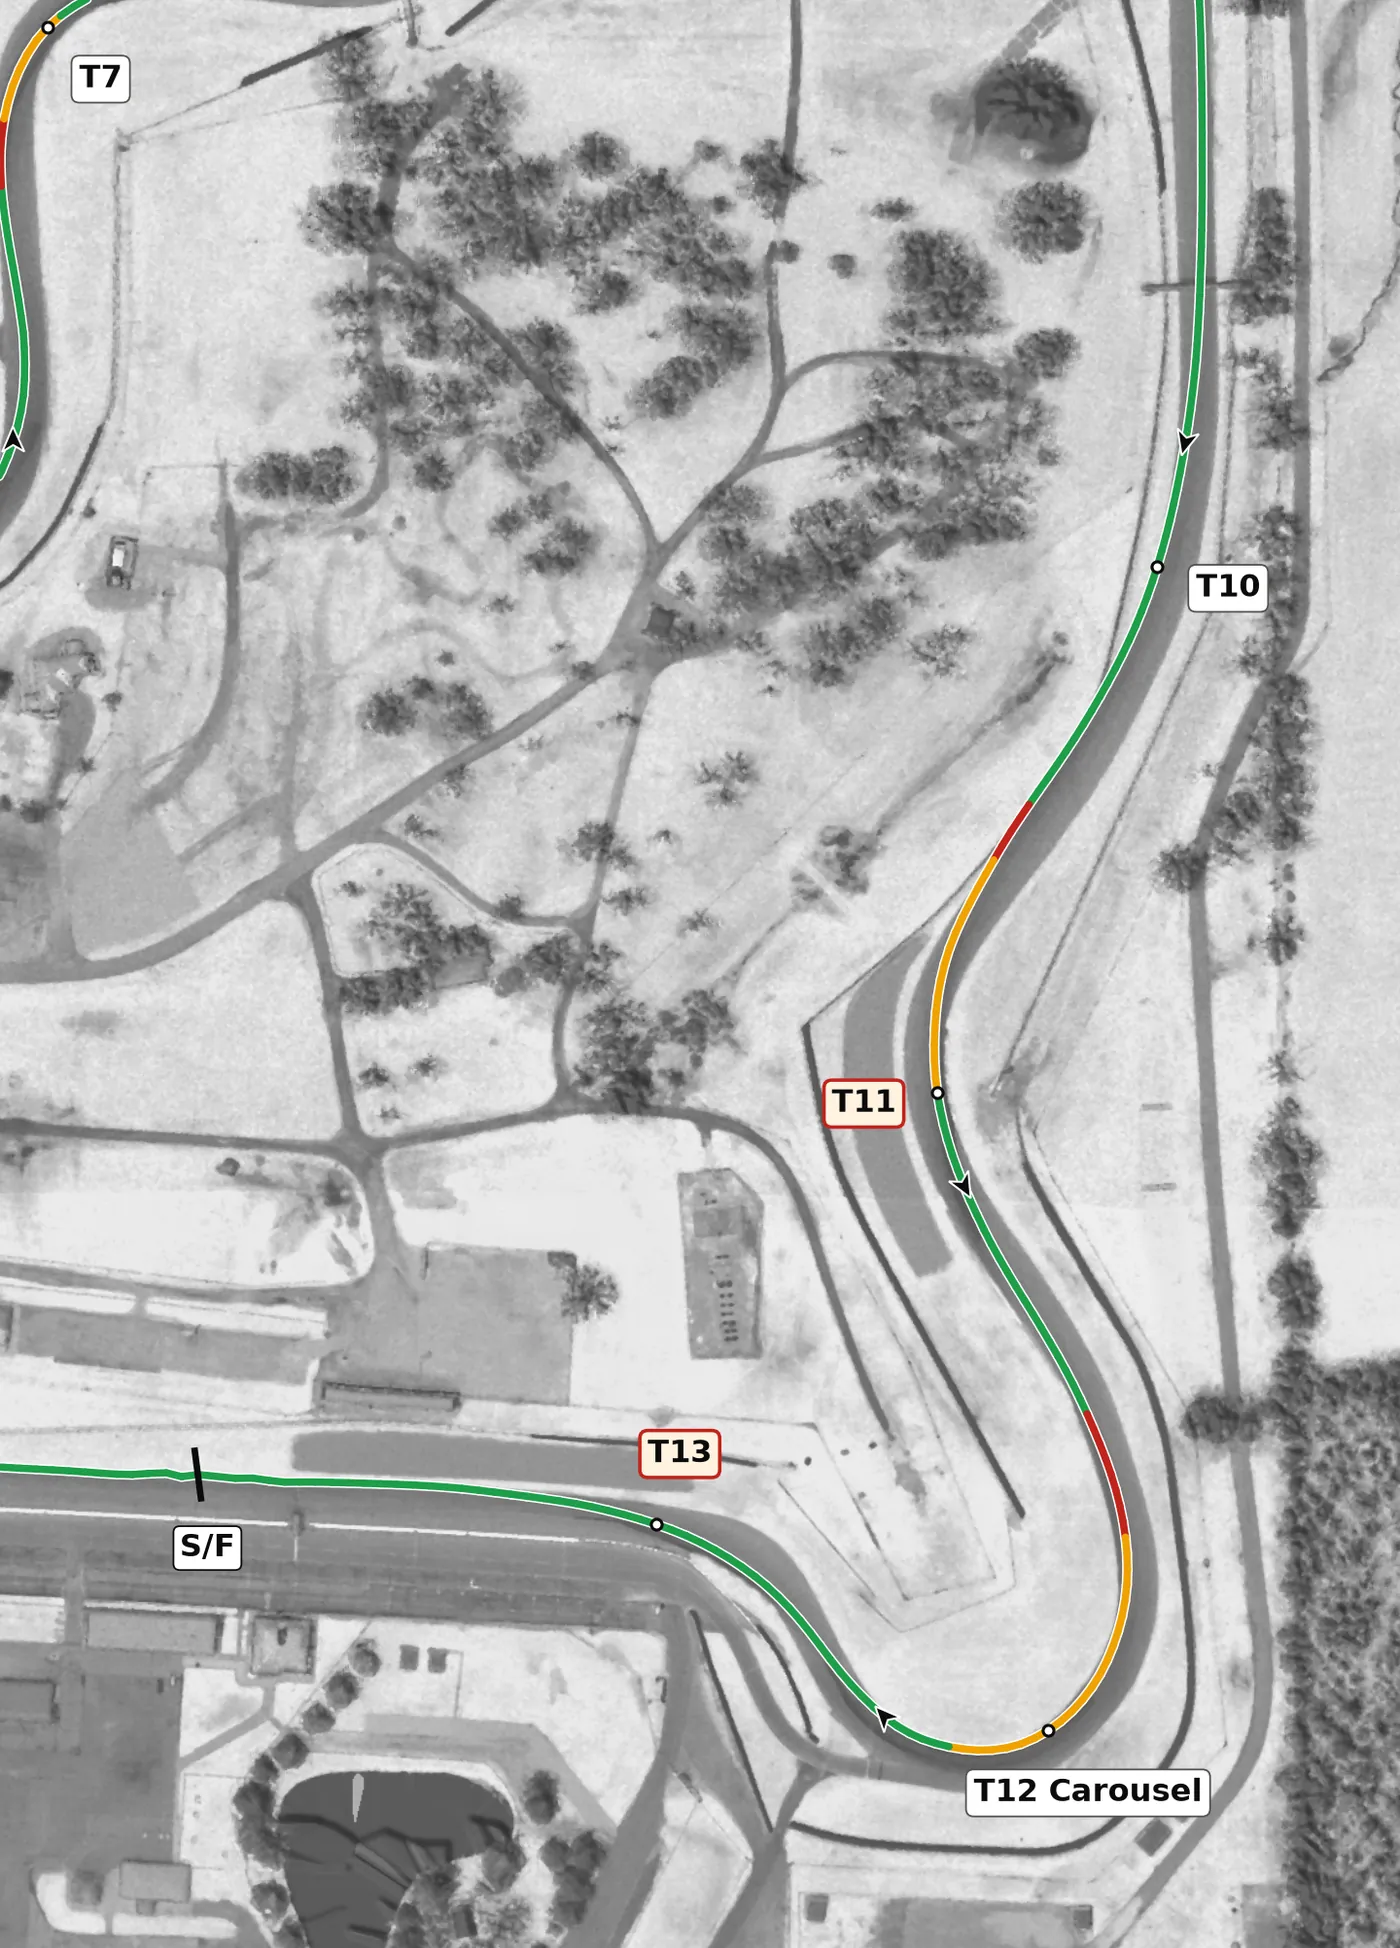
T10 is the fastest and most banked corner on the lap, and T11 climbs uphill and slightly off camber toward the Carousel. The Carousel is a long, tightening right taken as a double apex, with trail braking deep into it and throttle only at the second apex, and then a short left at T13 through a compression puts you onto the front straight.
Corners
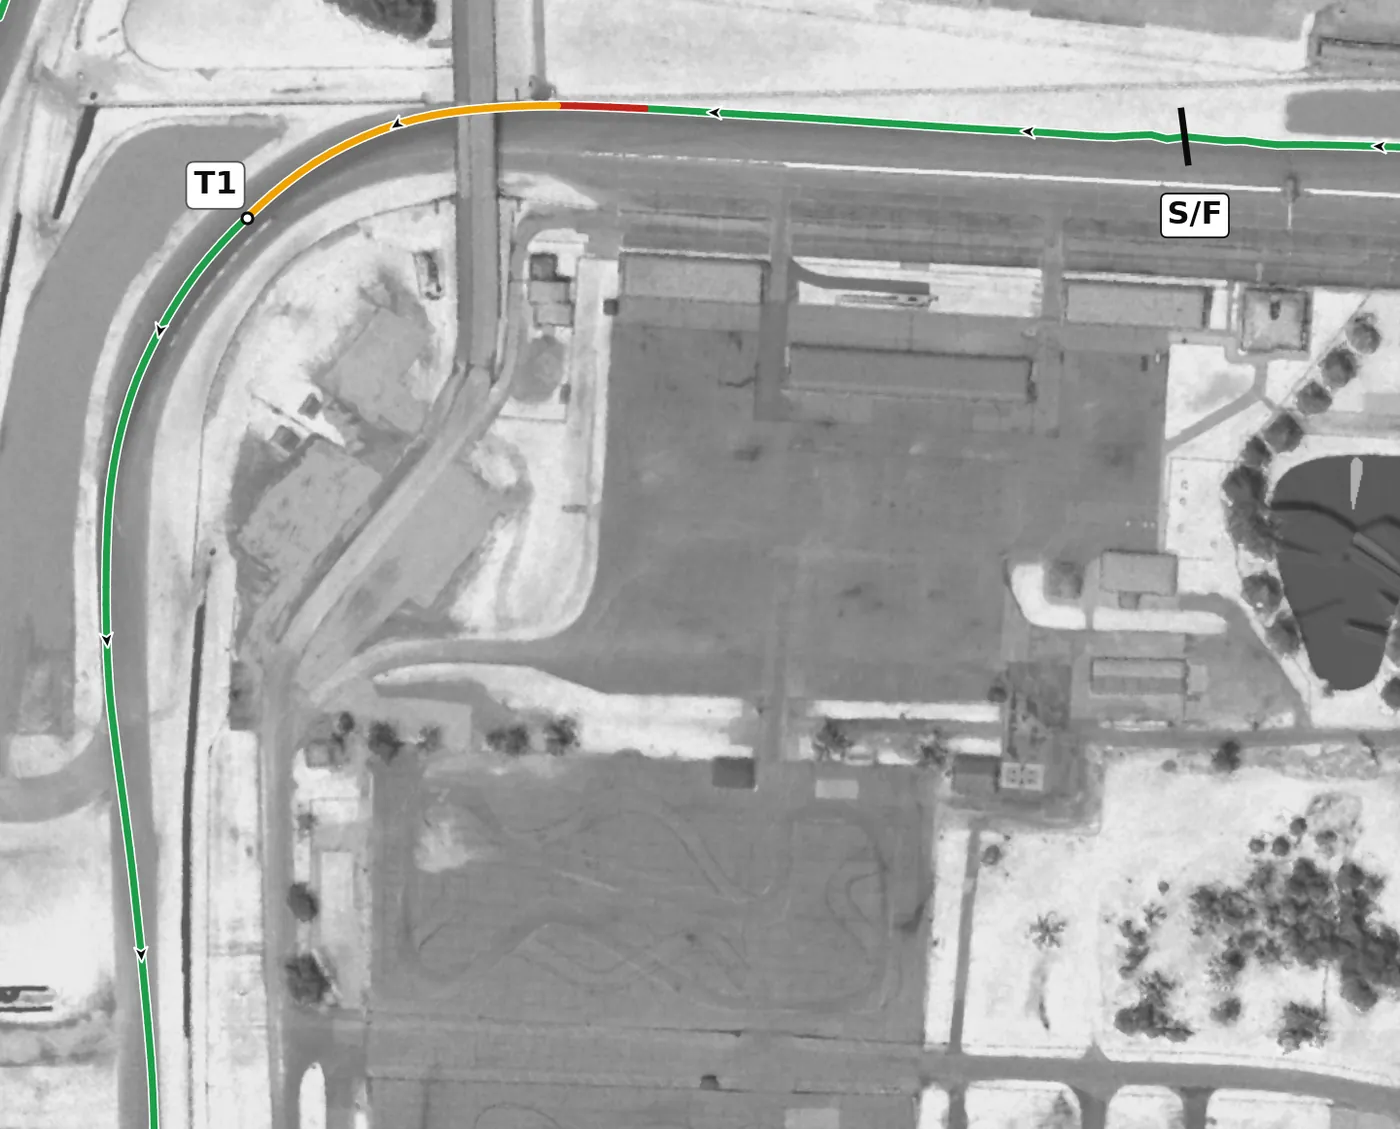
T1 is a fast, blind left on a slight rise, and depending on your car it needs anything from a brief lift to a short brake. Turn in smoothly, clip the apex and let the car run out to the right as the road climbs toward T2. The mistake to avoid is taking it flat on your first laps: it is blind, so build up to it gradually.
From the survey: +0.6% camber at the apex, then the road climbs 4 m to the exit.
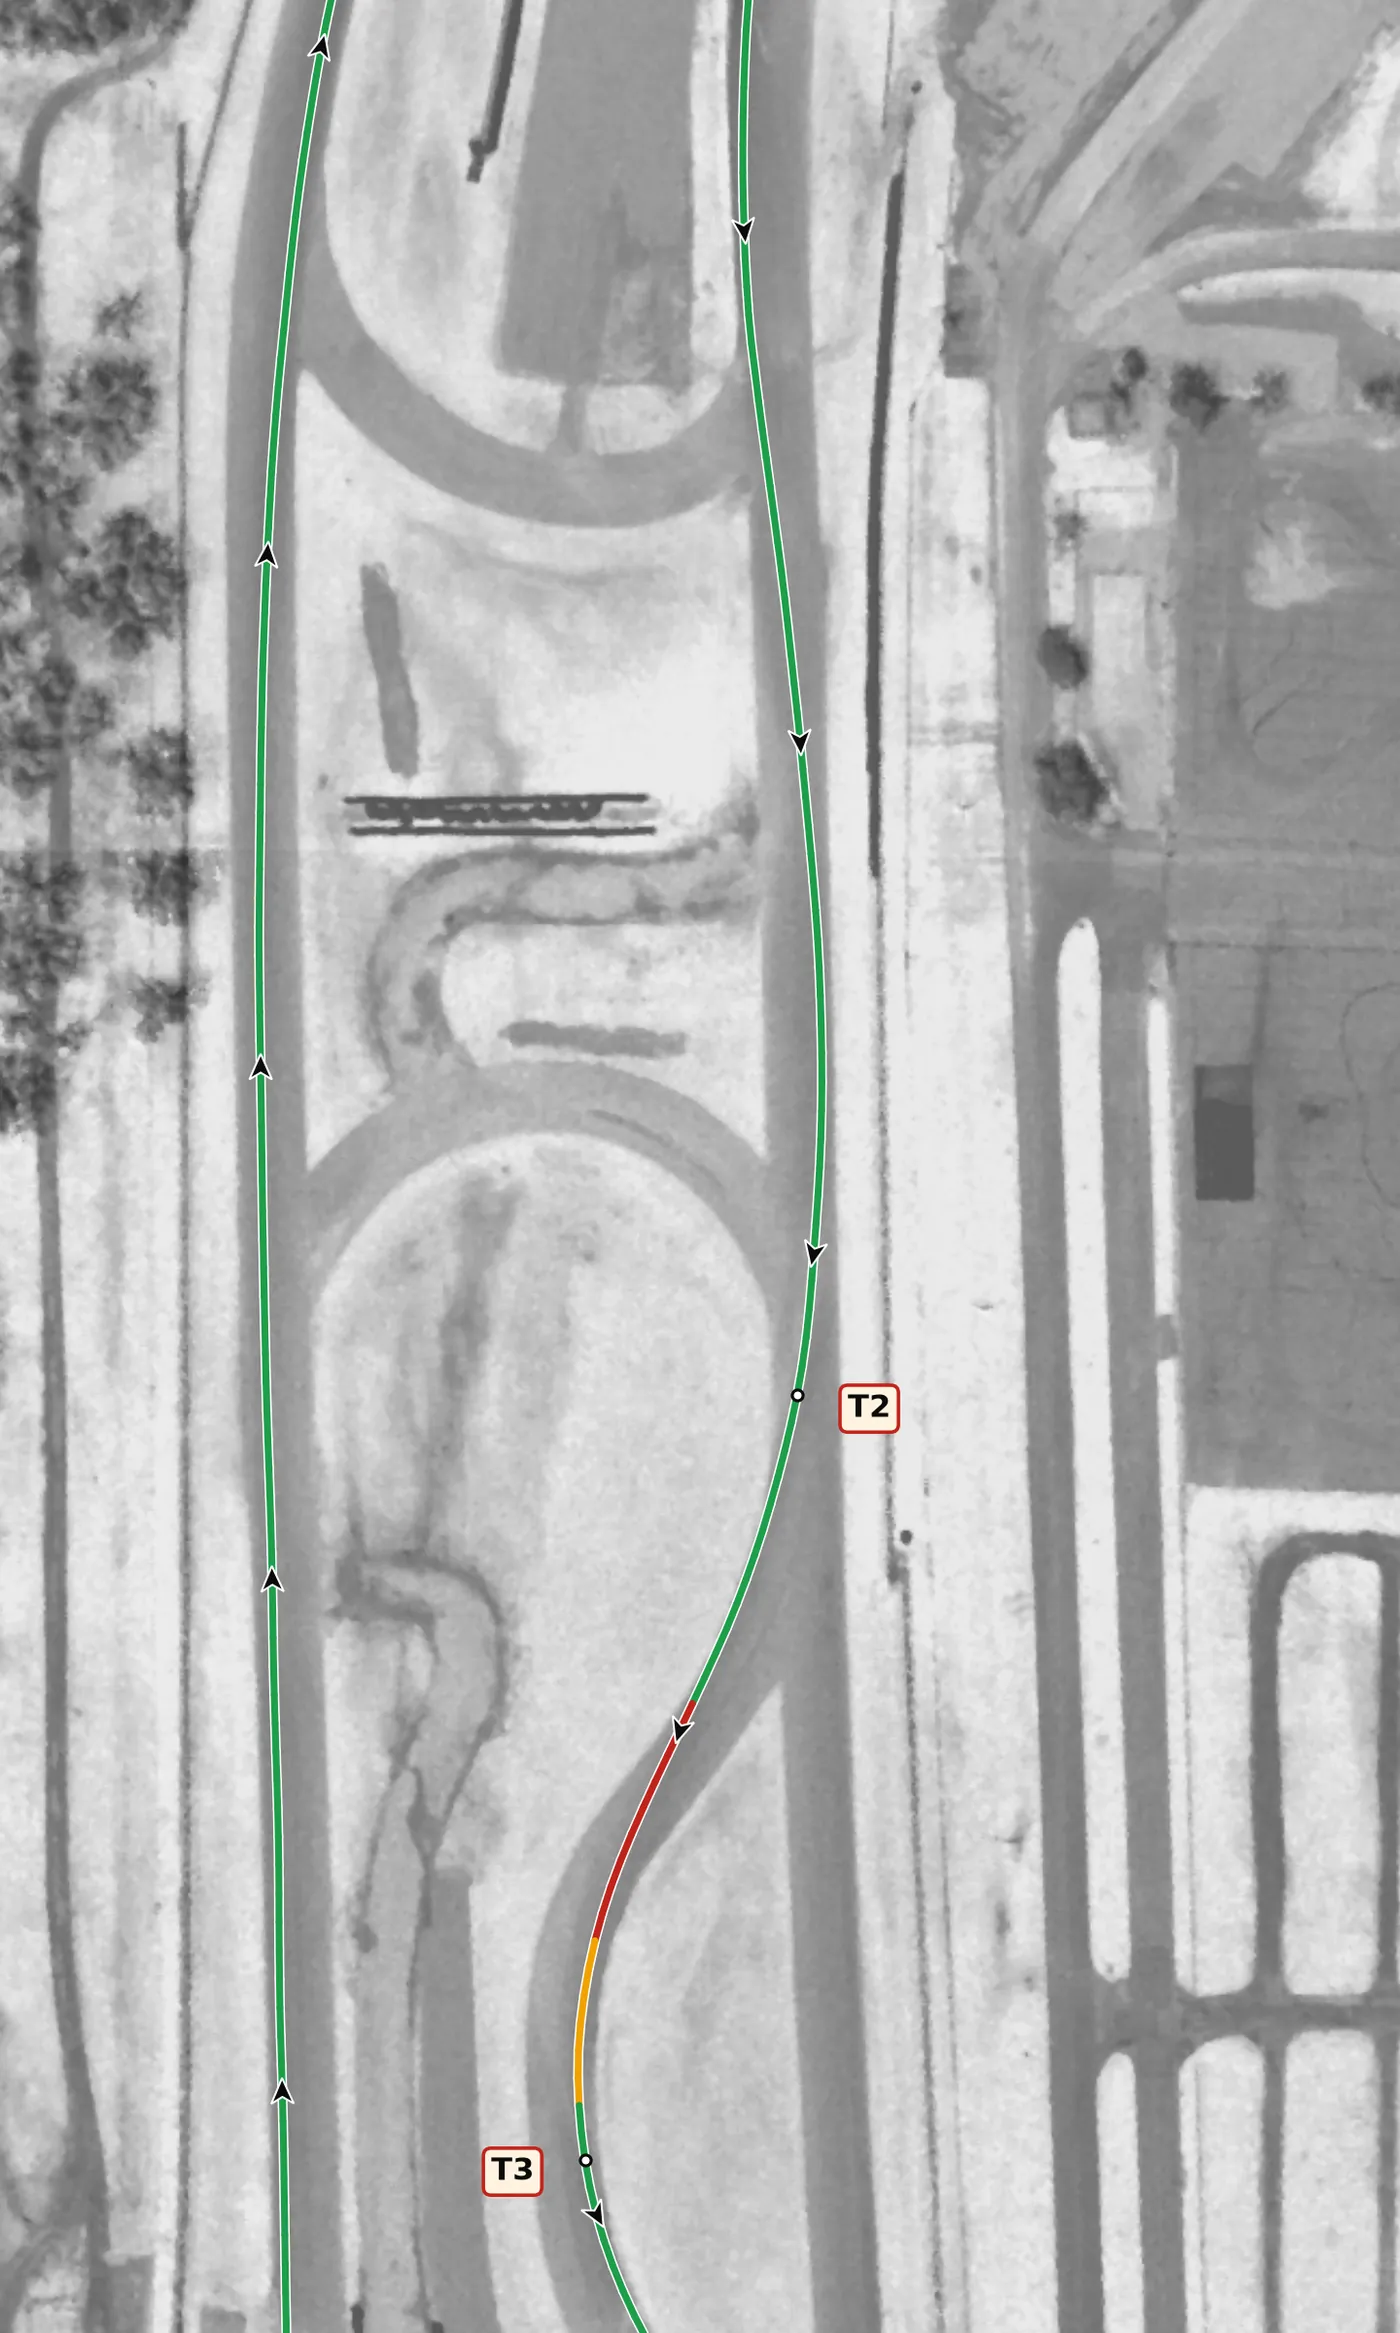
This right climbs uphill with an off-camber apex, so the surface gives you less grip than you might expect. At HPDE pace it needs no brake: the climb takes a little speed off, and the braking comes after it, for T3. Don't track all the way out to the left, because you need to be back on the right for T3. The mistake to avoid is carrying too much speed in and sliding wide on the unhelpful camber.
From the survey: Uphill and off camber (−0.9% at the apex).
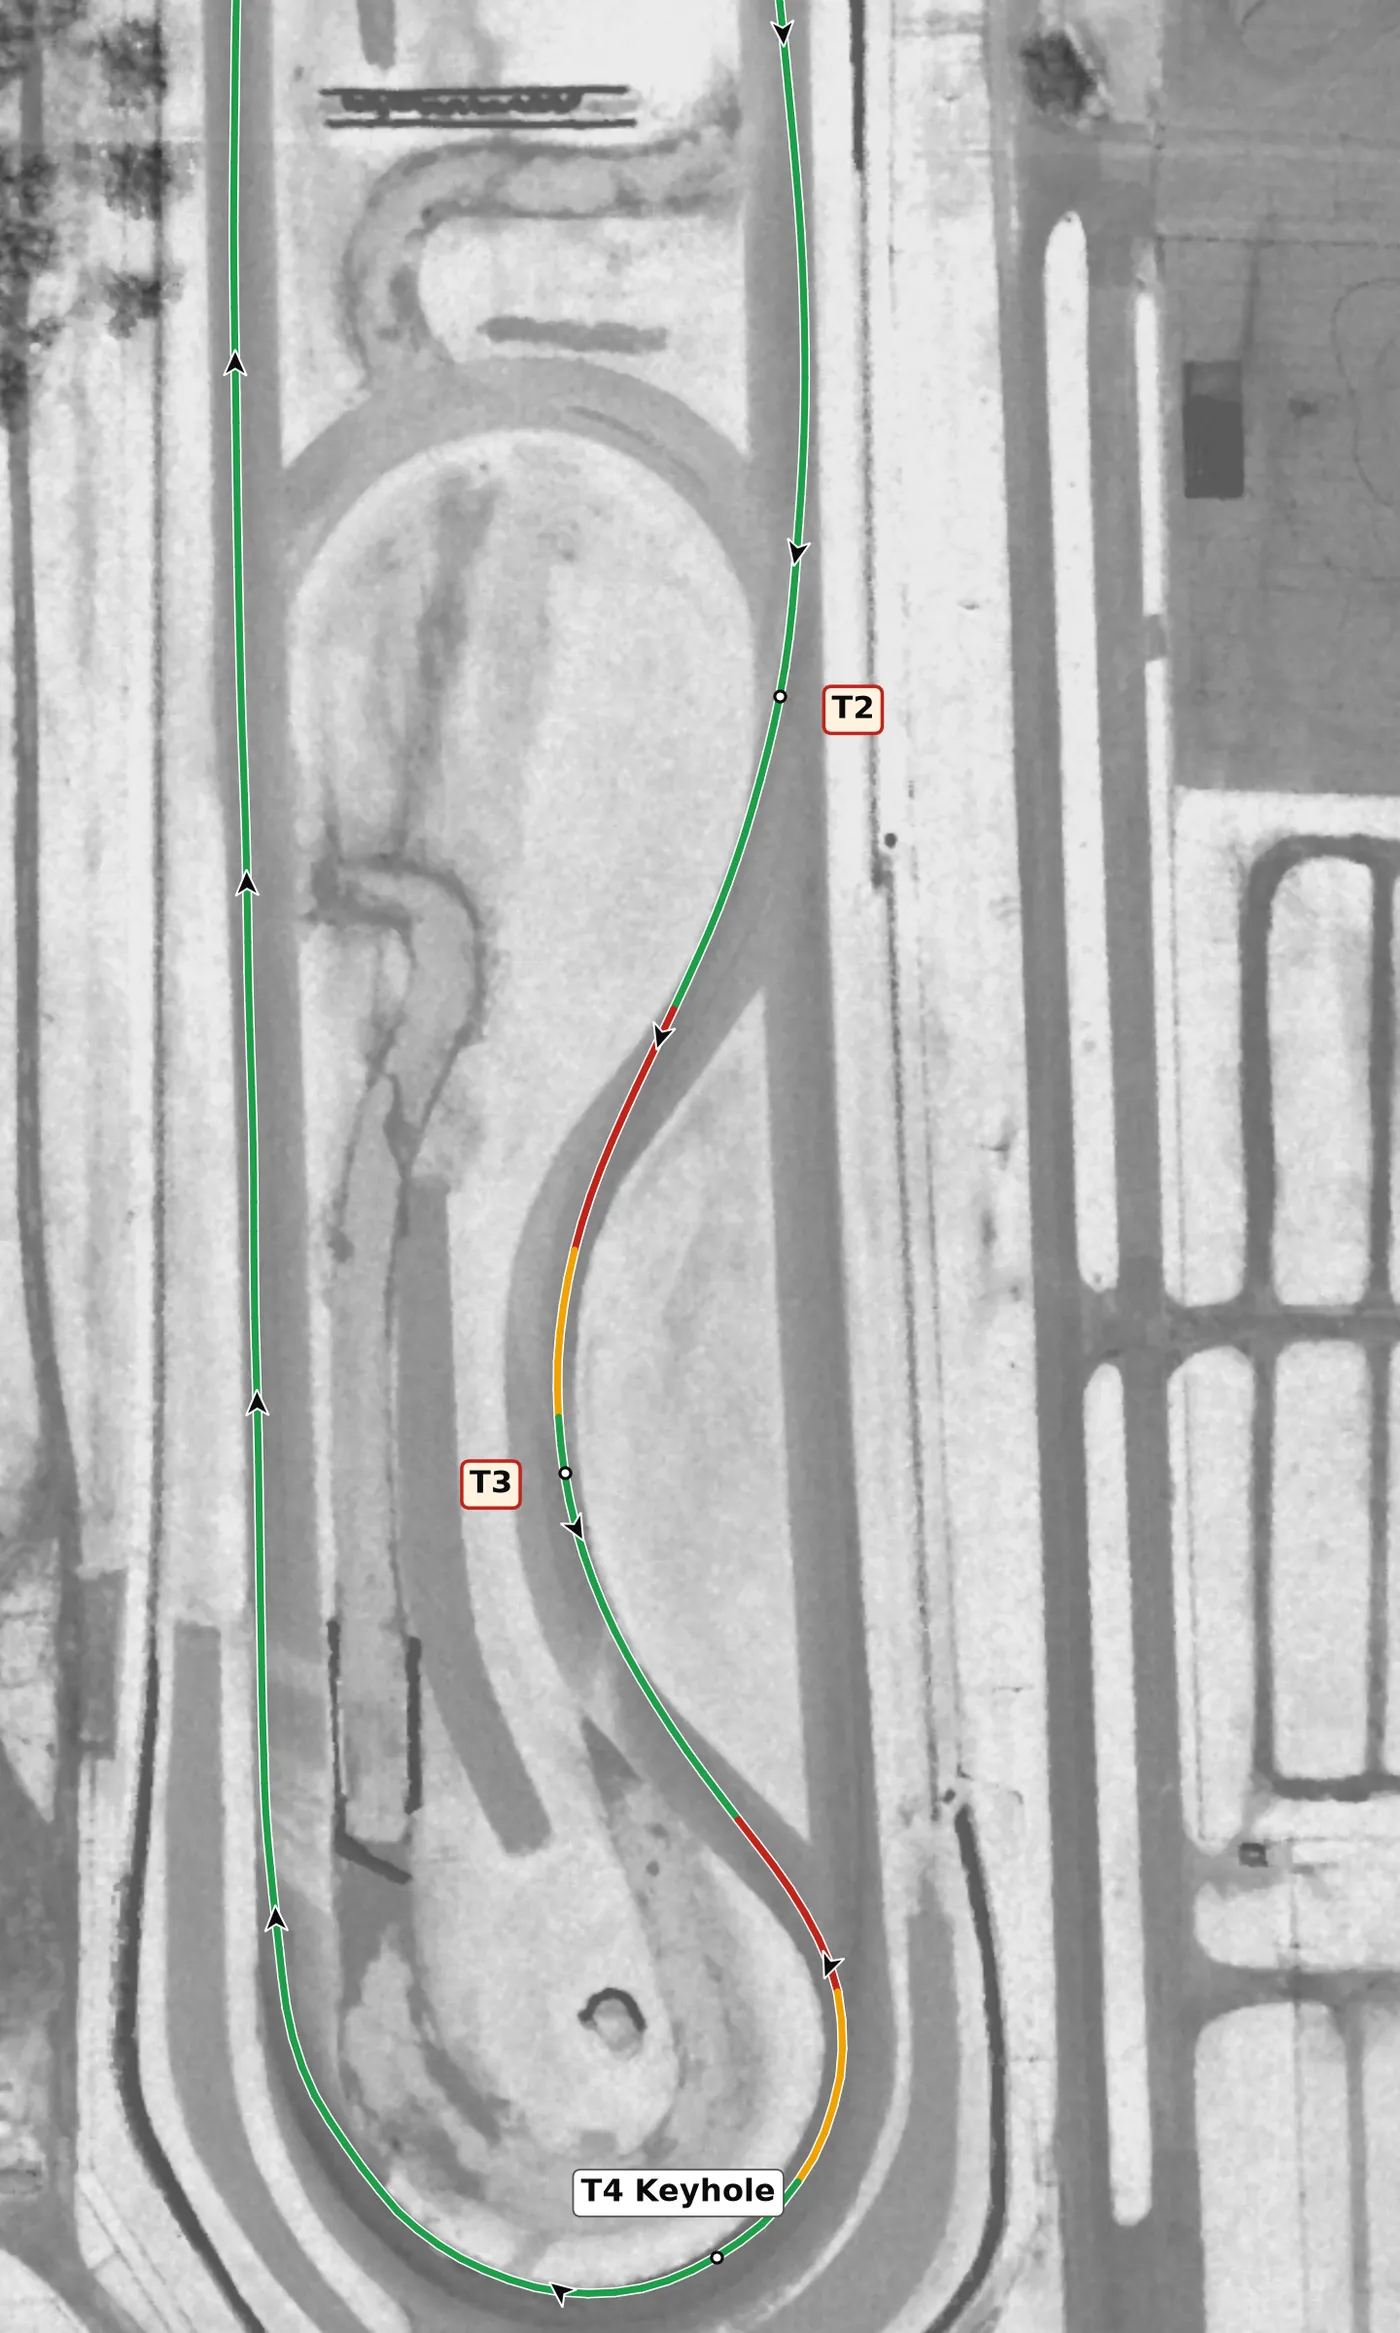
This left is also uphill and slightly off camber, and it is the first real brake since T1: brake in a straight line as you arrive from T2, then lift through the corner, because it leads almost directly into the Keyhole braking zone. Take only as much exit as you need and get the car back over to the left side before you brake for the Keyhole. The mistake to avoid is a wide exit that leaves you on the wrong side of the track for the most important corner on the lap.
From the survey: Uphill and off camber (−0.5% at the apex).
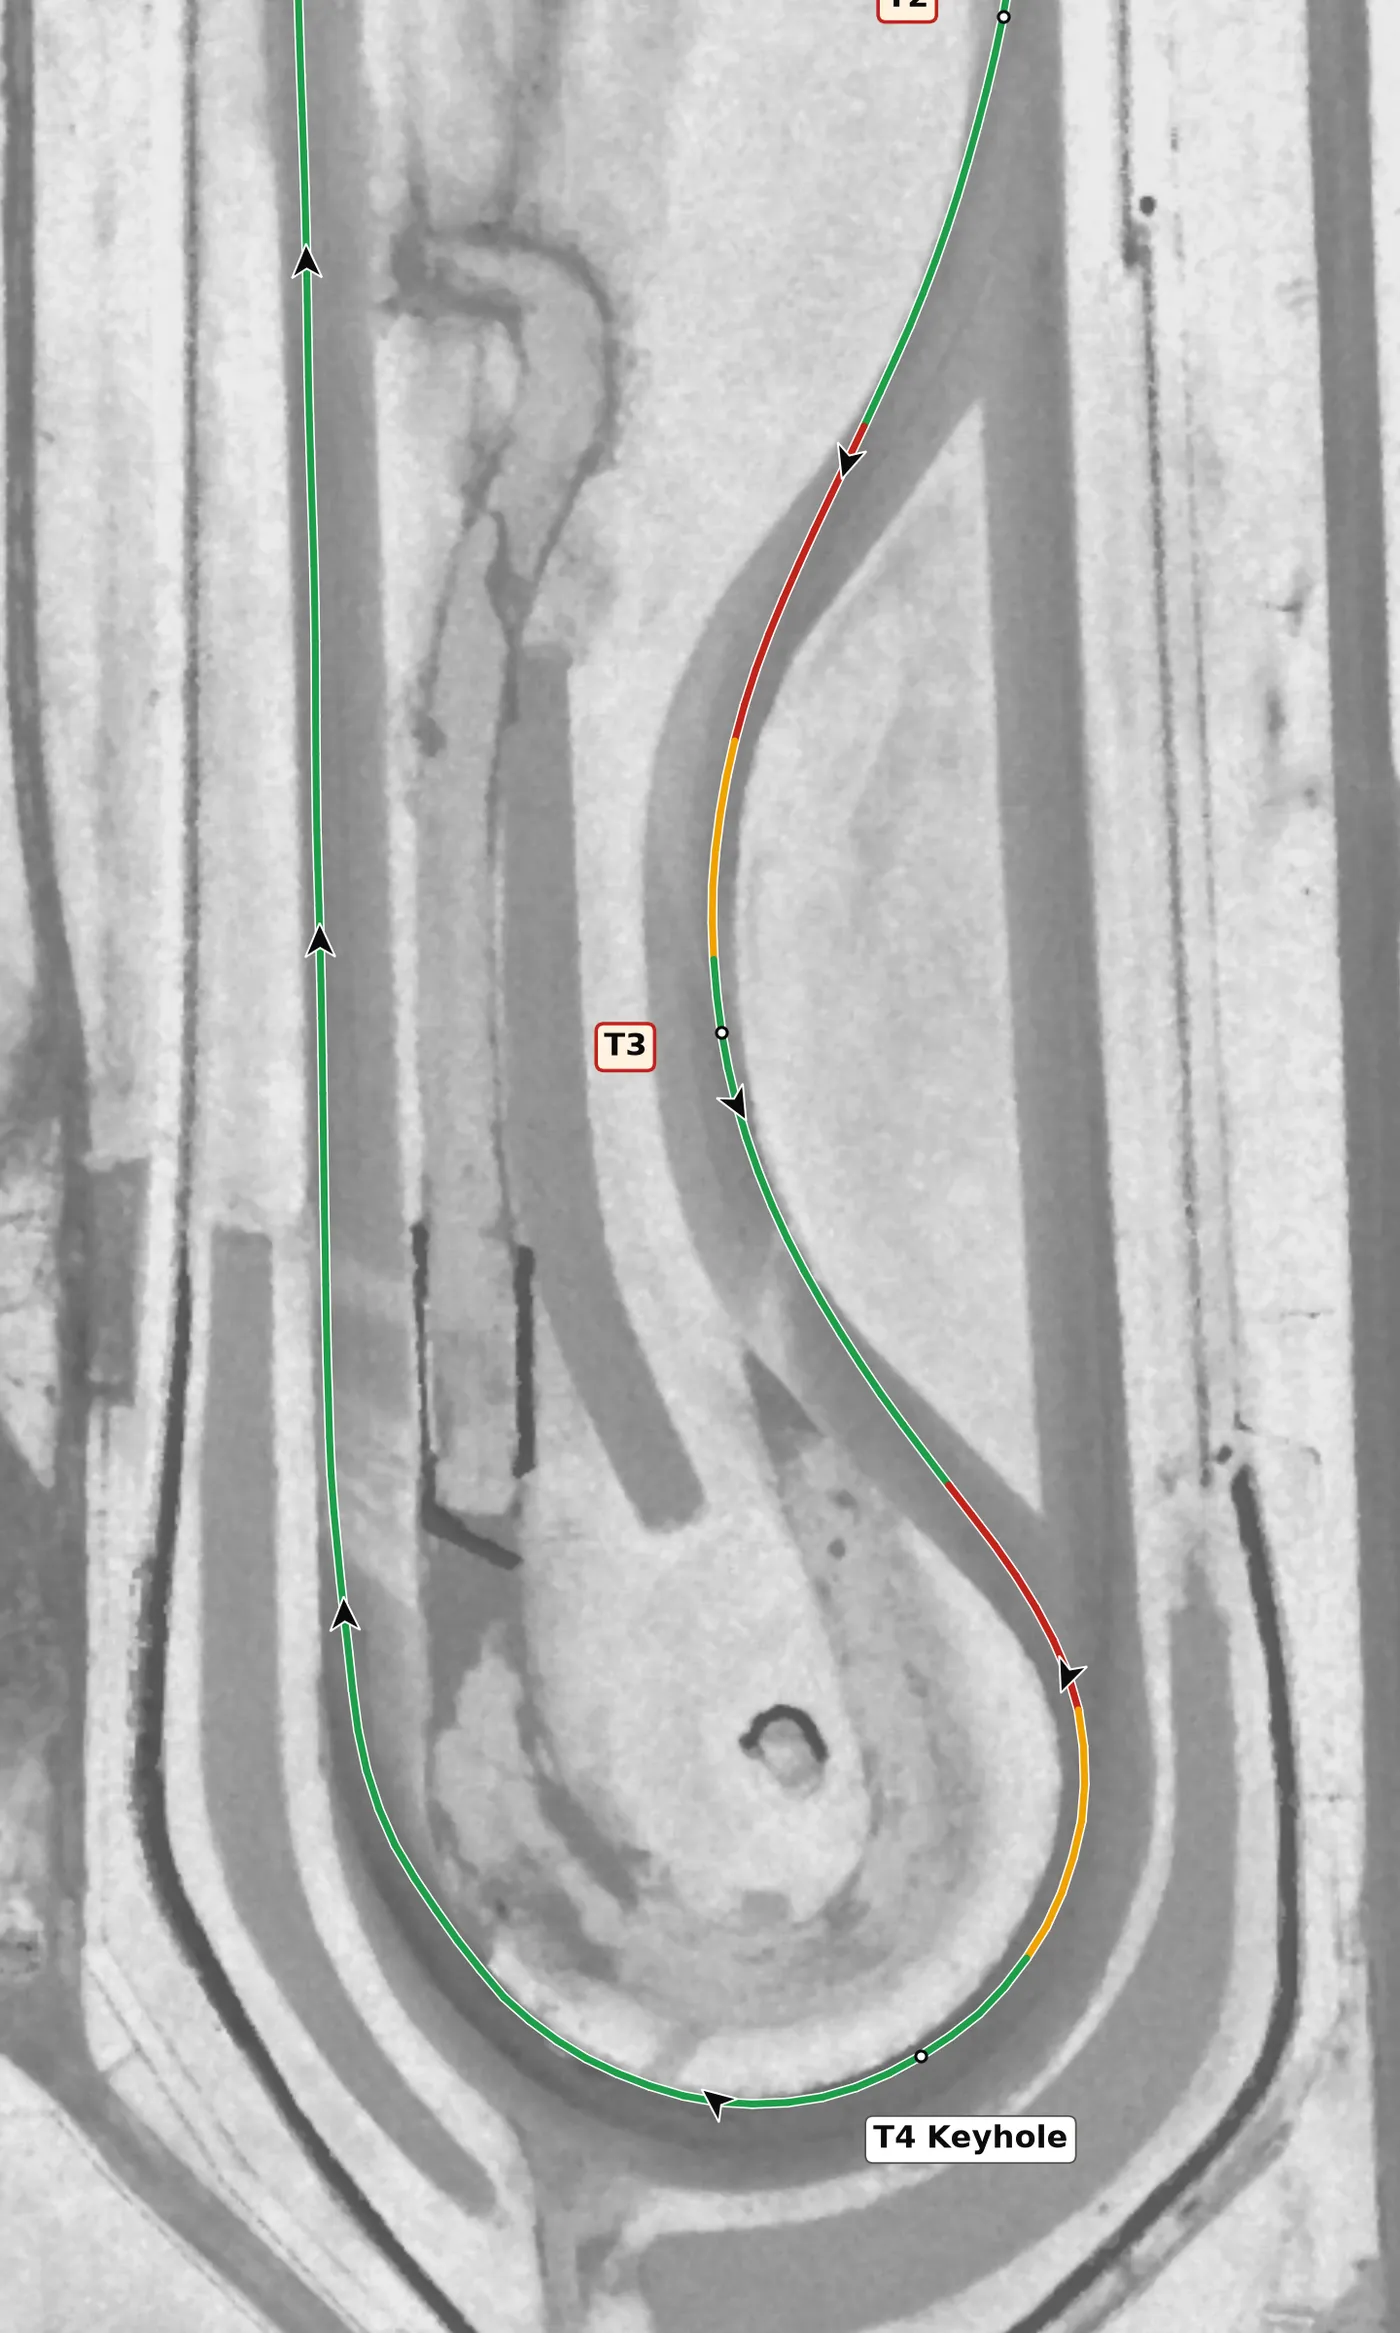
The Keyhole is a very long, late-apex right with an uphill entry, a crest near the apex and a downhill exit, and it feeds the back straight. Treat it as a double apex: trail brake past the first apex, let the car sit about a car width off the inside through the middle, then pick up the throttle at the second apex and use the banking at the apex to drive out. The mistake to avoid is getting on the throttle too early and then having to lift as the car runs wide on the downhill exit.
From the survey: The official T2, and the highest point on the lap. Banked +6.8% at the apex, which sits on a crest; the road drops 6.5 m to the exit.
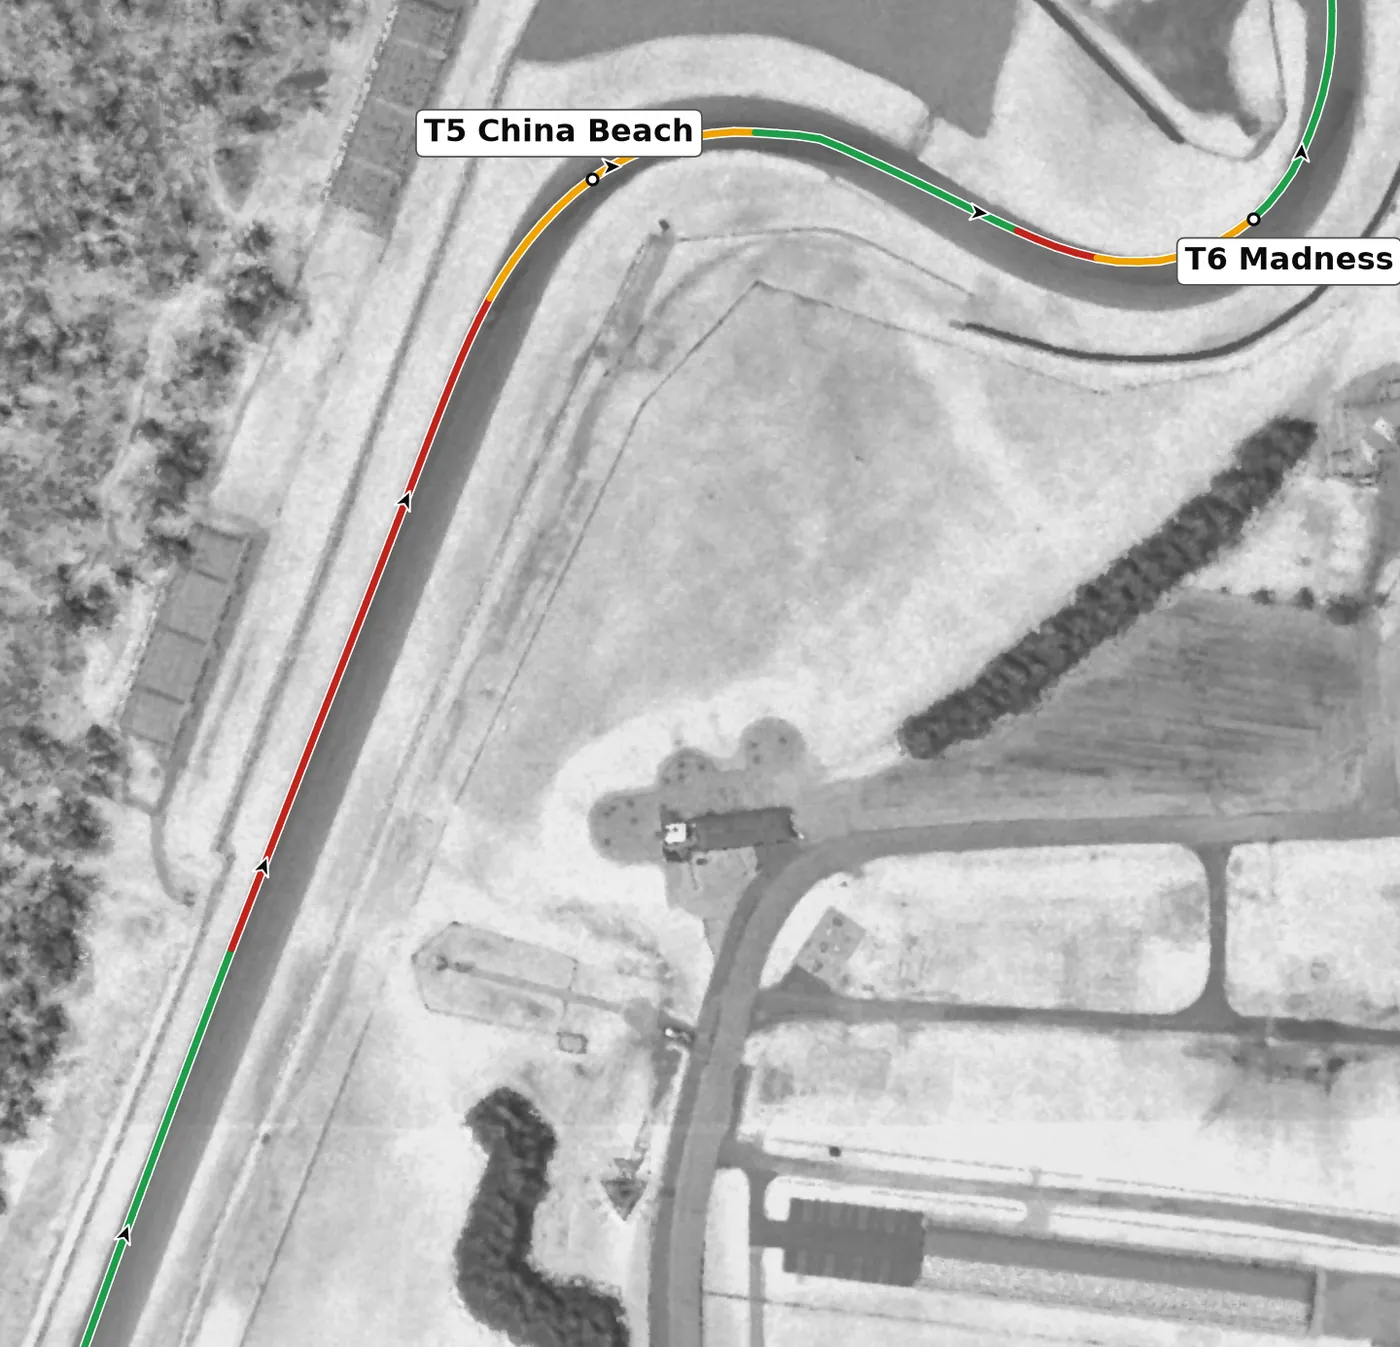
China Beach comes at the end of the long back straight, and the braking zone and the corner both run downhill, so the car takes longer to stop than you expect. Brake early and in a straight line, then use what banking there is at the apex (it was reduced in the 2024 rework), and track out only to the middle of the road so you can get across to the right for Madness. The mistake to avoid is a late, deep braking attempt that ends in the gravel trap this corner is famous for.
From the survey: The official T4. Banked +6.4% and downhill when surveyed; reprofiled in late 2024 with less banking.
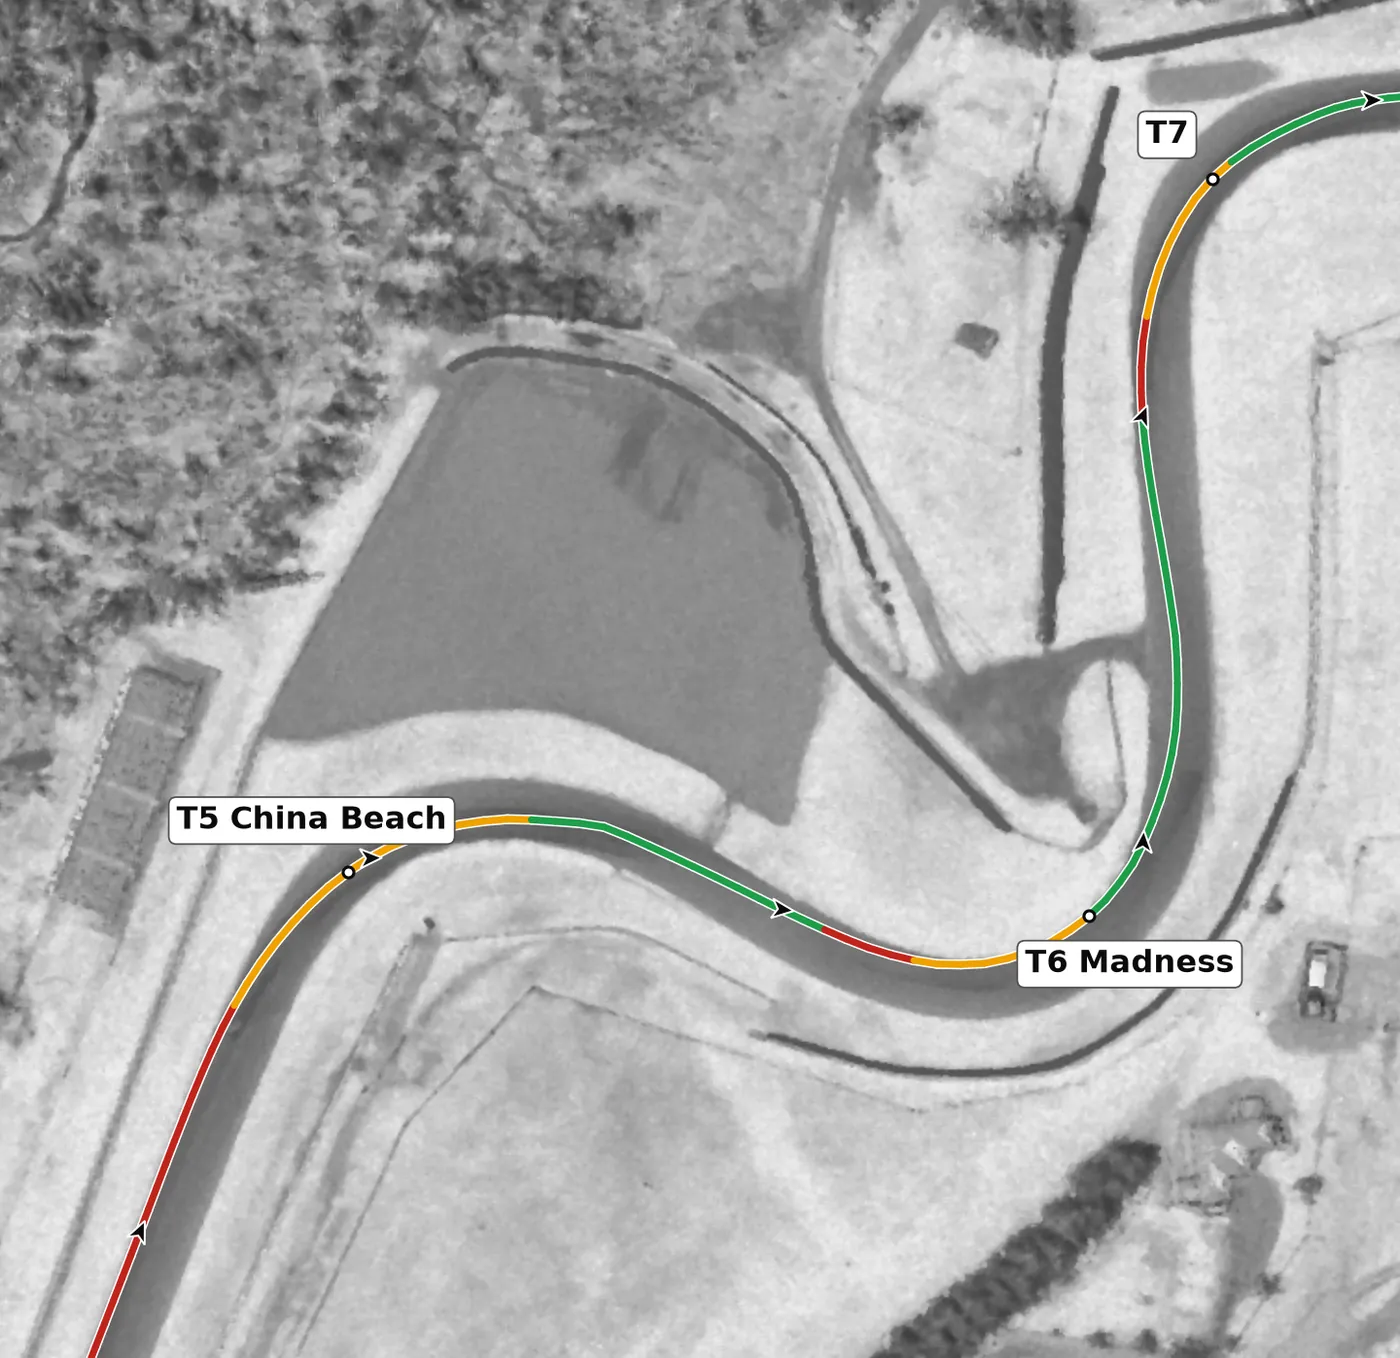
Madness starts with a left whose apex sits on a crest, so the car goes light just as you are turning, although the apex itself is banked. Settle the car before the crest, turn in precisely from the right, and keep your steering and throttle gentle over the top as the road drops steeply on the far side. The mistake to avoid is braking or adding steering on the crest, which can easily send you off on the exit.
From the survey: The official T5. Banked +10% at the apex, not off camber, over the tightest crest on the lap; the exit falls at −9.5%.
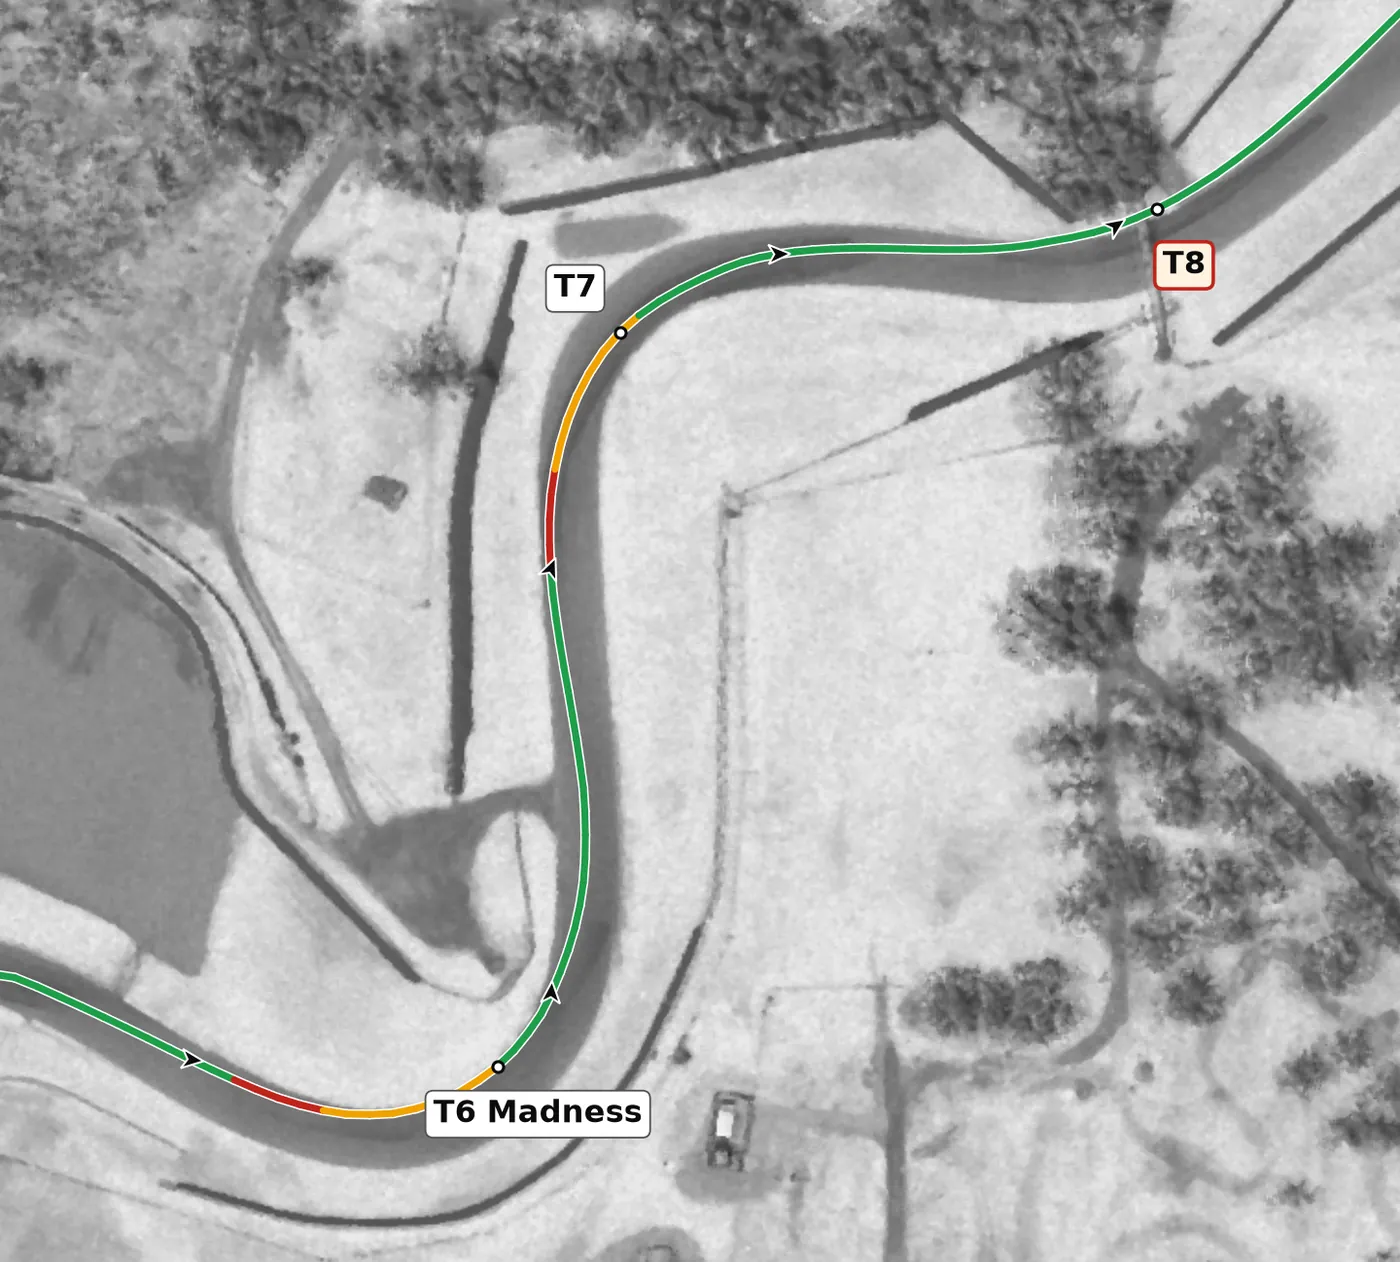
This right arrives downhill and flattens into a compression, which pushes the car into the road and gives you extra grip at the bottom. Keep the car balanced on a light throttle from turn-in rather than overbraking, and use the compression to help you turn. The mistake to avoid is braking hard on the steep entry and arriving at the apex with the car unsettled.
From the survey: Arrives at −7.9% and flattens into a compression.
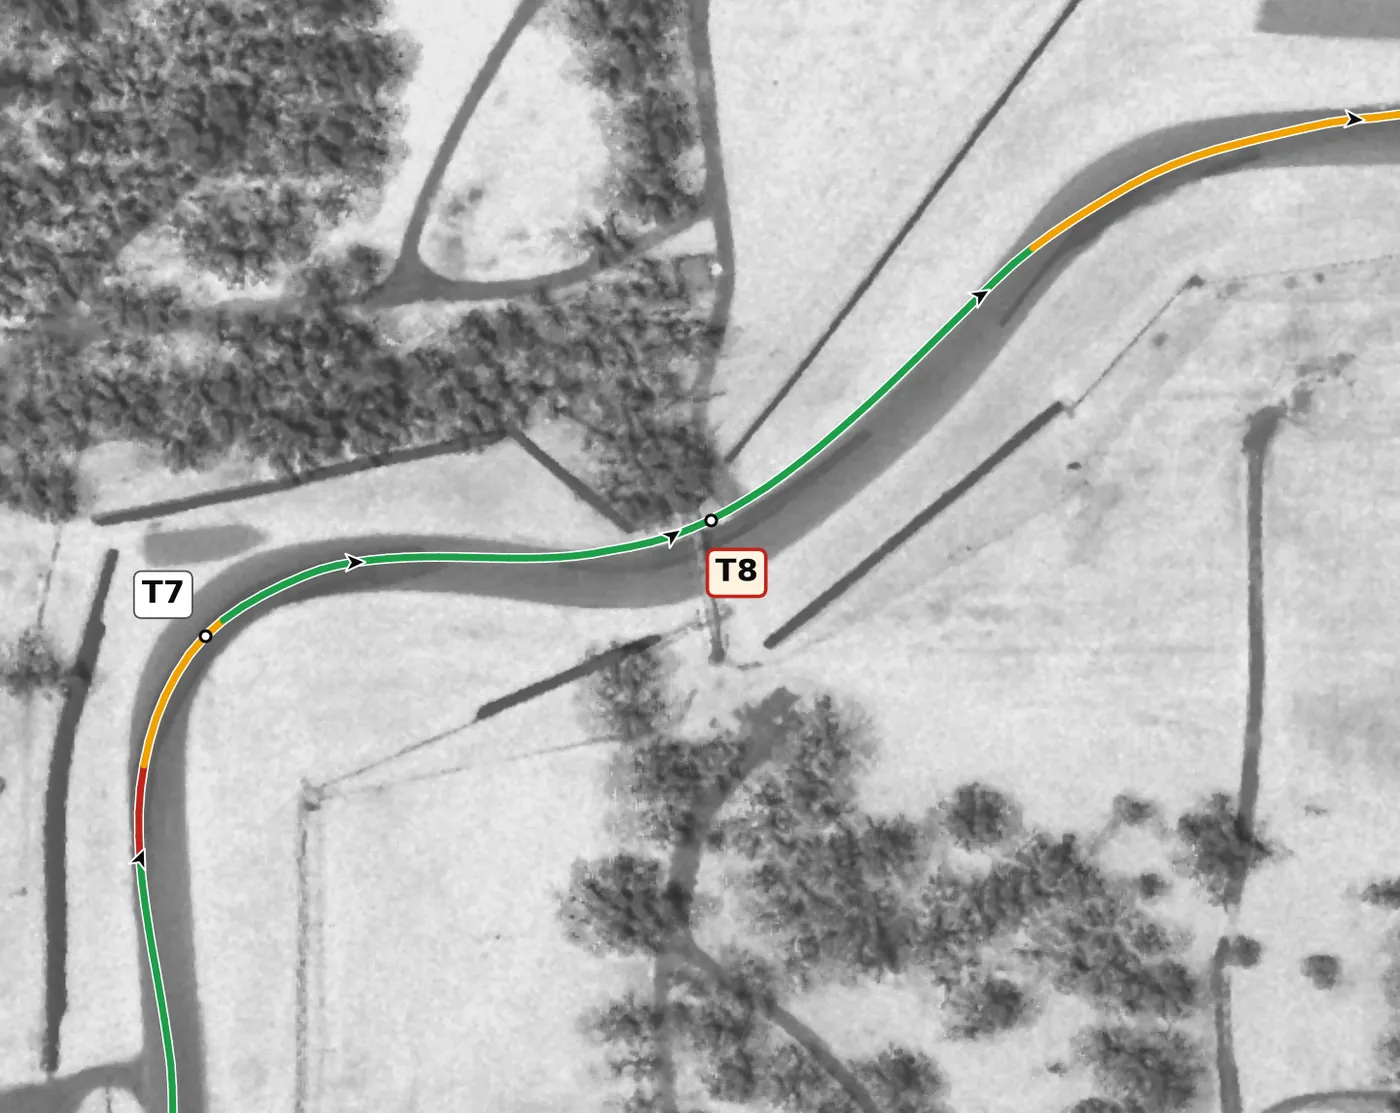
This left is the most off-camber corner on the circuit and climbs over a crest, so grip fades just as the car goes light. Compromise your line here and track out only to the middle of the road so you are set up for T9. The mistake to avoid is asking for too much grip on the off-camber exit; keep the car as straight as you can over the top.
From the survey: The most off-camber corner: −2.8% at the apex, −4.3% at worst, over a crest.
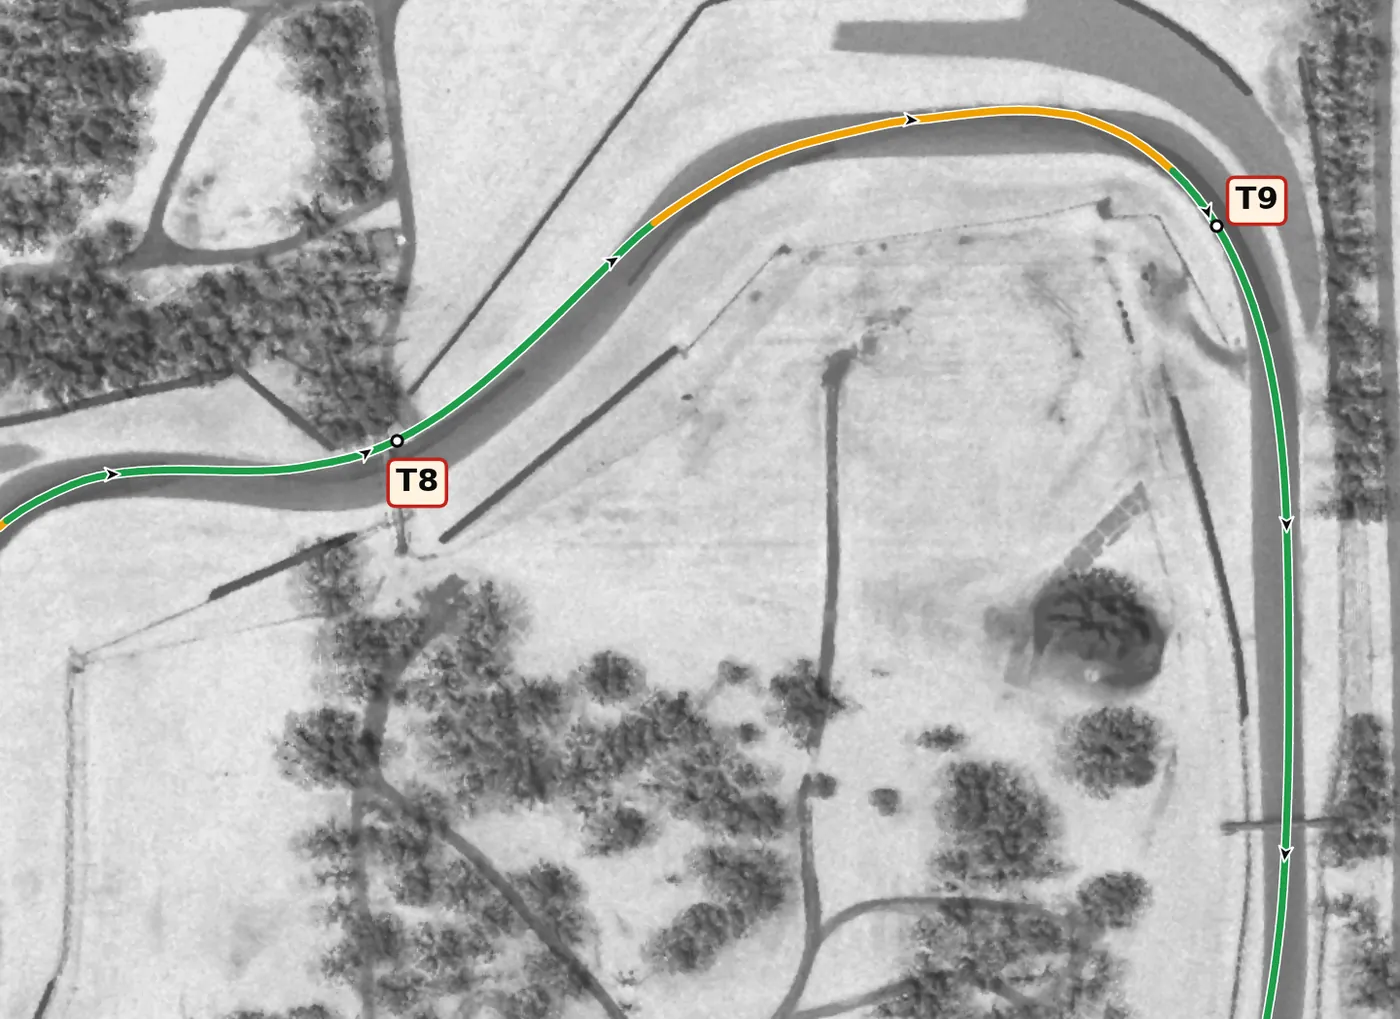
This right drops to the lowest point on the lap and then over the biggest unloading crest on the circuit, with an off-camber apex. Have the car pointed where you want to go before the crest, with soft hands on the wheel, because the car will move sideways as it goes light. The mistake to avoid is turning or braking hard over the blind crest; build up to it over several laps.
From the survey: Holds the lowest point on the lap, then the biggest unloading on it, over the crest. Off camber at the apex (−1.3%).
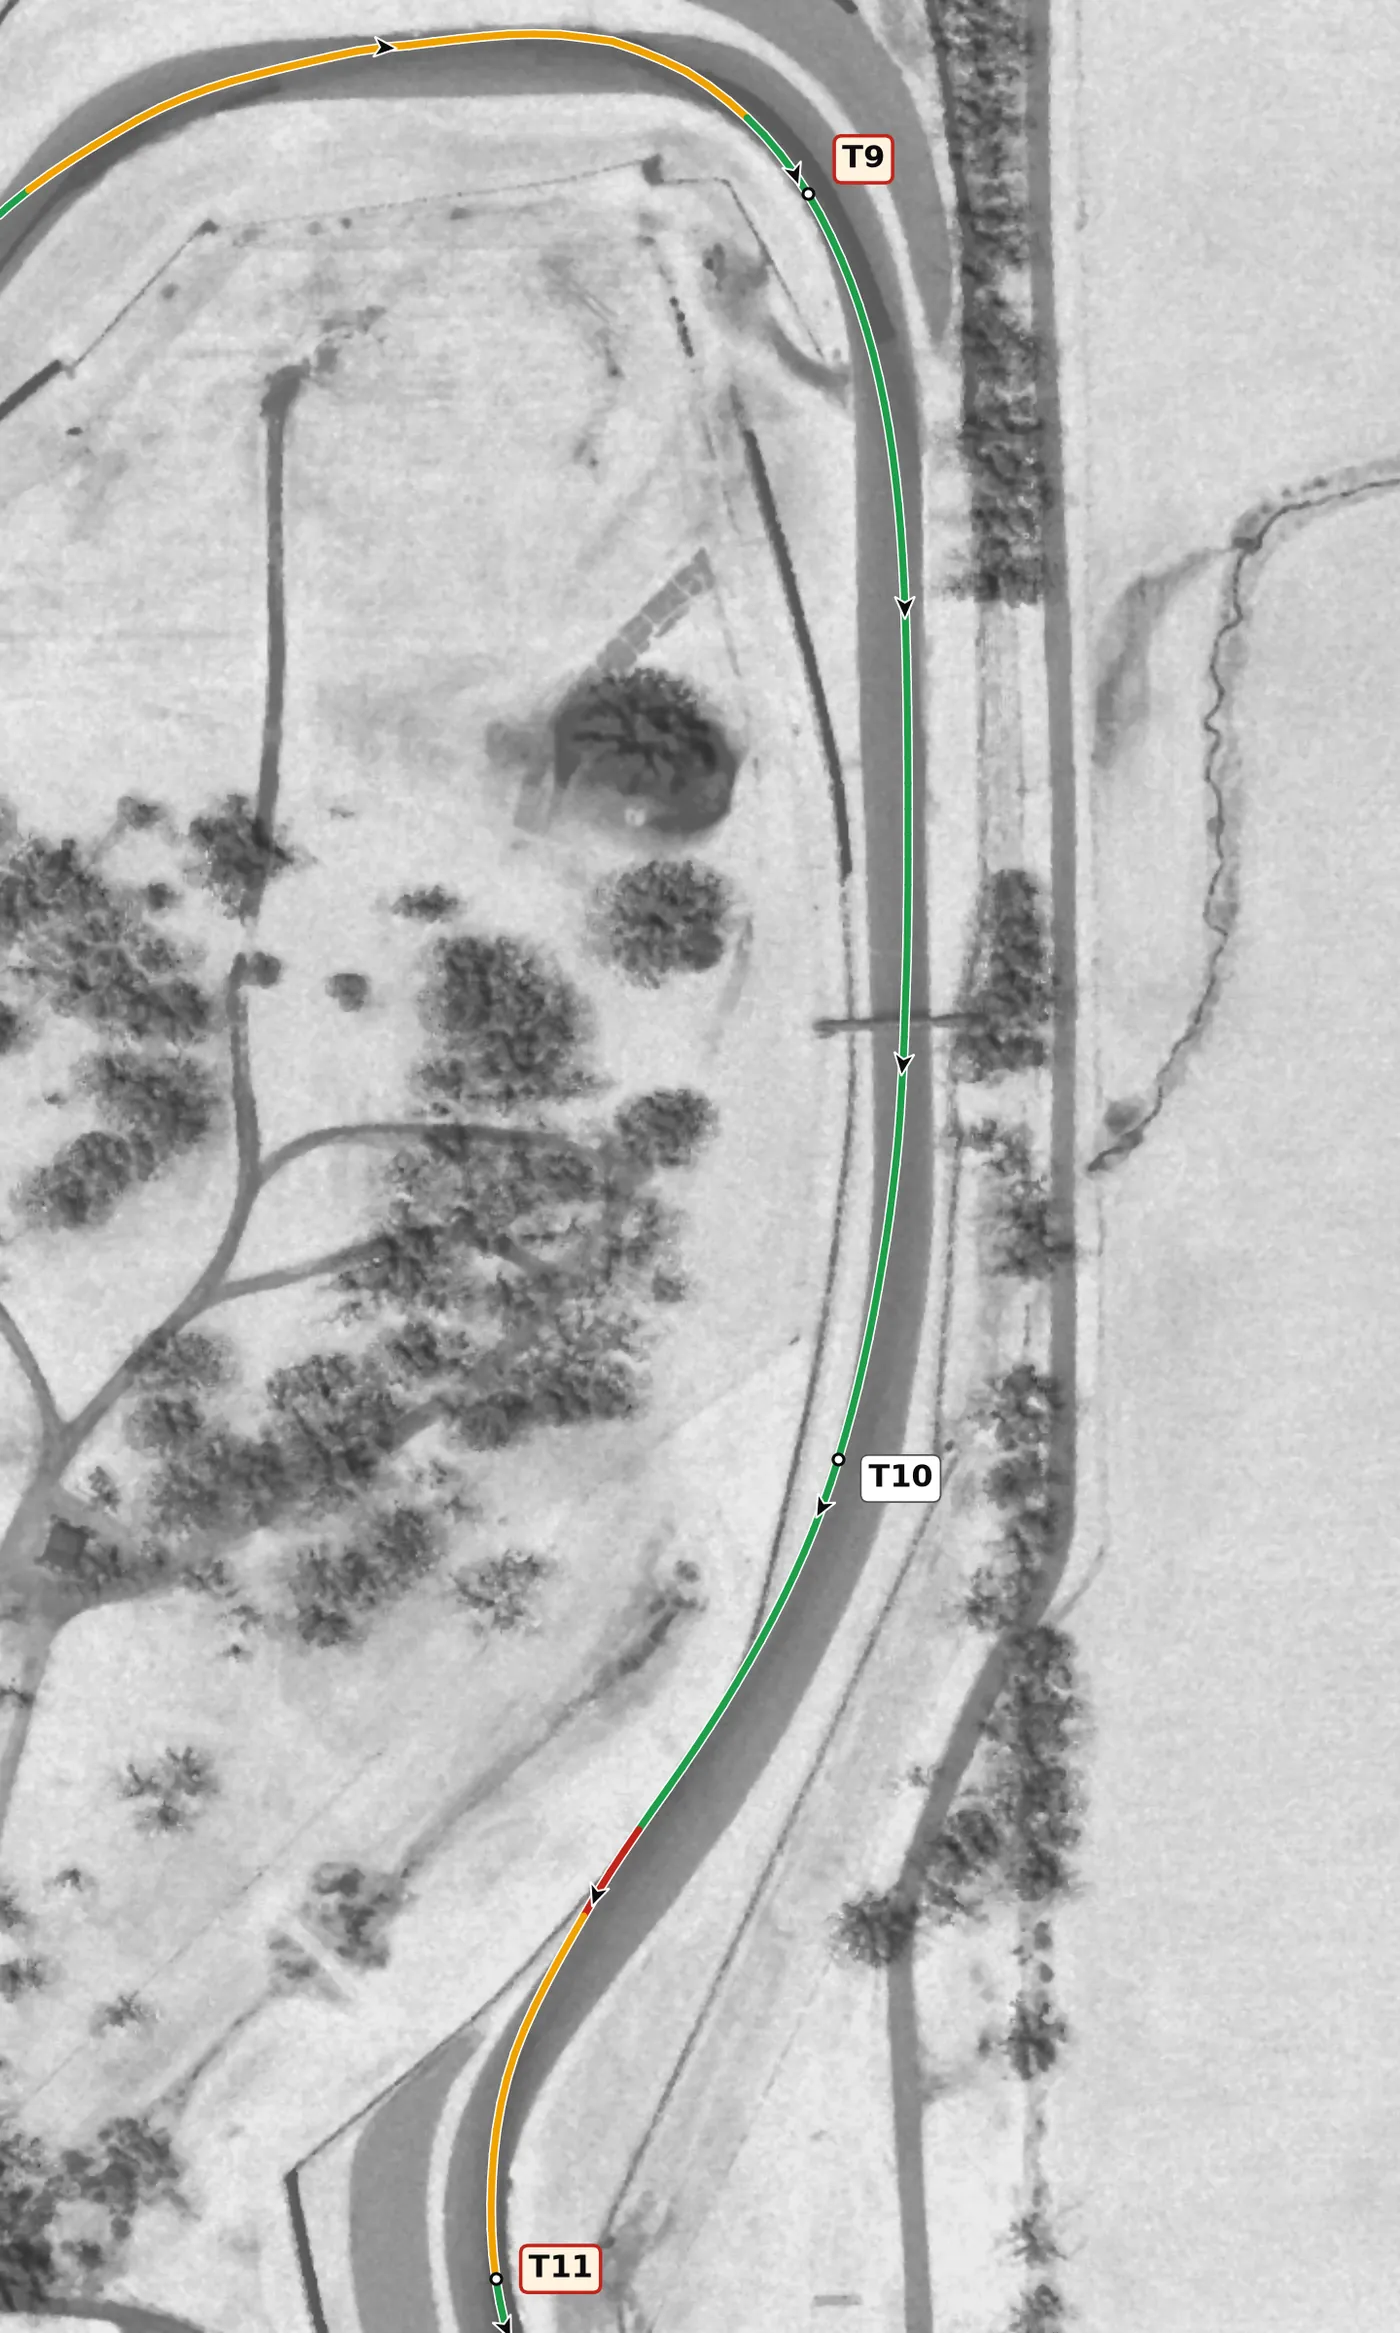
T10 is the most banked corner on the circuit and the fastest, climbing uphill, so the surface holds the car far better than it looks. Hit the apex precisely so you can carry speed through and still get to the outside before T11. The mistake to avoid is a timid, early apex that leaves you on the wrong side of the track for the next corner.
From the survey: The most banked point on the circuit (+11.4%) and the fastest corner on the lap.
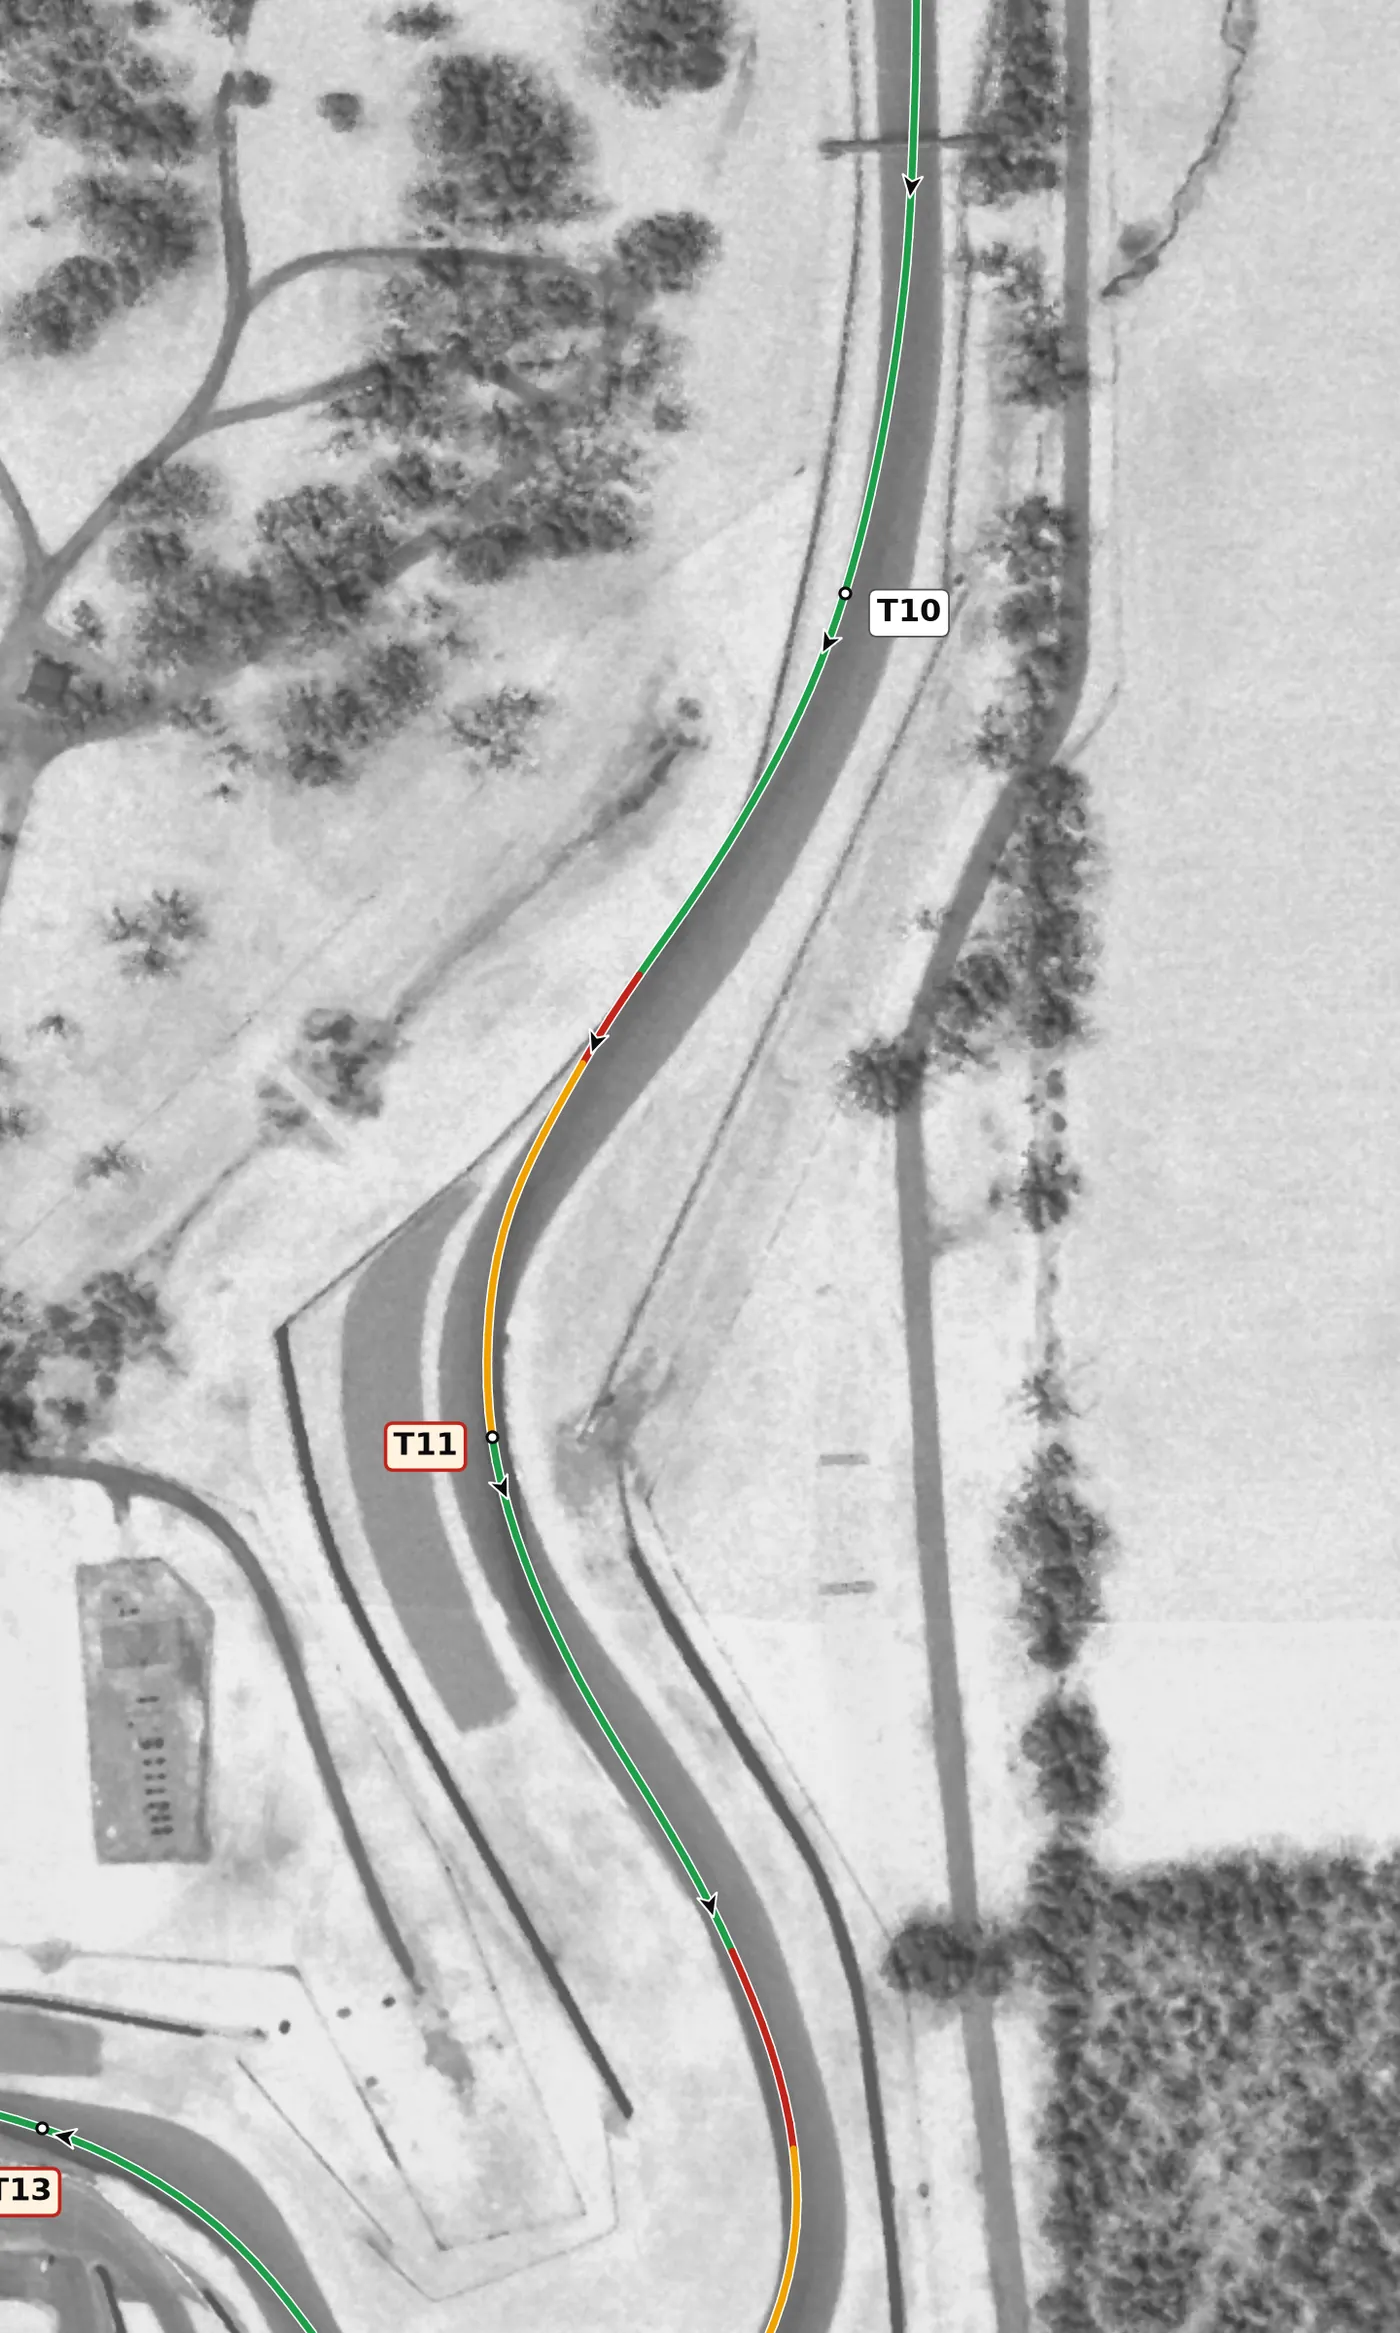
This left climbs uphill and is gently off camber, so it is fast and less forgiving than it looks, with little run-off. Take a short brake at turn-in and a lift to the apex, then get to the throttle from the apex to settle the car on the climb, keep your steering smooth, and finish about a car width from the middle of the road to set up the Carousel. The mistake to avoid is a big mid-corner correction that unsettles the car on the uphill exit.
From the survey: Uphill and gently off camber (−0.9% at the apex).
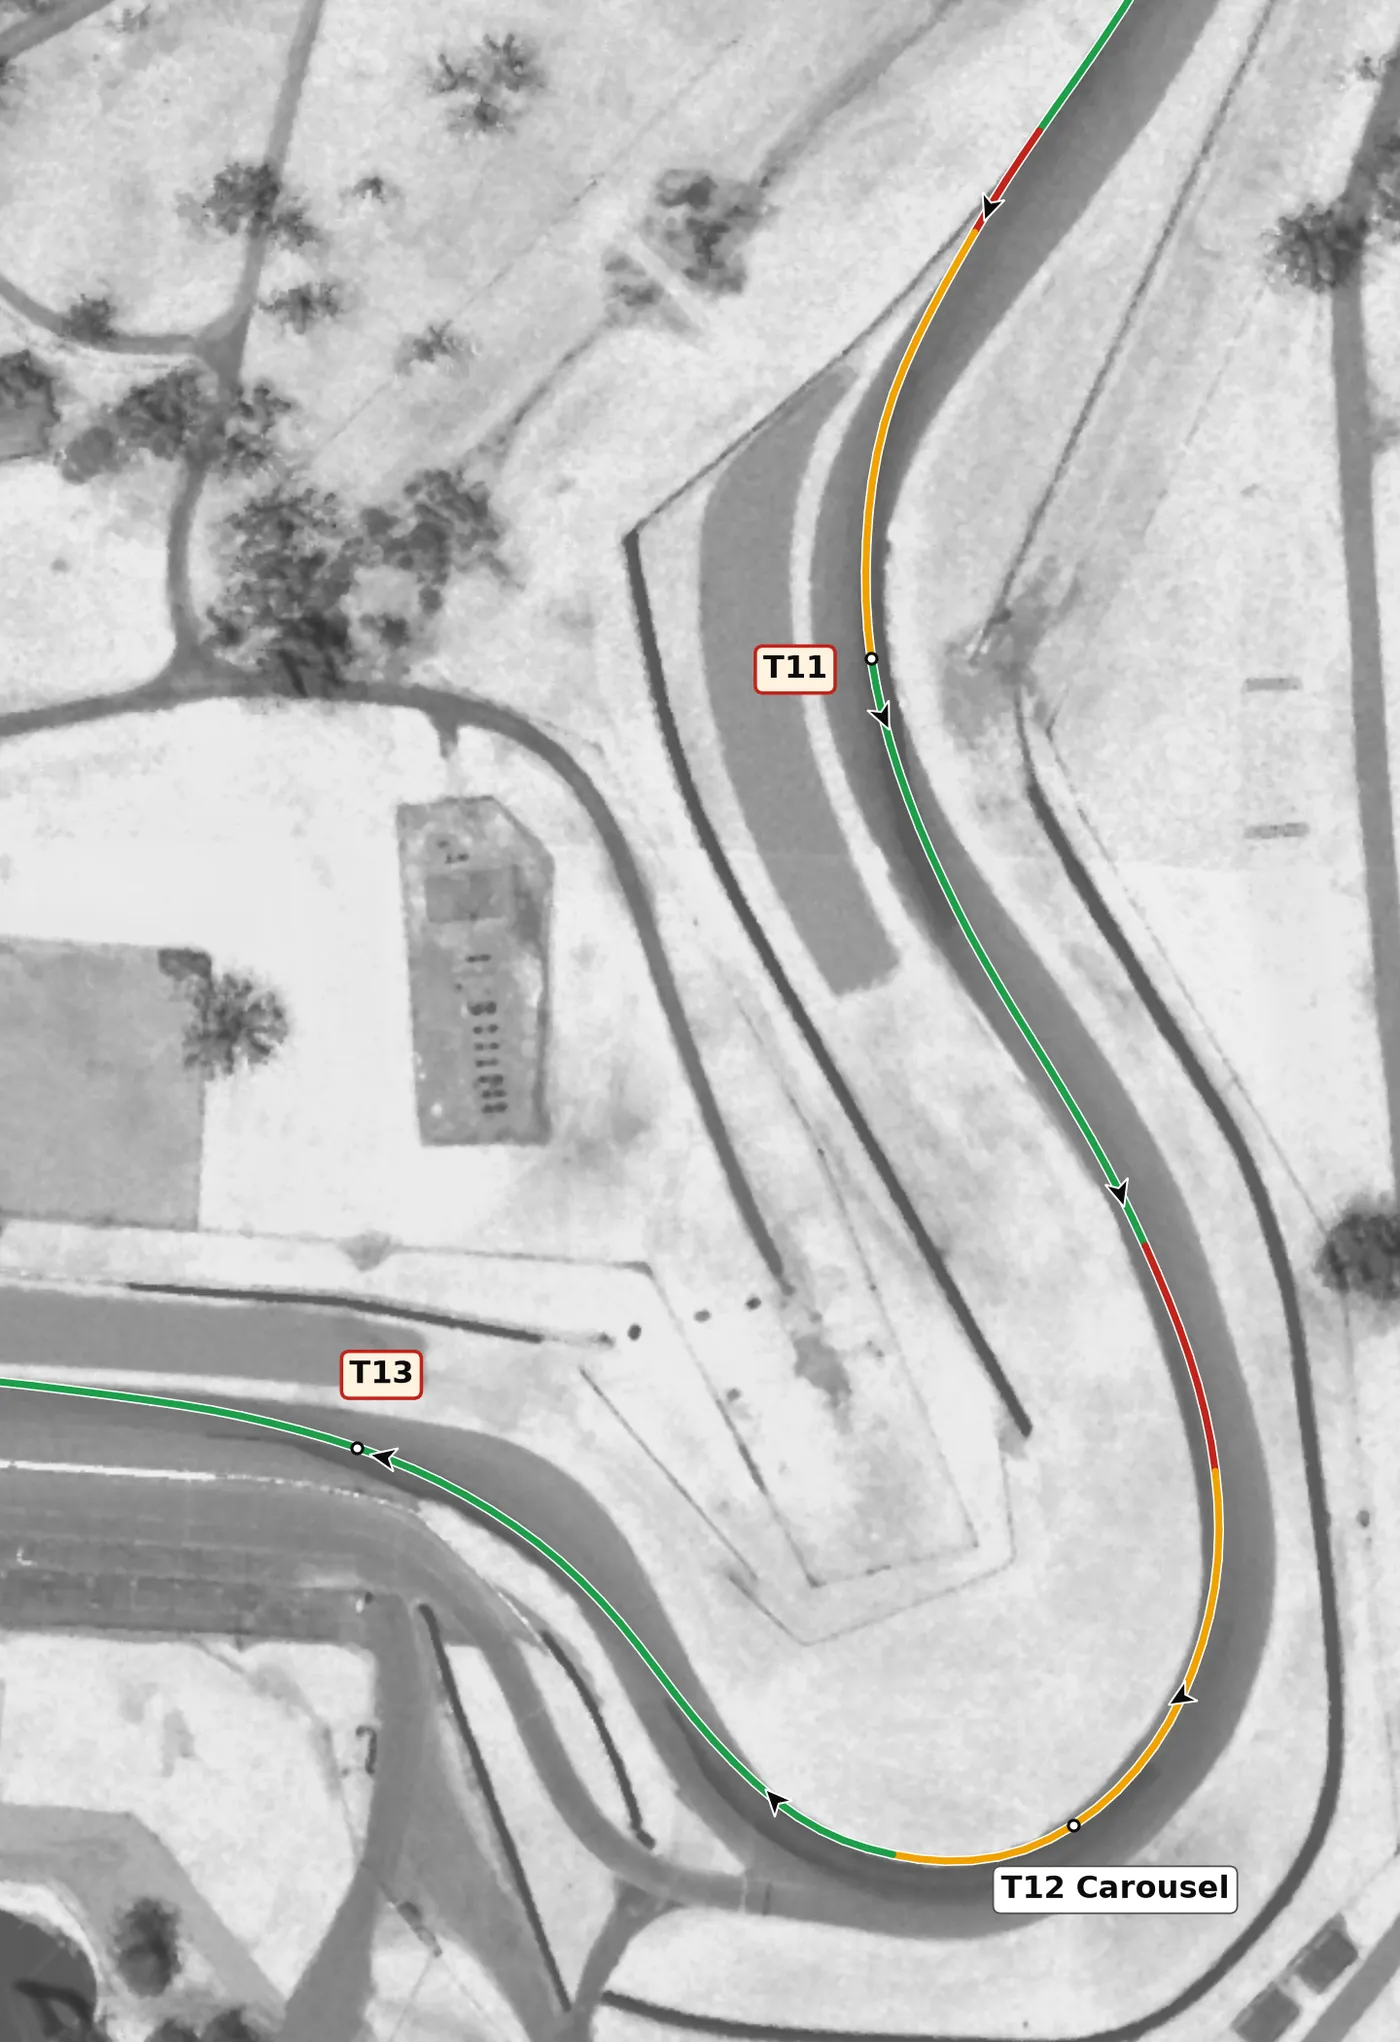
The Carousel is a long, tightening right with modest banking at the apex and a crest near the exit. Brake hard in a straight line, then ease off steadily and trail the brakes deep into the corner, carrying enough speed that the car sits in the middle of the track through the middle, and only pick up the throttle at the second apex. The mistake to avoid is getting on the throttle too early and running wide before the second apex.
From the survey: Long and tight with only +2.1% of banking at the apex, cresting near the exit.
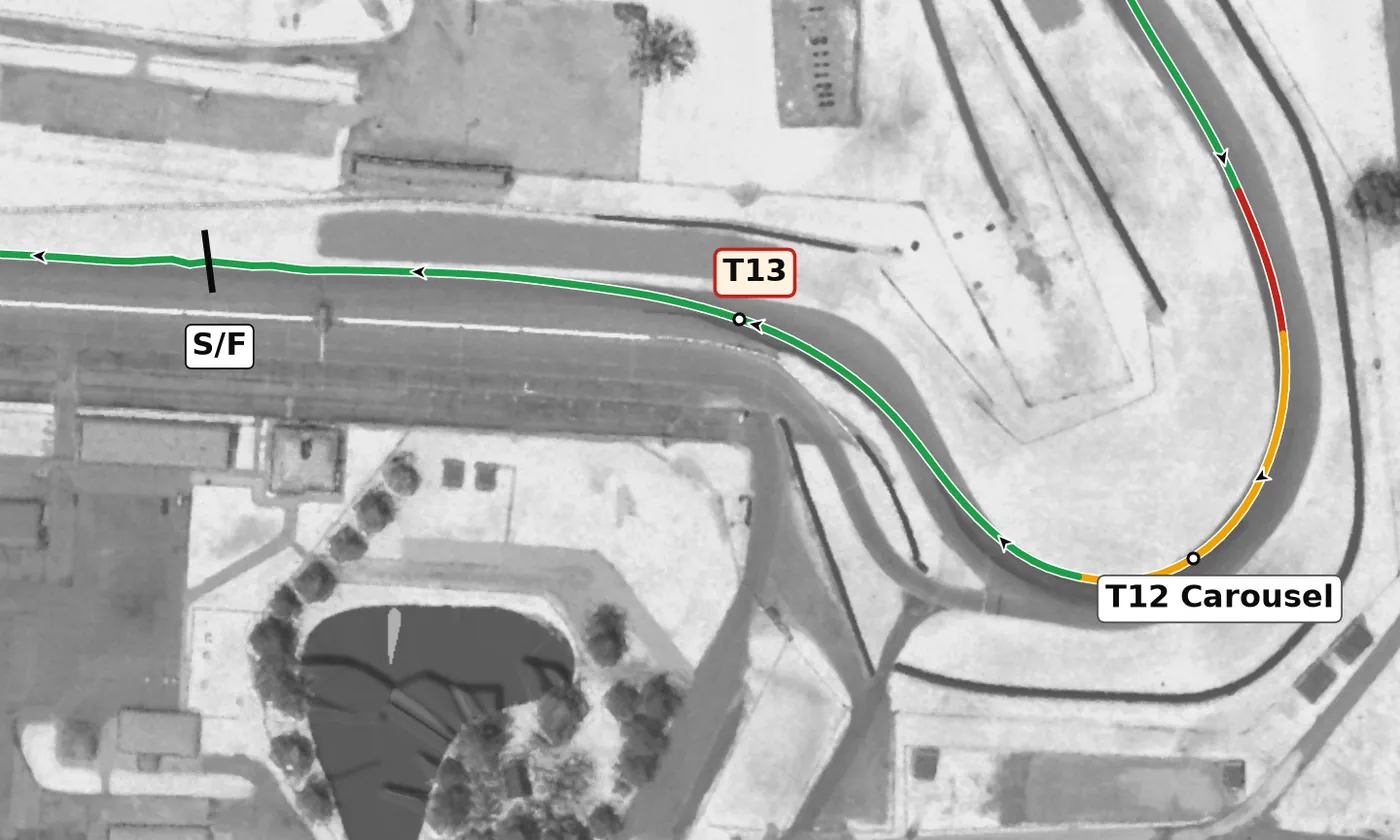
This short left drops into a compression and is slightly off camber, putting you onto the front straight. Let the car track out from the Carousel, then flick it left smoothly, clip the inside and use the full width of the road on exit. The mistake to avoid is a jerky steering input here that unsettles the car just as you go to full throttle.
From the survey: Slightly off camber (−0.8%) into a compression, onto the front straight.
Version history
- v1.2 · 2026-10-01 — T2 and the Keyhole exit are now drawn as throttle rather than a lift: the car gains speed there, which takes throttle.
- v1.1 · 2026-10-01 — Speeds and braking points rebuilt at a typical quick HPDE pace and checked against published guides: braking starts about 35 m later at T1 (now only a short brush of the brakes), 30 m later at T11, 20 m later at T3 and 10 m later at China Beach and the Keyhole, T2 is flat, and the dip in T9 is a lift rather than a brake. The line now goes straight from throttle to brake, with no coasting in between. Version history and feedback contributors added.
- v1.0 · 2026-10-01 — First version.
Feedback contributors
Drivers and instructors whose feedback has improved this line. Thank you.
- Mike M — no coasting between throttle and brake; braking points (v1.1)
- Brian L — corners where the car gains speed are throttle, not a lift (v1.2)