Summit Point — Race Line
Estimated from data not in trackdays.ai. The speeds and braking points come from cars lapping at a typical quick HPDE pace, checked against published brake markers. If you have data you would like to contribute, please send it to upload@trackdays.ai to help improve our estimates. Main circuit. Turn numbers are Chin's 10 (provisional).
Heads up: This is an estimate of a typical quick HPDE line, not any one car's lap. Braking points are a starting point, not a target: start a little earlier and work later in small steps. The line goes straight from throttle to brake; amber only marks where you really lift or hold part throttle. Turn numbers follow Chin's map and are provisional: T1–T2 and T6–T7 are each one continuous curve split in two, and the two unlabelled dots on the hill after T3 are kinks with no number. The LiDAR corner survey traced the middle of the road, so its camber figures describe the centre of the track rather than the racing line.
- Throttle
- Coast / partial
- Braking
- Apex
- T4Off-camber corner
Arrows show the direction of the lap. The grey basemap is USGS LiDAR: dark = asphalt, light = grass. Tap any map for the full-size image.
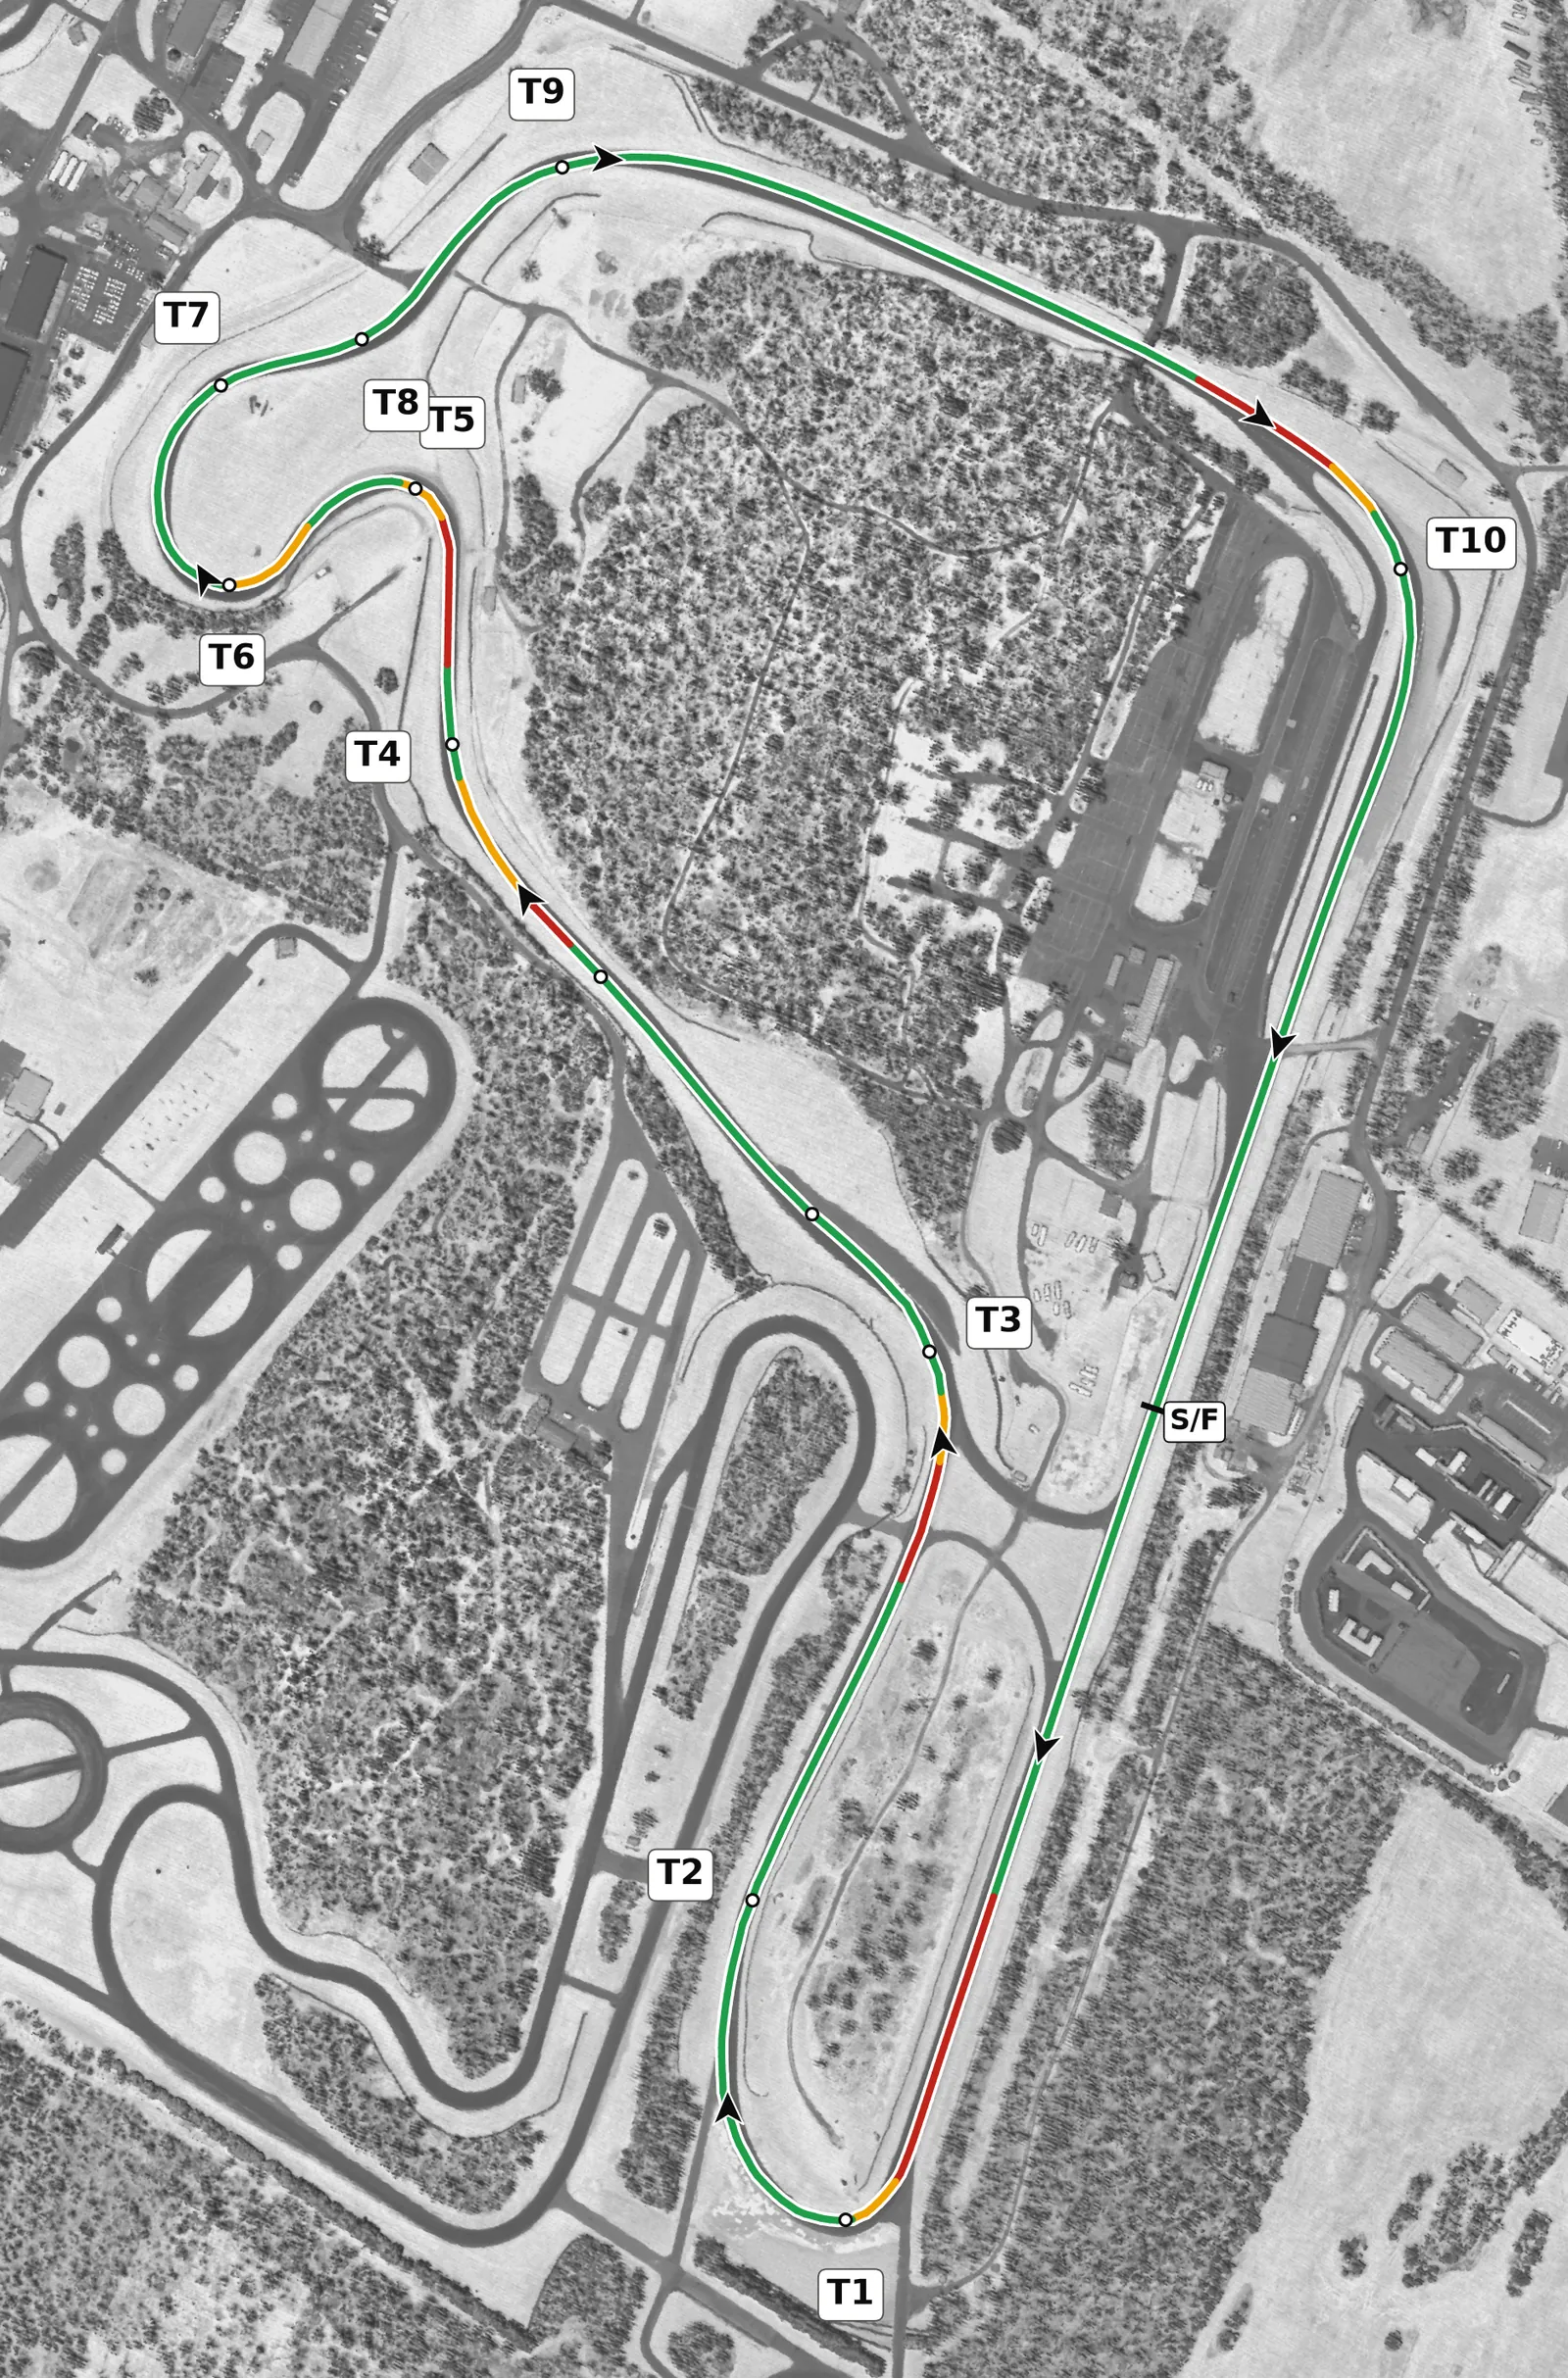
Summit Point's Main circuit is short and busy: one long front straight, a fast run over the hill and down through the Chute, the slow Carousel, and a fast finish through T9 and T10. Every corner is banked by about 3–5%, so the surface helps you everywhere, and the whole lap has only about 11 m of relief; T10 is the most important corner because it feeds the long front straight. Many corners have little run-off, so build your speed in steps and favour late apexes that let you get to the power early.
Sectors
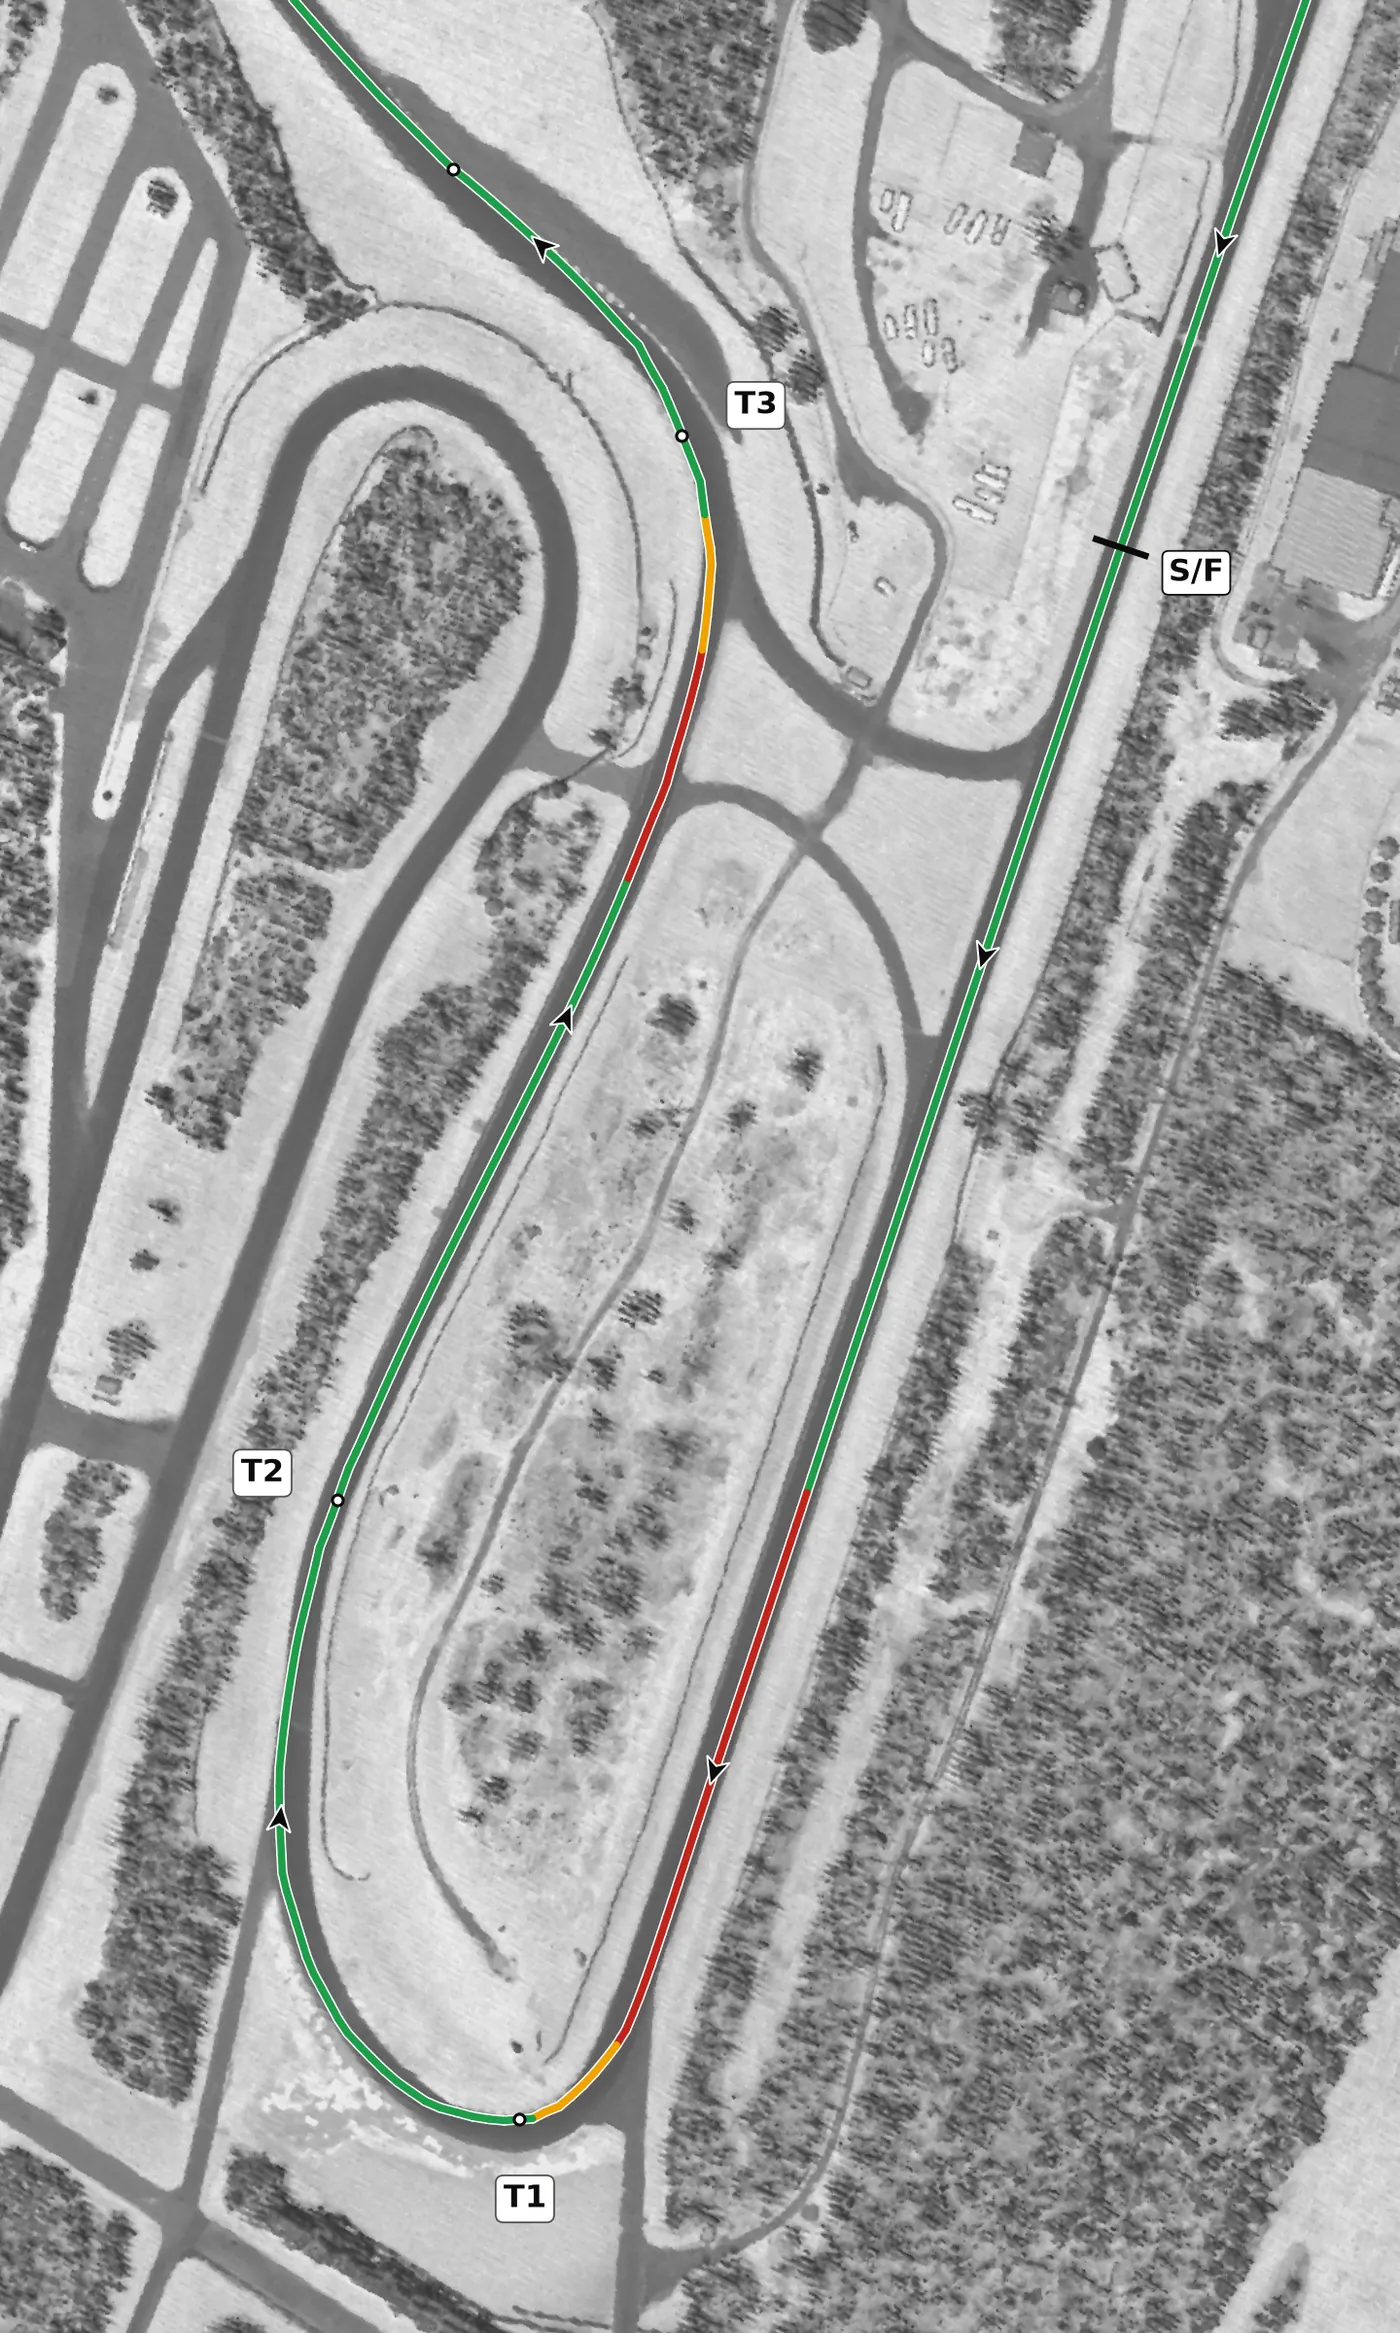
The front straight ends at T1, a slow, long right where you brake from the left, turn in late and take a late apex so you can accelerate early; it opens into T2, which most cars take flat as the road keeps curving. Move across to the right for T3, a blind uphill left where you brake a little early and lightly, and stay smooth over the top of the hill just after it.
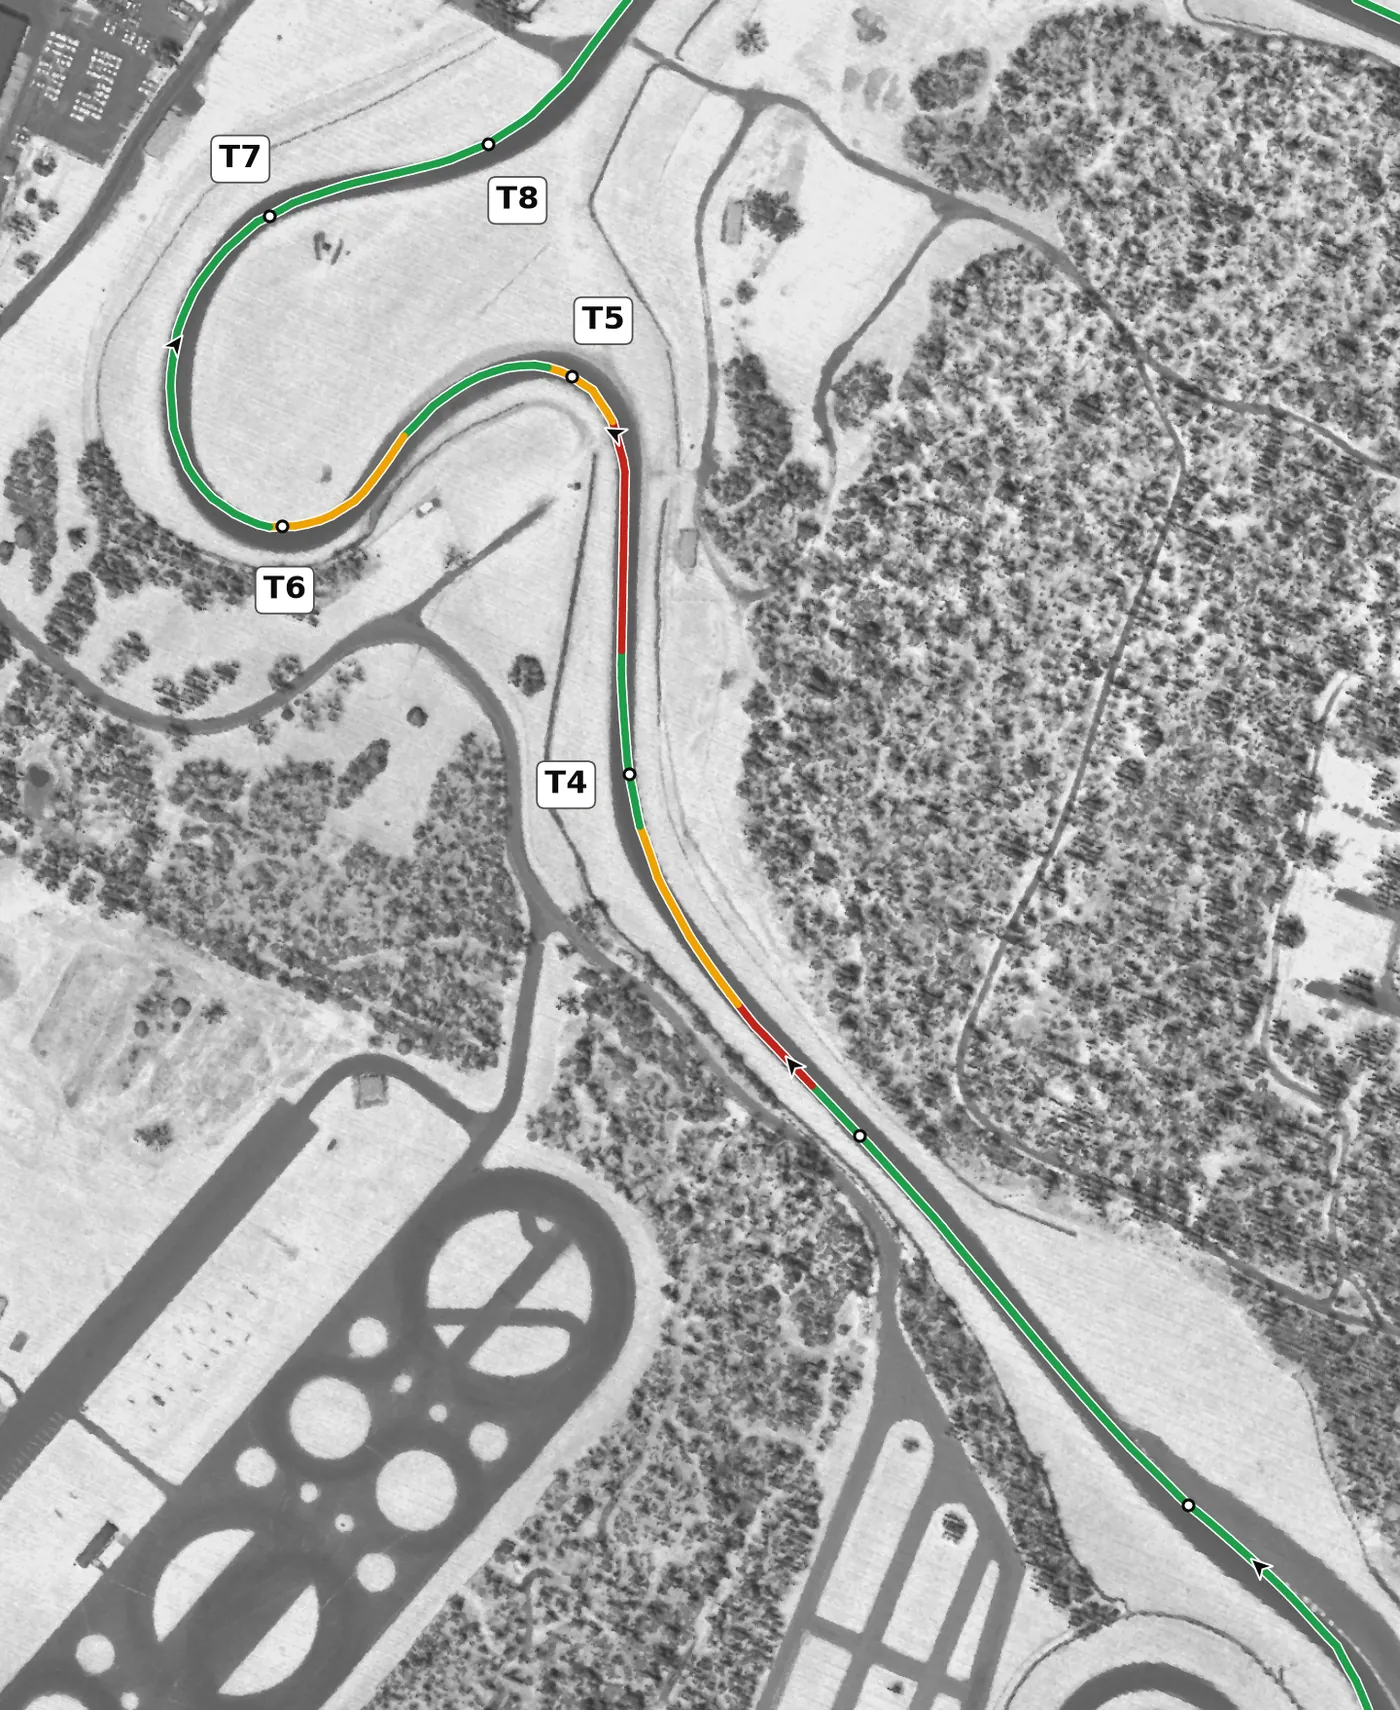
Over the top of the hill the road drops into the Chute: T4 is a fast downhill right where you settle the car with a light brake or a lift before turn-in rather than trail braking. At the bottom, T5 is a slow left with little run-off, and the Carousel (T6 and T7) follows as one long right that you drive as a single, patient late-apex arc with smooth throttle.
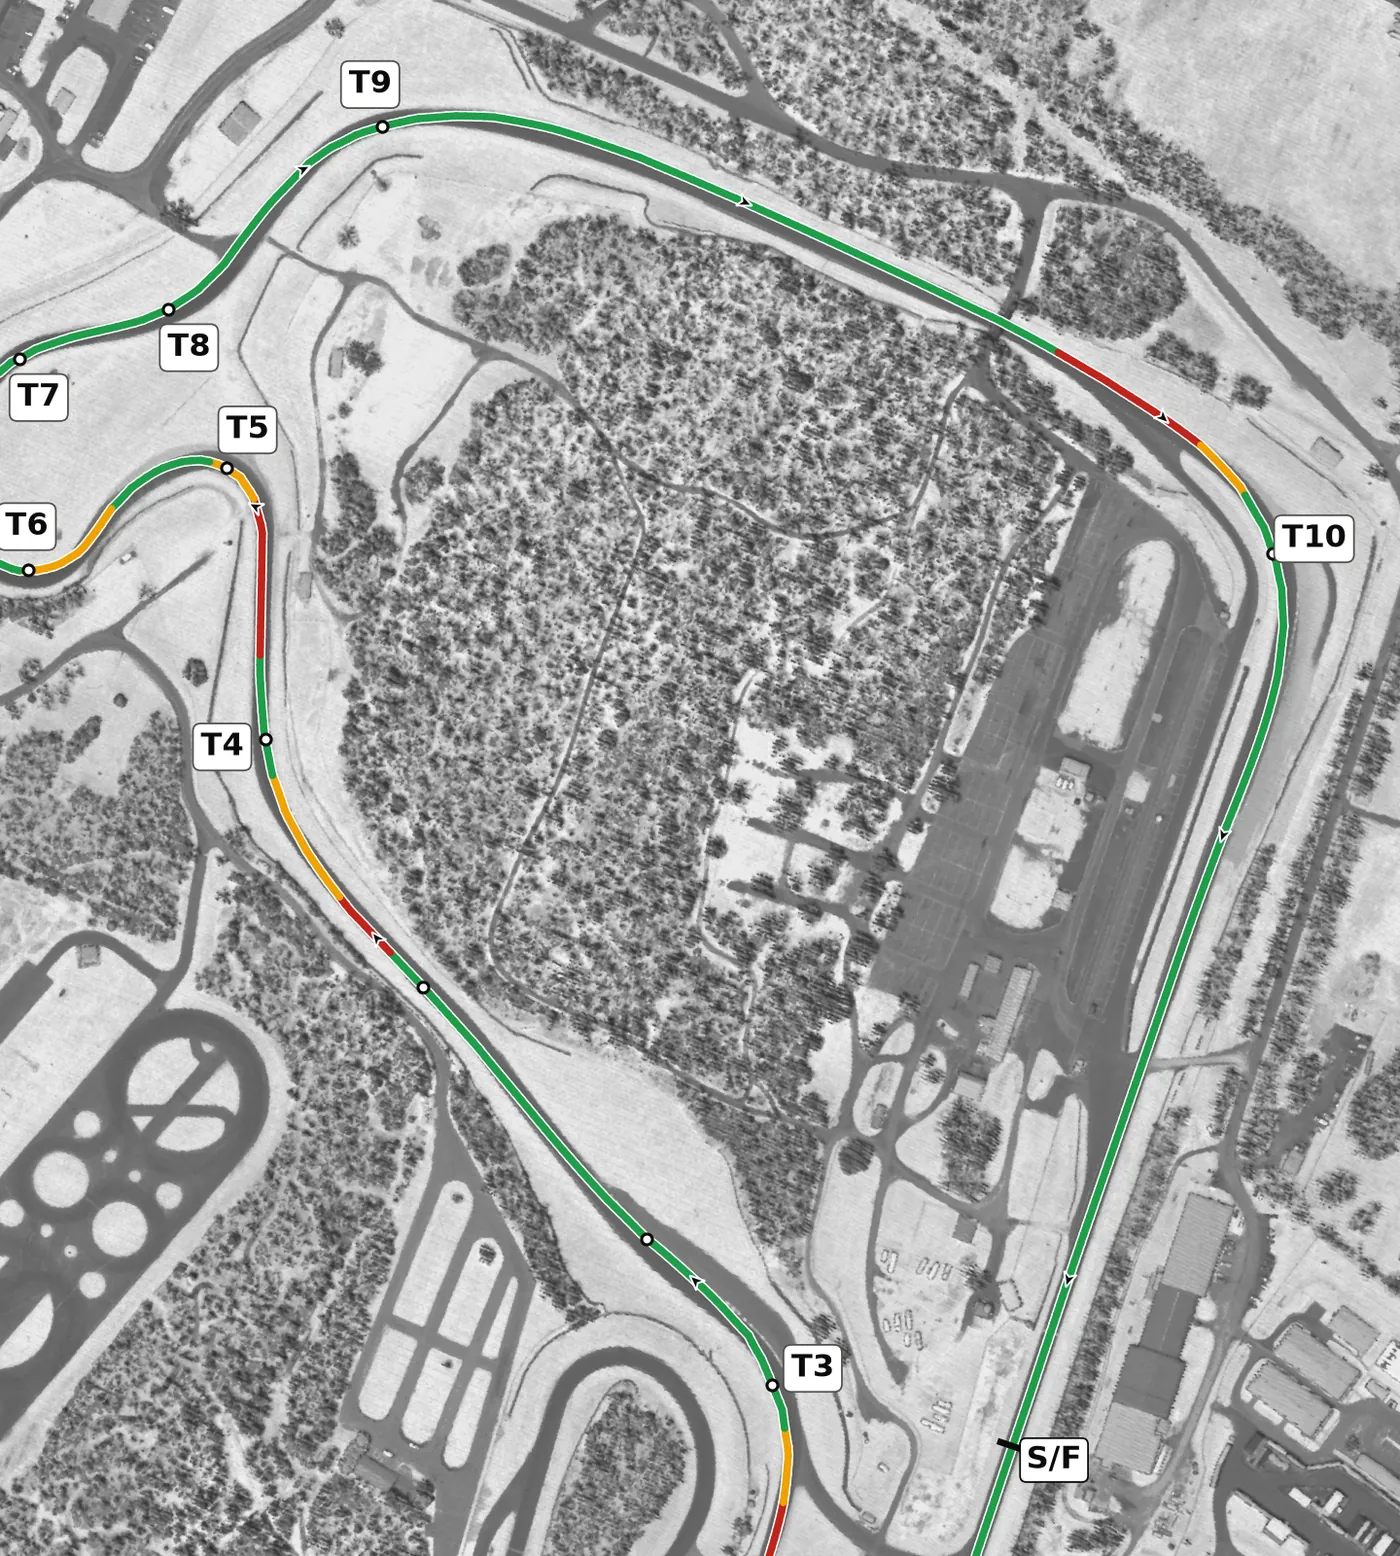
T8 is a fast left that you late-apex to set up T9, a fast right that climbs and that most cars take flat, so take it with a late enough apex to be on the power early up the hill. Keep a steady throttle over the gentle rise toward T10, brake firmly and a little early for this fast right, and use all the exit, because it feeds the long front straight.
Corners
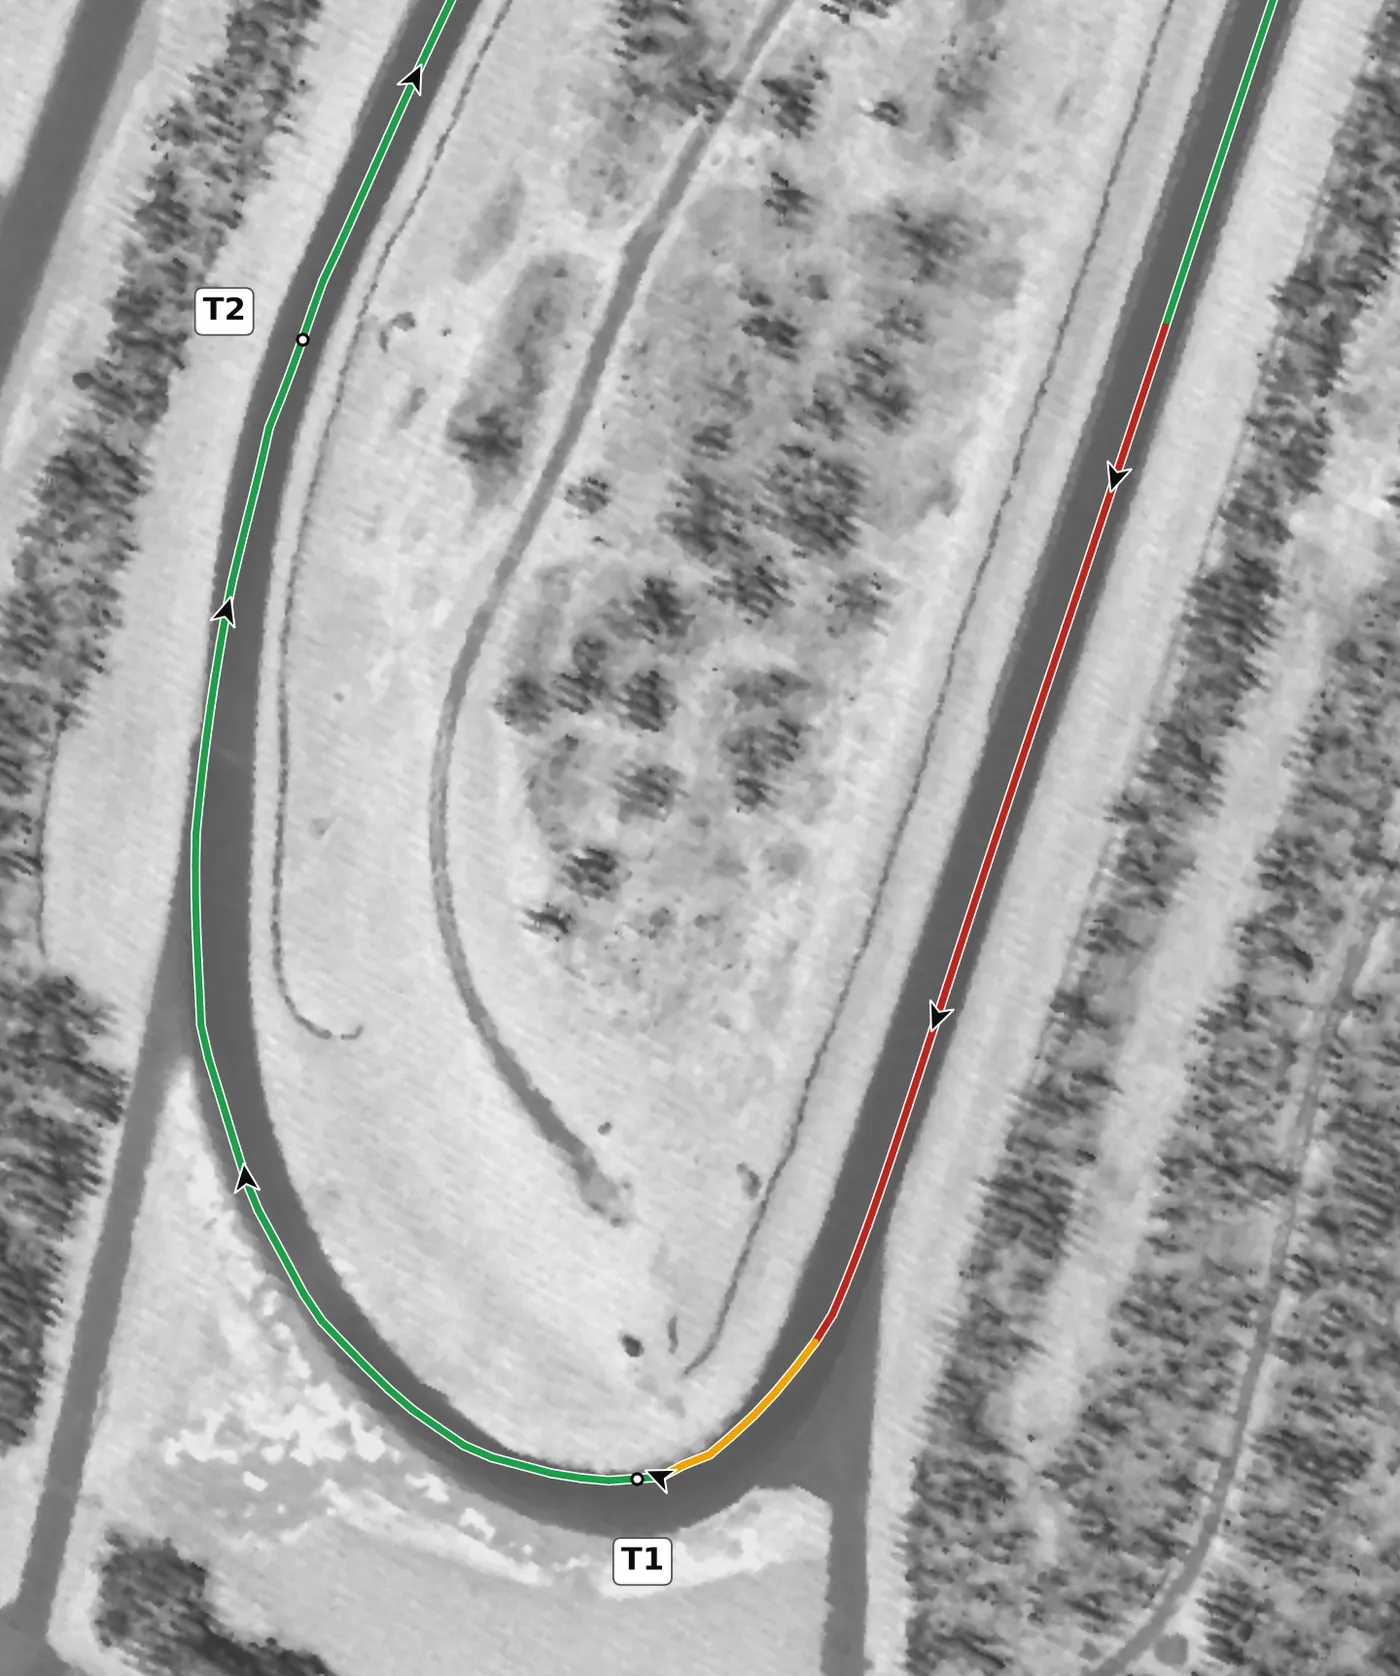
Brake from the left side of the straight, using the painted line and pavement extension on the left as your guide, and take your time, because this is the slowest corner on the lap. Turn in late for a late apex on this banked, level right so you can be at full throttle early through T2. The mistake to avoid is turning in early, which leaves you waiting for the throttle.
From the survey: The slowest corner on the lap (radius about 28 m): banked +4.2% and level at the apex, with a slightly uphill braking zone.
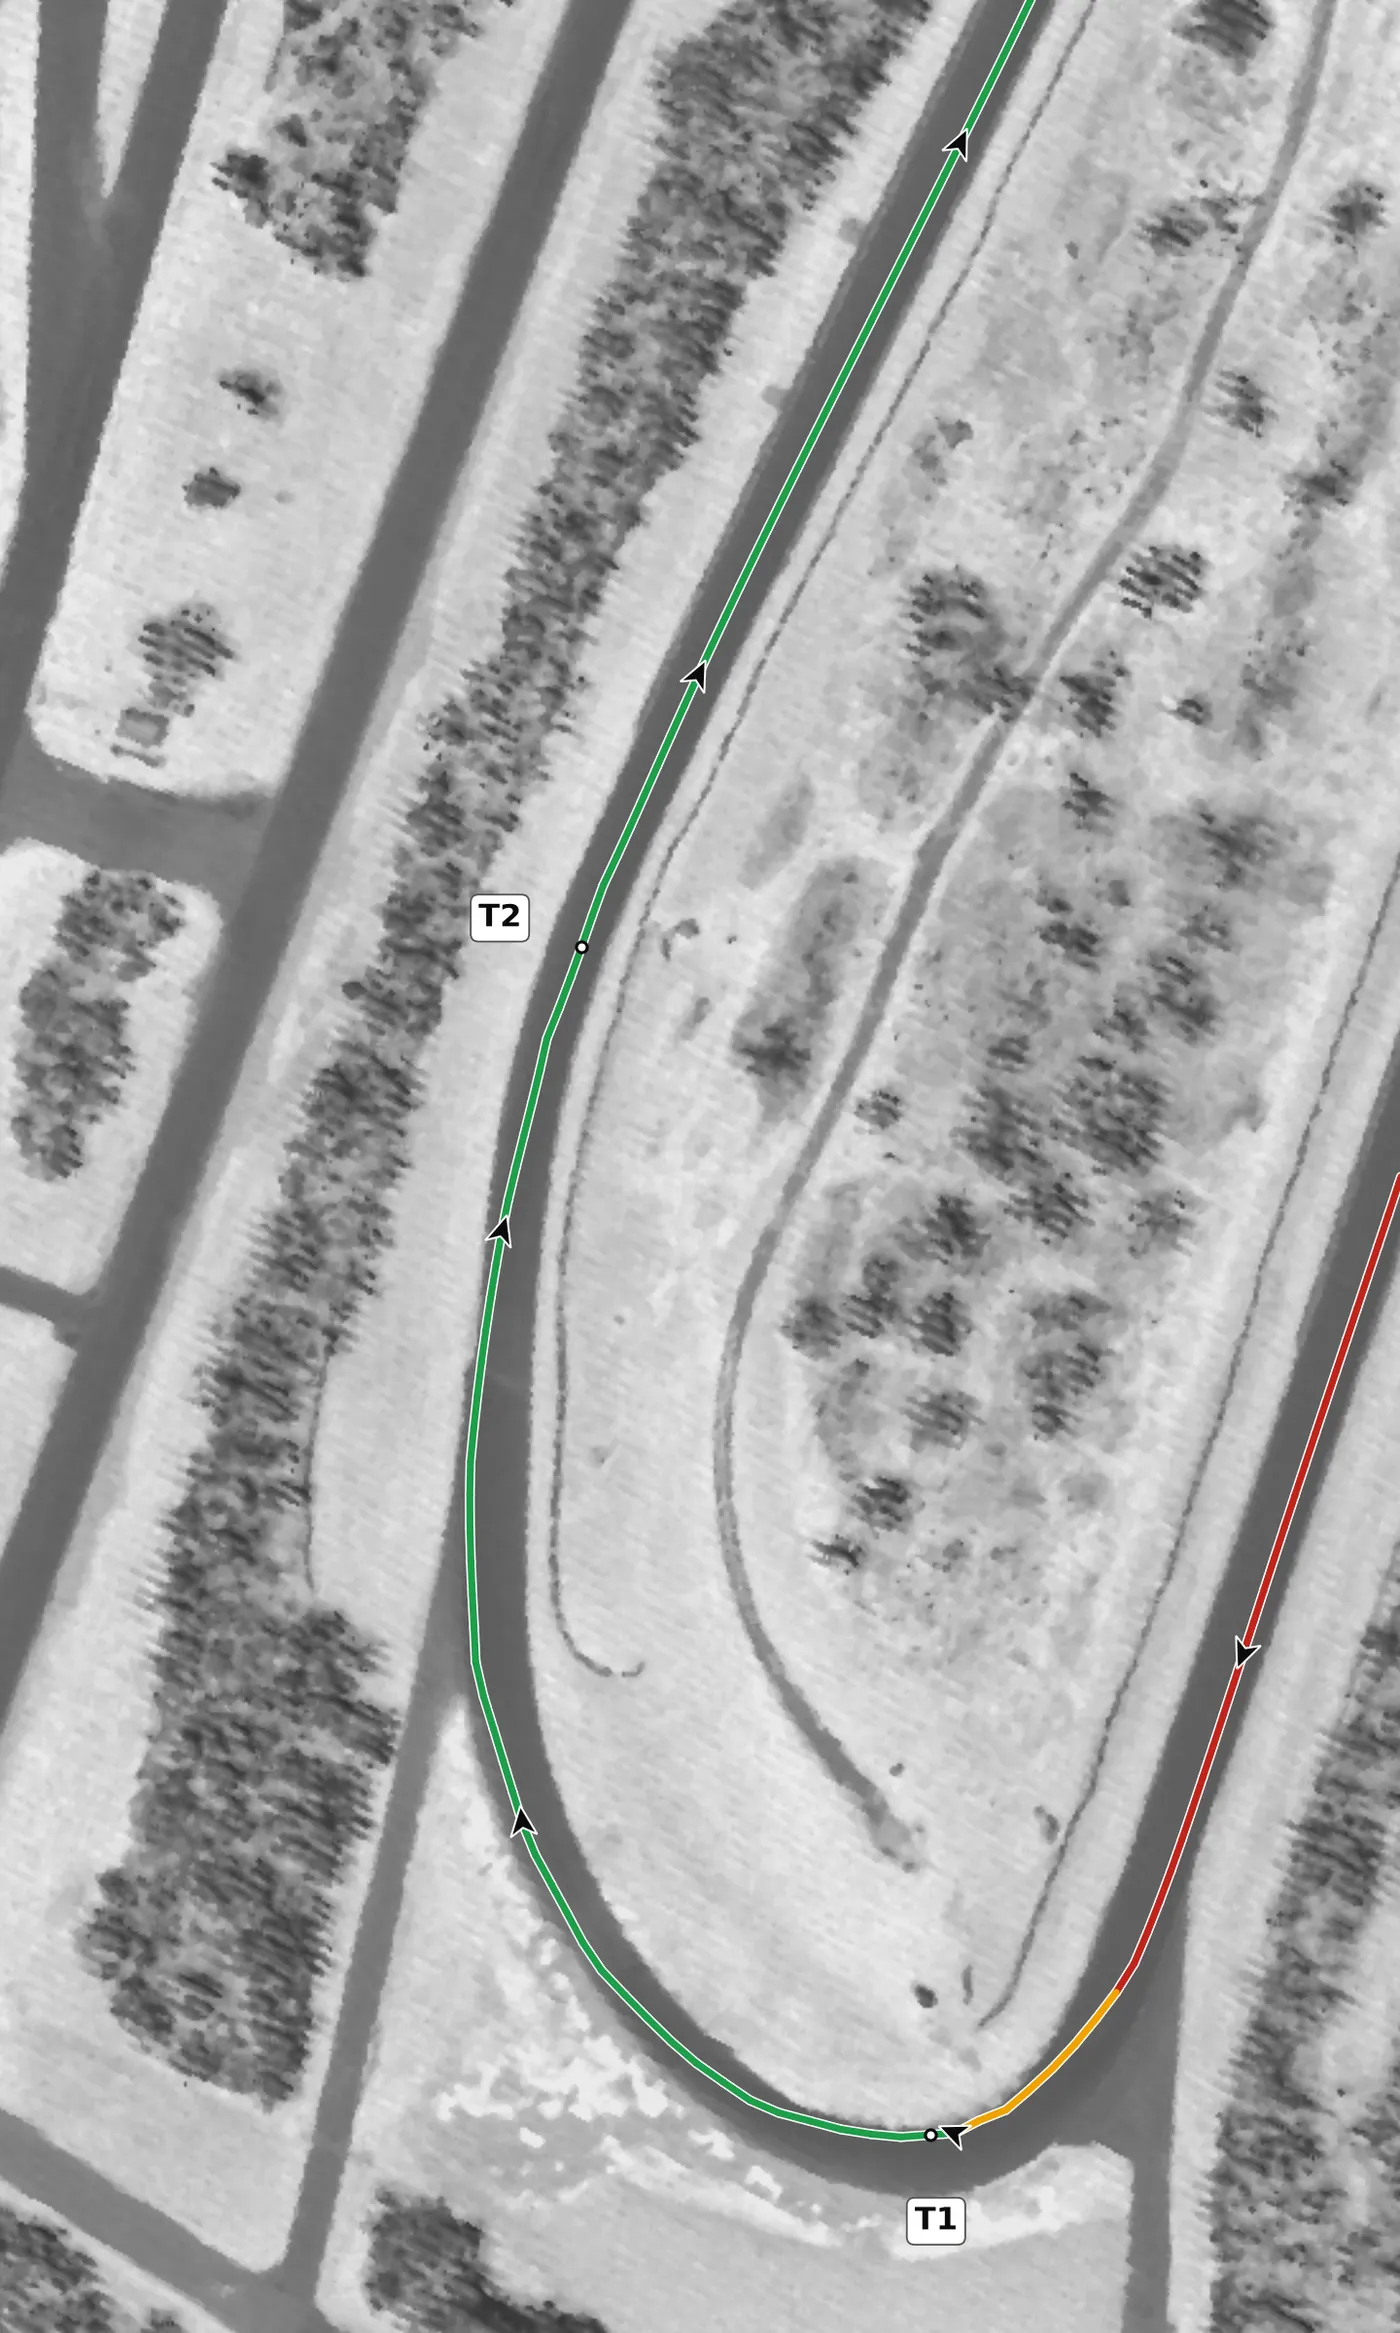
This is the continuation of T1: the road keeps curving right and most cars are flat out here. Feed the throttle in smoothly from the T1 apex and let the car run out toward the left, then move across to the right for T3. The mistake to avoid is a ragged T1 exit that has you lifting here.
From the survey: The most banked corner outside the Carousel (+4.8%).
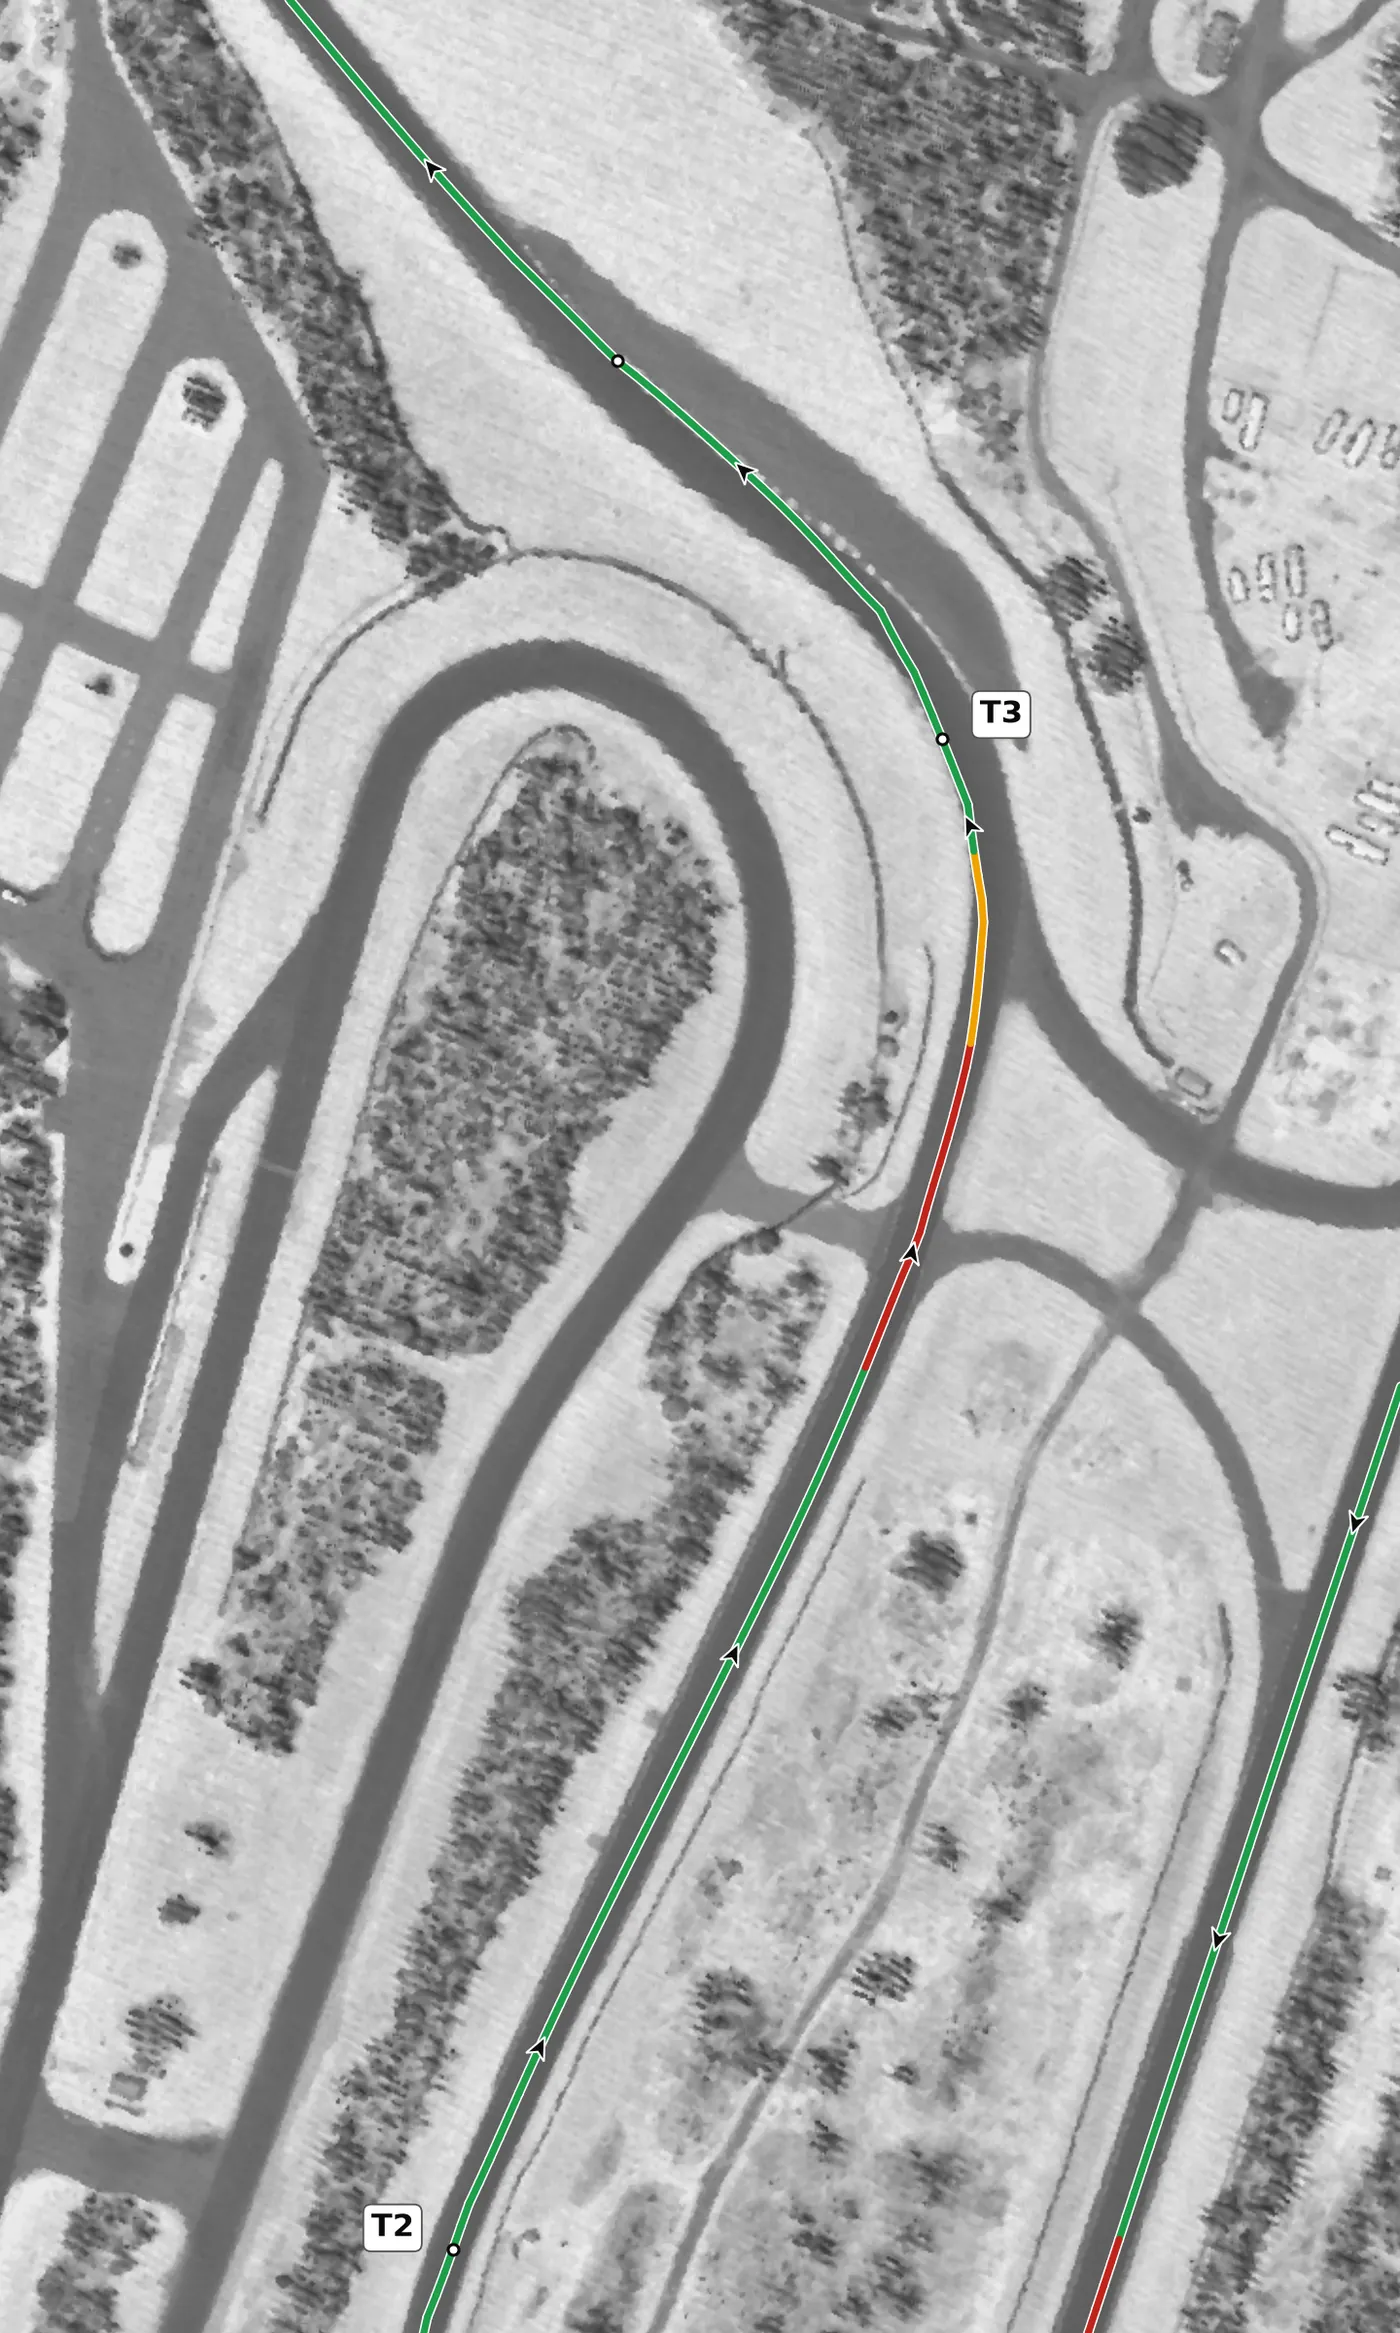
This blind left climbs into the apex, so brake a little earlier and lighter than you would on the flat and concentrate on a smooth turn-in. A geometric apex usually works best, but go easy on the inside curb because the hill tops out just after the corner. The mistake to avoid is over-braking on the climb and then turning in late.
From the survey: Banked +3.2% while climbing at +2.9%, the steepest climb on the lap; the circuit's high point is 100 m later.
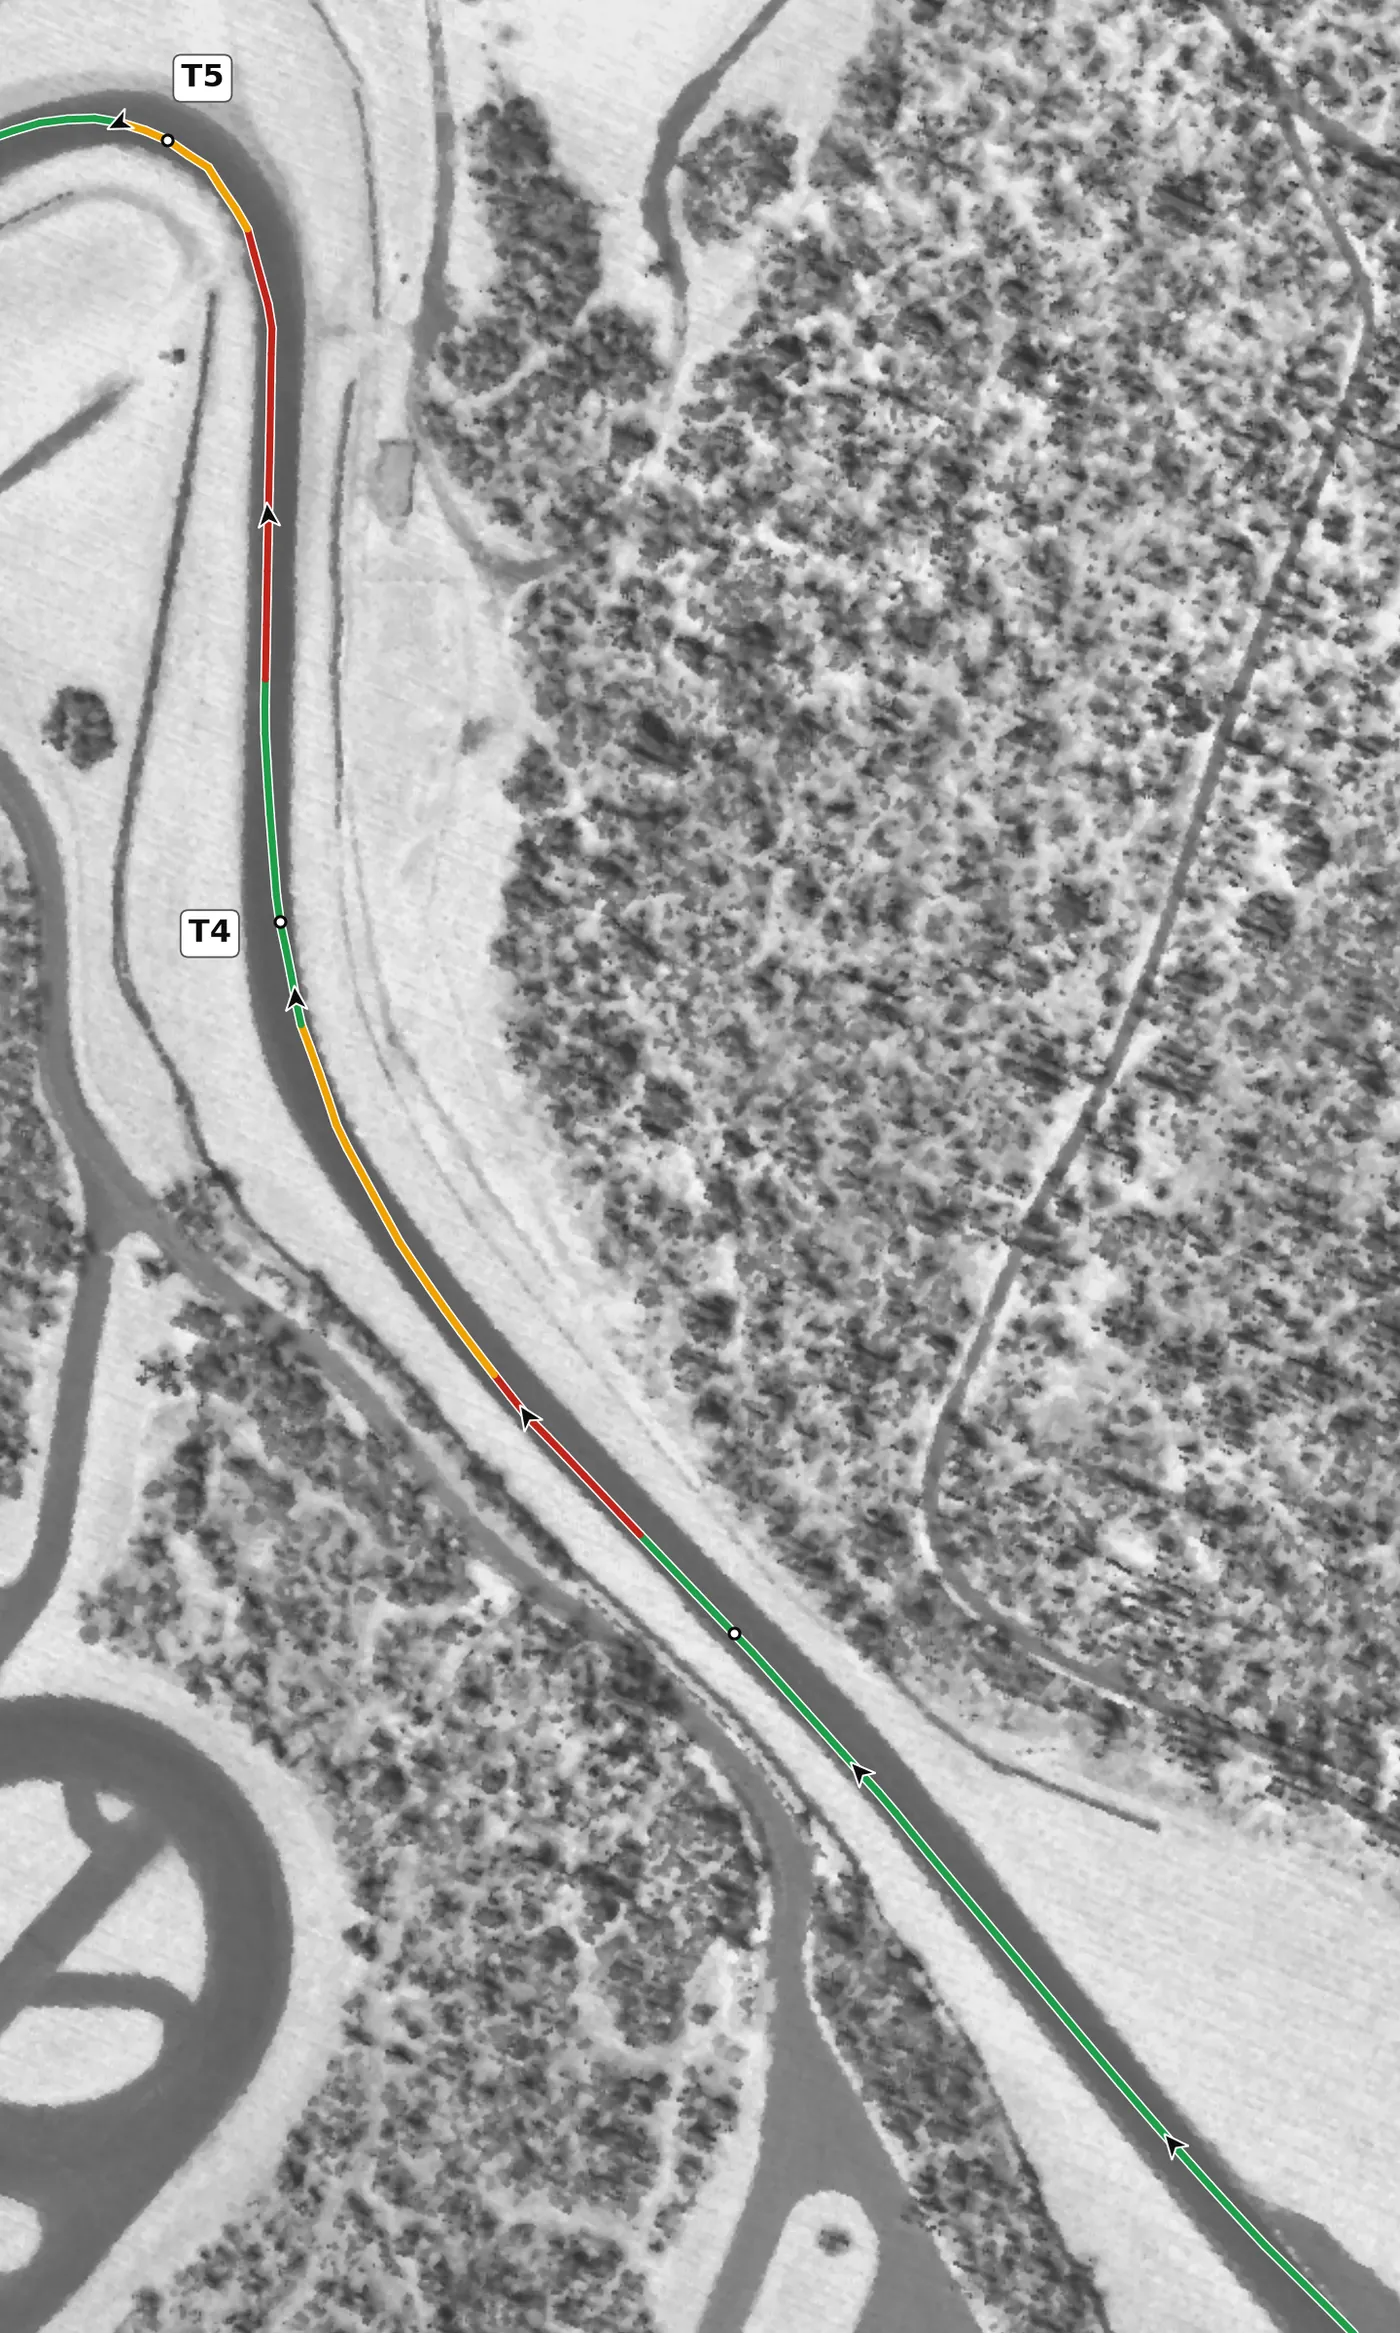
Over the top of the hill the road drops into this fast right, the start of the Chute. Settle the car with a light brake or a lift before turn-in rather than trail braking, because a bump just after the turn-in can loosen the rear, then commit smoothly to the banked arc. The mistake to avoid is a sudden lift mid-corner on the downhill, which throws weight onto the nose and can spin the car.
From the survey: Entered at −4.1%, the second-steepest descent on the lap, and banked +3.7%.
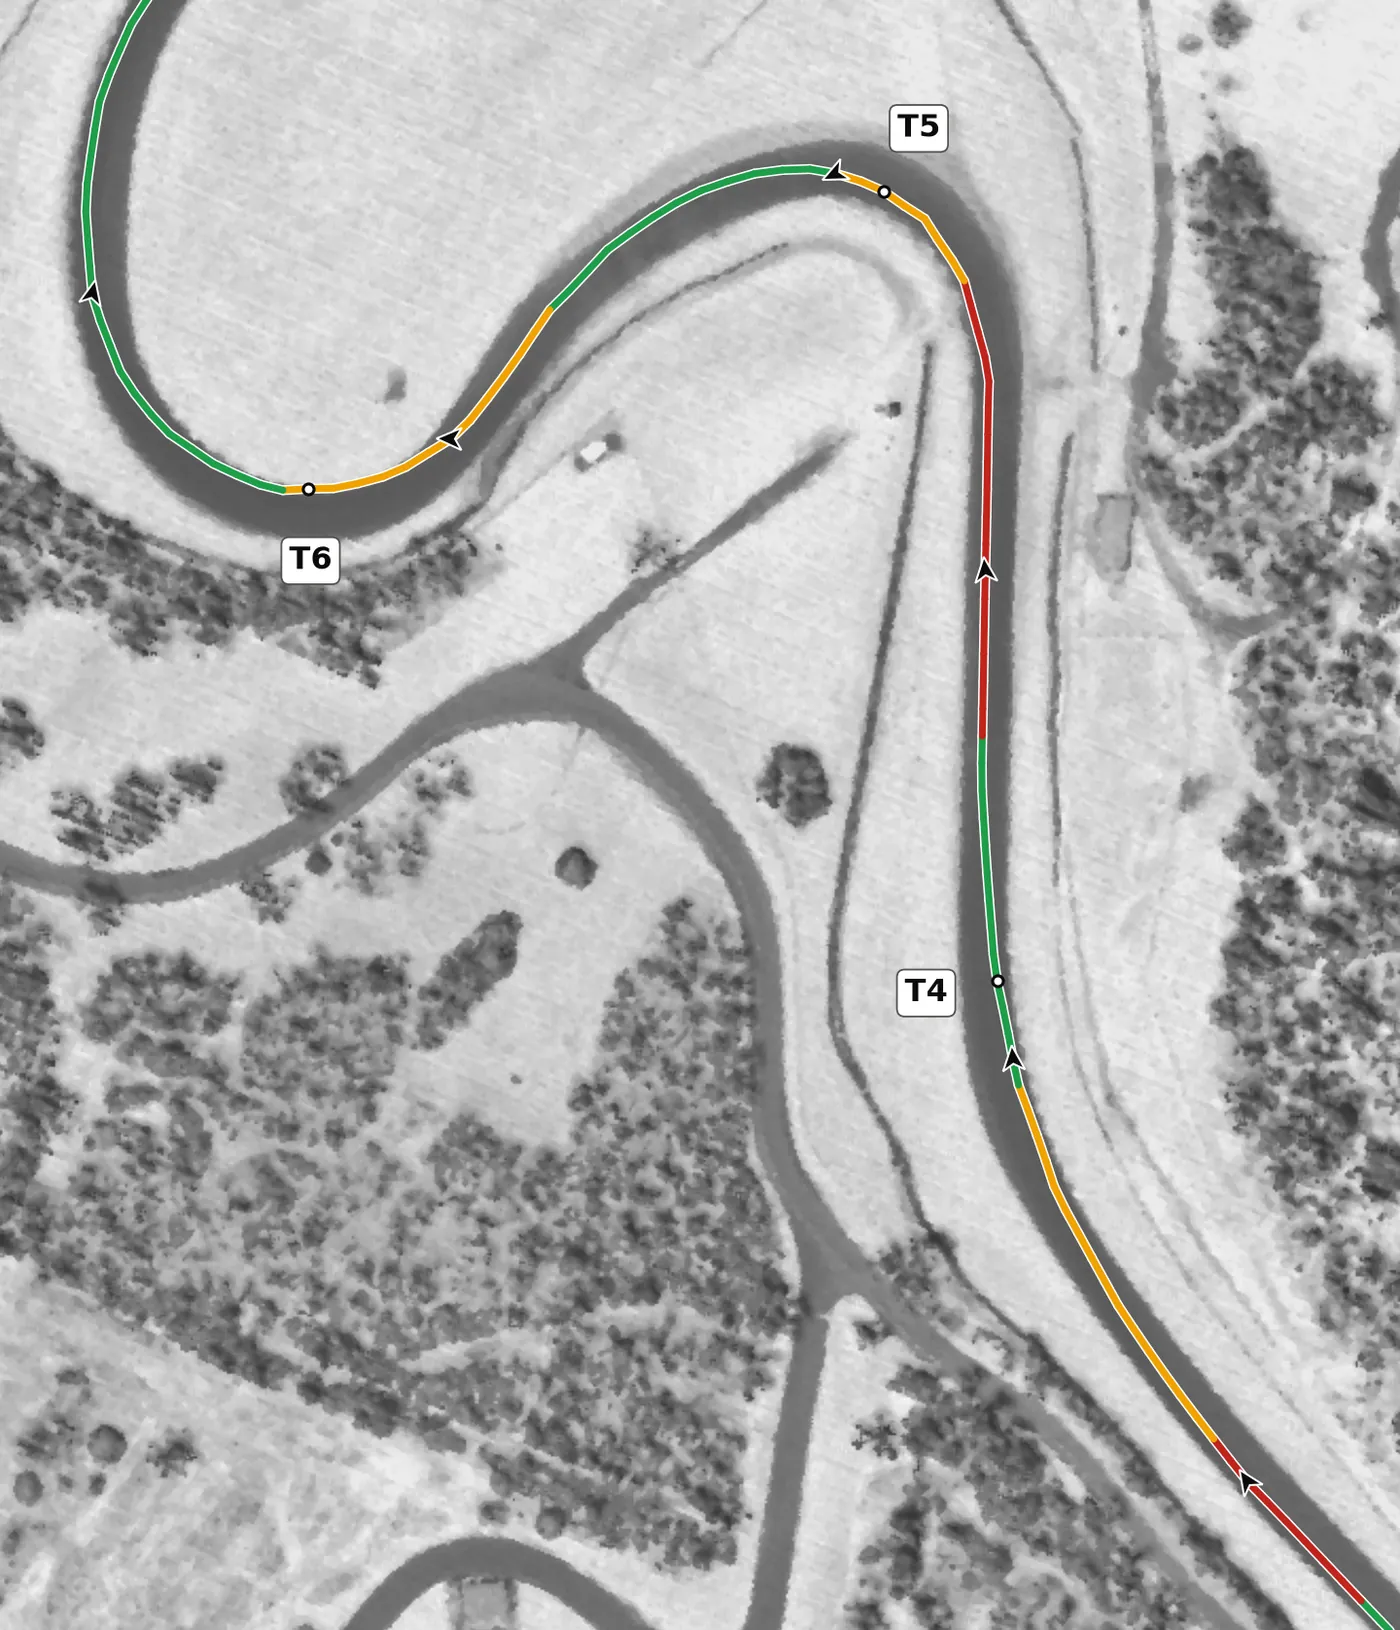
At the bottom of the Chute, brake in a straight line and enter around the middle of the track, trailing the brakes into this slow left. Aim for an apex about three-quarters of the way round, using the banking, and keep it tidy because there is little run-off. The mistake to avoid is carrying too much speed down the hill and running wide, which spoils the Carousel.
From the survey: The bottom of the hill: the lap's low point is just past its exit; banked +4.4%.
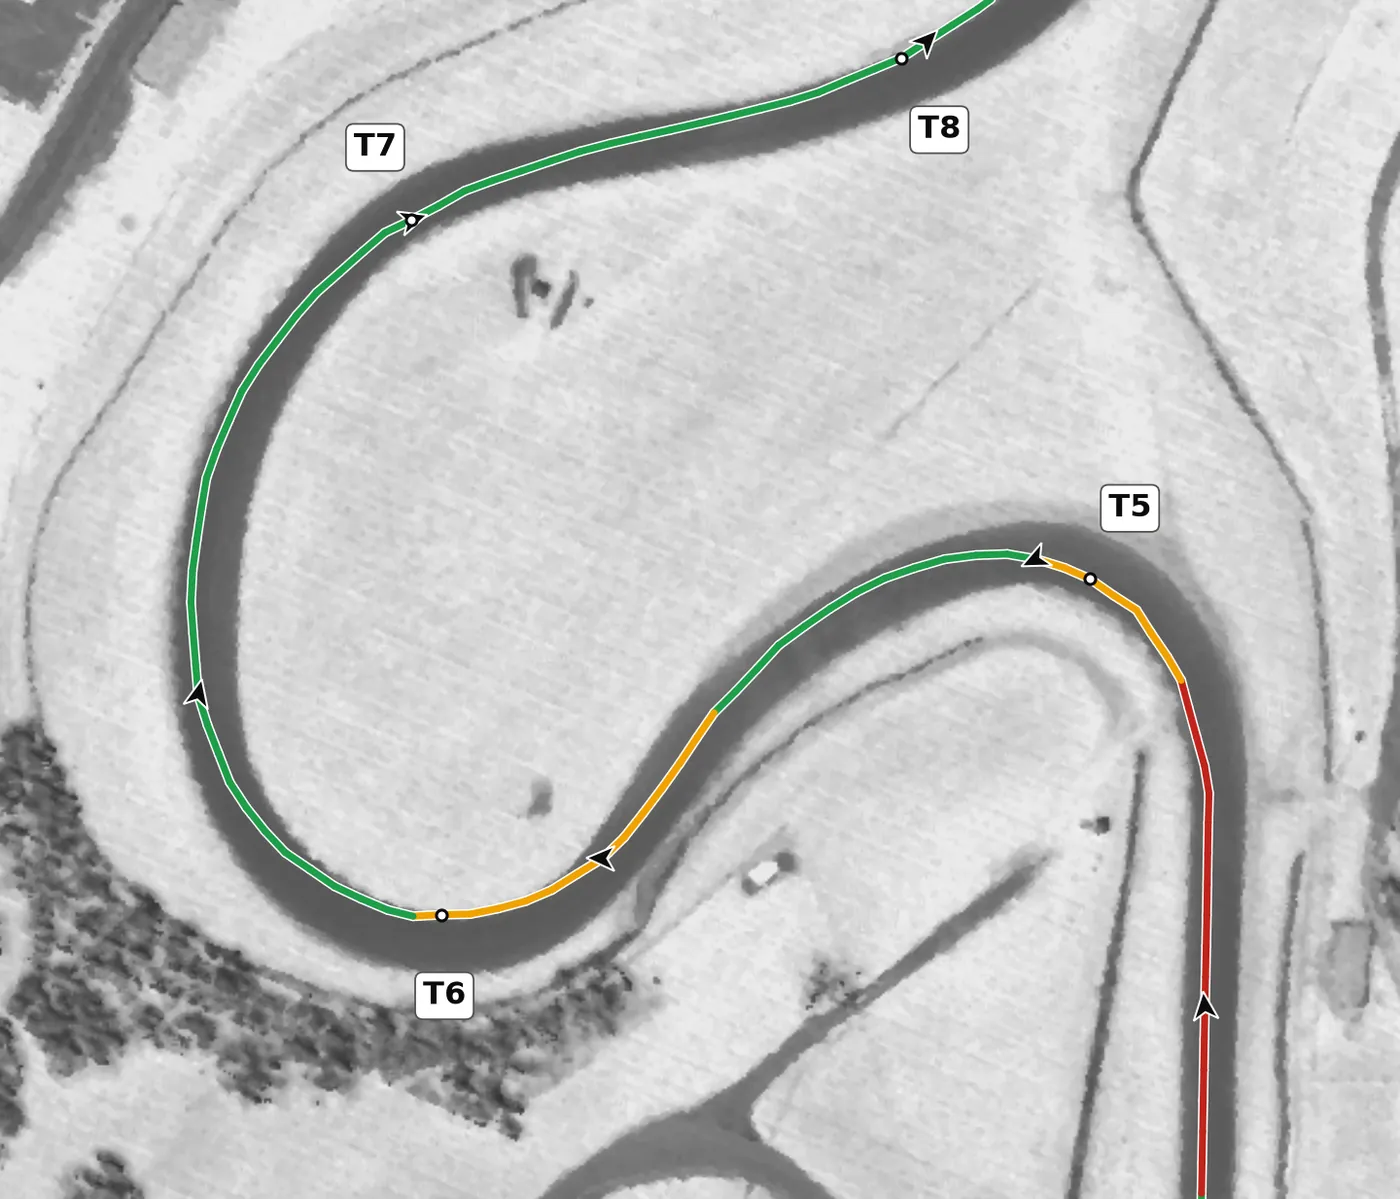
The first half of the Carousel is the most banked corner on the circuit, so use it. Turn in for a very late apex and try to hold one steady steering position all the way through to the exit of T7, adding throttle gently. The mistake to avoid is turning in early and having to tighten your line through T7.
From the survey: The most banked corner on the circuit (+5.3%), on a gentle rise.
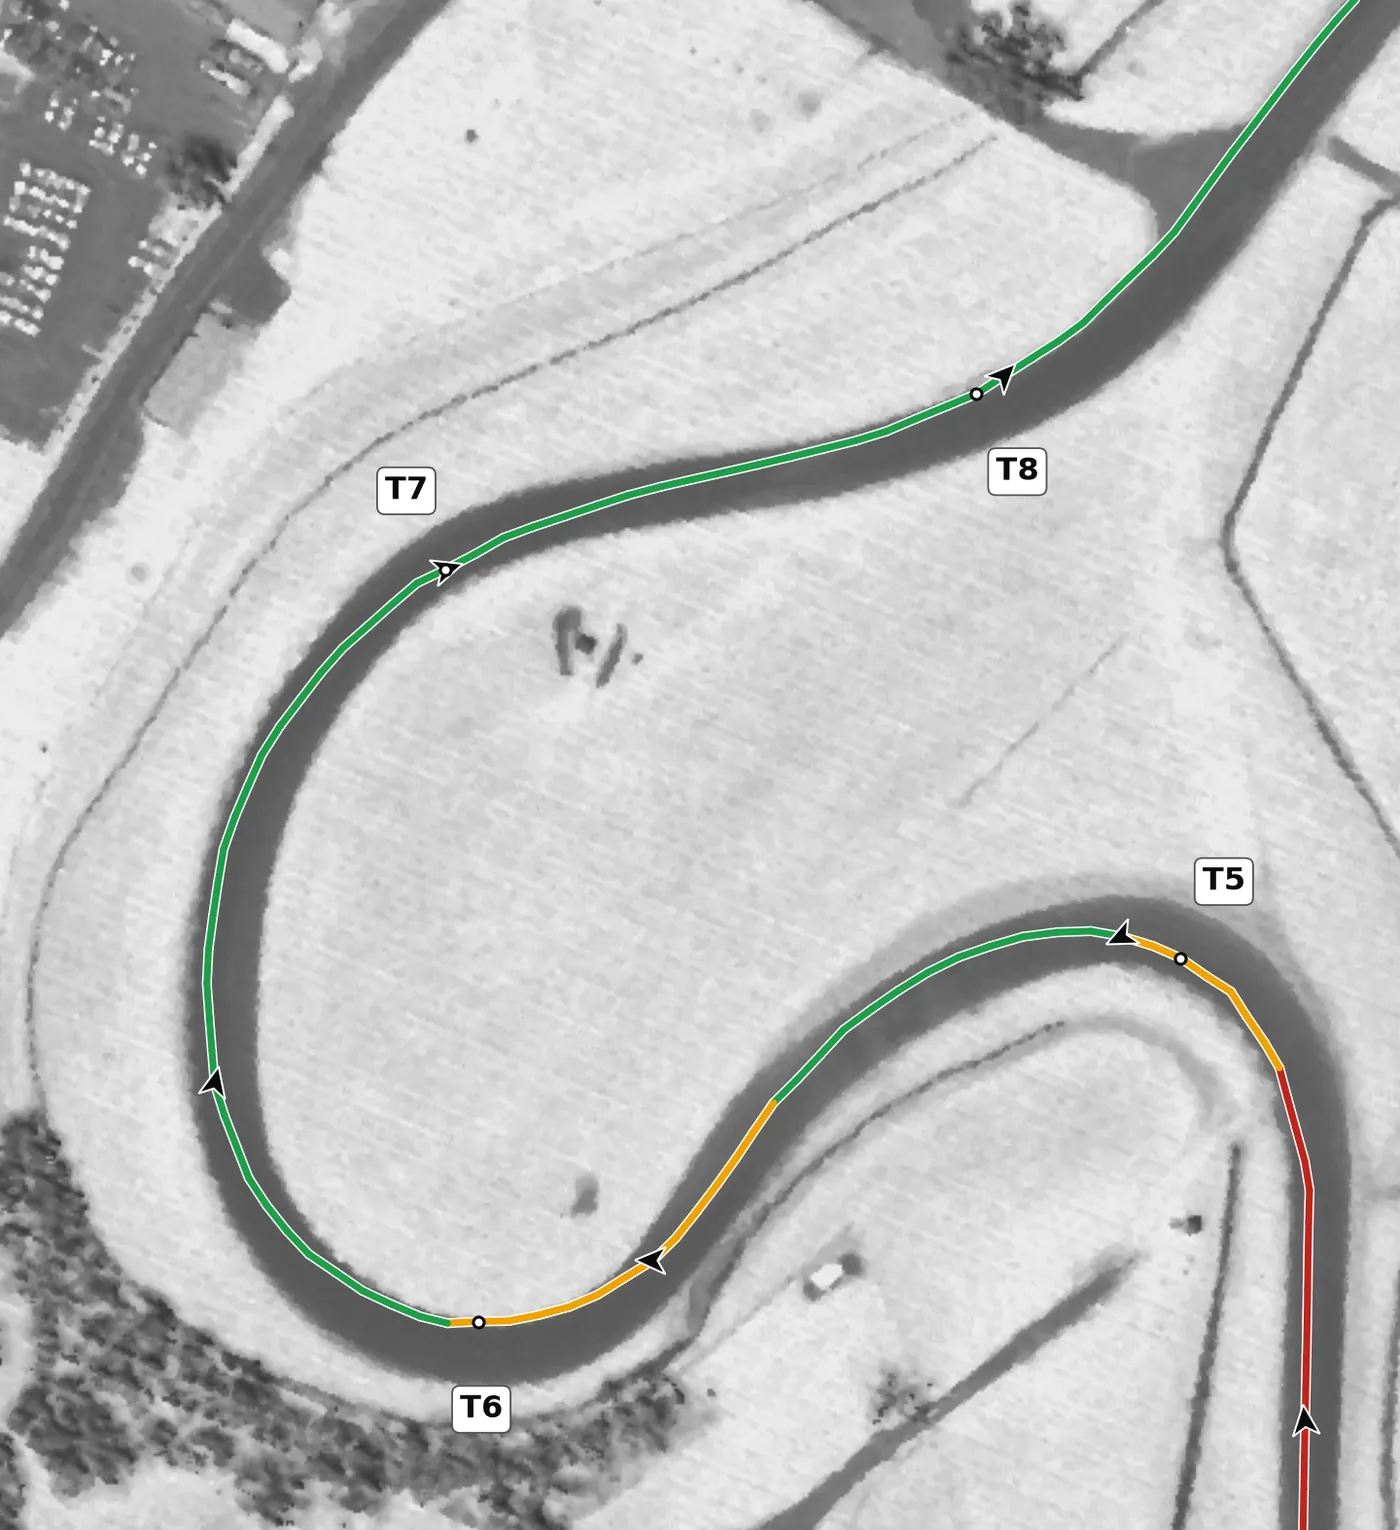
Treat this as the second half of one long right with T6: keep the steering steady and apex a little late. The exit drops away slightly, so unwind with the car rather than fighting it, and use only as much exit as you need to be placed for the fast left at T8. The mistake to avoid is going too deep into the corner, which delays the throttle.
From the survey: Banked +4.5%; the exit falls away at −2.0%.
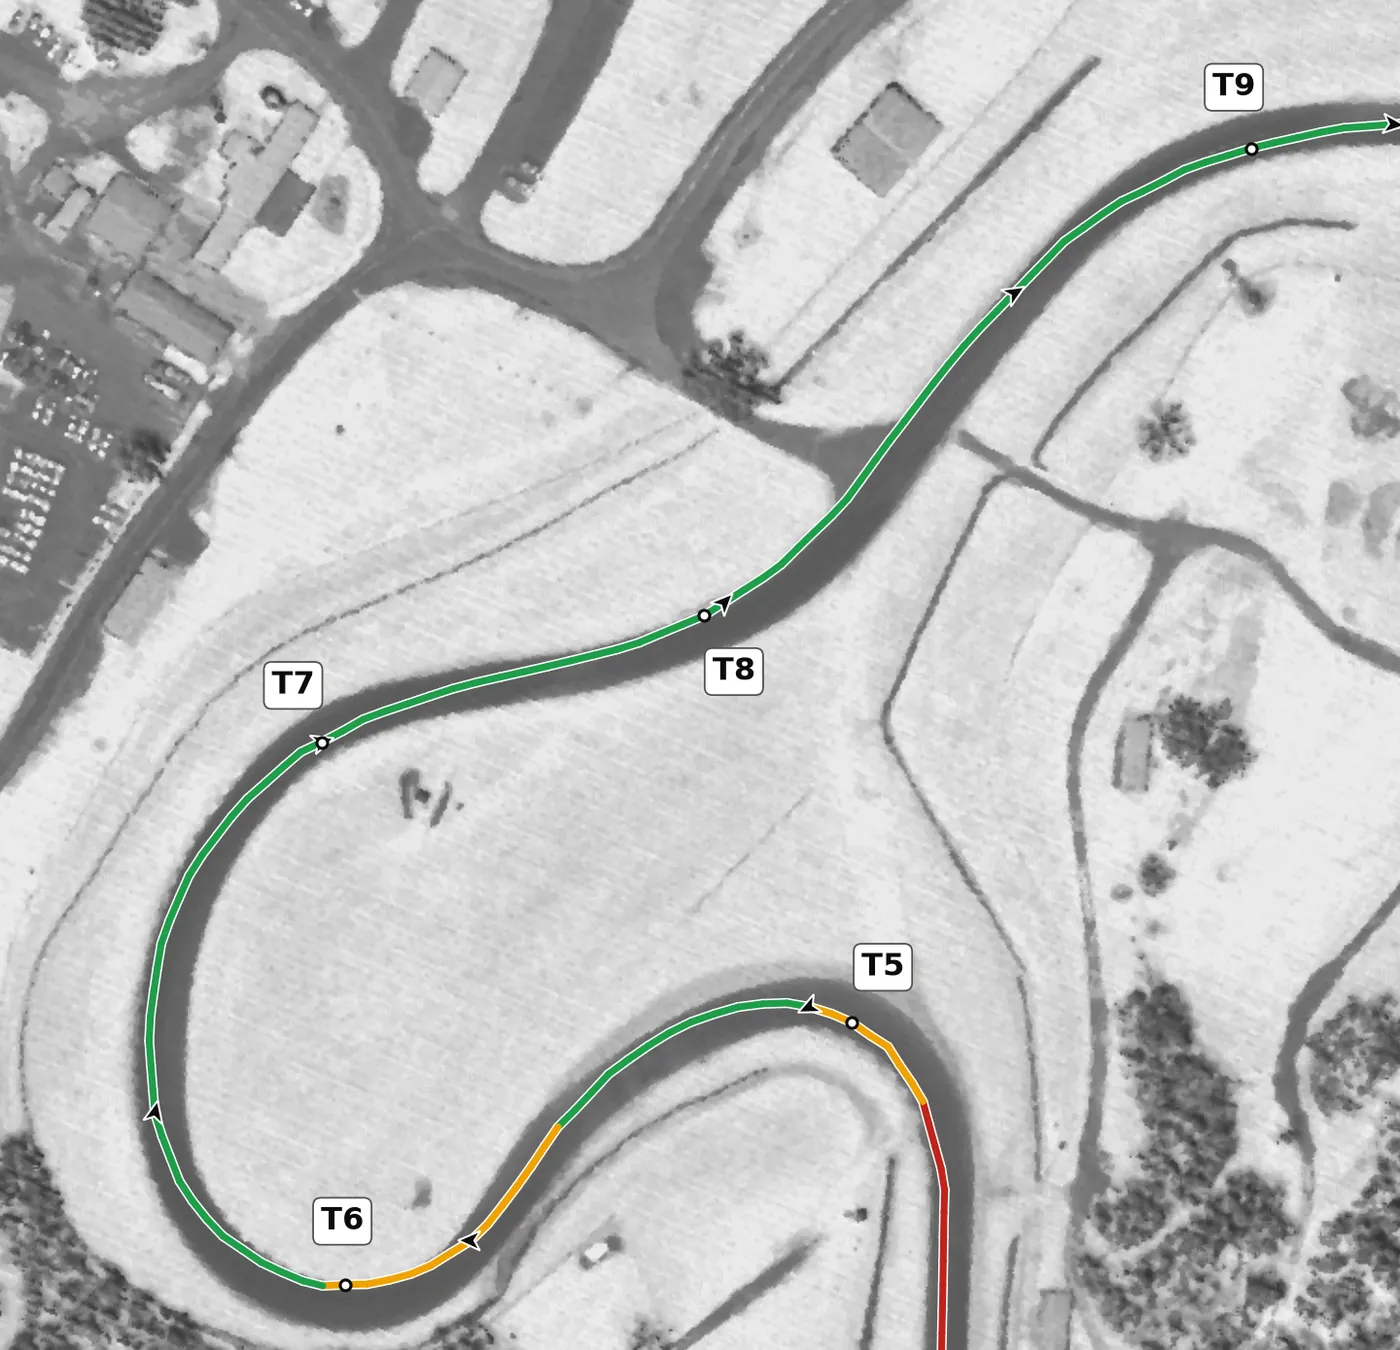
This fast left comes almost straight out of the Carousel, and with moderate banking and no gradient it is a pure line-and-commitment corner. Take a late apex and keep the exit tight enough to place the car for T9, which follows right after. The mistake to avoid is an early apex that leaves you on the wrong side of the track for T9.
From the survey: Banked +3.4% and flat at the apex (−0.2%).
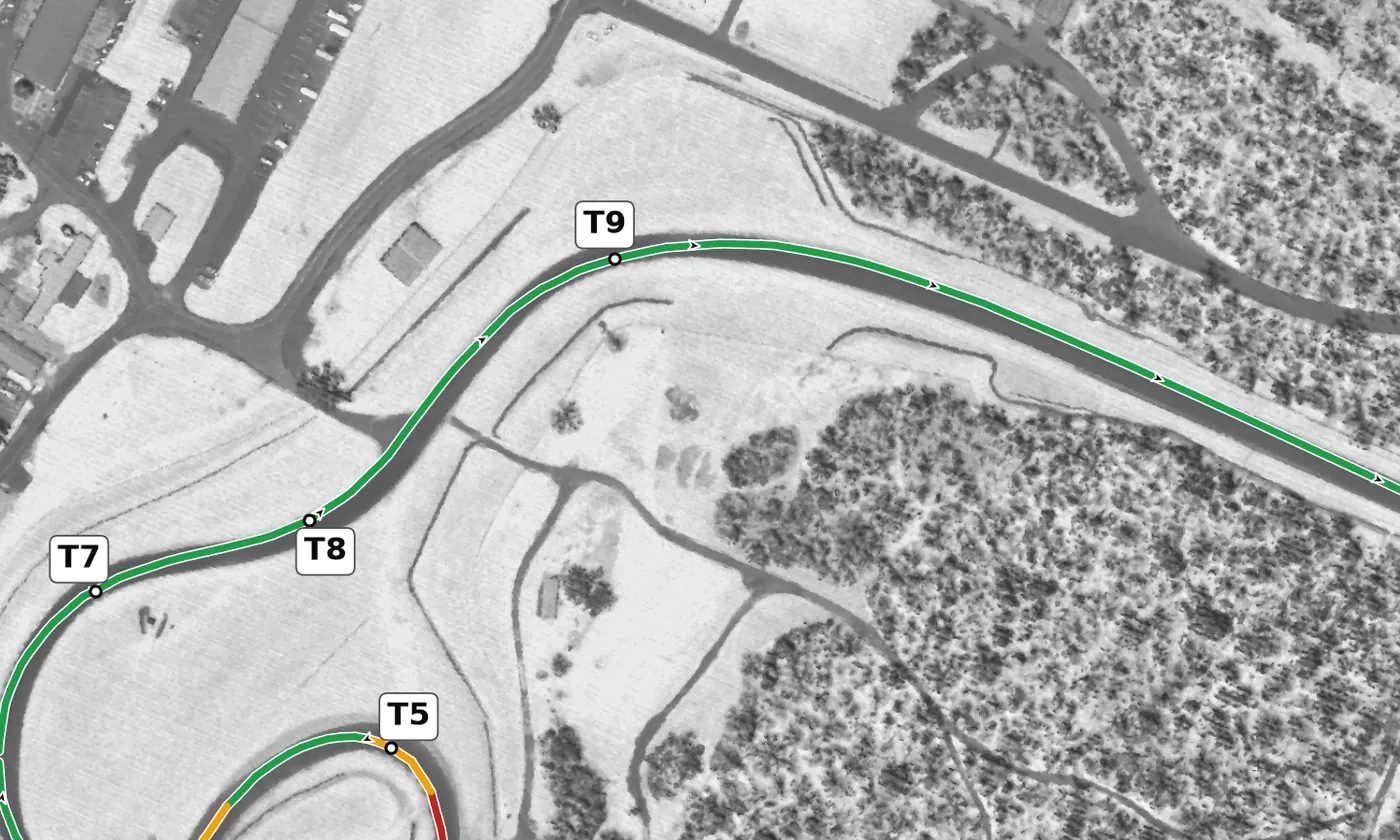
This fast right leads onto the uphill back section, so take a late enough apex to be on the power from the apex onward. Most cars take it flat once committed: carry good entry speed, especially in a lower-powered car, and let the banking support you as the road climbs. The mistake to avoid is an early apex that forces a lift on the climb.
From the survey: Banked +3.4%; the exit climbs 5.6 m over 260 m, the big climb of the lap.
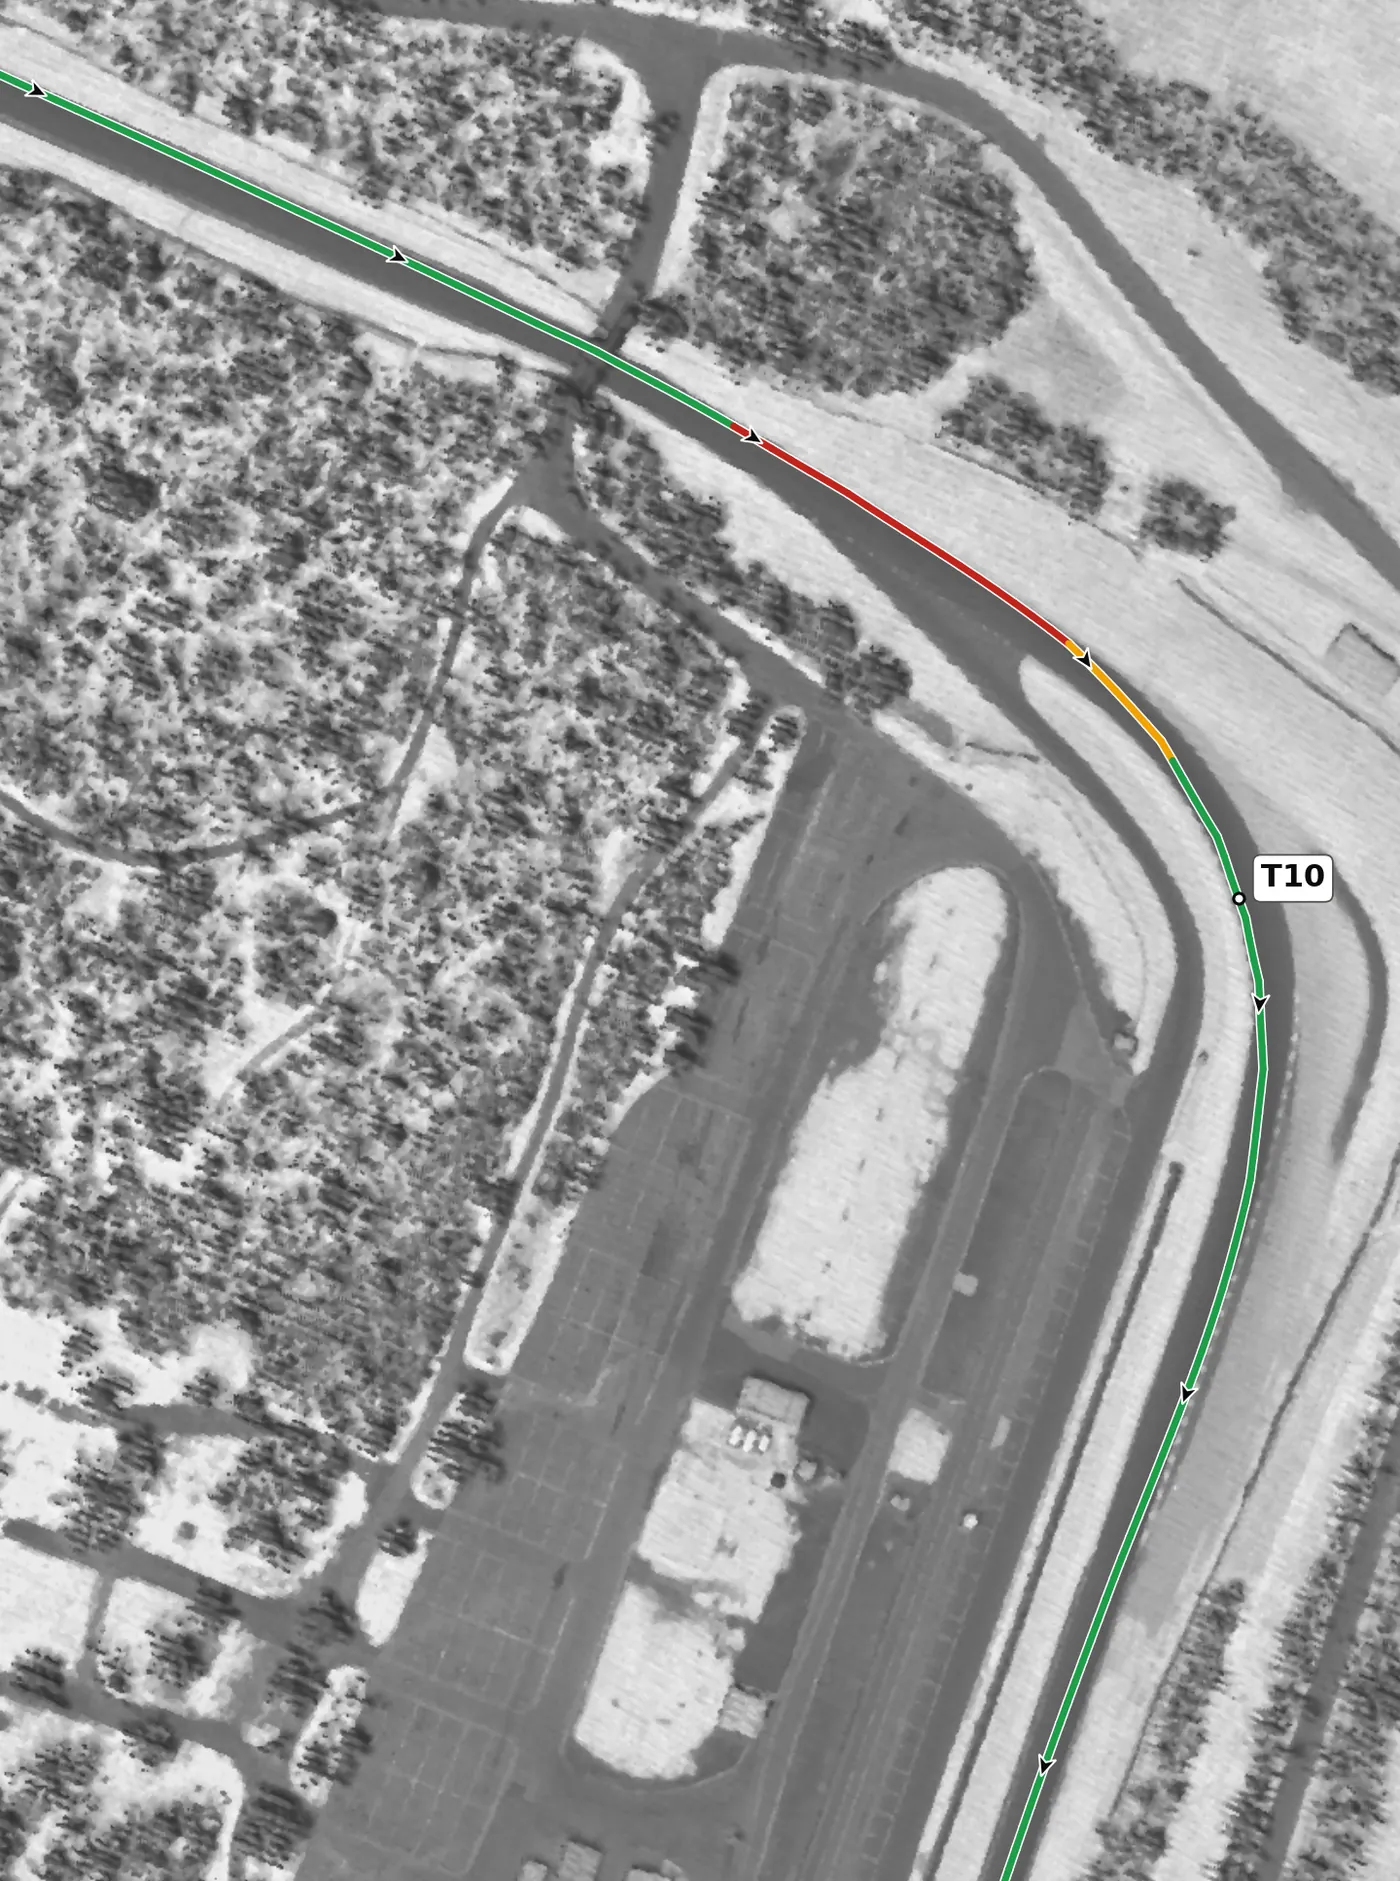
This fast, 90-degree right is the most important corner on the track because it feeds the long front straight. Brake firmly in a straight line, a little early rather than late, turn in from the outside edge, use the banking to carry speed to a late apex and use all the exit, getting the car straight early as the exit climbs. The mistake to avoid is late, deep braking that ruins the exit; if you do run wide, keep the wheels straight.
From the survey: Banked +4.0%; the exit climbs at +1.9% to a crest on the front straight.
Version history
- v1.2 · 2026-10-01 — T9 is now drawn as throttle: the car gains speed through it, so it is not a lift. T10's exit goes green 30 m sooner for the same reason.
- v1.1 · 2026-10-01 — Speeds rebuilt from cars at a typical quick HPDE pace: about 30 km/h lower at the end of the front straight and 8–20 km/h lower at corner minimums. Braking points were checked against published markers and stayed within 5 m of v1.0: T1 and T3 5 m later, T4 5 m earlier. The line now goes straight from throttle to brake, with no coasting in between.
- v1.0 · 2026-10-01 — First version.
Feedback contributors
Drivers and instructors whose feedback has improved this line. Thank you.
- Mike M — no coasting between throttle and brake; braking points (v1.1)
- Brian L — corners where the car gains speed are throttle, not a lift (v1.2)