VIR Full — Race Line
Bill's '23 BMW M440i: the median line of his 6 fastest M440i laps (2:13.1–2:14.1), June 29 2026, 25 Hz GPS. The six laps agree to about half a metre. Turn numbers are Chin's, handed out in lap order; VIR has no T13. Bill's single fastest VIR lap is in the M5 (2:12.92); the M440i laps are 25 Hz and much sharper.
Heads up: The turn numbering is provisional: directions and apexes come from the data, but no one has walked the corner markers to confirm which number goes where. The LiDAR was flown in November 2017.
- Throttle
- Coast / partial
- Braking
- Apex
- T4Off-camber corner
Arrows show the direction of the lap. The grey basemap is USGS LiDAR: dark = asphalt, light = grass. Tap any map for the full-size image.
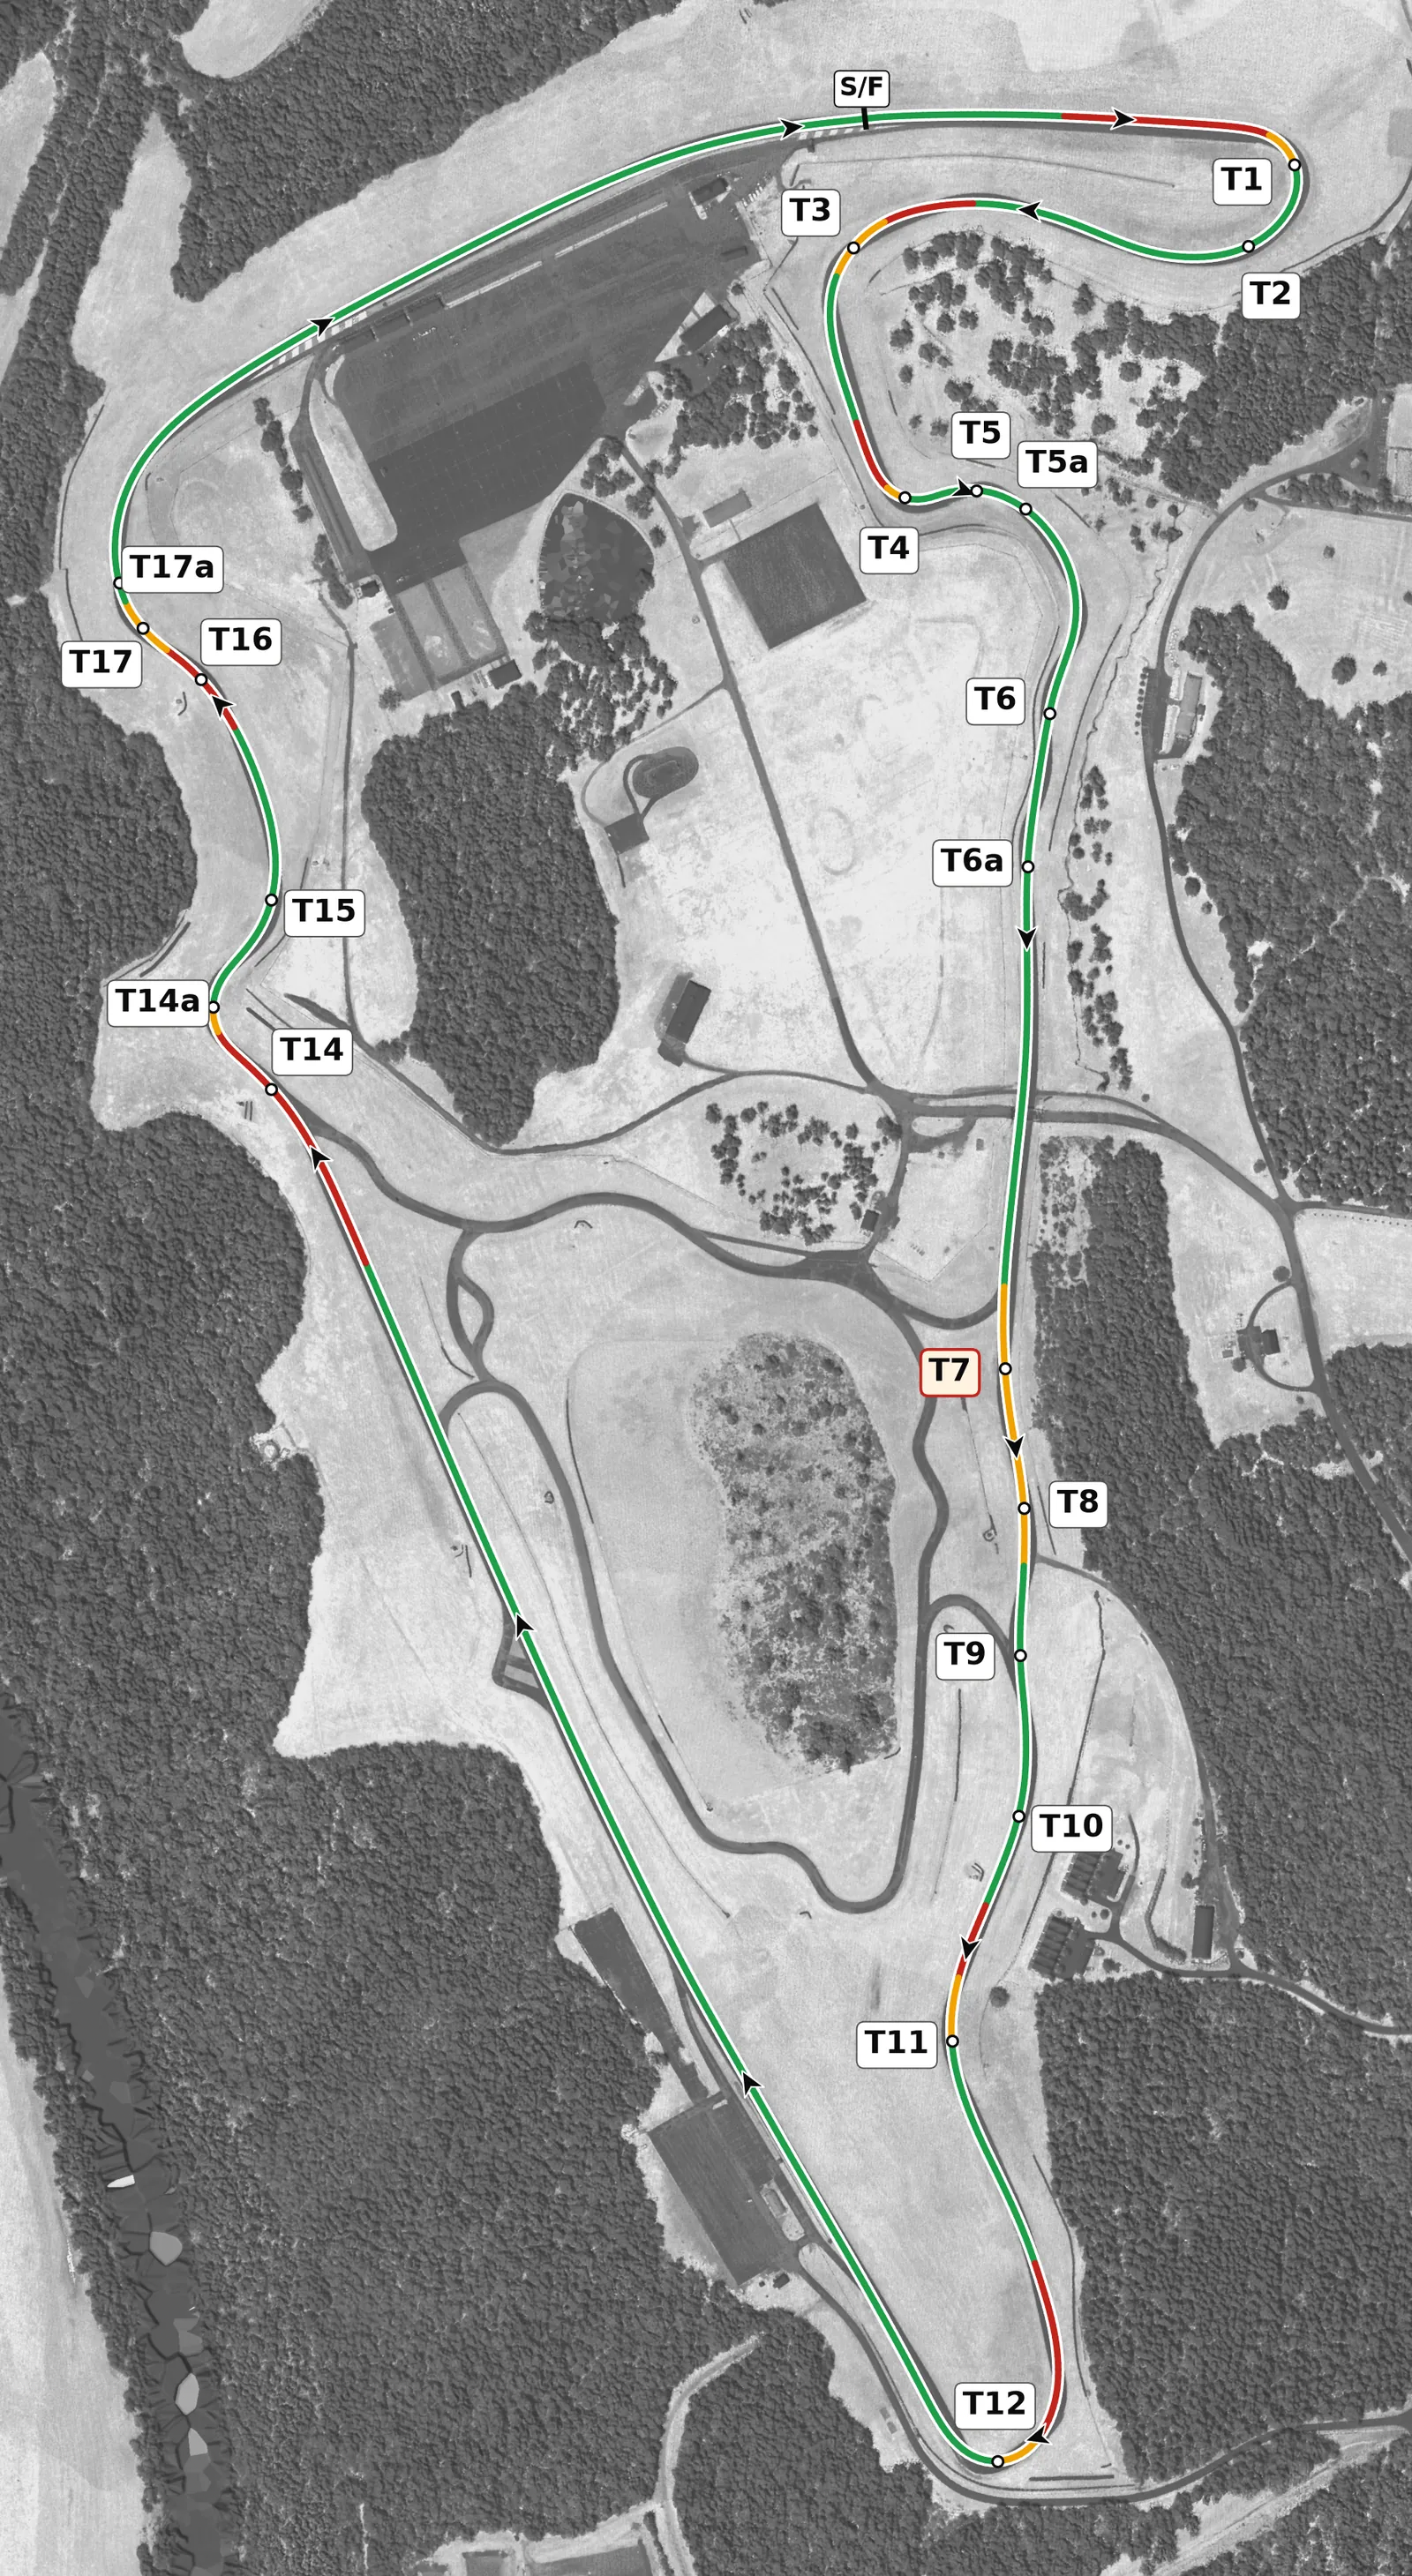
VIR is a fast, flowing lap with big elevation changes and long straights, so exits matter most, above all Oak Tree onto the back straight and Hog Pen onto the front straight. Several corners hide their apex or exit behind a crest, especially T11 and the Roller Coaster, so finish your braking in a straight line before each crest and build speed over several laps. Treat the Climbing Esses and the downhill esses as rhythm sections where smooth, small steering inputs are faster than aggressive ones.
Sectors
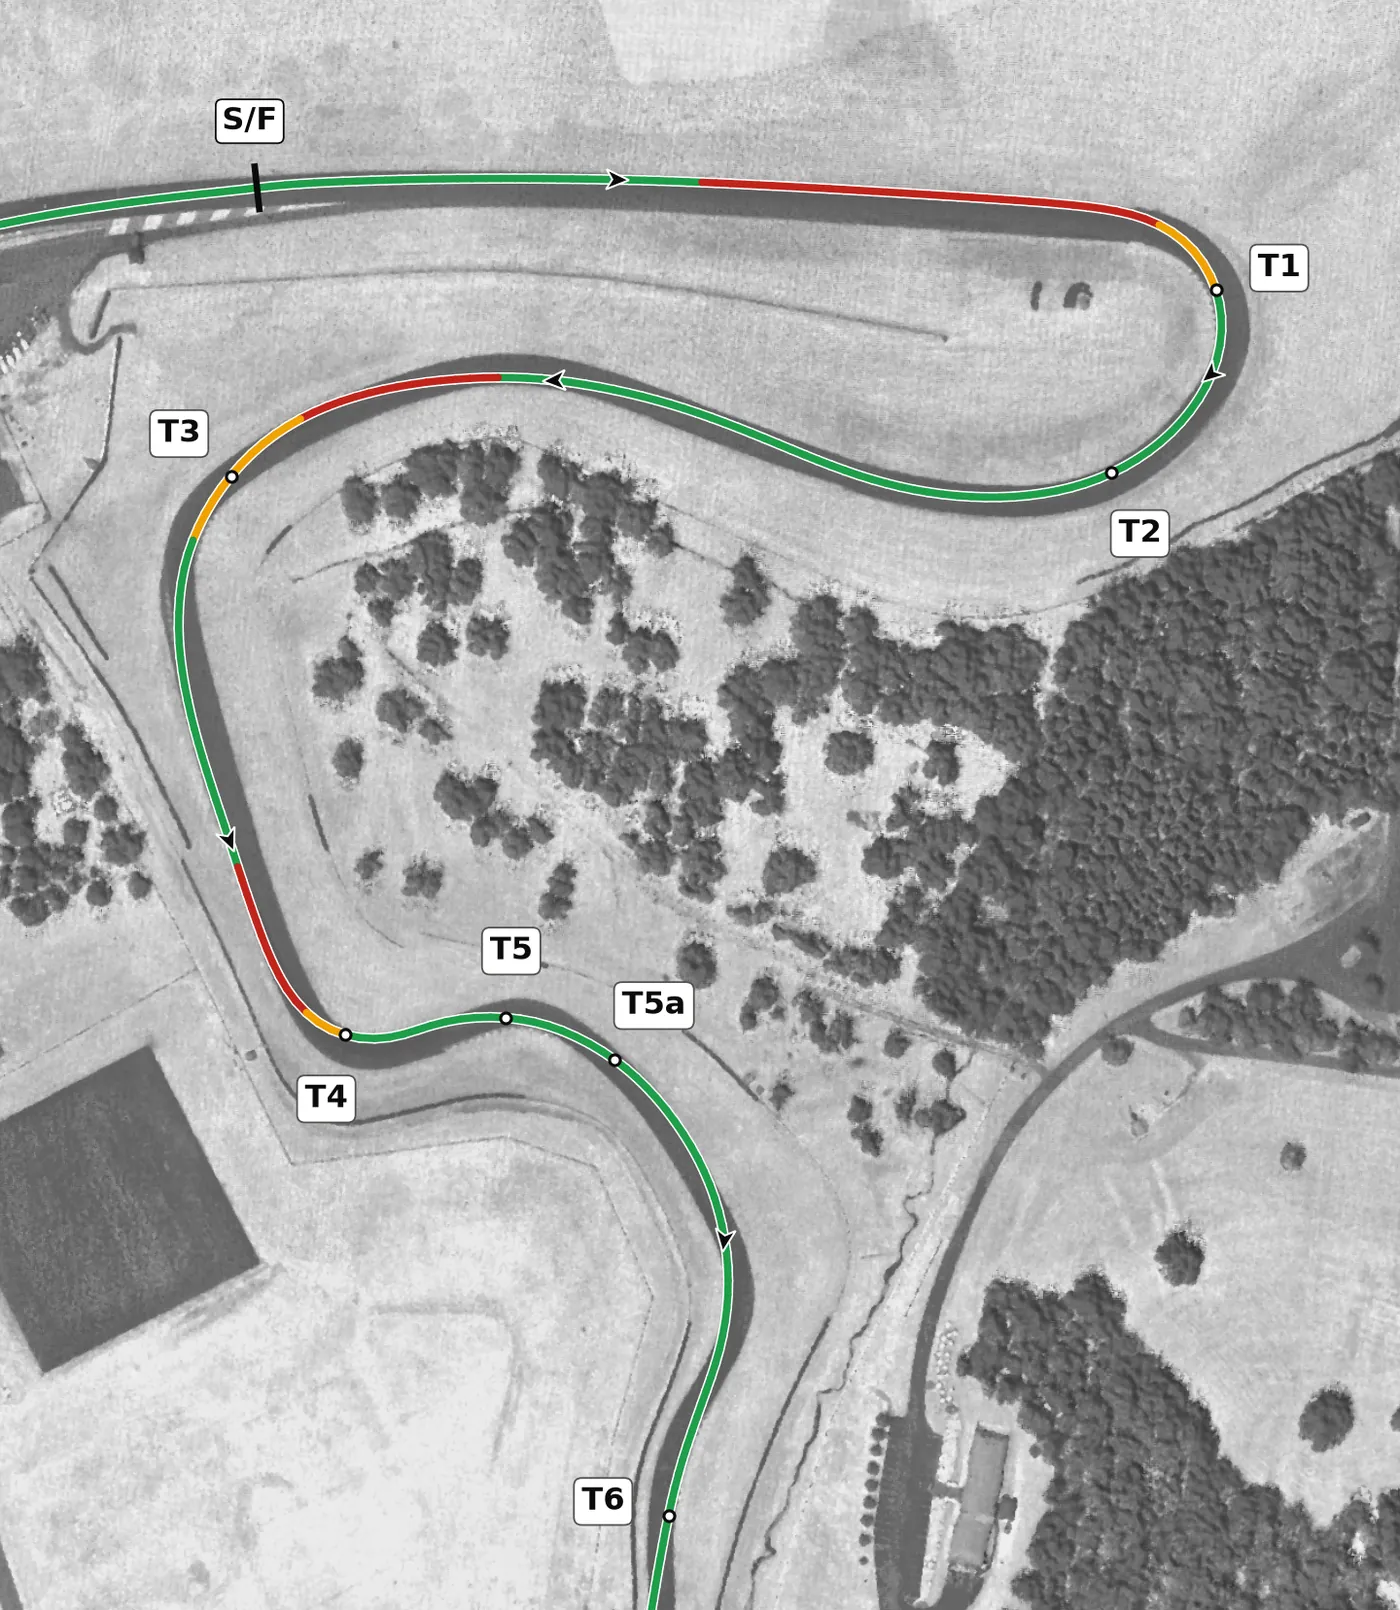
The lap starts with a fast run down the front straight into the long right of T1, followed by the T2 arc, the long left of T3 and the slower T4. Smooth braking that starts while the car is slightly turned is the skill here, and a careful T4 exit sets up the Snake. Through T5 and T5a, get the car turned early so you can stay on the power.
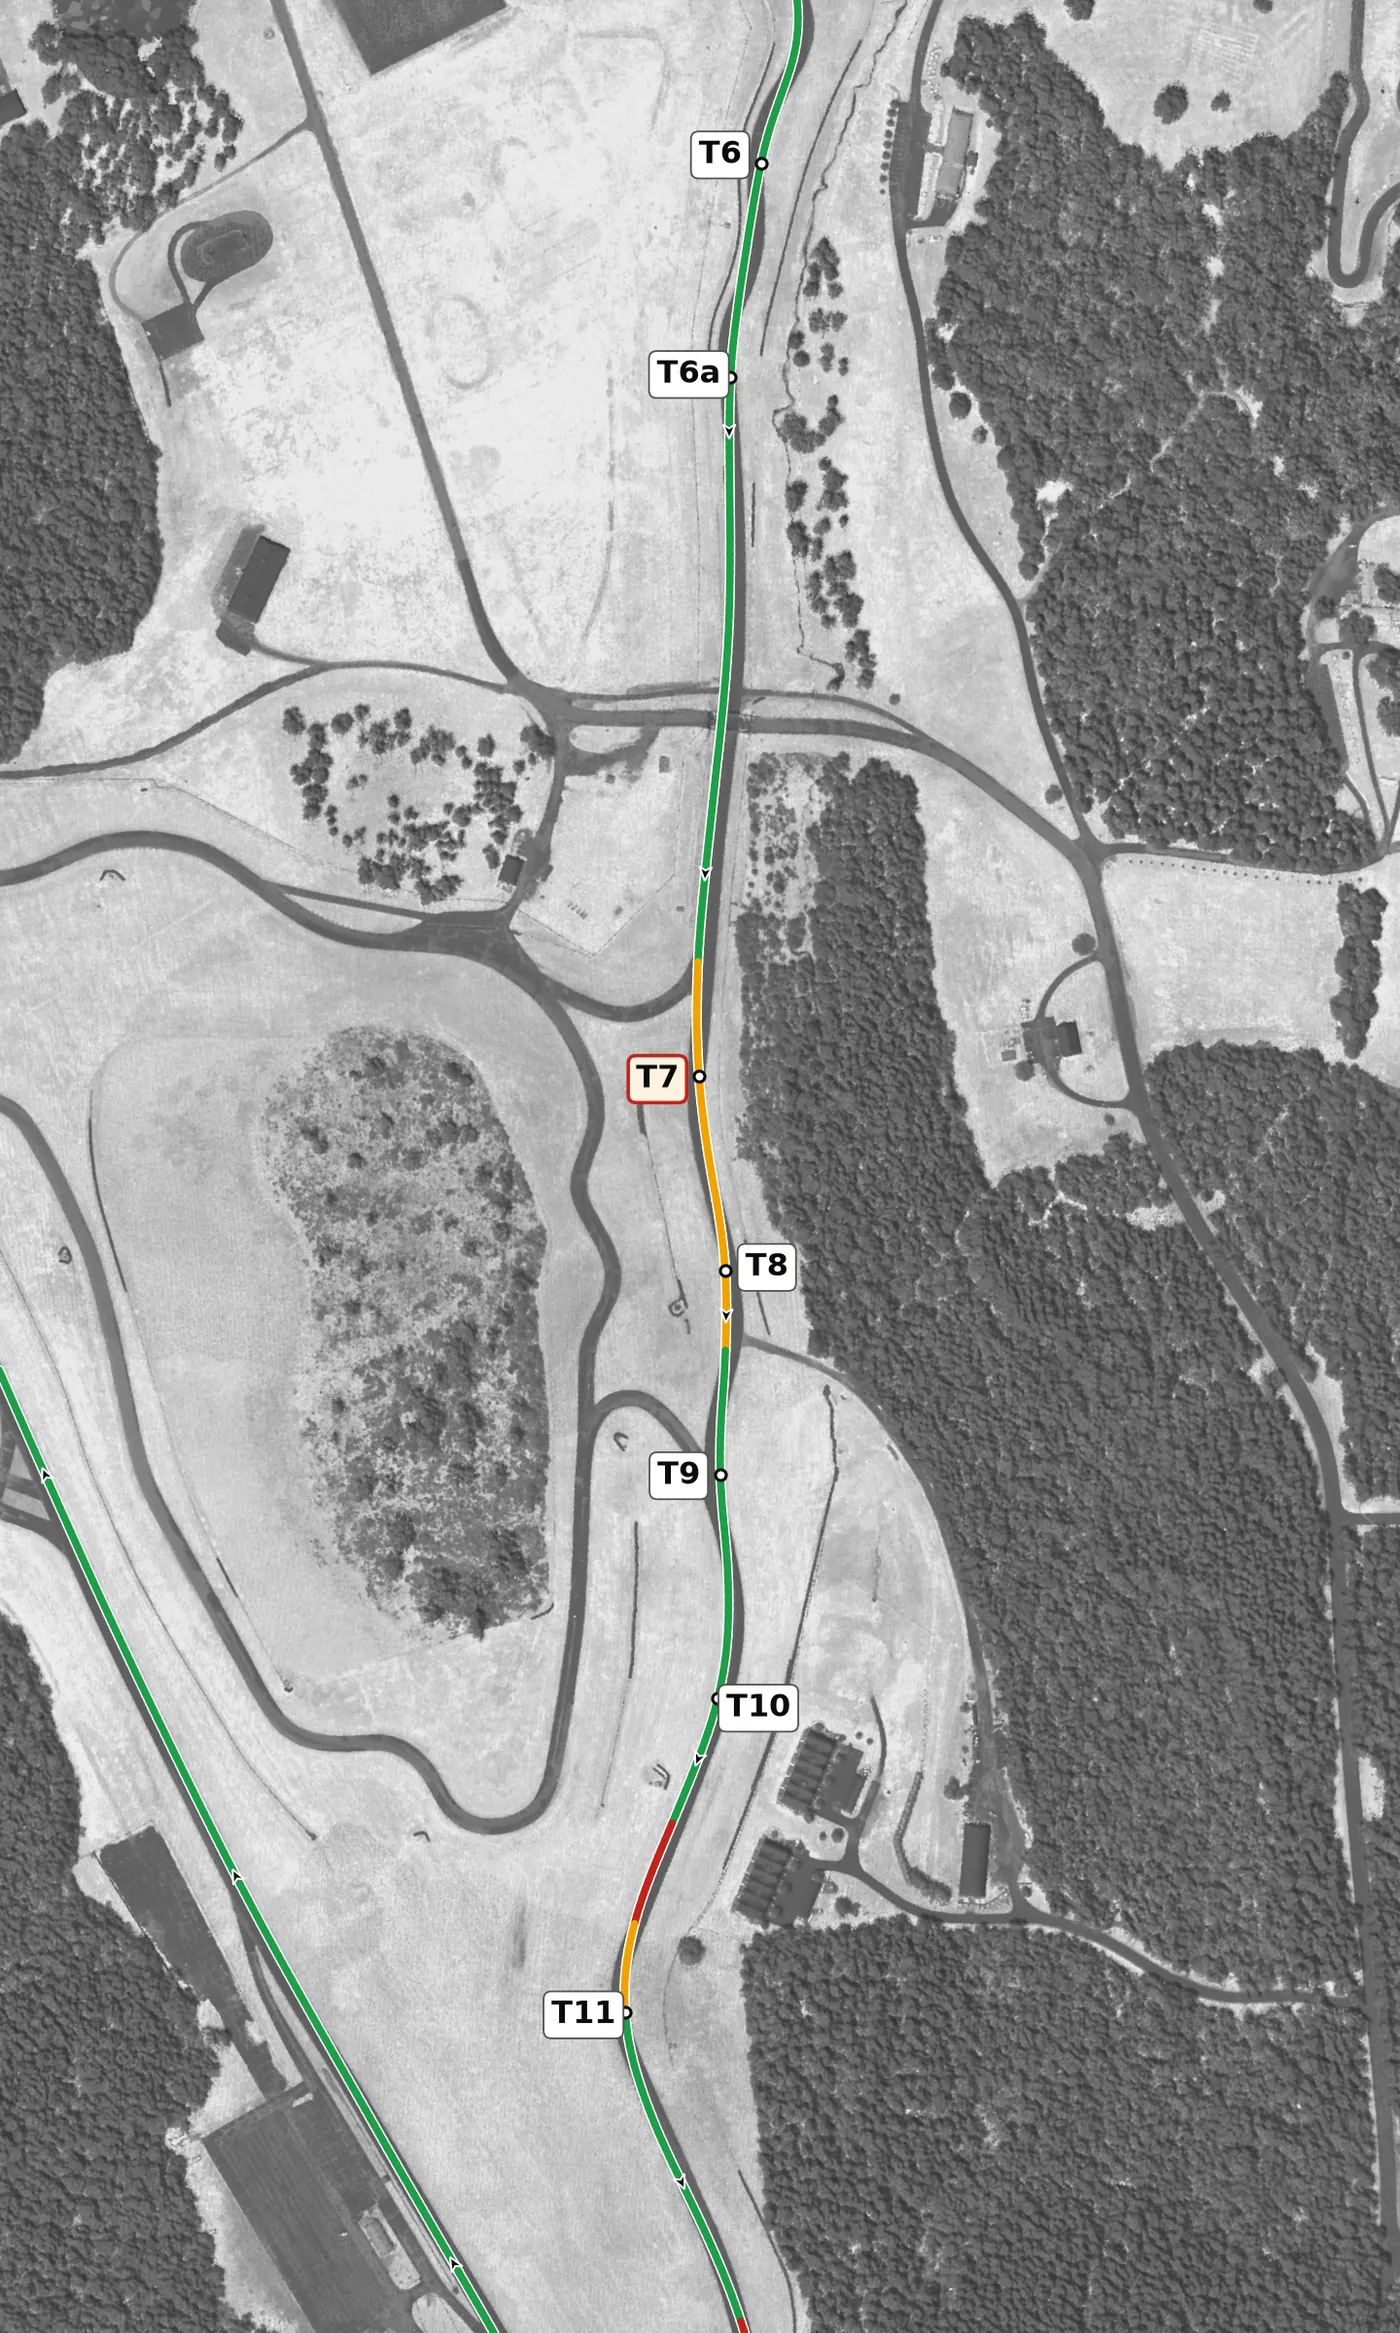
T6 and T6a flow left at speed onto the run up to the Climbing Esses, VIR's most famous section. The esses, T10 and the blind crest of T11 all reward a smooth, gradual build-up: the car goes light in several places, so keep it straight and settled there and never brake or steer hard over a crest.
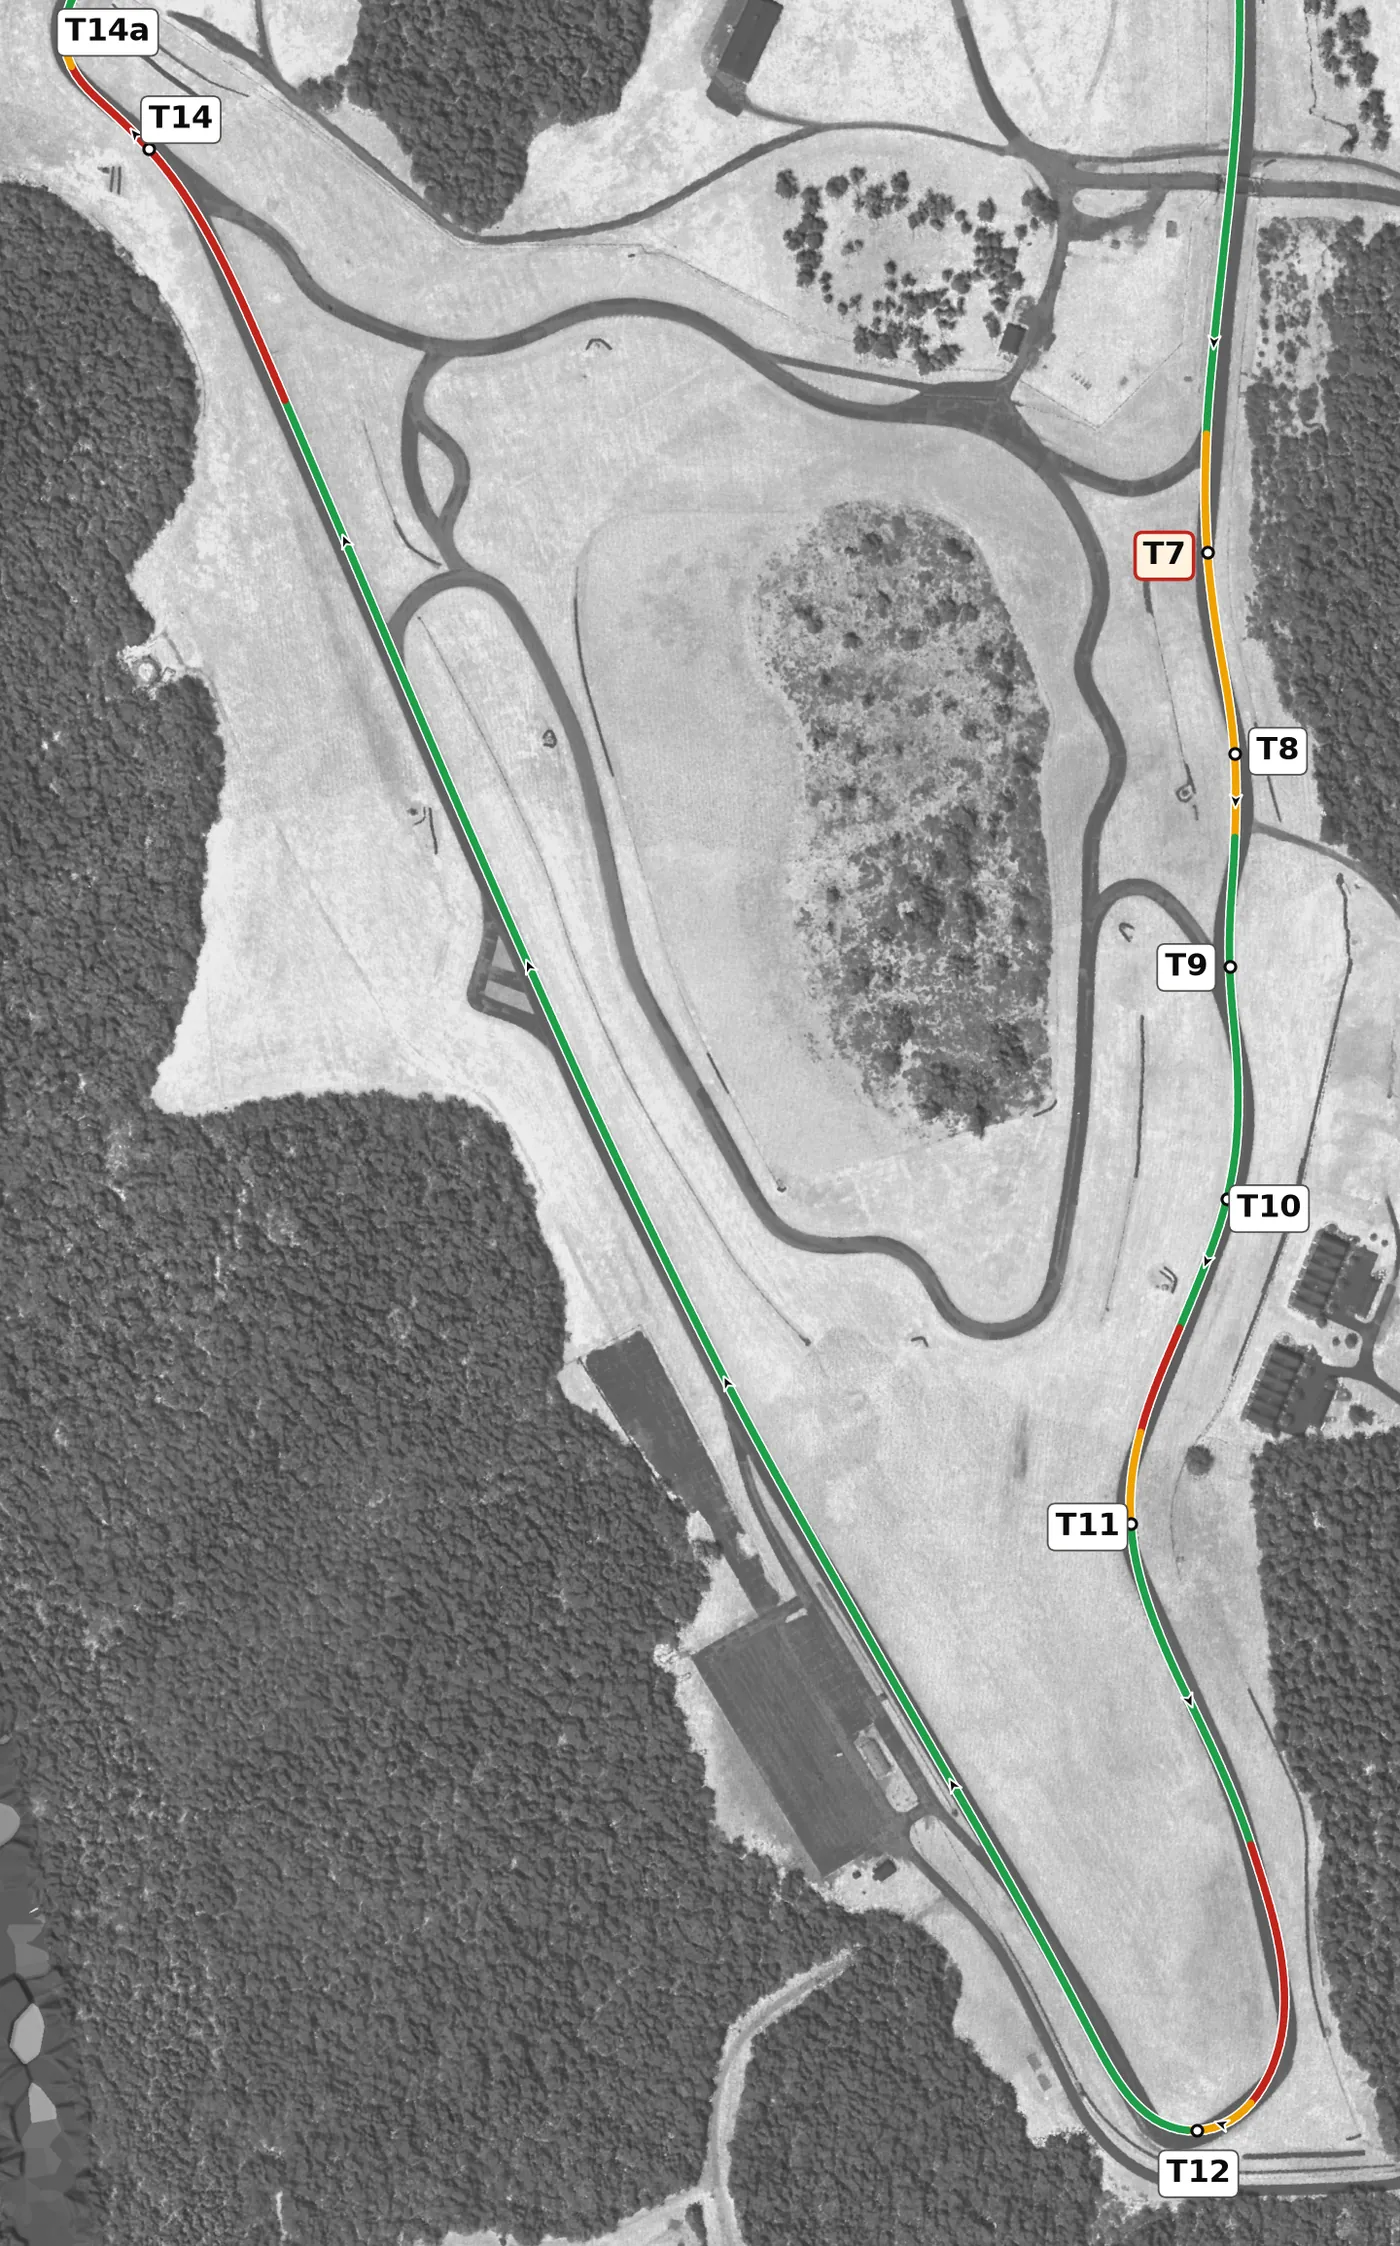
This sector is mostly about one corner: Oak Tree sends you onto the very long back straight, so a patient entry and an early, clean throttle there are worth more than anything else on the lap. At the end of the straight, brake hard and straight uphill into T14 and arrive settled at the Roller Coaster brow.
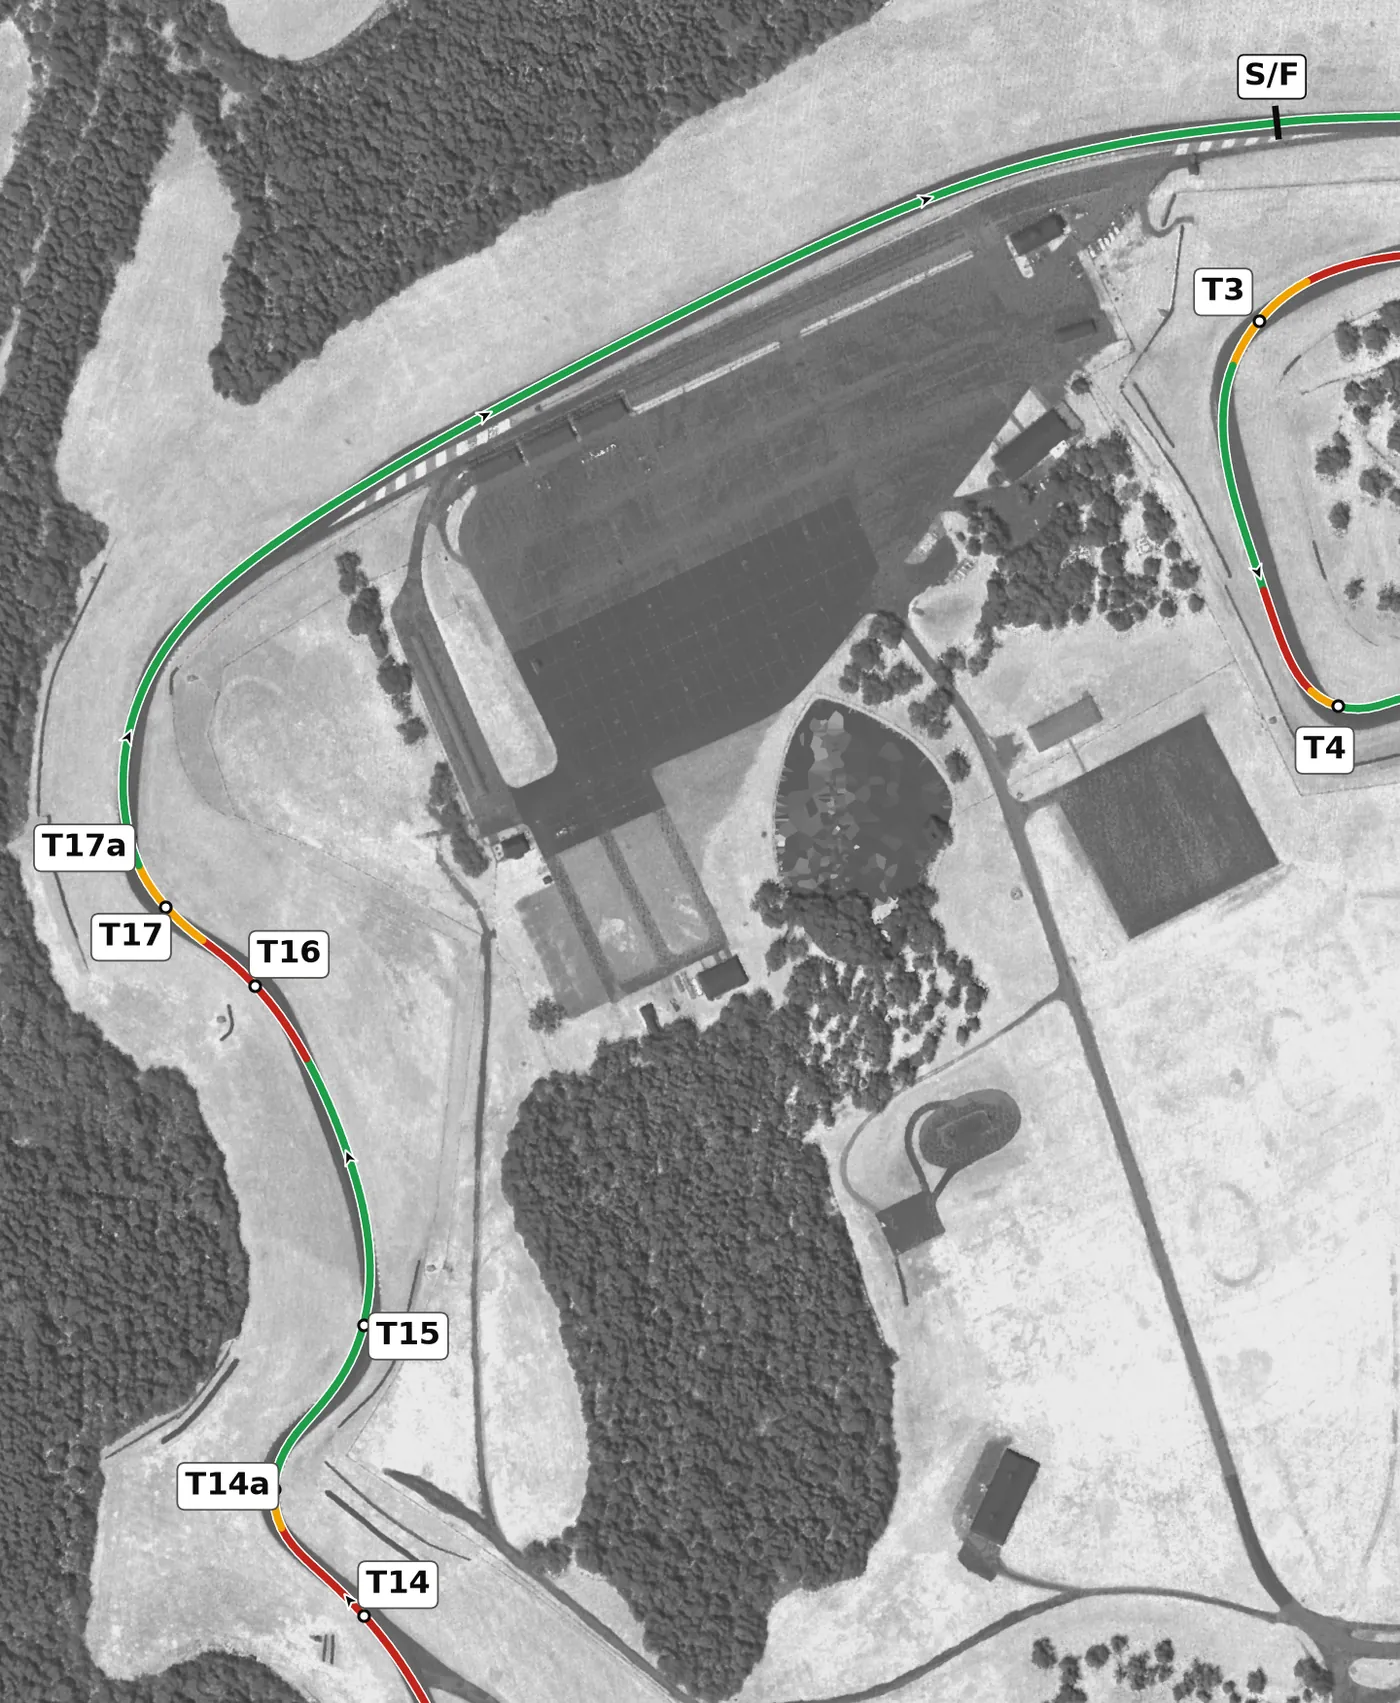
From the Roller Coaster brow the track drops steeply through T14a, T15 and T16 before the downhill double-apex Hog Pen. Grip changes quickly as the car goes light and then loads up, so use gentle inputs, wait for the car to settle, and put the most effort into a clean Hog Pen exit onto the front straight.
Corners
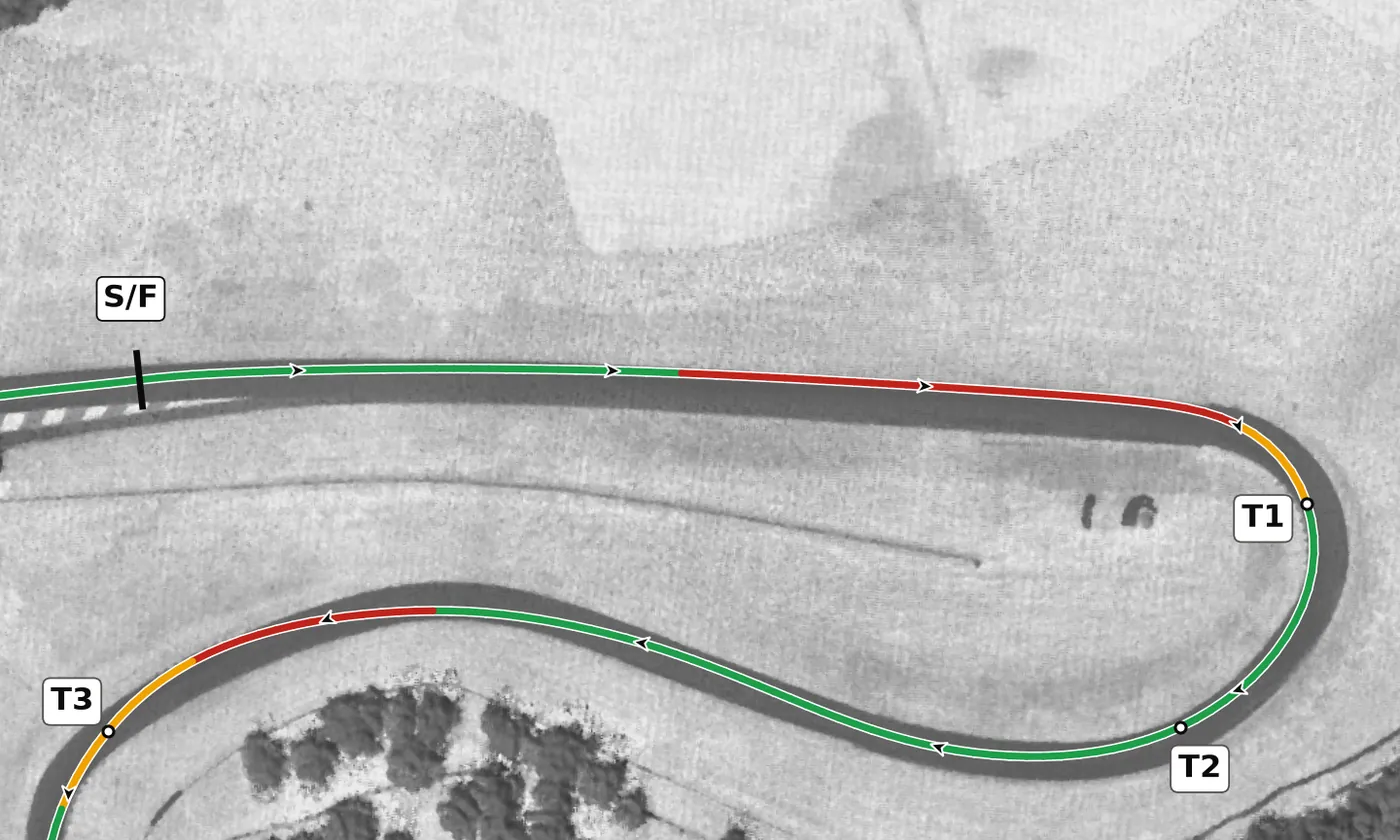
The front straight bends and falls toward T1, so stay flat to your brake marker, then brake hard while the car is pointing straight. T1 is a long right that opens up, so take a late apex while you learn it and let the car unwind out toward the left edge. The mistake to avoid is lifting early on the straight and then coasting: brake once, firmly, and look for the apex.
From the survey: T1 and T2 sit at the lowest point on the circuit.
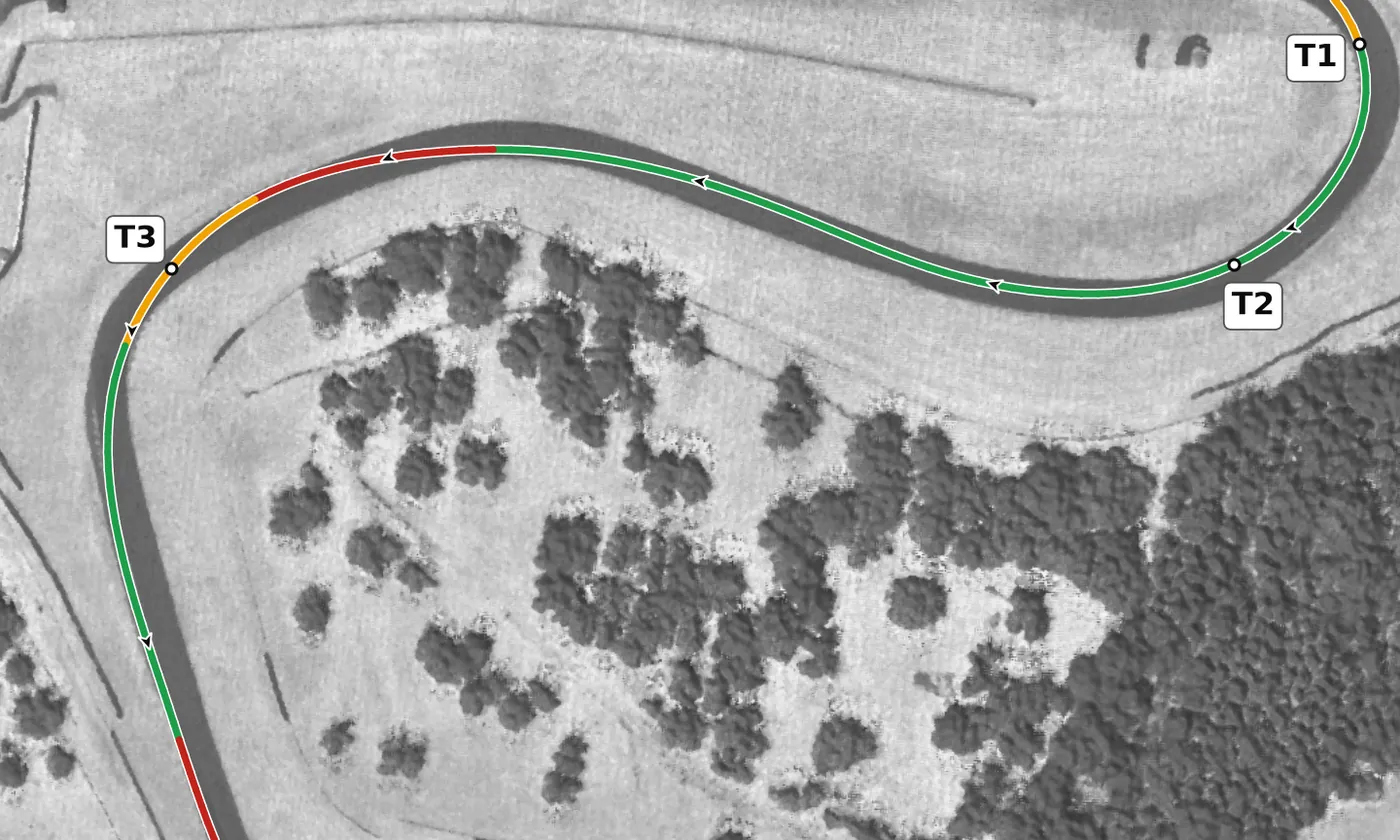
T2 is a smooth, banked right-hand arc that joins T1 to the braking zone for T3, so keep the car flowing on steady throttle. You start slowing for T3 while the car is still slightly turned, so come off the throttle and onto the brakes very gently. The mistake to avoid is a stab at the brakes here, which unsettles a car that is still carrying load through the arc.
From the survey: Banked +2.3% at the apex, and on camber all the way through.
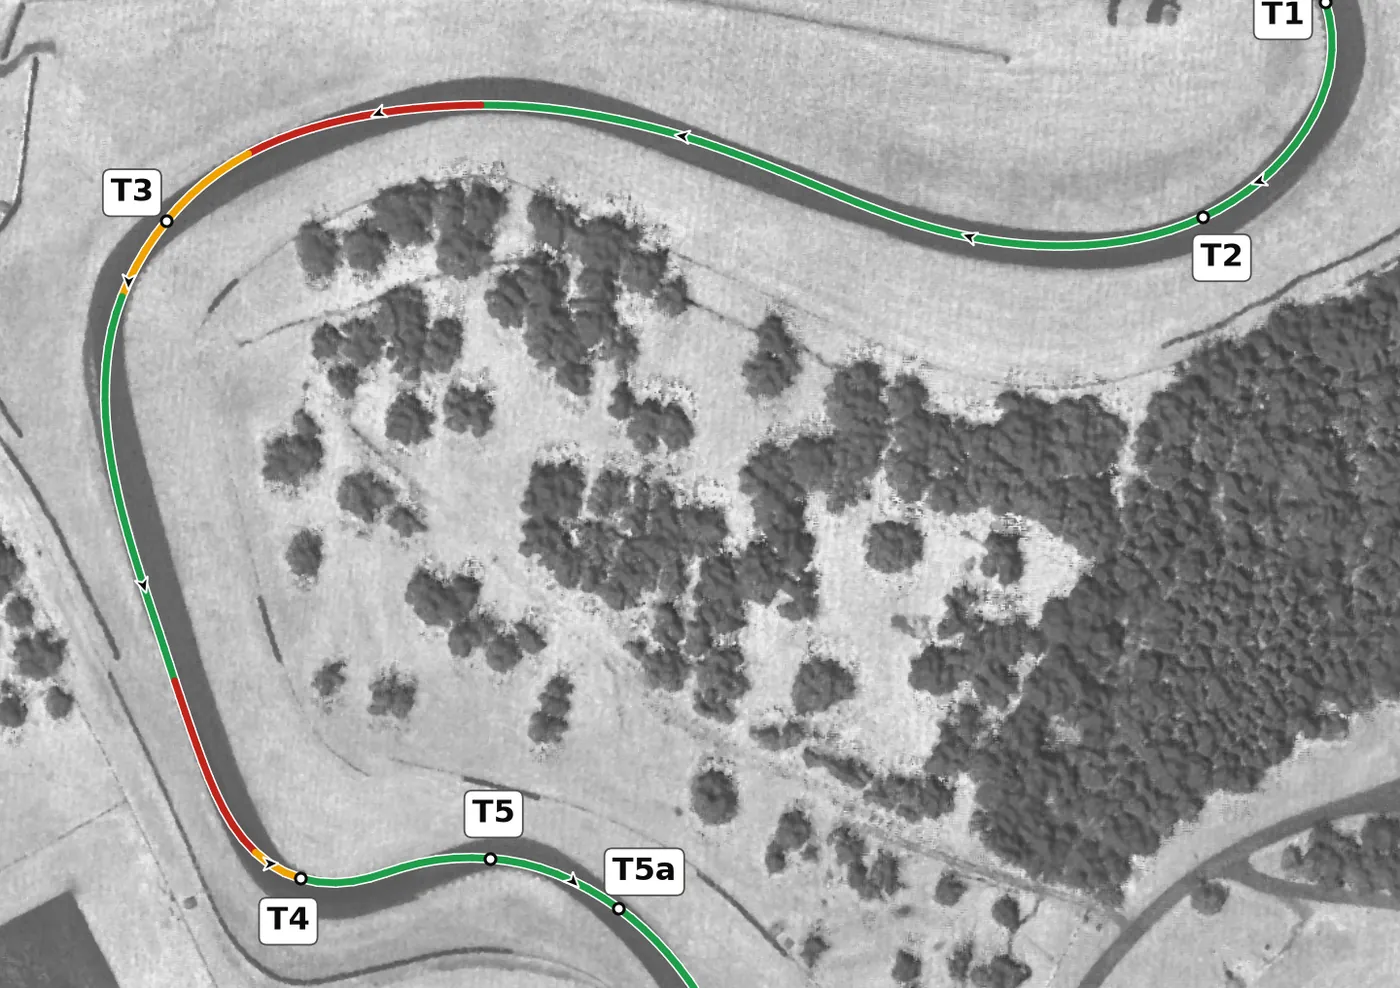
T3 is a long left that tightens toward the end and climbs gently, so brake modestly, turn in a touch later than it looks and aim for a late apex. Once you see the exit, unwind the wheel and let the car run out toward the right, where the exit is wide. The mistake to avoid is turning in early: the corner keeps tightening and the camber dips inside it, so an early apex runs you out of road.
From the survey: Nascar Bend. On camber at the apex, but the camber dips to −2.5% inside the corner.
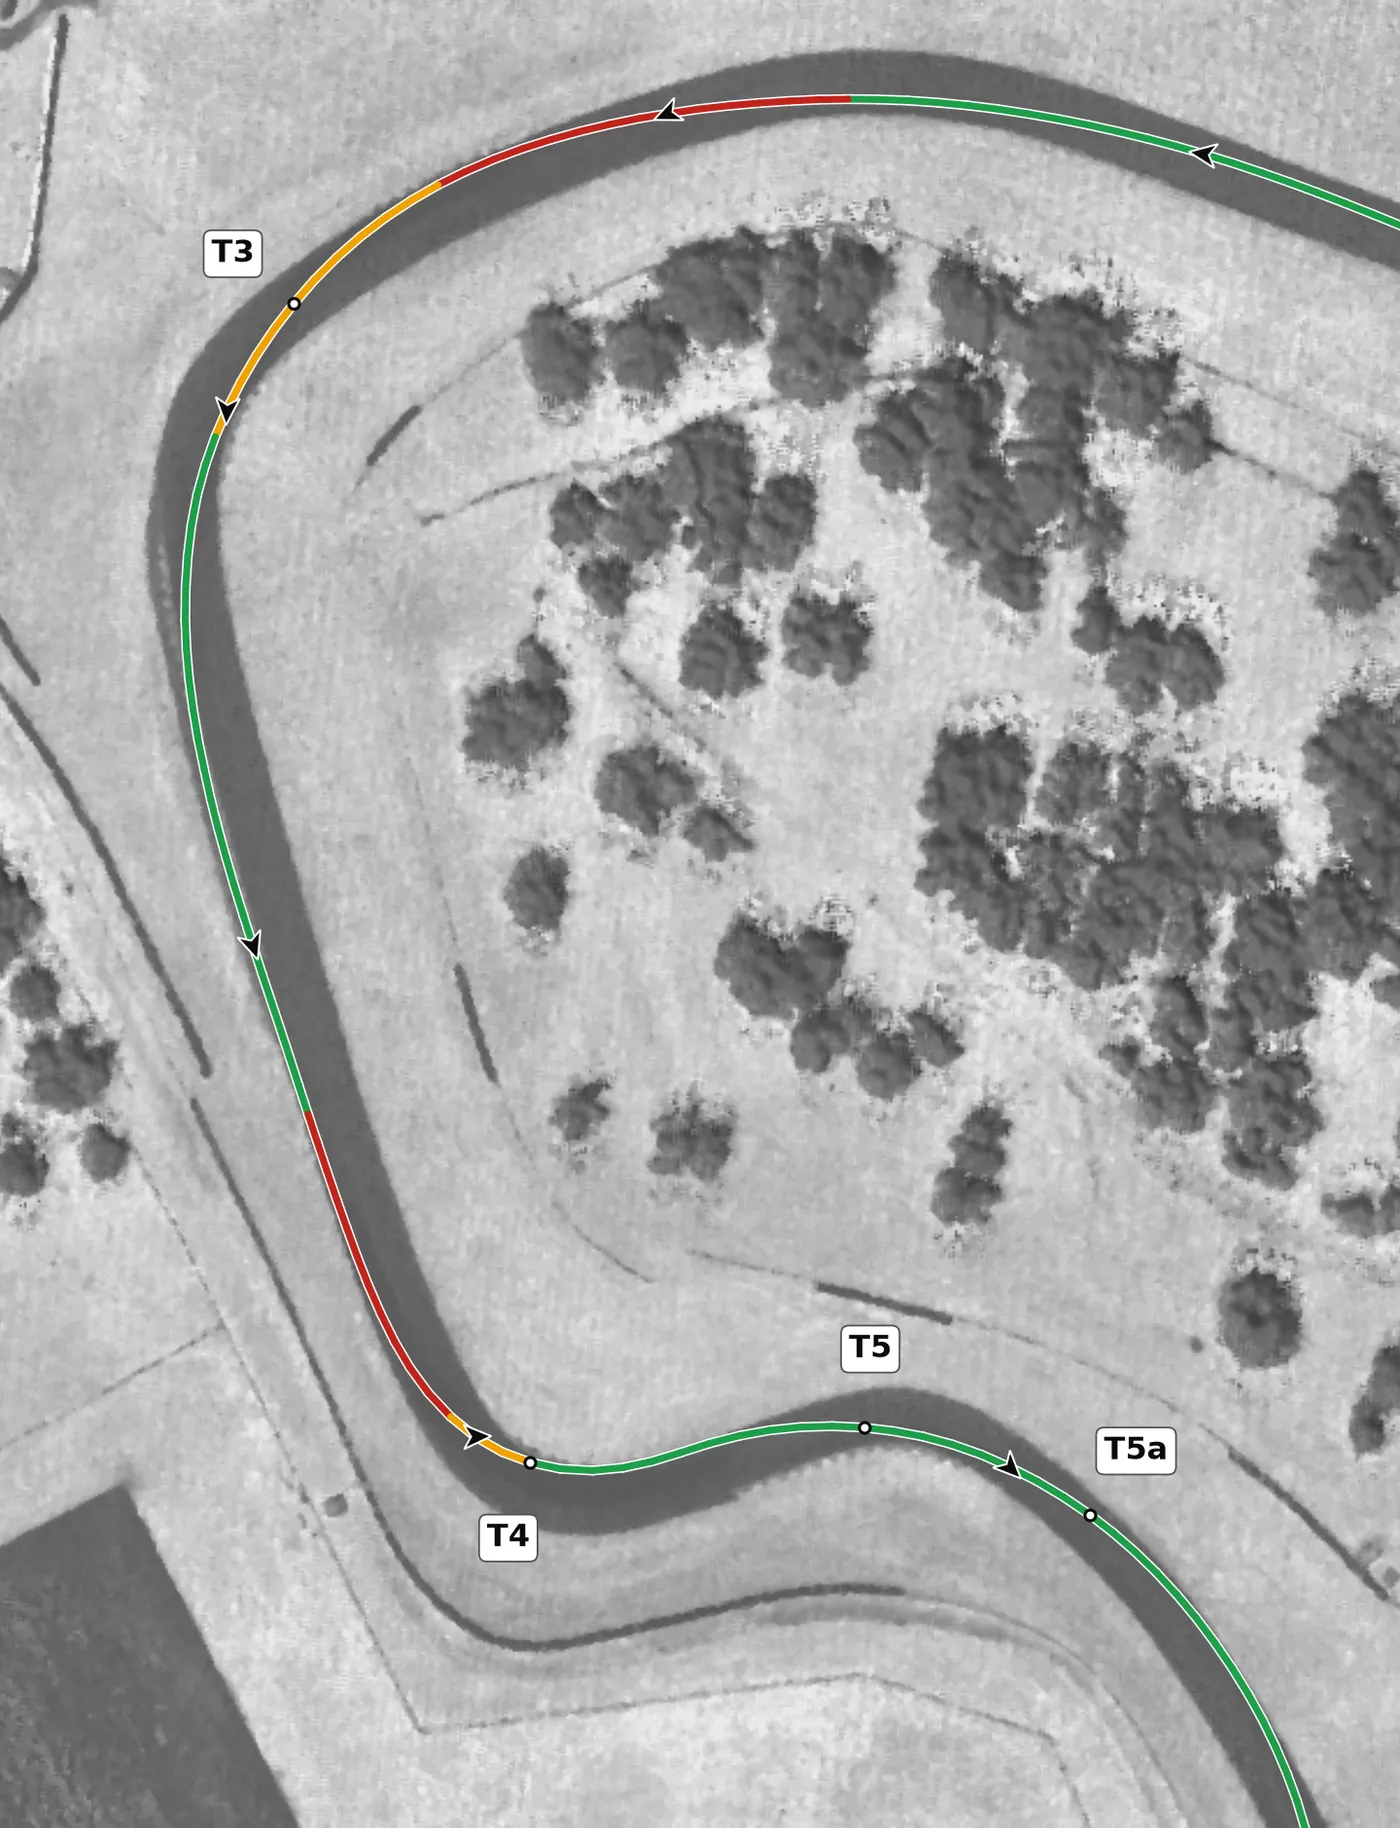
T4 is a slower, banked left whose real job is to set up the Snake that follows. Brake in a straight line, take a slower, tighter line than usual and keep the car near the left side on the exit instead of running all the way out, so you arrive in position for T5's right-hander. The mistake to avoid is carrying too much speed and tracking wide, which ruins the line through the next three corners.
From the survey: Banked +3.4% at the apex.
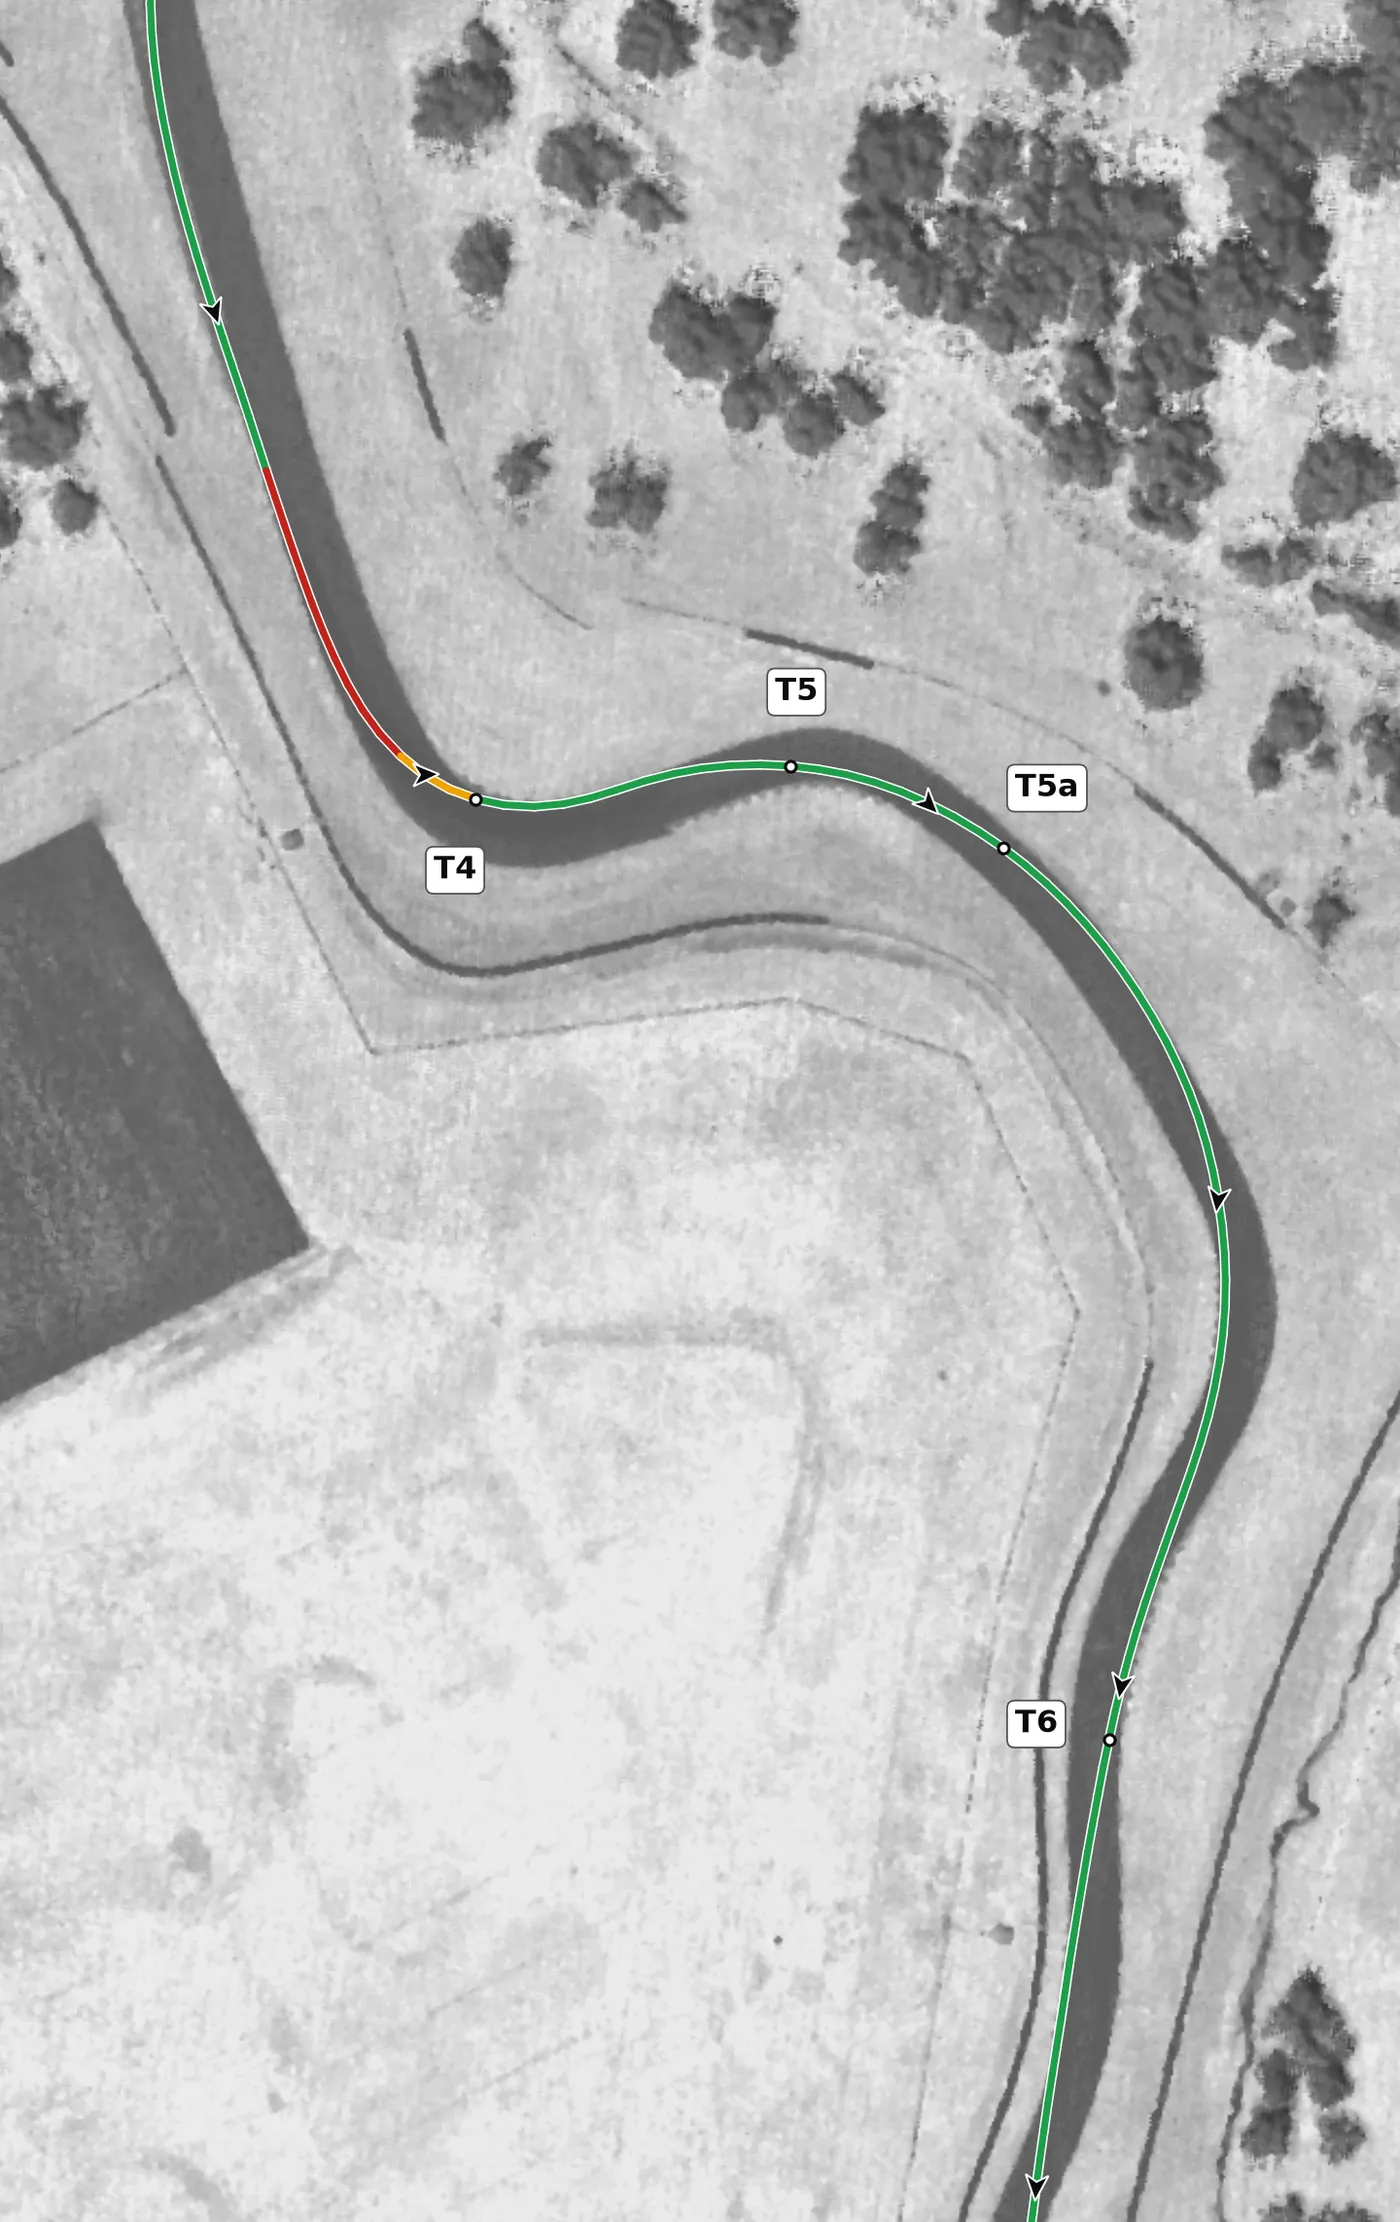
T5 and T5a are one long right whose radius steadily opens, so turn in from the left side, find the first apex and squeeze on throttle as the corner straightens. Get the car pointed early here so you can stay on the power through T6 and T6a. The mistake to avoid is treating T5 and T5a as two separate corners with a lift between them: one smooth arc is faster and calmer.
From the survey: One right-hander with two numbers. The split is a curvature saddle, not a marker.
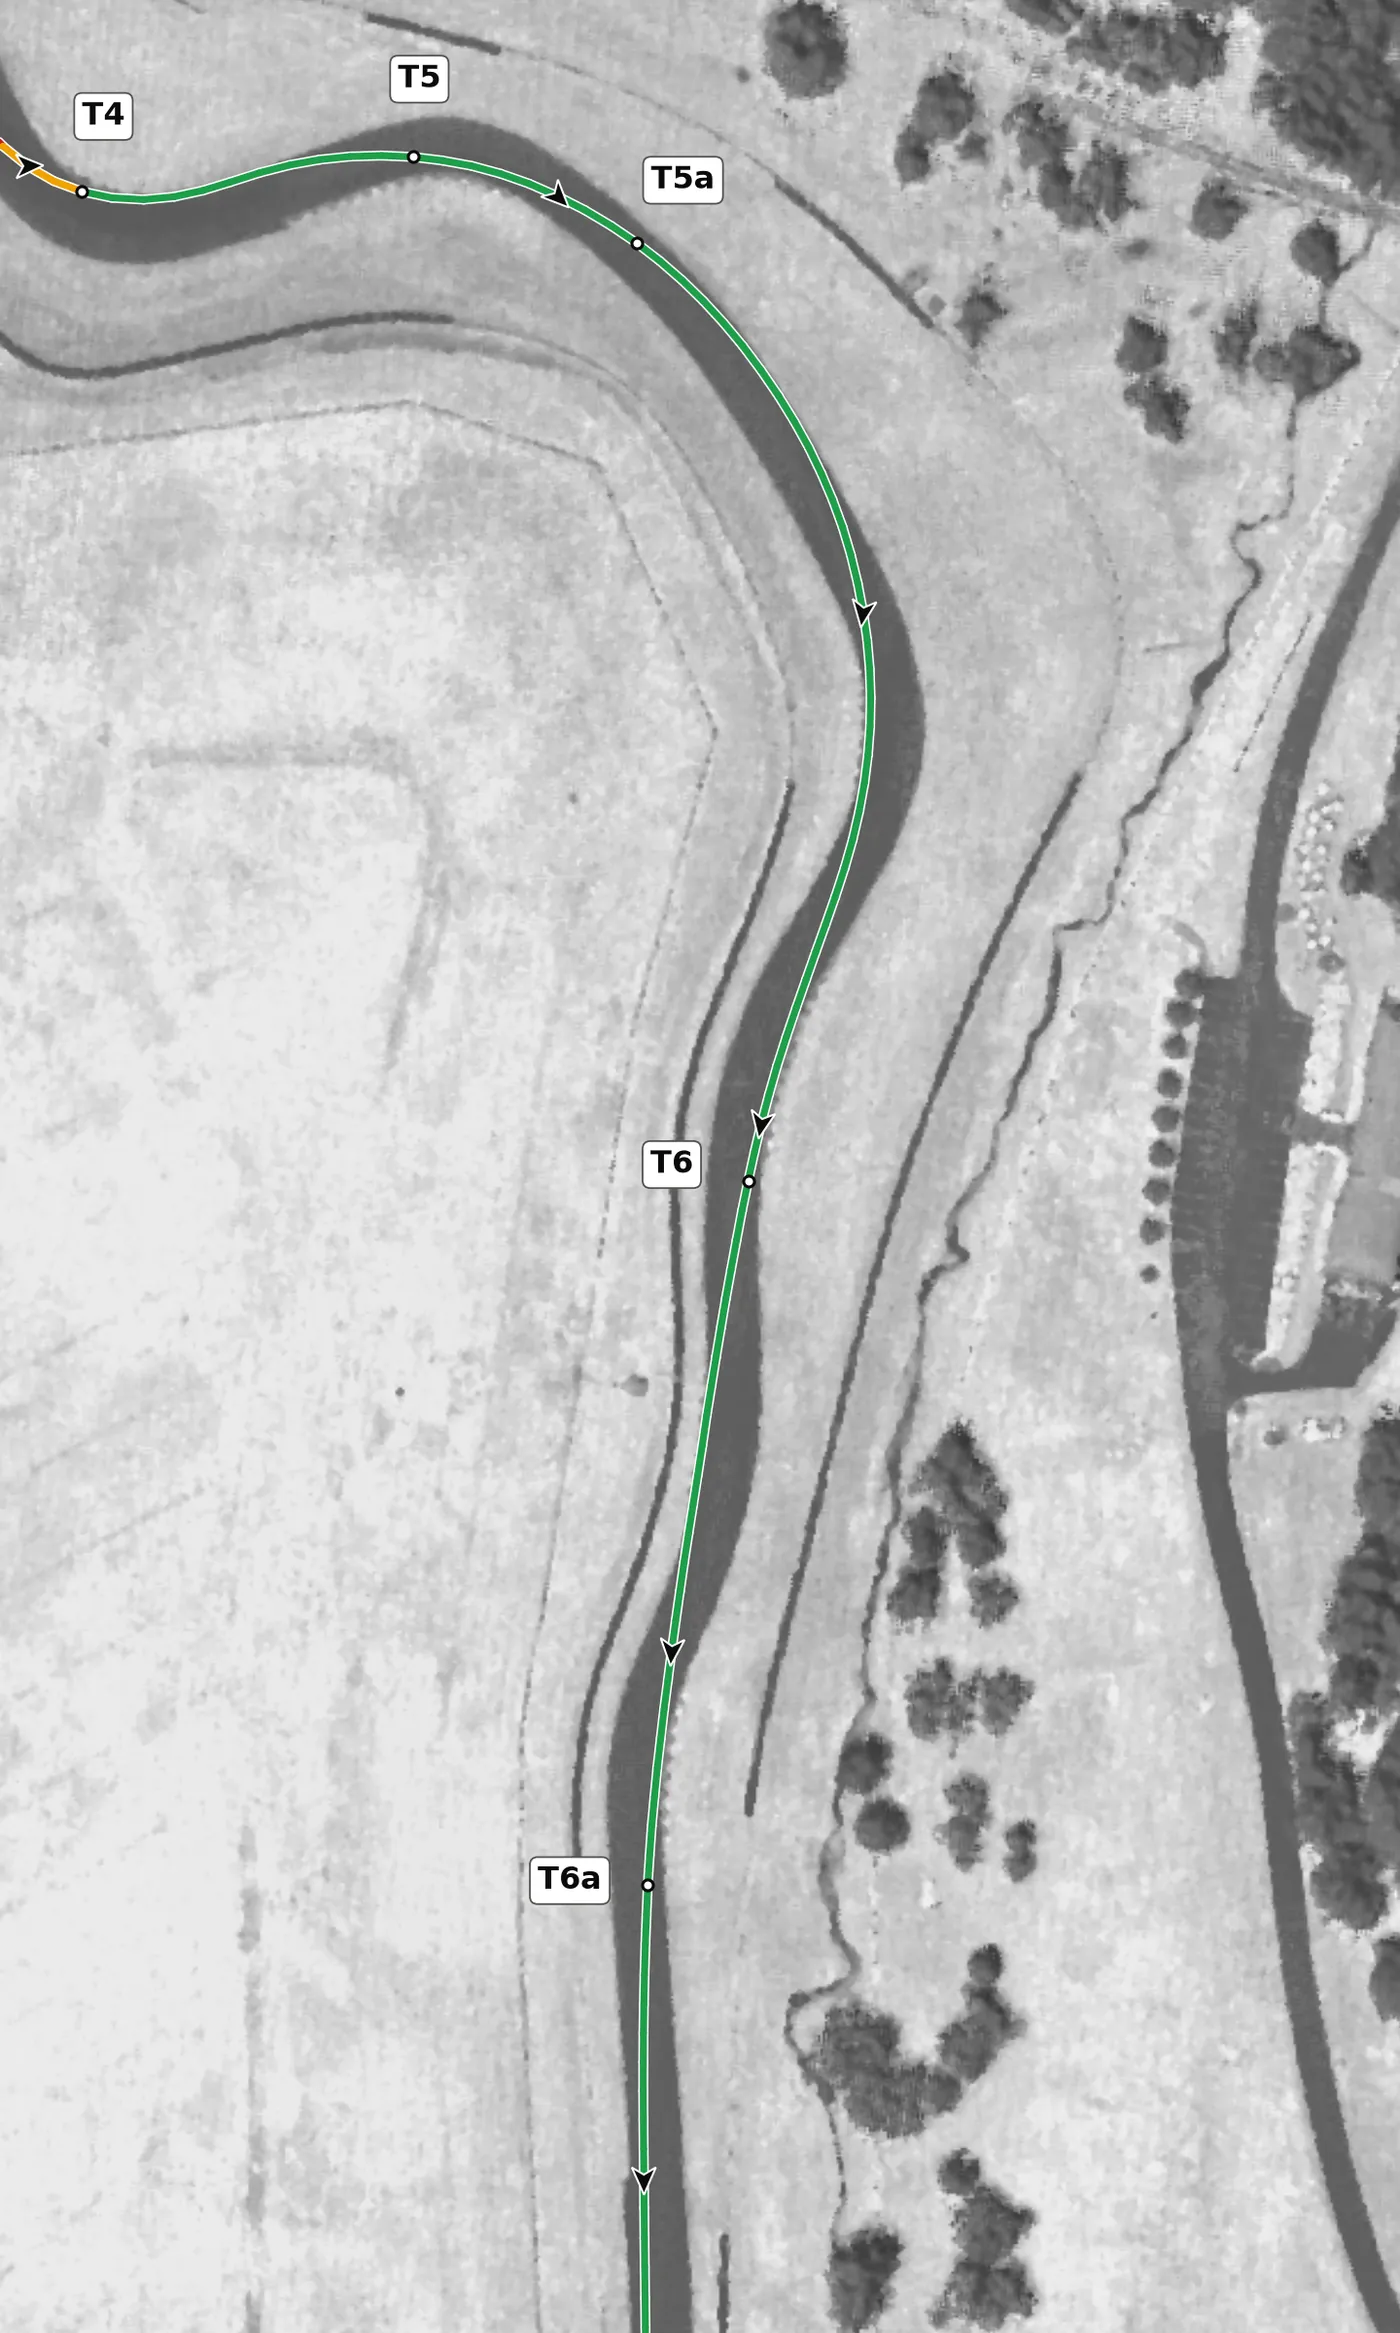
T6 is a quick, banked left that comes straight off T5a, so your placement out of the right-hander decides how much throttle you can use here. Keep your steering smooth and stay on steady power, using the whole road without a sudden correction. The mistake to avoid is a lift mid-corner, which shifts weight forward and makes the car wander toward the right edge.
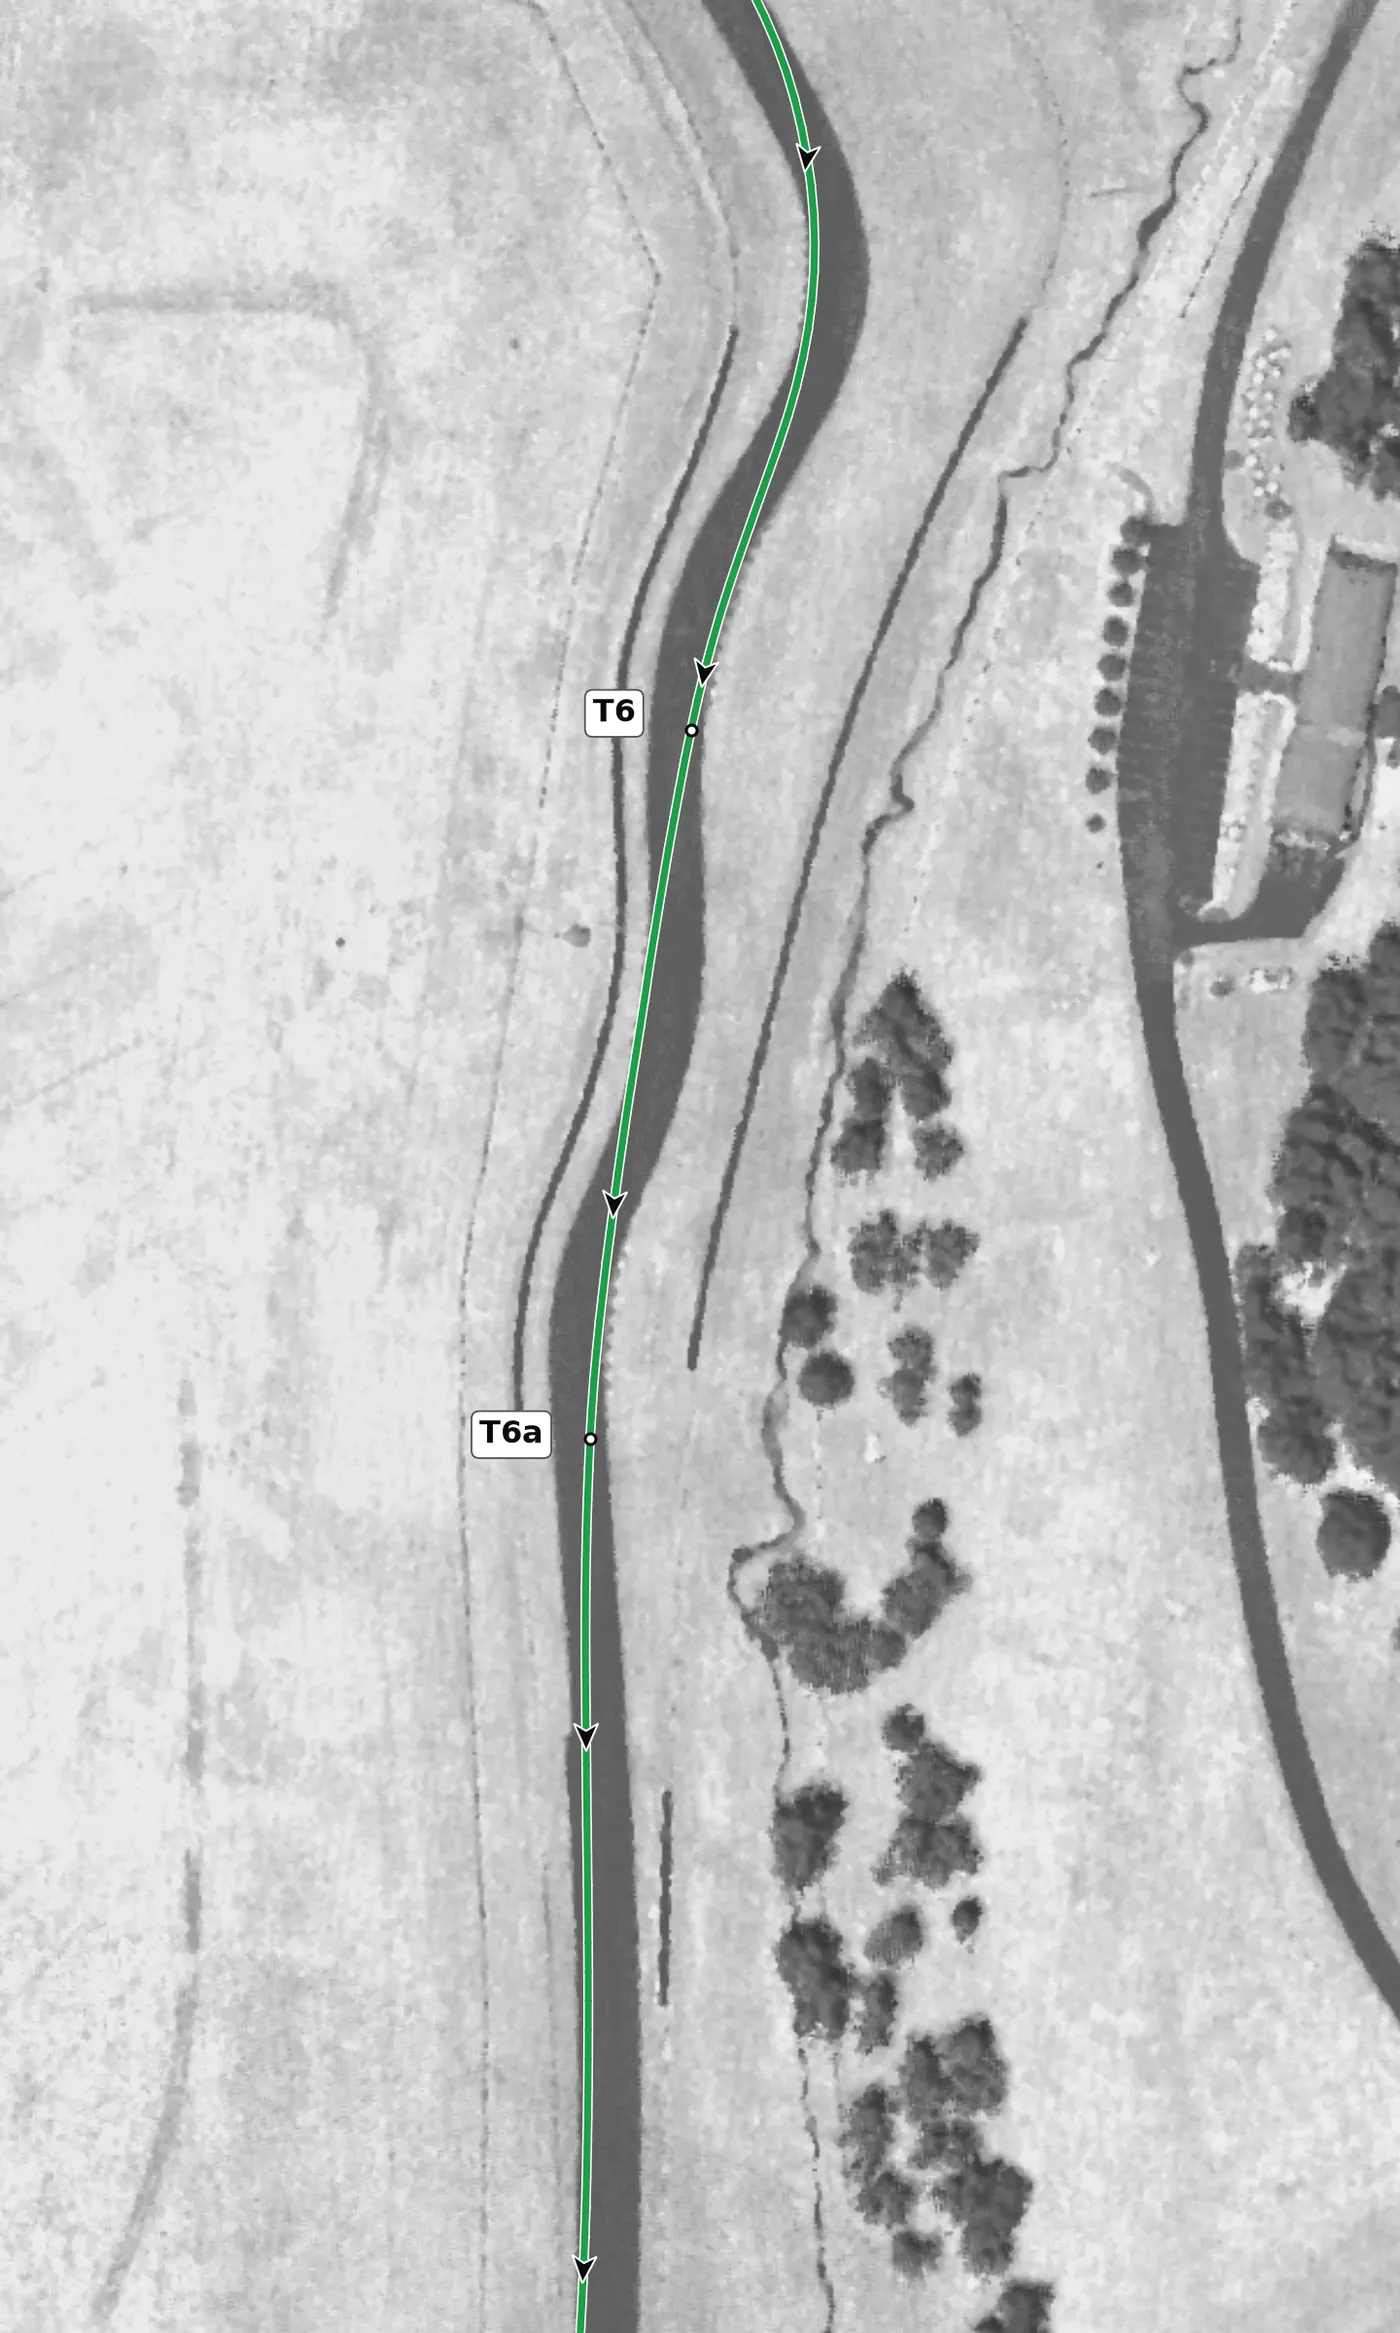
T6a is the last left of the sequence and is banked all the way through, so commit to a smooth arc and track out toward the right as you straighten. A clean exit here carries straight up the hill toward the Climbing Esses. The mistake to avoid is pinching the exit, because every bit of speed you lose here is lost all the way to the esses.
From the survey: Banked all the way through (+1.9% to +3.7%).
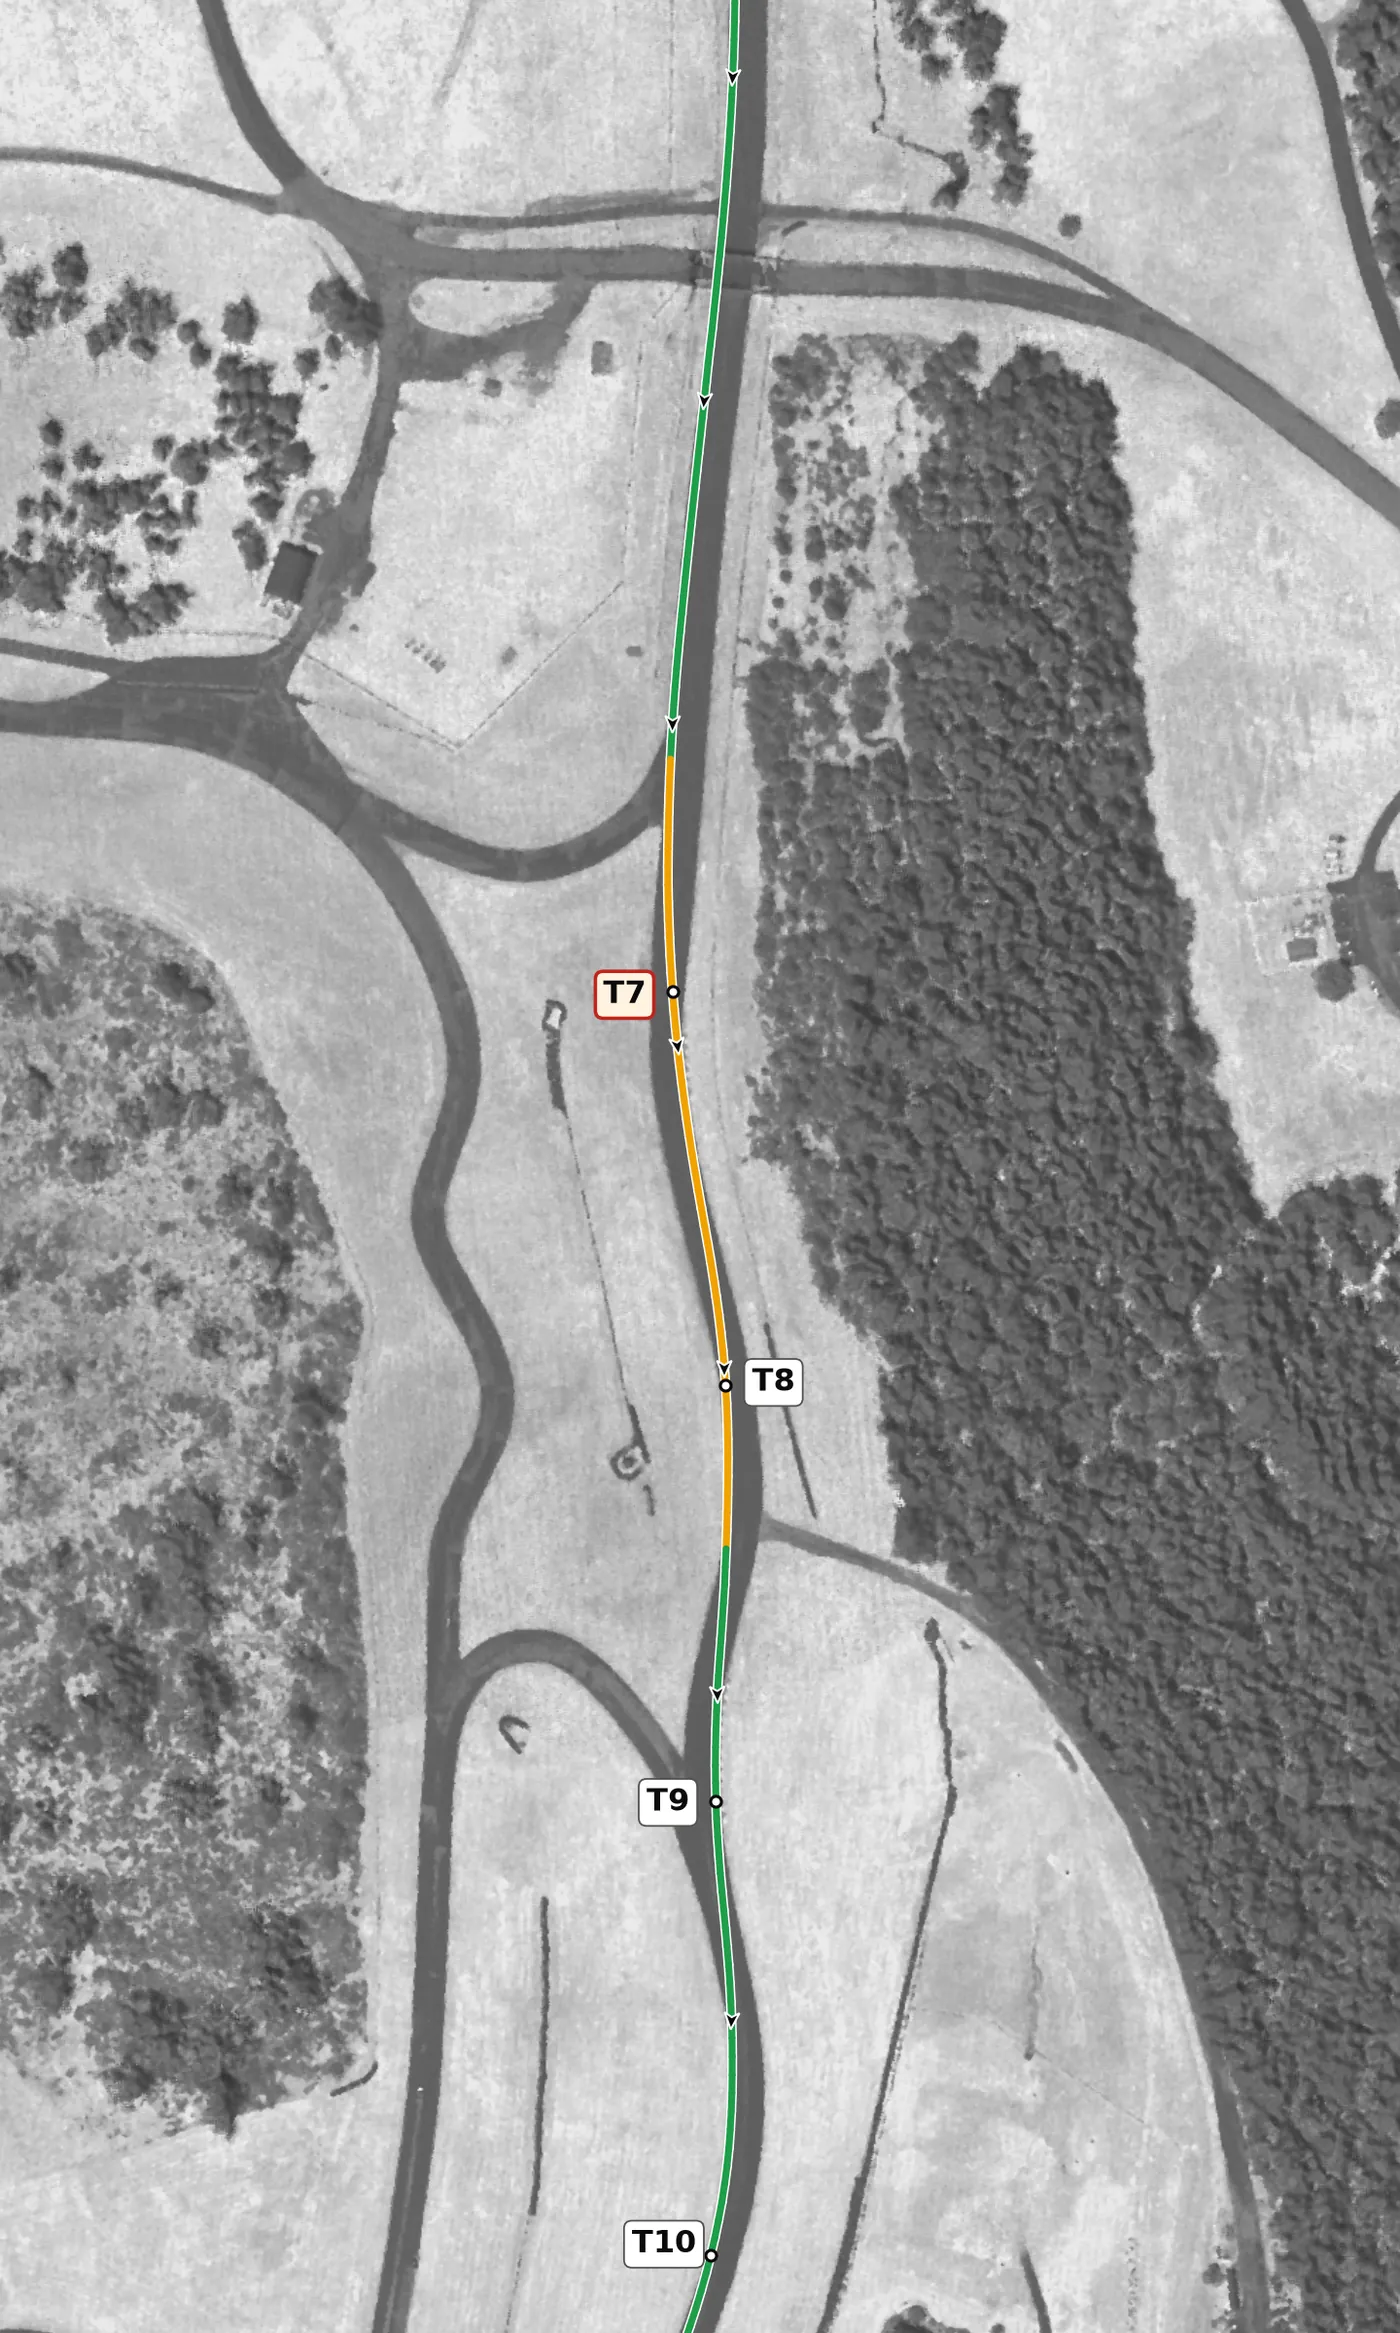
Brake or lift in a straight line before T7, the uphill left, then link T7, T8 and T9 into one smooth, flowing line with small steering inputs. T7's apex is slightly off camber and the car goes light just after T8, so keep the car straight and settled over those spots and start with a late apex in each part until you have built up to it. The mistake to avoid is turning harder or braking while the car is light: build speed here over several laps, never in one jump.
From the survey: T7 is the only off-camber apex at VIR (−0.76%), taken at 116 mph. The car goes lightest (−0.30 g) just after T8.
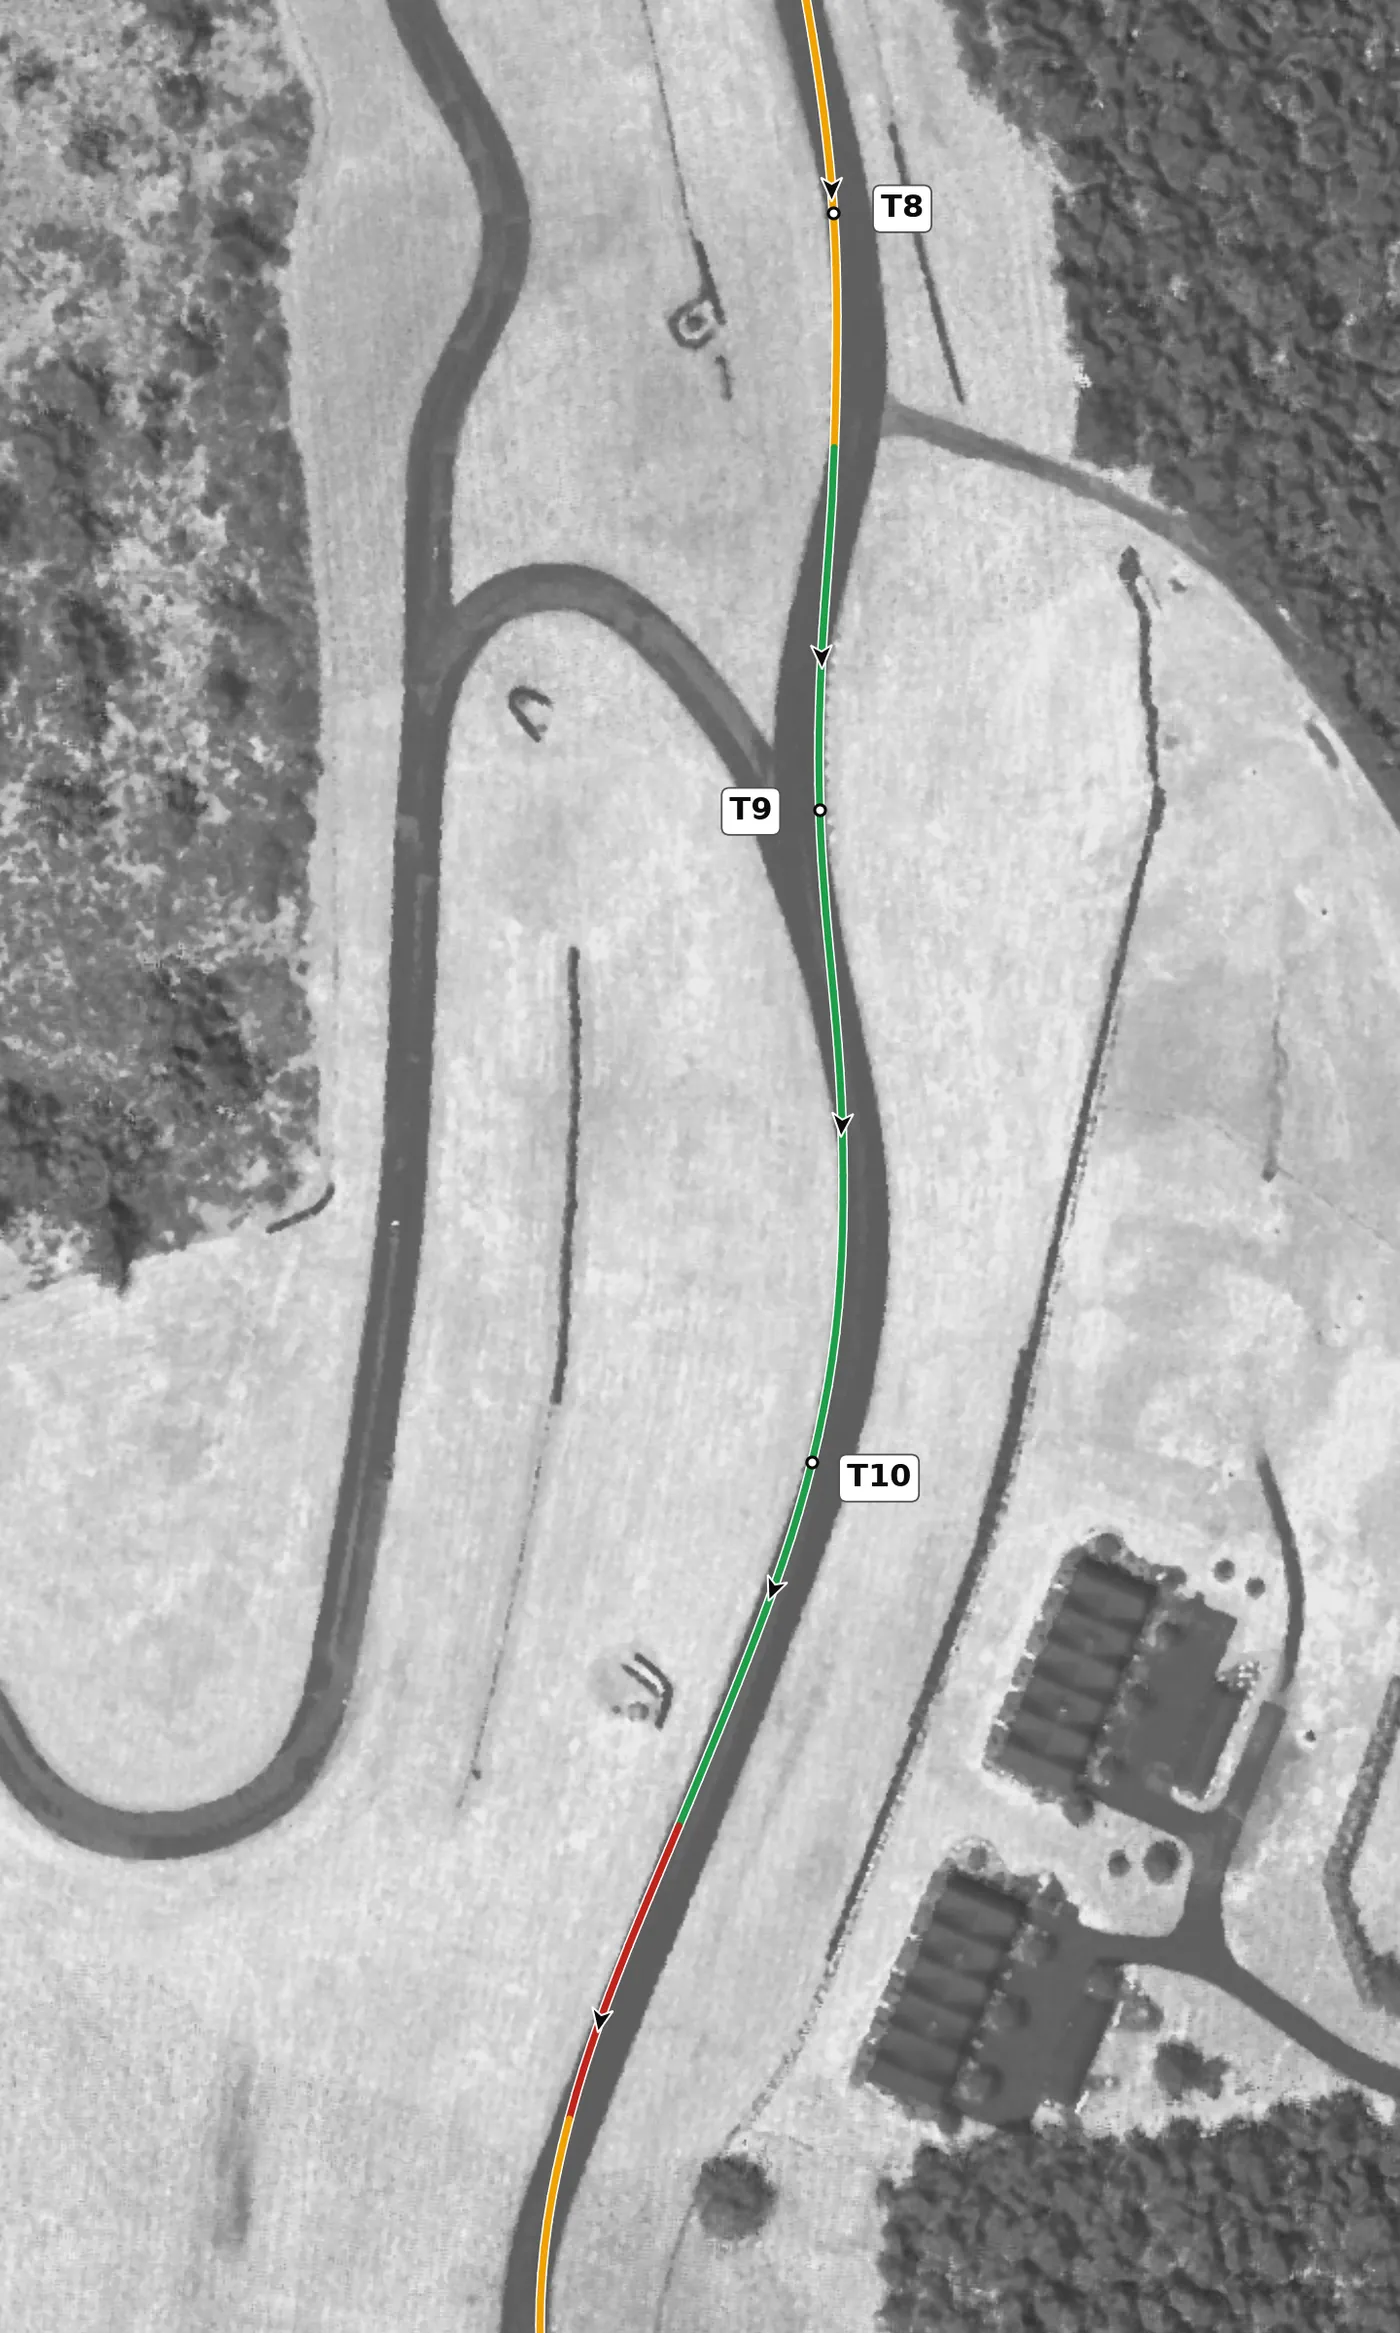
T10 is a right that climbs steeply, so stay on the throttle through it and let the car drift toward the middle of the road on the exit. Once it straightens, ease back to the right side and do your braking for T11 in a straight line. The mistake to avoid is straightening early and running out of line; if you find yourself going straight too soon, you have room to use more throttle through T10.
From the survey: The steepest climbing corner: +4.8 m from entry to apex, and −0.30 g as the car unloads.
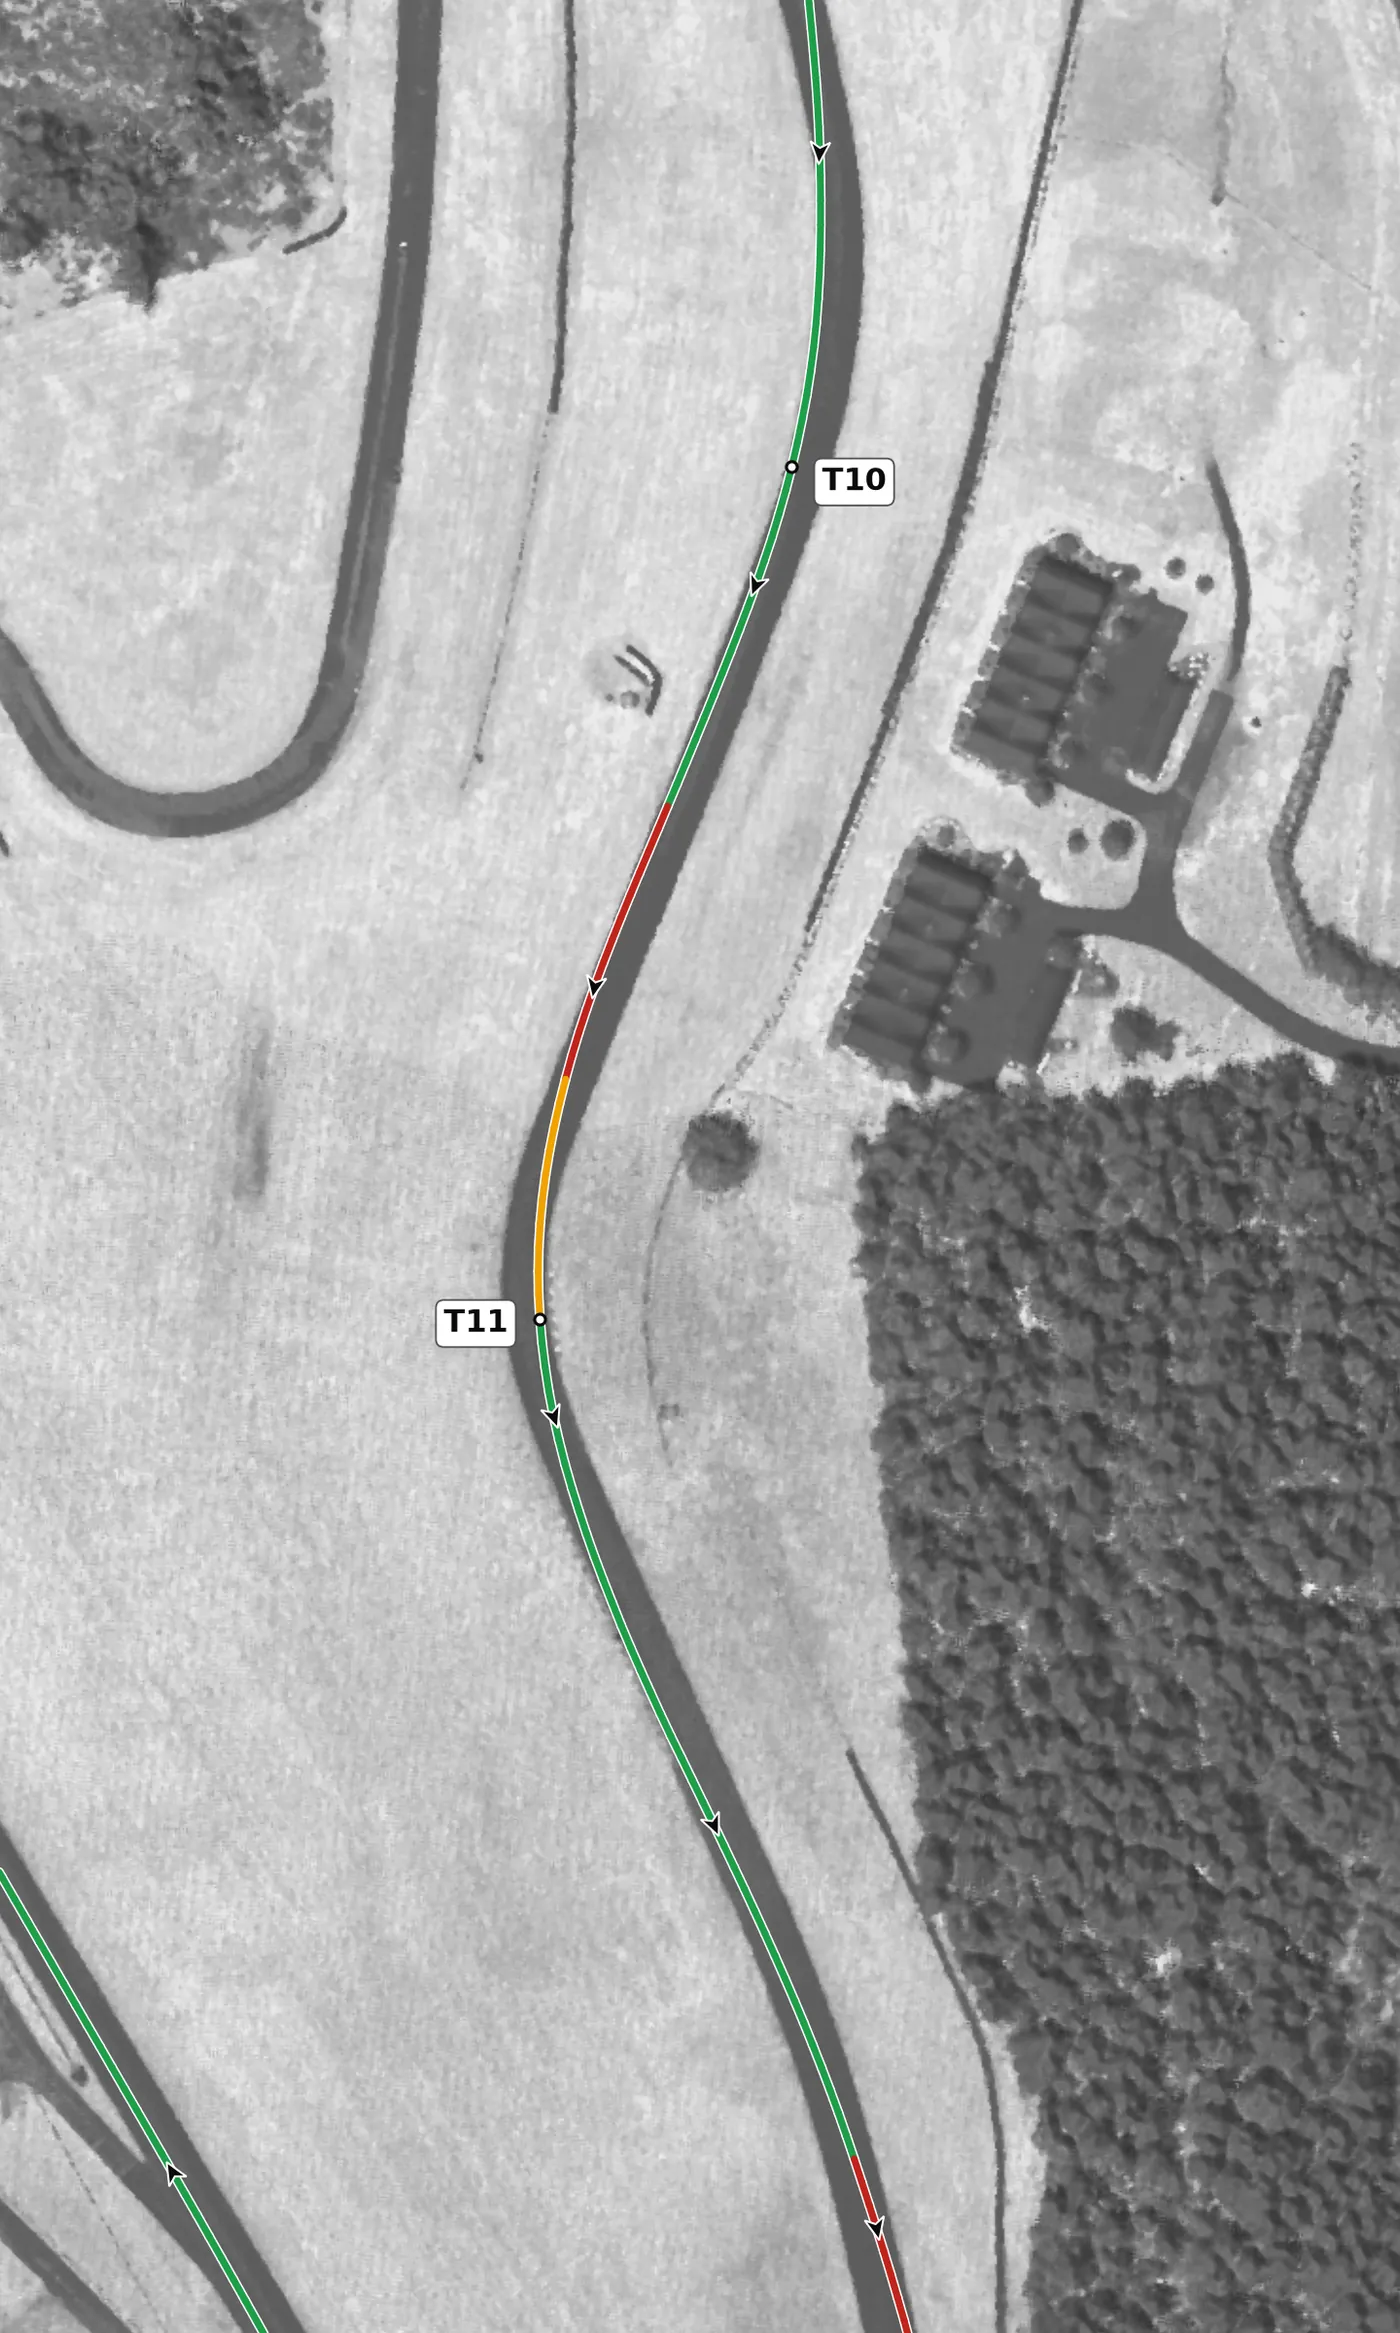
This is a left over a crest with a blind apex and exit, and the road drops away beyond it. Finish your braking in a straight line before you turn in, aim for an early-to-middle apex and keep the car settled over the top, because the car goes light and the camber falls away inside the corner. The mistake to avoid is arriving fast and turning while still braking over the blind crest; build up gradually here.
From the survey: South Bend: a crest just after the apex (−0.28 g), and the camber reaches −2.7% in the corner.
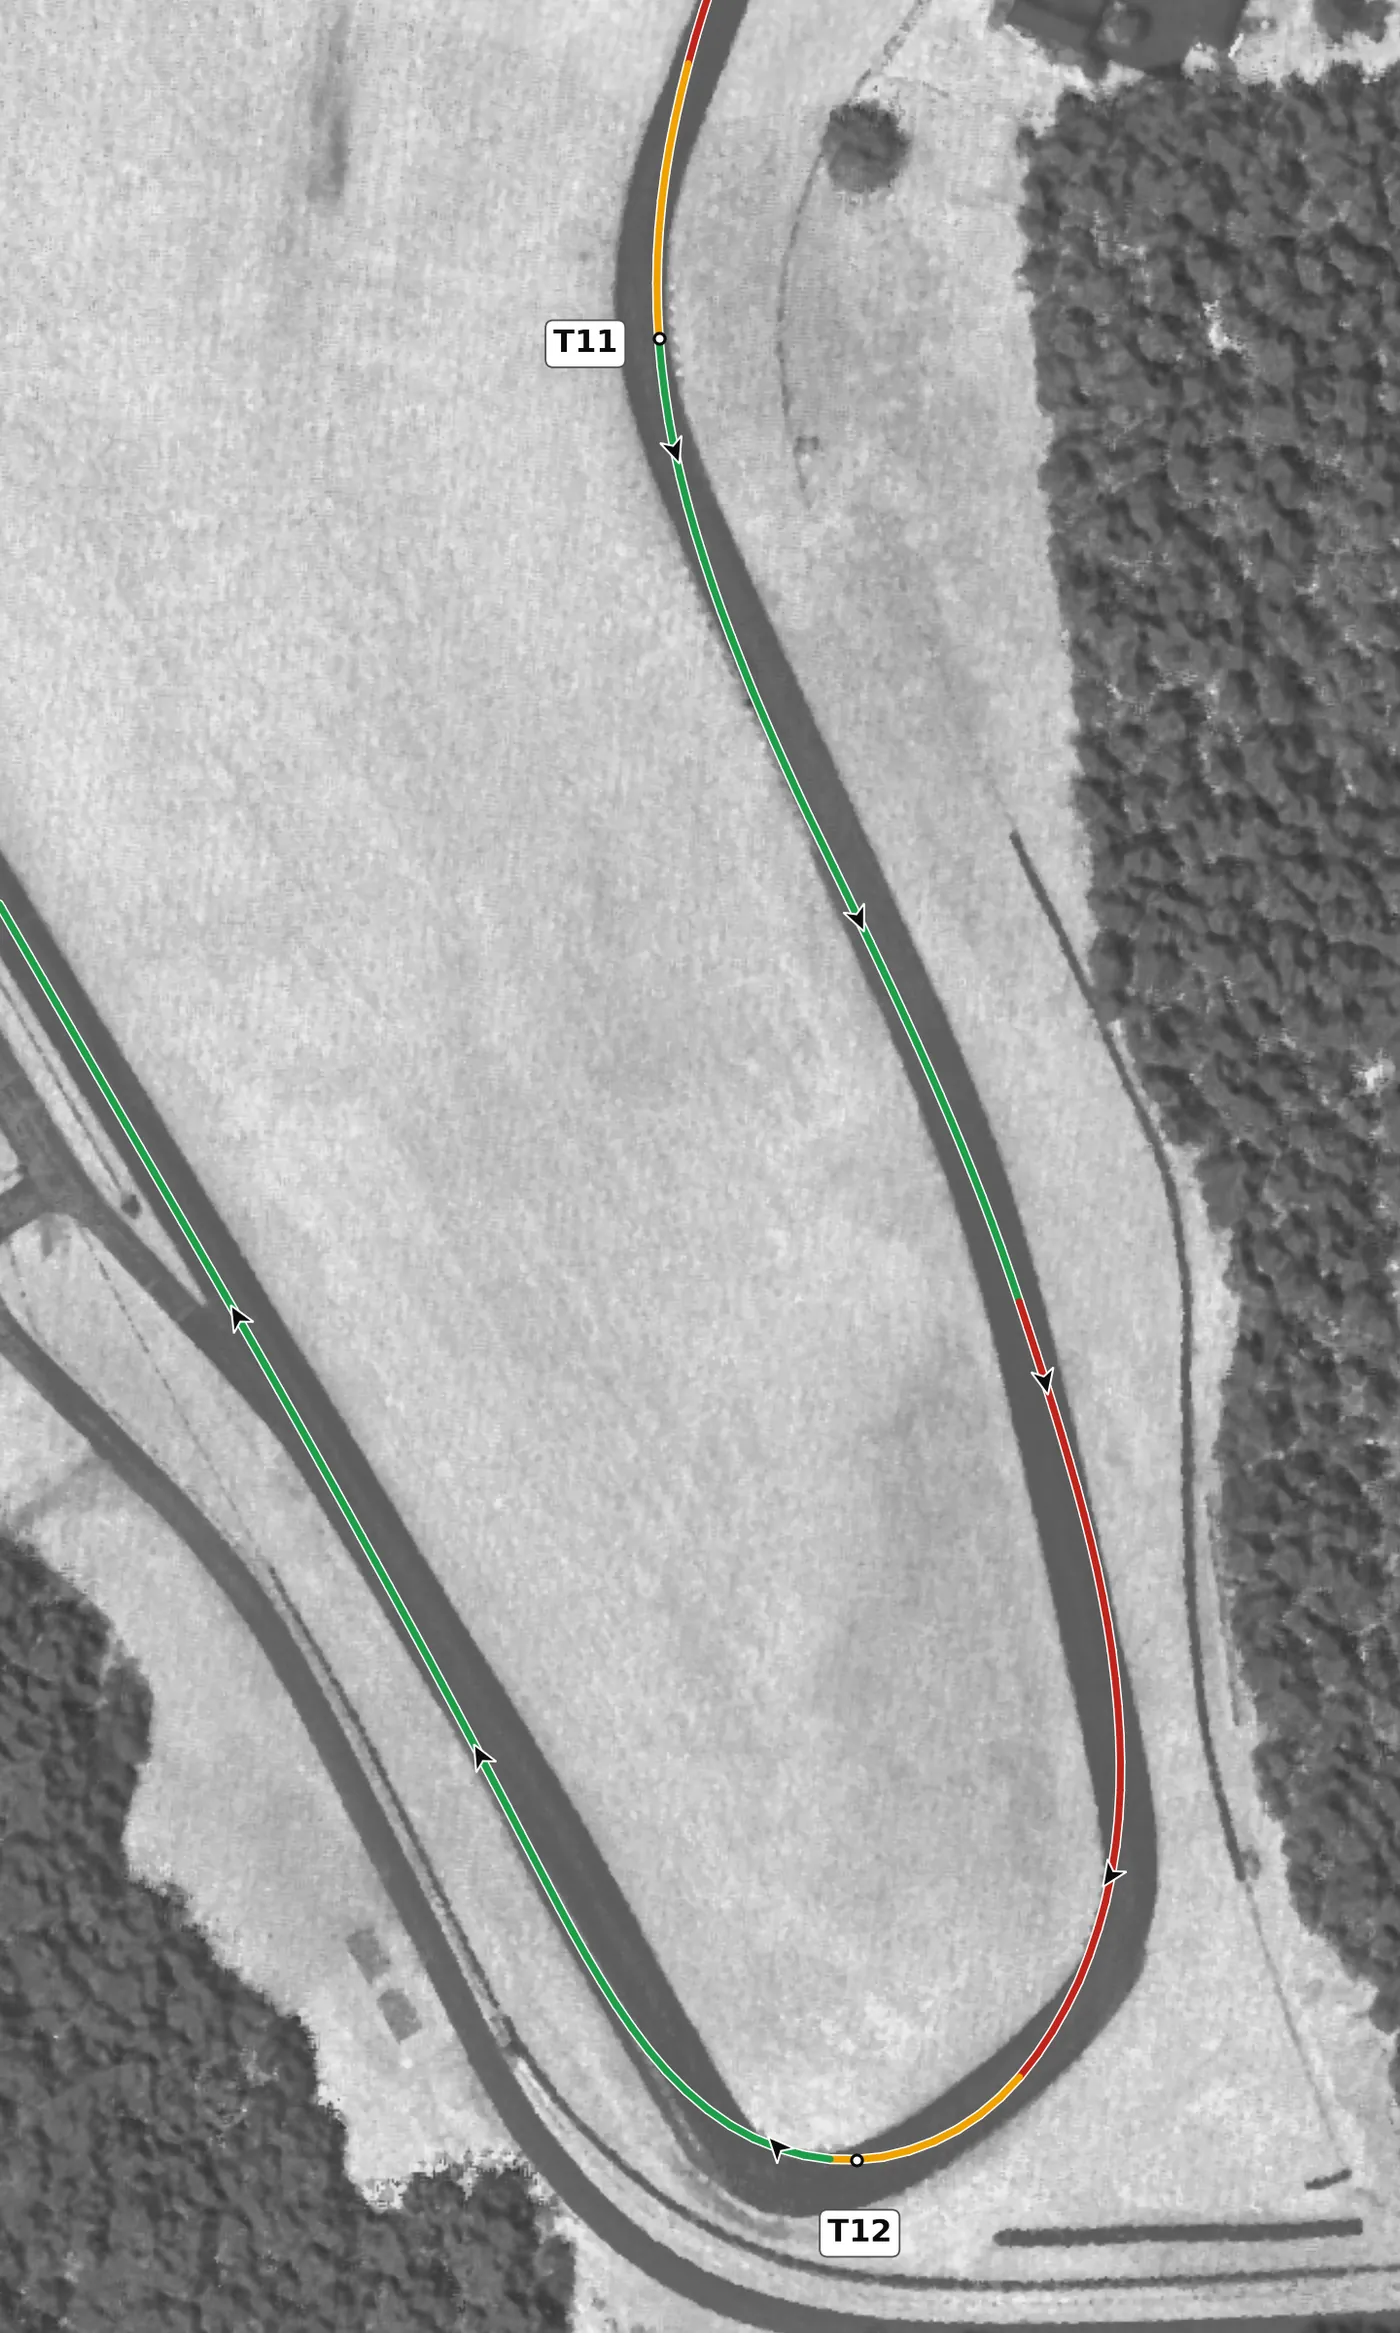
Oak Tree is a long right that leads onto the very long back straight, which makes it the most important exit on the lap. You brake through a compression with an off-camber turn-in, so finish most of the braking straight, be patient, take a late apex on the banked part and then use all the road out to the left as you open the throttle. The mistake to avoid is charging the entry: a slower entry and an early, clean throttle beat a late brake every time.
From the survey: Oak Tree: the biggest compression on the lap (+0.49 g) is in the braking zone, and the turn-in is off camber (−1.9%) before a banked apex (+3.5%).
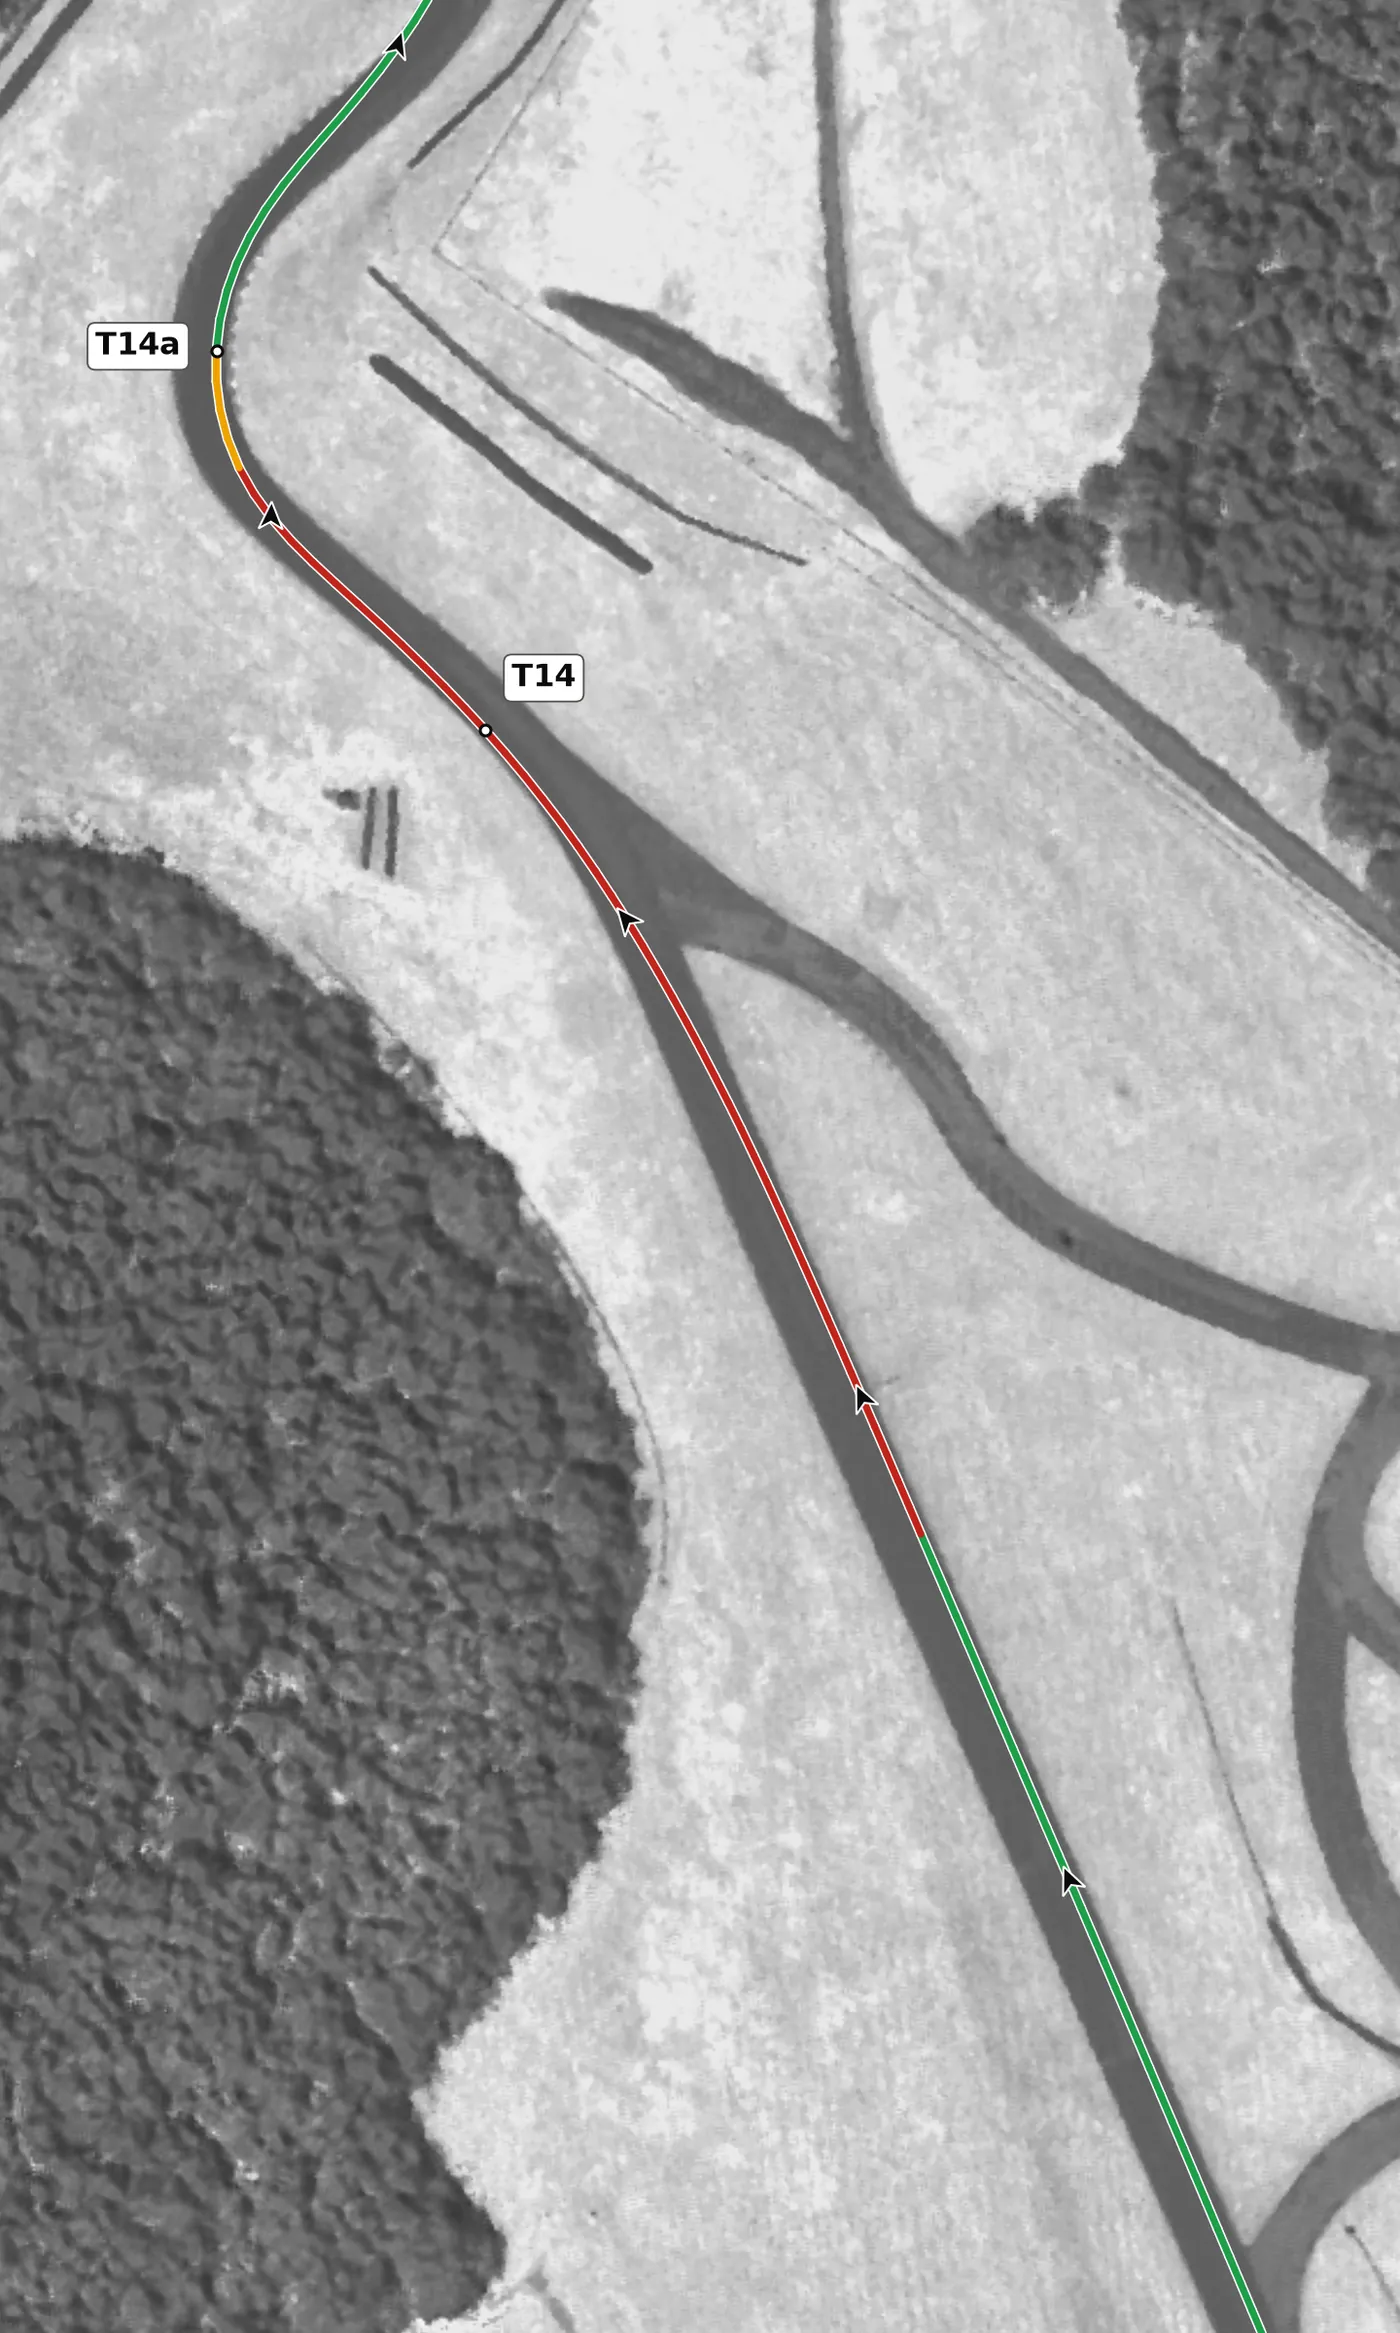
At the end of the back straight, brake in a straight line and keep braking up the hill toward this left; the uphill slope helps you stop. There is almost no camber at the apex and the brow of the Roller Coaster is just beyond it, so keep the car straight and settled as you go over the top before turning into T14a. The mistake to avoid is braking late and still turning hard when you reach the blind brow.
From the survey: Almost no cross-slope at the apex (−0.2%).
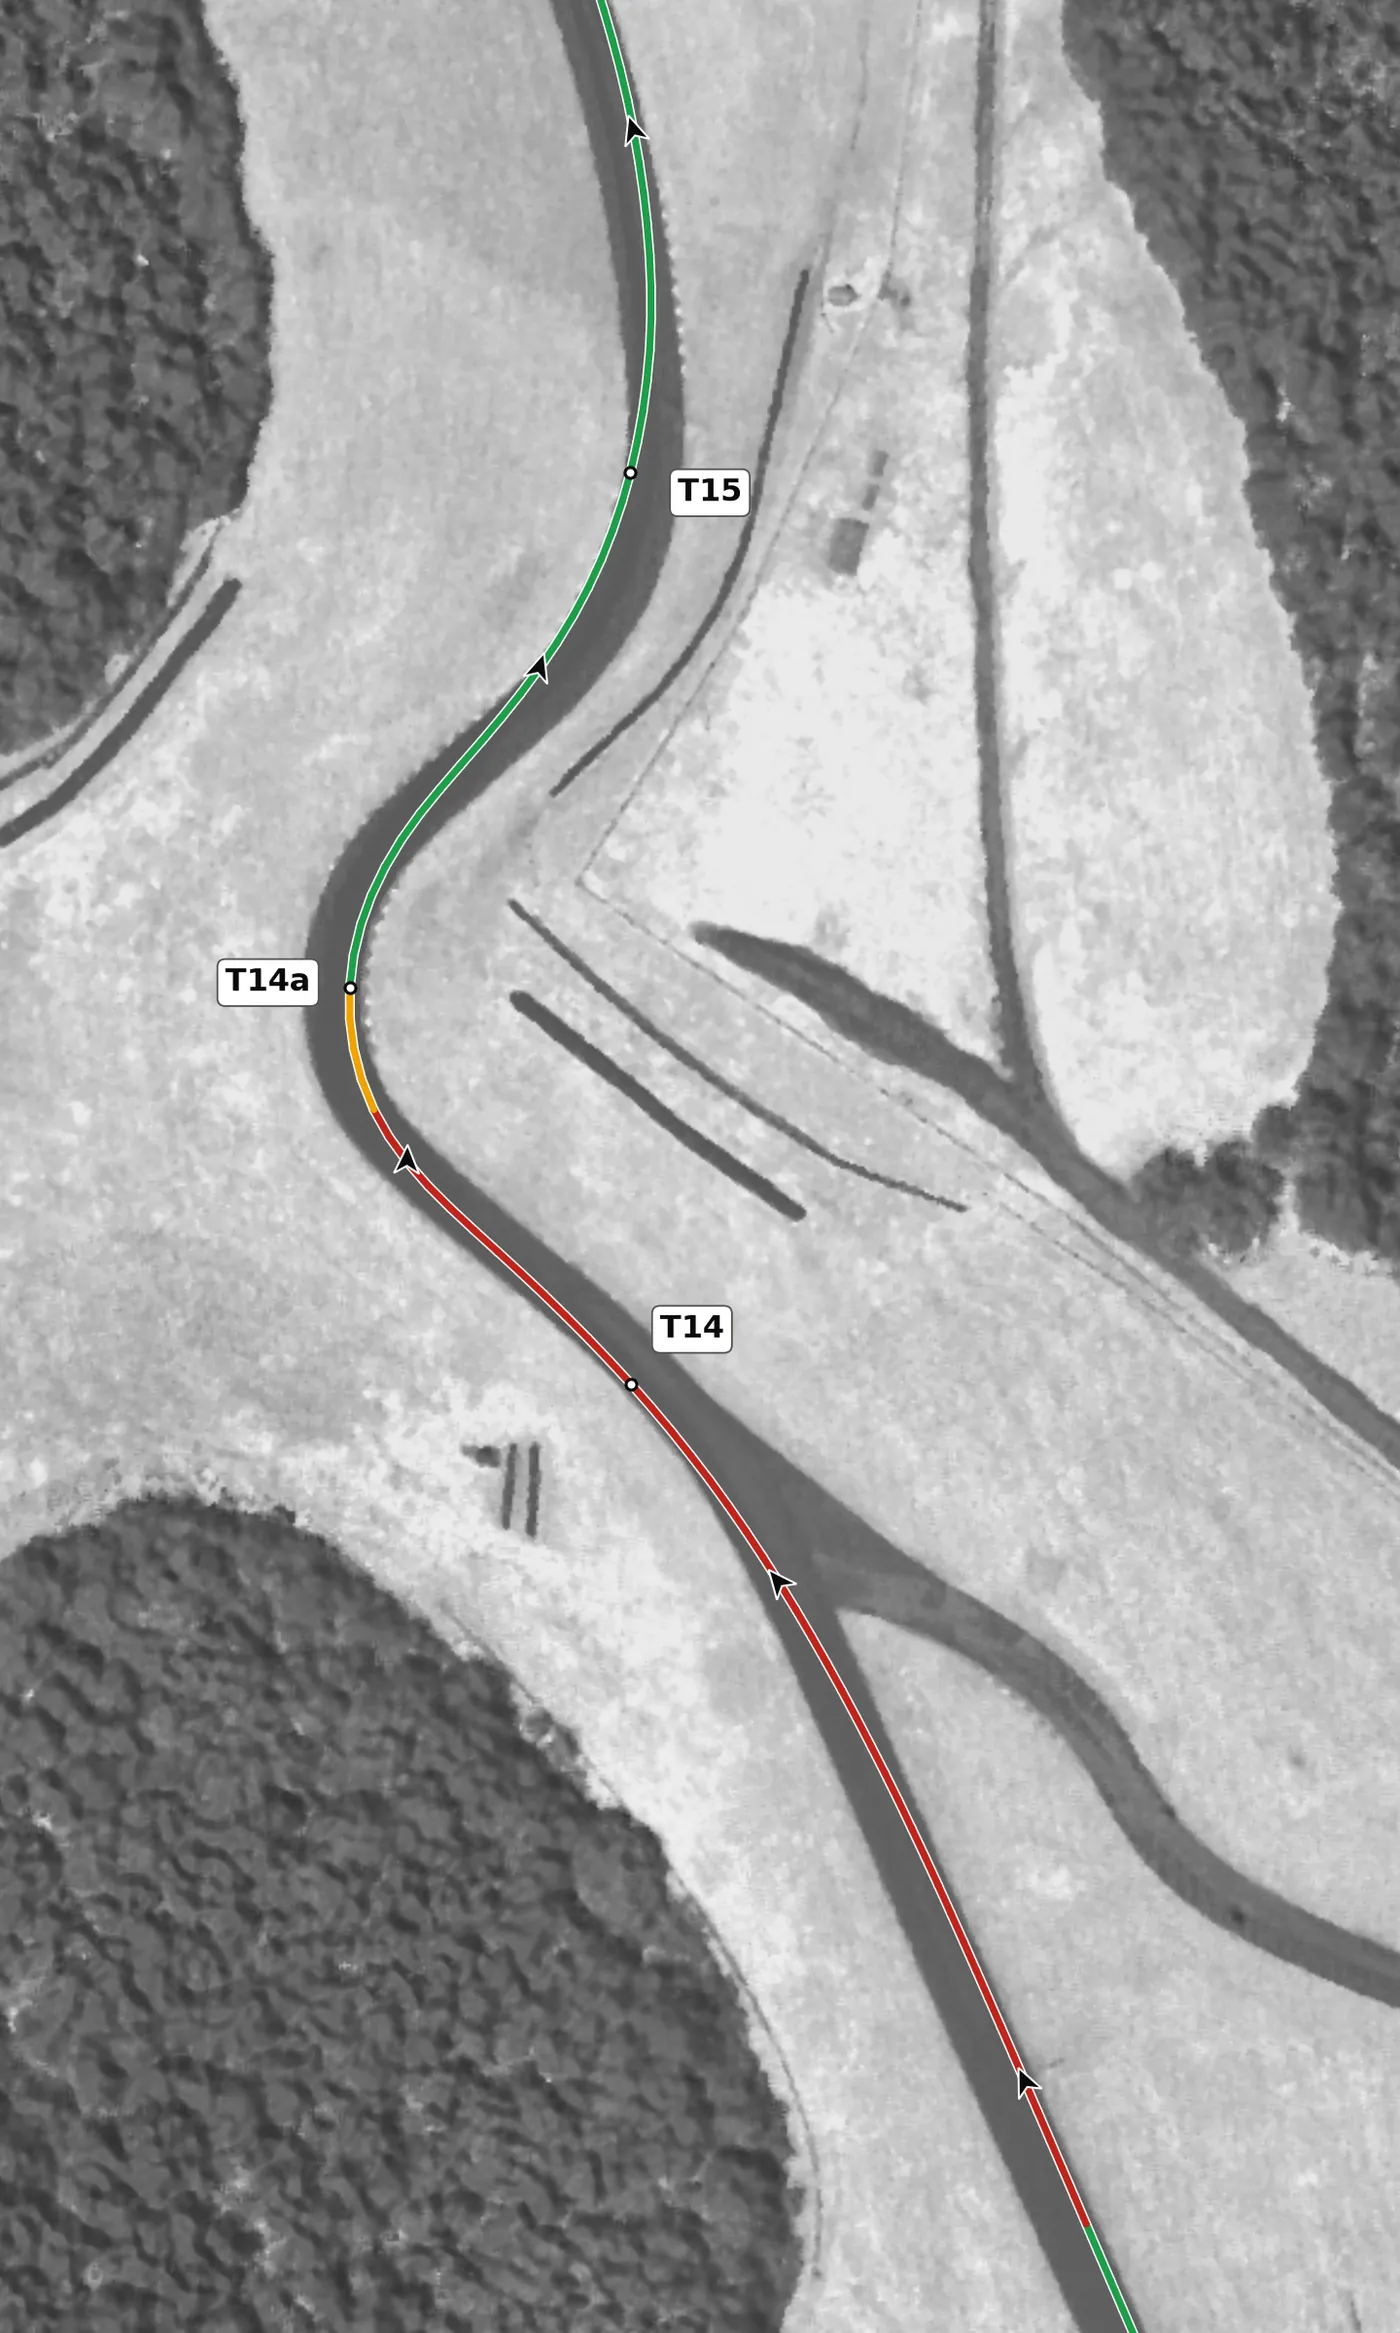
Over the brow, turn decisively into this right as the road falls away down the steepest drop at VIR, on light, steady throttle. The car is light at the top and then loads up as the slope levels, so keep your inputs gentle and don't let the car run all the way to the left edge, because you want to be near the middle for the next left. The mistake to avoid is turning in before you can see the apex over the brow.
From the survey: Over the brow, then the steepest descent at VIR (−11.6%).
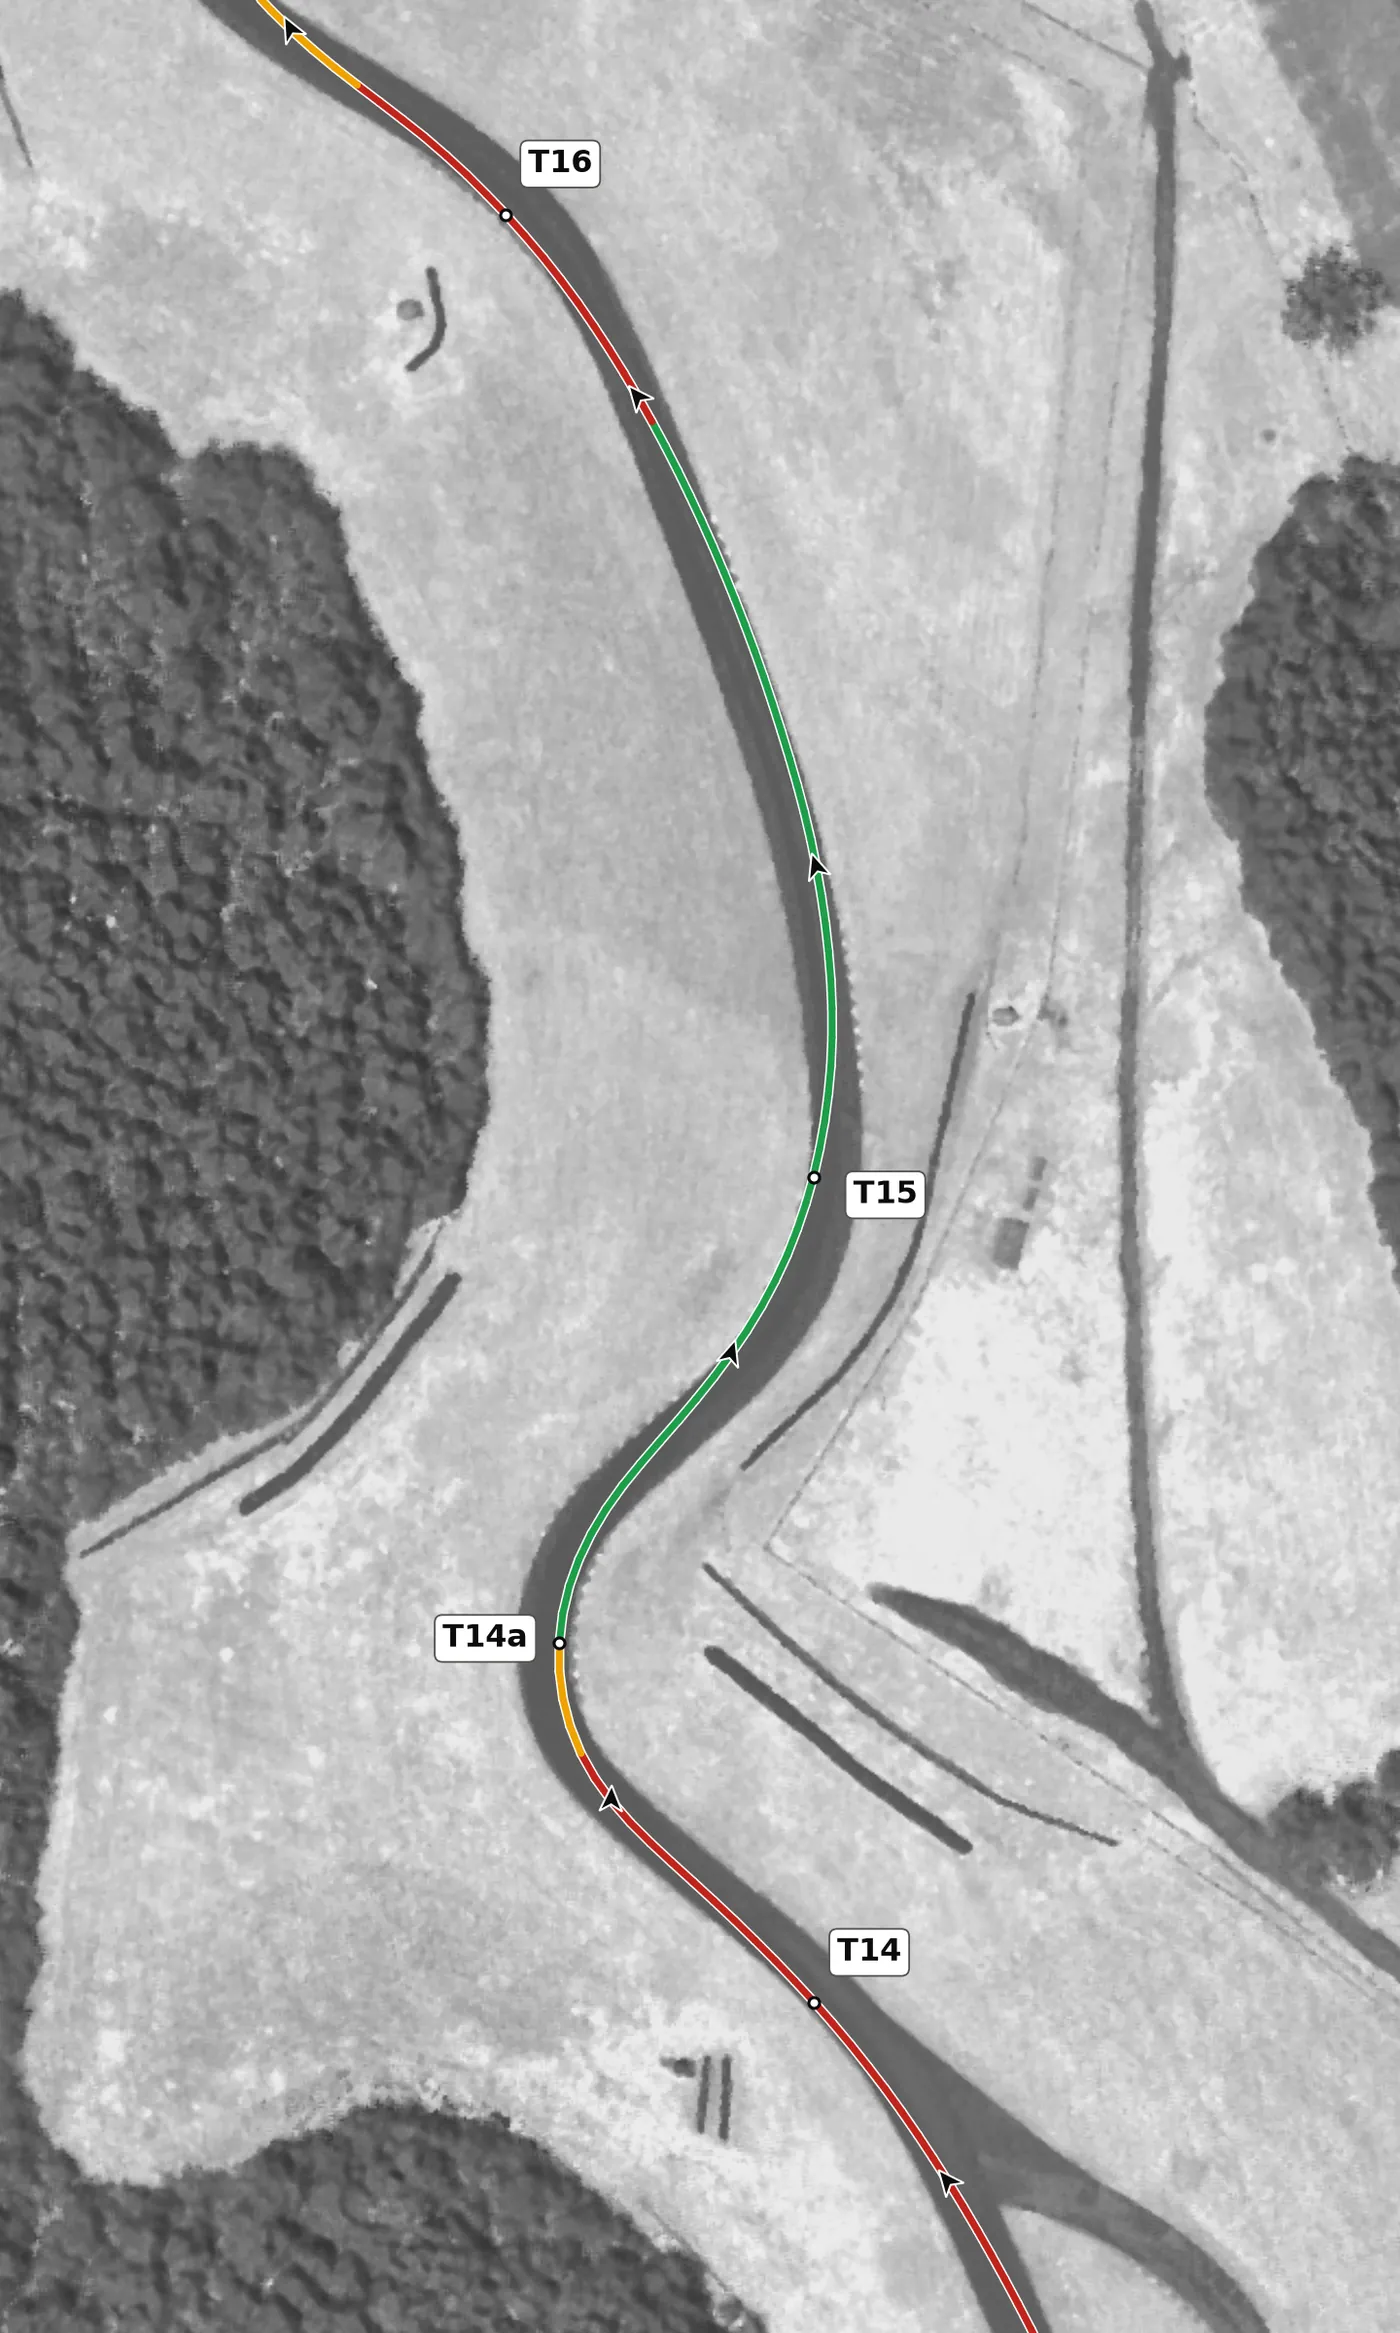
T15 is a downhill left that you take on the throttle, still accelerating from the Roller Coaster, with the most off-camber surface on the lap just after the apex. Keep the steering smooth, touch the apex late in the corner and let the car track out toward the right, adding more power only as the wheel straightens. The mistake to avoid is a big throttle or steering input while the car is on the off-camber part past the apex, which pushes it wide.
From the survey: Downhill, with the most off-camber point on the circuit (−2.8%) after the apex.
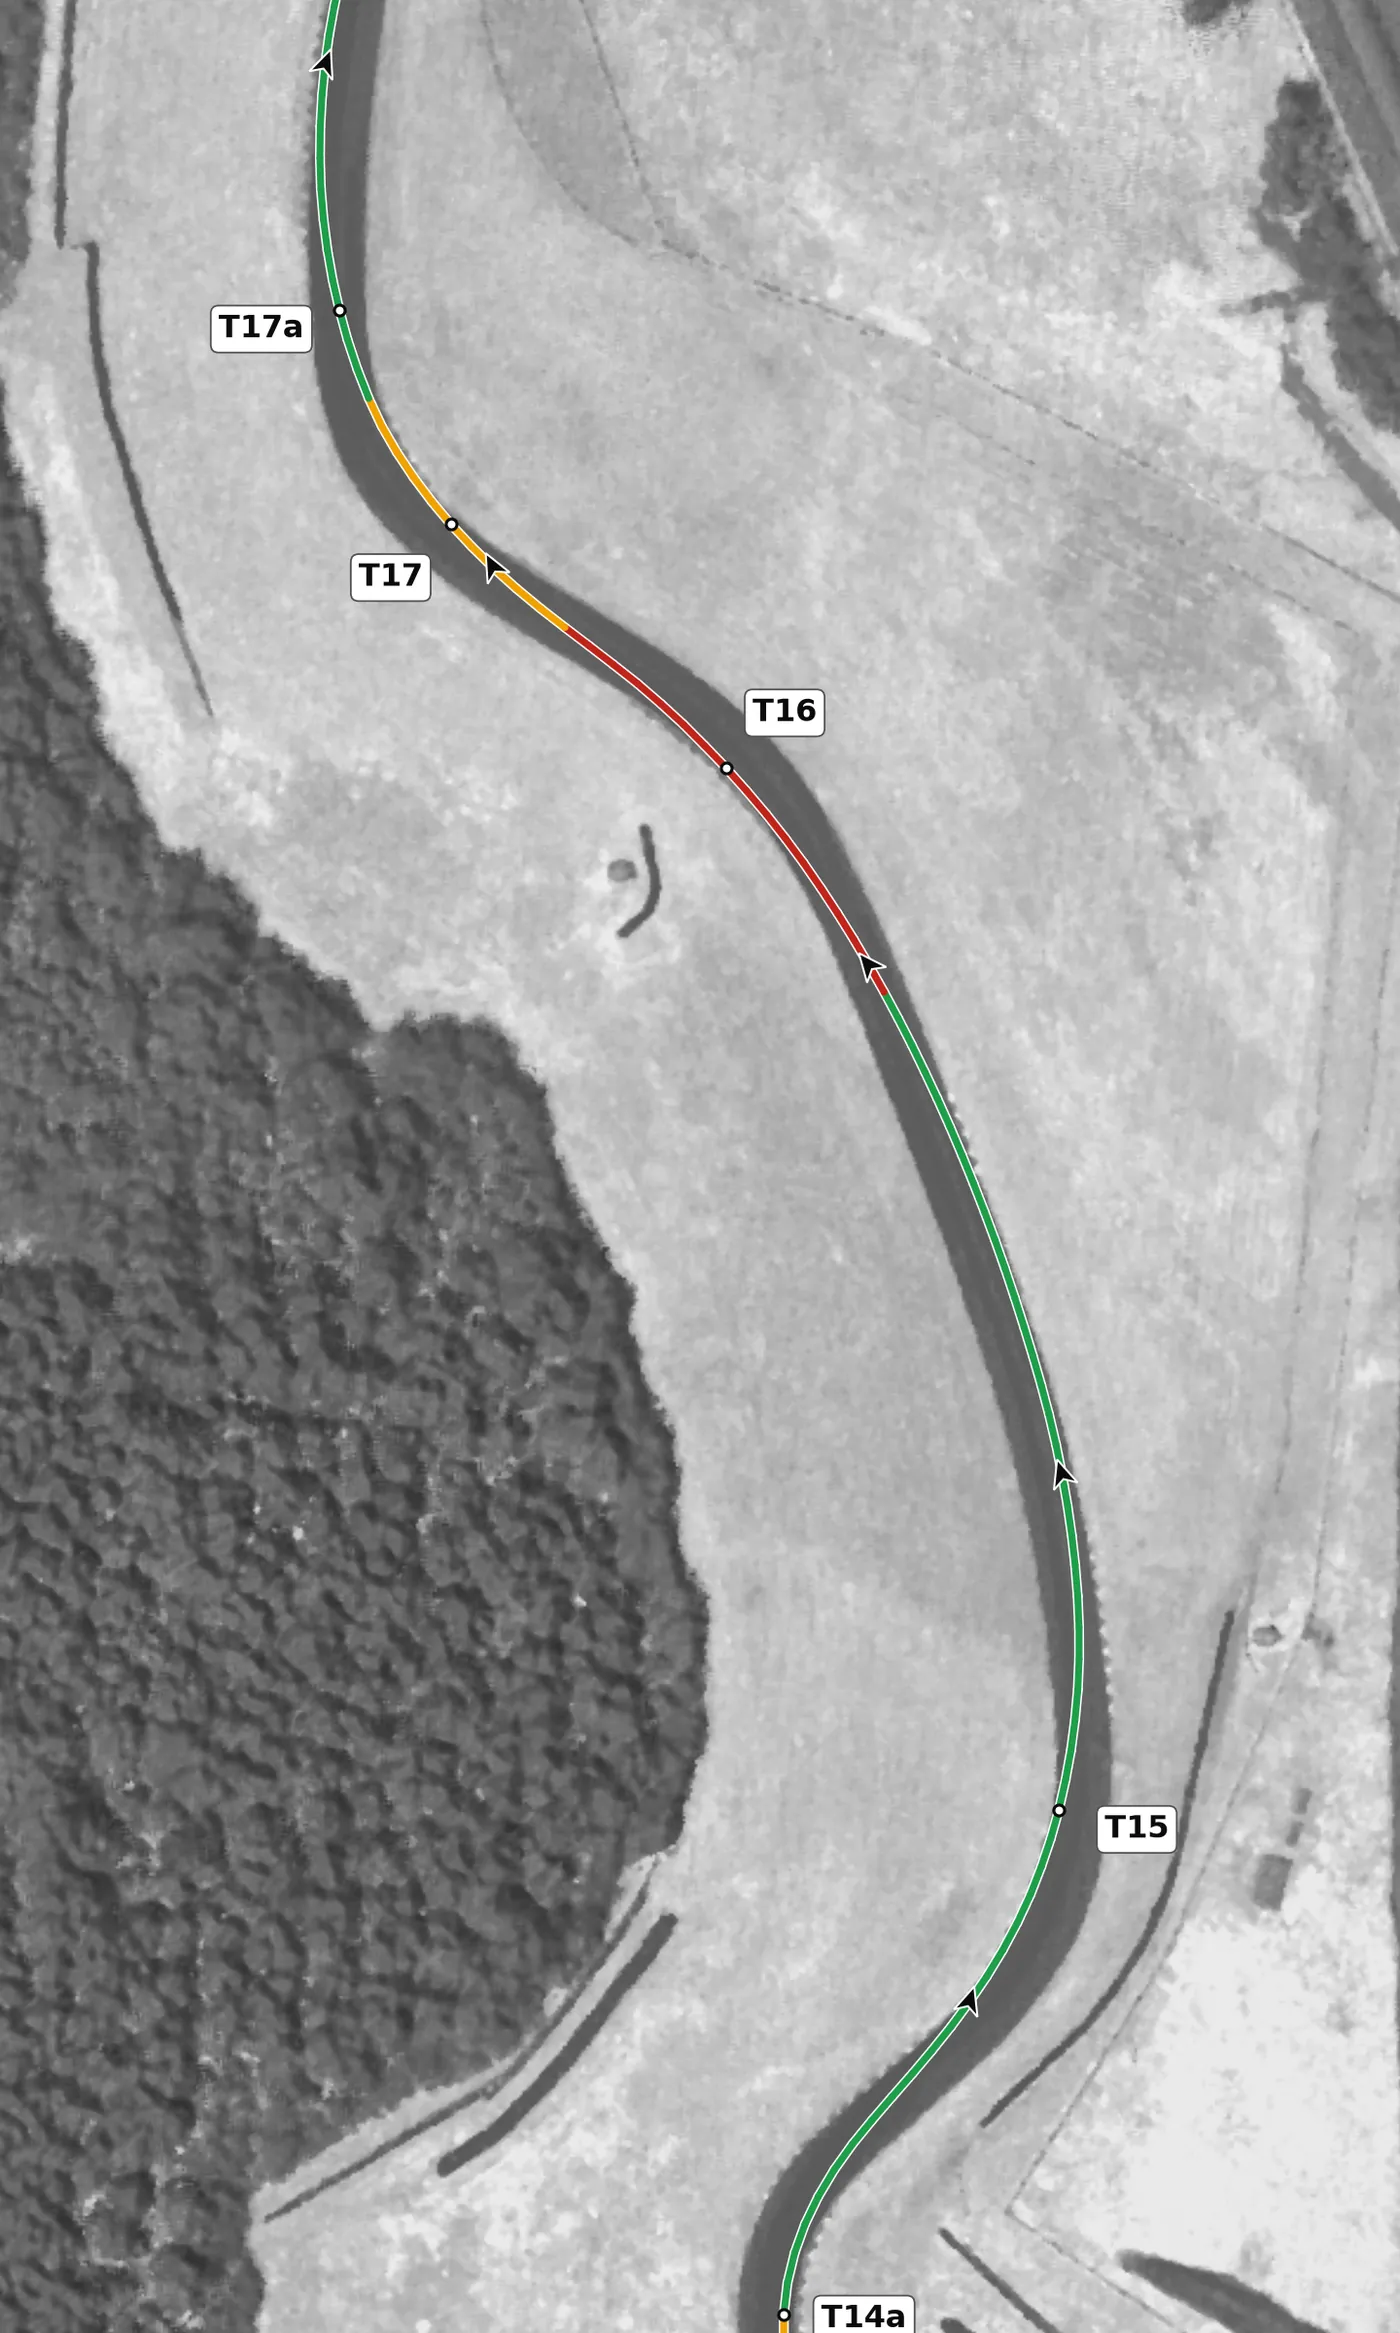
T16 is another left that keeps falling downhill, so brake in a straight line, bend the car in and return to gentle throttle. Track out only as far as you need, then set the car up on the left side for Hog Pen. The mistake to avoid is hurrying this corner: a tidy T16 decides how early you can get on the power through Hog Pen.
From the survey: Still falling: 5.3 m from entry to apex.
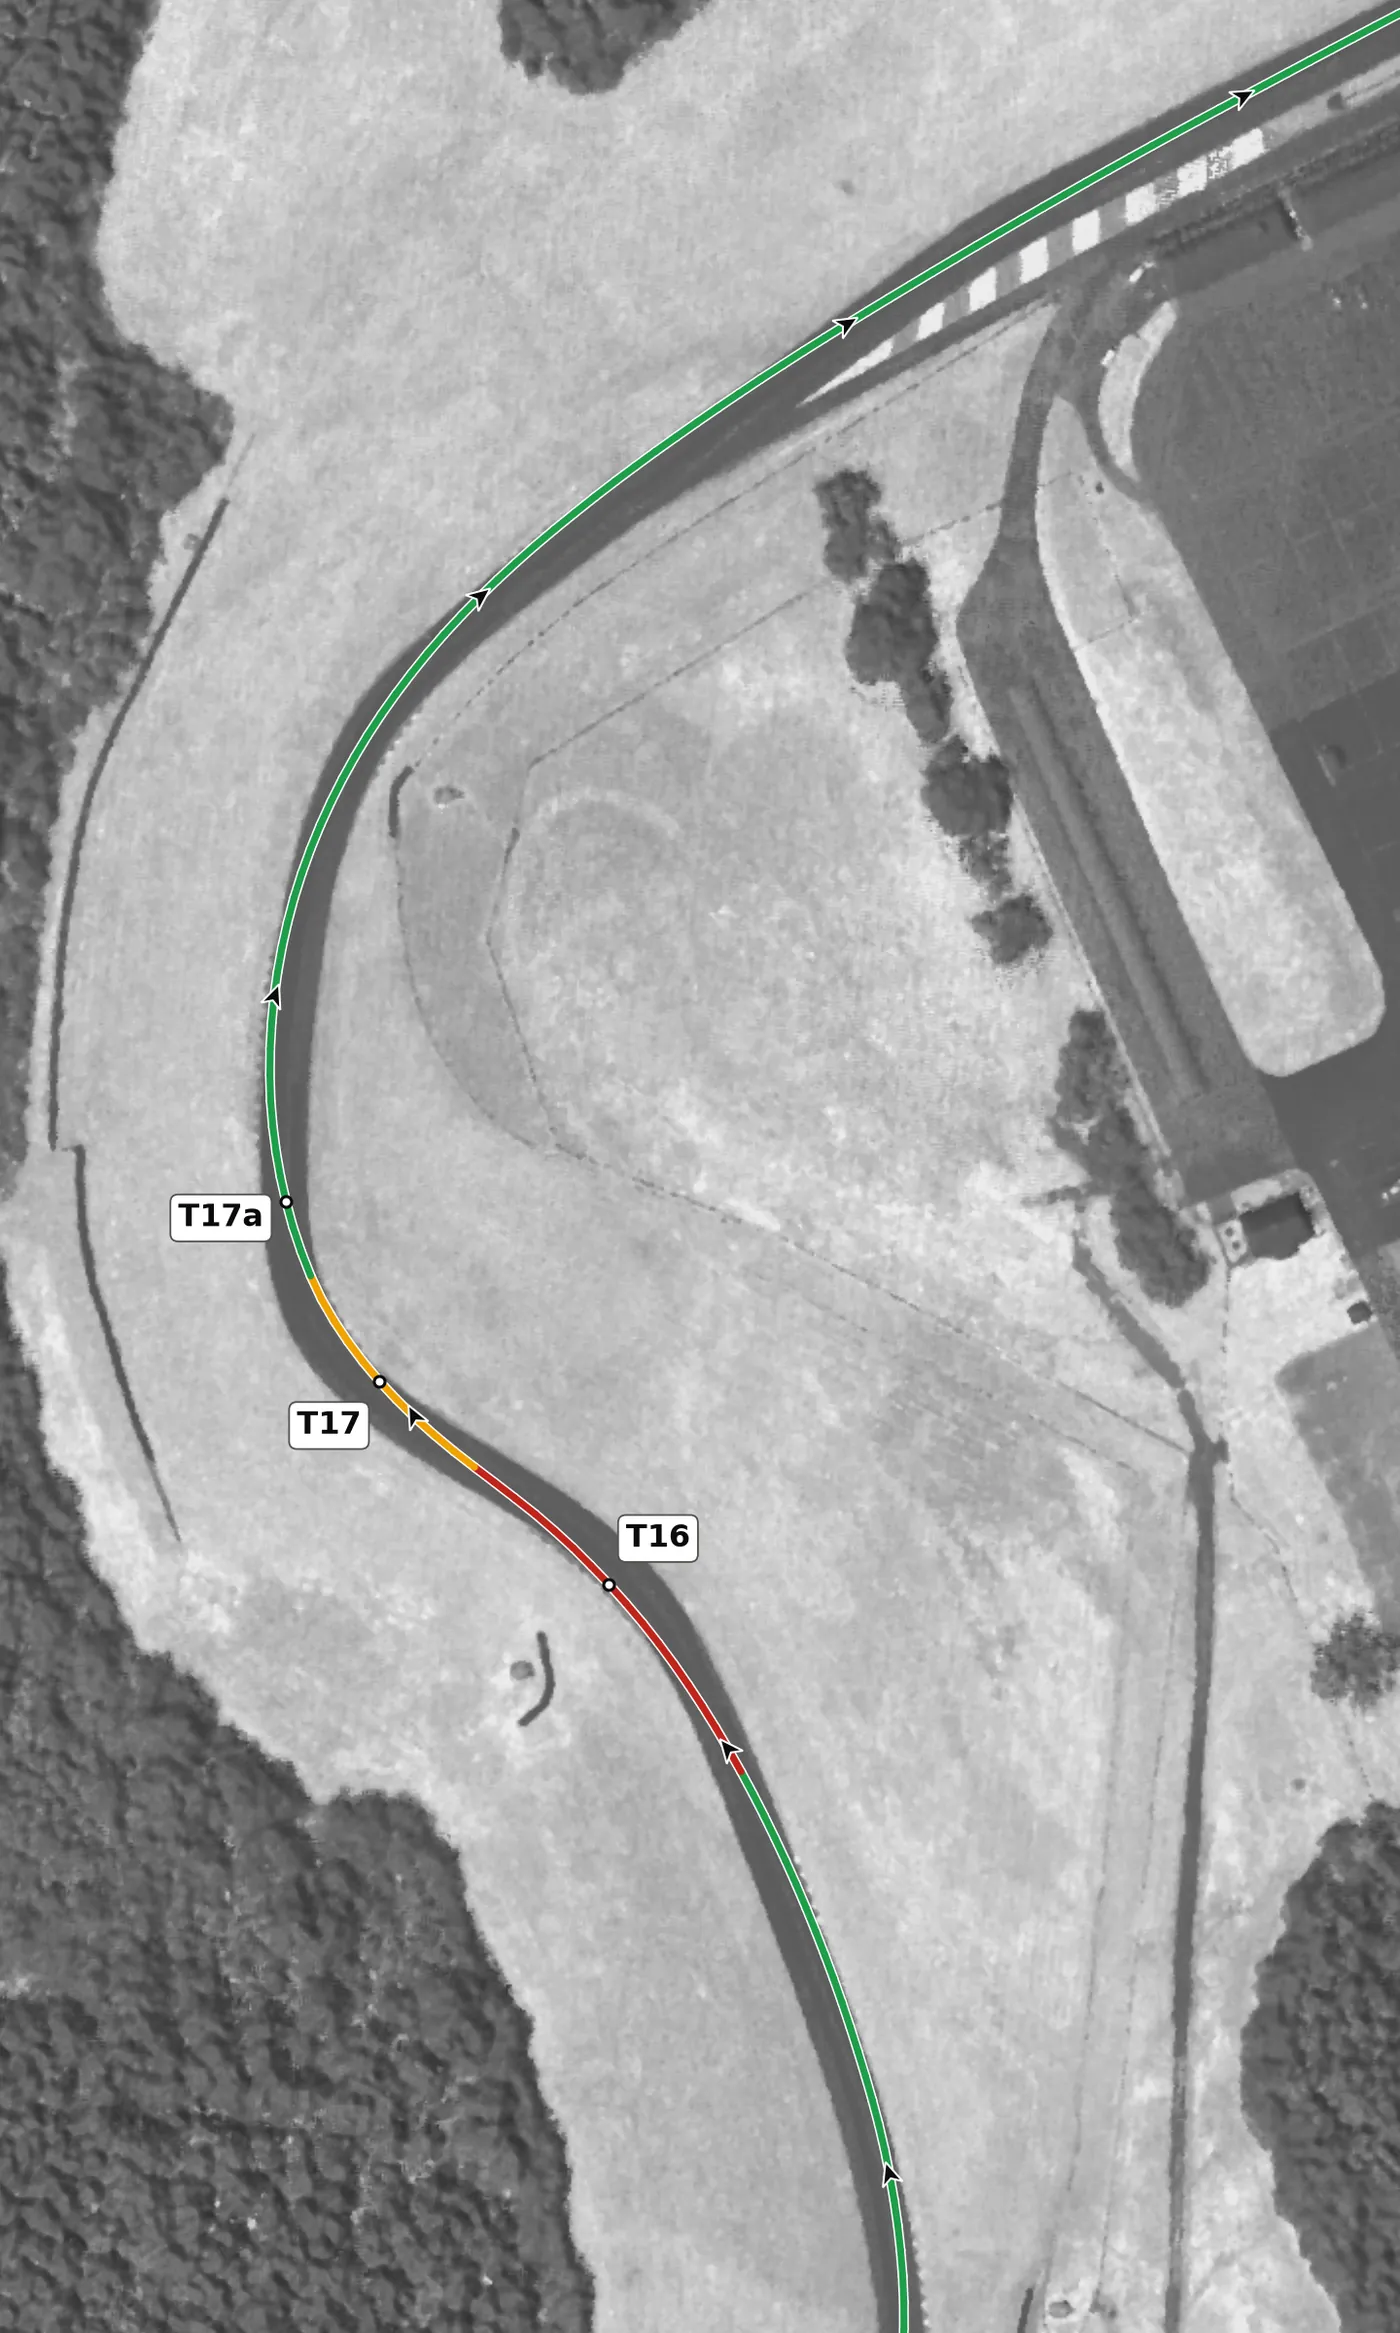
Hog Pen is a downhill, double-apex right onto the front straight, best driven as one smooth, constant arc. Clip near the first apex, let the car drift slightly out between the two and come back to the second apex, then add power and use most of the road out to the left as the car compresses. The mistake to avoid is too much throttle too early, which runs you out of road at the exit, often onto the edge where grip is worse.
From the survey: Hog Pen: on camber and downhill, with a compression at each end.
Version history
- v1.2 · 2026-10-01 — T10 is now drawn on throttle: the car holds about 170 km/h while climbing steeply through it, so it is not a lift. Its note already said to stay on the throttle.
- v1.1 · 2026-10-01 — The line now goes straight from throttle to brake: the 10–45 m of coasting drawn before each brake zone (most at T3 and T14) is gone. The braking points are my own and stay where they were. T15 is now described as a throttle corner and T16 as a real brake, which is what the data shows.
- v1.0 · 2026-10-01 — First version: my own M440i laps (25 Hz).
Feedback contributors
Drivers and instructors whose feedback has improved this line. Thank you.
- Mike M — no coasting between throttle and brake; braking points (v1.1)
- Brian L — corners where the car gains speed are throttle, not a lift (v1.2)