Read this first — what we do and do not have. You have exactly one Barber lap in the
system: session 06afbdd8, lap 593b407c, a single-lap AiM export at
10 Hz. No prior Barber history, and nothing else from the weekend has arrived yet. So there is no run table, no
consistency number, no Saturday-to-Sunday trend and no heat-cycle count on this page — those sections are marked
pending rather than filled with guesses.
Send the rest of the weekend and this fills in. In Race Studio 2 or 3, export one CSV per session
(all laps, not a single lap) and mail them to upload@trackdays.ai.
That turns on: the run table, lap-to-lap consistency, the Sat→Sun trend, tire heat cycles, and a theoretical
best-segment lap.
What one lap does support — and it is more than it sounds. A single clean flying lap with
GPS at 10 Hz gives an honest lap time, honest corner-window times, honest straight-line speeds, and a
distance-aligned comparison against any other lap ever recorded at this track. That is the whole of this page.
What it cannot give is anything about repeatability, and repeatability is most of lap time.
If you read nothing else
In the tight stuff you are the quickest car on the property. T7a/T7b in 5.697 s against a Z4 M40i's 6.297 and an E36 M3's 6.056 — and Charlotte's Web, T10 and T14a also go your way against both cars.
3.58 of the 4.64 seconds live in three fast corners: the T4 crest (1.66), T7 (1.15) and T6 (0.78) — and all three are the lead-ins to corners you win. The Mini is not losing where it is slow. It is losing where it should be fast.
The straights are the car; the speed you carry onto them is not. Roughly 2.15 s of the gap is straights and links, on 105.3 MPH against 116.9. That part is displacement. The T4 crest is not.
The lap
Sat 8/15 · 10:37 CT1:47.340ONLY BARBER LAP
1:47.340 · top 105.3 MPH · min 40.6 MPH · GPS path 3,649 m · 1,075 fixes @ 10.0 Hz · beacon lap 7 · quality PASS
Clean, valid, full-distance flying lap. The AiM export carries speed, lat/lng,
elevation and GPS-derived lateral and longitudinal g — every 1,075 rows populated, no gaps. There is
no throttle, brake, steering, rpm or temperature channel in this file, and no weather or track-condition
field, so nothing on this page claims to know what your feet were doing.
Conditions: not recorded in your file. For context only — a 25 Hz logger on the
same track that morning read 85.6 °F at 09:42 and 91.9 °F at 11:27, so your 10:37
lap sat somewhere in the high 80s on a track that was heating all day. That is borrowed context, not your data.
Against the reference laps
Two other cars ran Barber the same Saturday morning, both with their own loggers, and both laps are in the system.
Everything below is distance-aligned: each lap is normalised to its own GPS path length and compared at the
same fraction of the lap, which is the only way to compare two cars that measure two slightly different laps.
Car
Logger
Lap
Top MPH
Gap to you
Rich S. — 2011 Mini Cooper S
AiM, 10 Hz
1:47.340
105.3
—
Mike M. — E36 M3
AiM, 20 Hz
1:42.163
109.7
−5.177
Bill B. — G29 Z4 M40i
25 Hz
1:42.700
116.9
−4.640
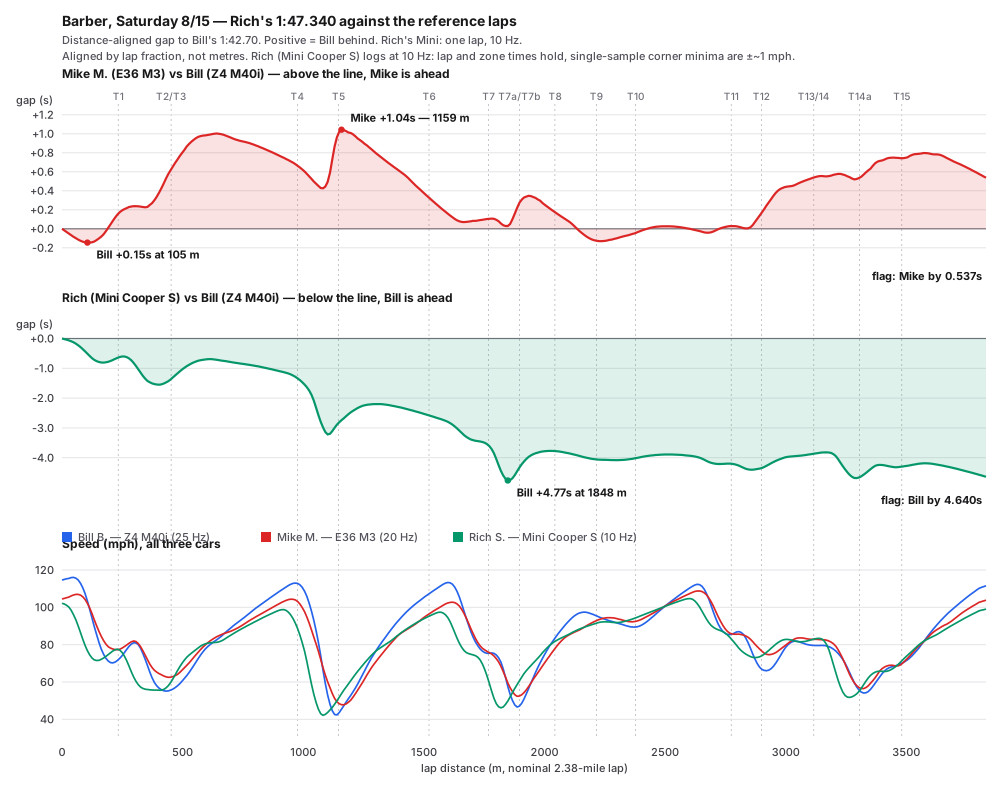
Both challengers are measured against the Z4's lap, each on its own vertical scale — a +0.5 s curve and a
−4.6 s curve on one shared axis would flatten the close fight into a straight line. Your trace is the one that runs
away steadily: it never comes back, but notice where it goes flat — those are your corners.
How the 4.640 s to the Z4 splits. Fifteen corner windows account for
2.491 s; the straights and links between them account for 2.147 s
(2.491 + 2.147 = 4.638, against a real margin of 4.640 — the two-thousandth is rounding, and the alignment is
asserted against the true lap times, not eyeballed). Inside the corner half of that, you
give up 4.744 s in seven corners and take back 2.253 s in the other eight.
Corner by corner — 15 JTI corners
Corner times, not apex speeds, are the currency here. A 10 Hz logger samples every ~1.8 m at 40 MPH and
~4.5 m at 100 MPH, so a window time is solid but a single-sample corner minimum falls between samples and is
worth about ±1 MPH — every minimum in the last column carries a ~ for that reason, and
several sit at a window edge where they describe the approach rather than the apex. Positive = you are faster.
Corner
Surface at apex
Your time
vs Z4
vs M3
Your min MPH
T1
ON +6.0%
5.516
−0.314
−0.690
58.5~
T2/T3
ON +9.1%
10.710
+0.441
−0.311
54.8~
T4 crest
OFF −0.5%
5.707
−1.662
−1.293
40.8~
T5 Charlotte's Web
OFF −1.8%
11.266
+0.394
+0.221
41.1~
T6
NEUTRAL −0.2%
5.482
−0.777
−0.274
80.4~
T7
ON +2.3%
5.143
−1.145
−1.134
42.6~
T7a/T7b
ON +8.9%
5.697
+0.600
+0.359
43.1~
T8 track-out
OFF −1.3%
2.851
−0.013
+0.184
74.7~
T9
ON +2.2%
4.591
−0.251
−0.036
84.9~
T10
ON +1.1%
3.624
+0.173
+0.053
91.6~
T11
ON +2.8%
3.027
−0.119
−0.162
77.0~
T12
NEUTRAL +0.2%
4.840
+0.397
−0.043
72.3~
T13/T14 Carousel
ON +3.3%
7.046
−0.476
−0.590
51.8~
T14a
ON +7.5%
4.935
+0.207
+0.051
51.0~
T15
ON +6.1%
5.574
+0.054
−0.026
65.5~
All 15 corner windows
−2.491
−3.690
Fastest of all three cars — T7a/T7b, Charlotte's Web (T5), T10 and T14a. Faster than the Z4 but not
the M3 — T2/T3, T12, T15. Faster than the M3 but not the Z4 — T8. In a 2,350-lb momentum car that
distribution is exactly right: everywhere the corner rewards commitment over horsepower, you are in front.
What the surface is doing, corner by corner
Camber and elevation come from a LiDAR survey of Barber sampled every 5 m along the racing line — 706 stations, 2.84 cm
median plane-fit residual. Positive camber = banked in your favour (the inside of the corner is the low side);
negative = off-camber. Signs are per turn direction.
T1 — banked +6.0% and downhill into a compression. The bank is helping you; the brake zone is bumpy, so held pressure over the bumps is what eats entry.
T2/T3 — the most banked corner on the lap at +9.1%, one long arc rather than two corners, blind apex, and it drops 8.2 m from apex to exit. Enormous grip available here.
T4 crest — off-camber −0.5%, blind, and the strongest crest on the whole circuit sits just before it: an unnamed rise at 645–675 m worth −0.35 g vertically, on no club map, that lightens the car right where you are asking it to do something. This is the single most car-unloading feature Barber has.
T5 Charlotte's Web — off-camber −1.8%, the lap's only genuine threshold-brake zone, and it falls away from you through the arc. Your best corner of the fifteen relative to both other cars.
T6 — effectively flat (−0.2%) and taken over a crest. A fast direction change with no bank to lean on.
T7 — banked +2.3%, over a crest, and it drops 6.2 m from entry to apex. Both reference cars carry 71–74 MPH through here; you carry 42.6.
T7a/T7b — banked +8.9%, second-most on the lap, dropping another 3.6 m to track-out. The bank plus the compression is why a light car eats this section.
T8 — off-camber at the apex (−1.3%) with a single 5 m station reading −6.4% at entry, and it is the lowest point on the entire circuit at 181.7 m. The car arrives already unloaded from the drop through T7b. It is barely a corner.
T9 — banked +2.2% and climbing 5.2 m through the corner. Load-positive.
T10 — banked +1.1%, climbing, flat profile. First half of the chicane.
T11 — banked +2.8%, mildly downhill on exit.
T12 — neutral (+0.2%), blind apex, sitting in a +0.27 g compression and then the road falls away 4.4 m on exit. Full throttle before the apex here does not work.
T13/T14 Carousel — banked +3.3% at the apex building toward +6.3% through the arc, with a compression and then a 9.1 m climb. Blind apex. Both reference cars take it with no brake at all.
T14a — banked +7.5% at the apex but it drops 2.2 m to the exit, so the camber leaves you exactly when you want it. Middle link of the chain onto the front straight.
T15 — banked +6.1%, blind apex, uphill to the apex and then slightly off-camber at track-out. There is an exit curb here that almost nobody uses.
Three things the numbers point at
Said plainly: you coach this for a living and this is your own car — nothing here is a lesson. It is
one lap of your data, cleaned up and pointed at, so you can decide what is worth testing. The Mini is a
power-limited momentum car and every number below is read through that.
T4 crestLeft · blind · off-camber −0.5%
−1.662 s to the Z4 · −1.293 s to the M3 · 36 % of your total corner deficit, in one 198 m window
BIGGEST SINGLE LOSSBLIND APEXunnamed −0.35 g crest immediately before it
Your min
40.8~ MPH
Z4
80.1
M3
74.6
Your window
5.707 s
vs Z4
−1.662 s
The corner after this one is your best corner of the lap. This one is your worst. They are the same braking decision.
Your Charlotte's Web window is faster than both other cars (+0.394 to the Z4, +0.221 to the M3) — so the
corner itself is not the problem. But the window immediately before it, the crest and run-down, costs you 1.66 s, and your minimum
inside it reads 40.8 MPH against 80.1 and 74.6. Those two facts together say the braking for Charlotte's Web is starting up on the
crest rather than after it. Read the pair as one number: T4 crest + Charlotte's Web is 16.973 s for you against 15.704 for the Z4 —
you win the corner and lose the approach by more than you win the corner by. Worth testing: hold the crest, then brake — the
unnamed −0.35 g rise at 645–675 m unloads the car right where the instinct is to get the braking done early, which makes
early braking feel correct.
T6 + T7Right · fast · over crests
−0.777 s and −1.145 s to the Z4 · 1.922 s combined · the lead-in to T7a/T7b
1.92 s IN TWO WINDOWST7 BANKED +2.3%both taken over a crest
T6 you
80.4~ MPH
T6 Z4 / M3
96.1 / 88.1
T7 you
42.6~
T7 Z4 / M3
74.4 / 71.0
Then T7a/T7b
+0.600 s
Same pattern, second time: the two fast corners feeding your single best corner are two of your three worst.
T7a/T7b is where you are the quickest car on the property — 5.697 s against 6.297 and 6.056, on the lap's
second-most-banked surface. But T6 and T7, the fast pair that arrive at it, give back 1.92 s. T7 is banked +2.3 % and taken over a
crest, and both reference cars hold 71–74 MPH through it against your 42.6. Add the T4 crest and three fast windows hold 3.584 s
of your 4.640 — more than your entire net corner deficit. In a momentum car this is the expensive kind of loss, because speed lost
before a banked committed section is speed you then have to rebuild with 190 horsepower. Worth testing: treat T6 and T7 as part of the
T7a/T7b entry rather than as corners in their own right, and see how little the tight stuff actually suffers.
T13/T14Right · the Carousel · banked +3.3%
−0.476 s to the Z4 · −0.590 s to the M3 · the only tight corner you lose to either car
ON-CAMBER +3.3% → +6.3%BLIND APEXcompression +0.28 g, then a 9.1 m climb
Your min
51.8~ MPH
Z4
69.6
M3
68.1
Your window
7.046 s
Z4 / M3
6.570 / 6.456
Everywhere else the tight corners go your way. This one does not — and it is the one both other cars take with no brake at all.
The Carousel is a long sustained arc with camber building from +3.3 % at the apex to +6.3 % through the exit,
a +0.28 g compression loading the car, and then a 9.1 m climb. It is the corner on this circuit that most rewards a light car with a
stable platform, and it is the only tight corner where both a heavier Z4 and an E36 are ahead of you. It also has a blind apex whose
accuracy sets your line two corners later, onto the front straight, so a wide exit over the seam costs T14a and T15 as well —
both of which you currently win. Worth testing: whether it goes brake-free for you the way it does for them, and whether the 51.8 MPH
minimum is a line problem rather than a commitment one.
And the part that is not a cue. About 2.15 s of the 4.64 is straights and links: 105.3 MPH
against 116.9, and 102.3 MPH across the start/finish stripe against 116.8. That is displacement, and no line change buys it back.
It is also why the three cues above are all about exit and arrival speed — in a car that cannot re-accelerate its way out
of a mistake, the MPH you carry onto a straight is the only part of the straight you control.
Pending your other sessions
Run table
One lap is one row. With full-session exports this becomes a run-by-run table — laps, best, median, time of day —
and the shape of your day becomes visible instead of a single point.
Consistency
Not computable from one lap, and it is the biggest number missing. Lap-to-lap spread and per-corner
repeatability are usually where the available time actually is — on the reference Z4's Saturday, the gap between its best
lap and a best-segment stitch of its own laps was 1.46 s, all of it repeatability. With your full sessions we can compute
the same thing for you: which of your fifteen corners you already do perfectly sometimes.
Saturday → Sunday trend
Nothing from Sunday has arrived. With both days we can separate driver improvement from track and ambient change,
which is the only honest way to read a weekend.
Tires and heat cycles
No tire set, sizes, pressures or heat-cycle count on record for this car. Heat cycles are a measurement, not an
inference, so nothing is estimated here. Send the sessions plus what the tires are and when they were mounted, and the
cycle count starts accruing from a real baseline.
Theoretical best
Needs several clean laps to stitch best segments from. With one lap the theoretical best is the lap.
One more thing
You are the driver from The Race That Never Happened —
the Road Atlanta virtual race in July, where your Mini went through Turn 1 at 80 MPH to a Z4 coupe's 66 and led most of the lap on
pure cornering. Barber tells the same story in a different accent: you are still the quickest car through the committed
stuff, and the time is still in the fast approaches and the straights. Your Road Atlanta best on record is
1:47.848. Your one Barber lap is 1:47.340. Coincidence, two entirely different circuits — but a
neat one.